- Home
- Product Categories
- Switch
- Thumb Joystick

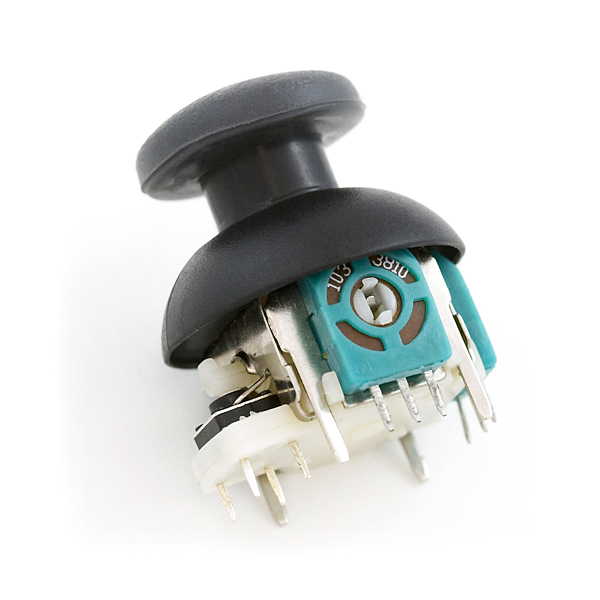
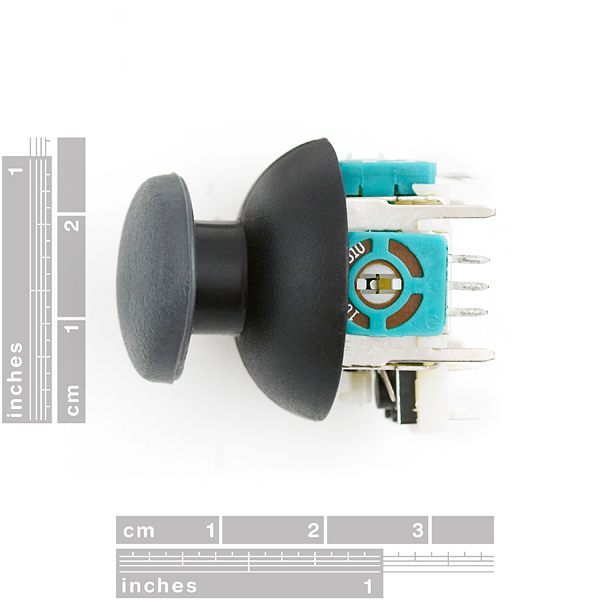
This is a joystick very similar to the 'analog' joysticks on PS2 (PlayStation 2) controllers. Directional movements are simply two potentiometers - one for each axis. Pots are ~10k each. This joystick also has a select button that is actuated when the joystick is pressed down.
Note: Breakout board available below.
Thumb Joystick Product Help and Resources
Qwiic Pro Micro USB-C (ATmega32U4) Hookup Guide
February 6, 2020
An overview of the ATmega32U4-based Qwiic Pro Micro USB-C, how to install it, and how to use it with Arduino.
Serial Controlled Motor Driver Hookup Guide
November 17, 2016
Hookup guide for the Serial Controlled Motor Driver
BadgerHack: Gaming Add-On Kit
February 16, 2016
Make a Breakout clone with the BadgerHack Gaming Add-On Kit.
Thumb Joystick Hookup Guide
February 20, 2019
Whether you're blasting aliens, driving a robot, or write your awesome classic Arcade Game for your Arduino, you'll find the analog thumb joystick a very useful addition to your projects!
Wireless Joystick Hookup Guide
January 5, 2017
A hookup guide for the SparkFun Wireless Joystick Kit.
PCB layout
We don't have a data sheet for this part, but you can find a footprint layout here for making your own PCB.
Core Skill: Soldering
This skill defines how difficult the soldering is on a particular product. It might be a couple simple solder joints, or require special reflow tools.
Skill Level: Noob - Some basic soldering is required, but it is limited to a just a few pins, basic through-hole soldering, and couple (if any) polarized components. A basic soldering iron is all you should need.
See all skill levels
Core Skill: Electrical Prototyping
If it requires power, you need to know how much, what all the pins do, and how to hook it up. You may need to reference datasheets, schematics, and know the ins and outs of electronics.
Skill Level: Competent - You will be required to reference a datasheet or schematic to know how to use a component. Your knowledge of a datasheet will only require basic features like power requirements, pinouts, or communications type. Also, you may need a power supply that?s greater than 12V or more than 1A worth of current.
See all skill levels
Comments
Looking for answers to technical questions?
We welcome your comments and suggestions below. However, if you are looking for solutions to technical questions please see our Technical Assistance page.
Customer Reviews
3.6 out of 5
Based on 5 ratings:
1 of 1 found this helpful:
Great little joystick
It is small and simple, but works really smoothly. And you can't beat the price. Be sure to purchase the PC board as an accessory since it makes mounting and wiring much easier. We made an Arduino robot controller using these and it drives great. The joystick centers nicely at Vcc/2, but doesn't have any trim feature. We handled the trim in the Arduino software so it worked fine. I'm guessing it is not the best joystick in the world, but for such a low price, you can't beat it.
2 of 2 found this helpful:
Very good Joystick
I have used these before with great results. One has many hours of use and shows no signs of failure.
1 of 1 found this helpful:
Nice joystick, easy to use & program but you need to buy a board
These are nice easy to use and program joysticks that can be built into a project quickly. The only problem is that the online ad doesn't make it clear that you need to get a small board to solder them to so you can plug them into a breadboard or Arduino - that can add quite a bit to the unit cost if you only want a few of these (I bought a load for a robotics class so it didn't add much per stick to the cost.) All round, my students have been very pleased with them and have produced some great products. Getting them to fit into a board can be a bit fiddly but nothing beyond a minorly handy teenager.
1 of 3 found this helpful:
Mine came borken...
I prchased 5 of these and some other things and one of the joysticks came broken. The shipment and everything was fine and came on time, it just kind of shocked me that sparkfun wouldn't check over their products to see if they're working. Maybe it broke during shipment, everything else was fine though. I doubt that sparkfun did this on purpose, but I was still kind of shocked to see a broken product. They also don't emphasize how YOU MUST BUY A BREAKBOARD. I'm warning everybody so they don't make the mistake I did, one breakboard, for one joystick. The feeling overall of the material is pretty cheap, but I mean, you can't expect too much out of a 7 dollar product (~9 plus breakboard). Other than that, nothing wrong with them so far. Fpr all the newbies out there like me, this will take up ALOT of pins on your arduino(or other microcontroller), I'm pretty sure you can only hook one arduino uno. Quite upset, hope Sparkfun will fix. But I will say, I'm loving this website.
I'm sorry one of your units came damaged. Our shipping staff does their best to avoid sending bad items. However, they do handle thousands of products each day. Sometimes a mistake slips through. I have a replacement unit on it's way to you. In the future if you have an issue with your products, please let us know https://www.sparkfun.com/technical_assistance
Nice!
Good joystick, remember that pcb, makes using lot easier. Button works even when moved stick and horizontal/vertical work independently. (handy for controlling servos/steppers for like remote camera stand or stuff like that)
Thumbs up! sorry, couldn't resist....
The breakout board link is wrong. It goes to a mislabeled board here https://www.sparkfun.com/products/9110#comment-5ea0f768106467363a1e42a3 instead of the proper (but also mislabeled!) breakout board here https://www.sparkfun.com/products/10467#comment-5ea0f6d06490e66ab8020653
Sorry about that! The link is correct but we recently updated the photos for this breakout and the Tactile Button Breakout and they appear to have been accidentally swapped. Everything is updated now!
Do not use these joysticks as replacements for the Xbox 360 controller, despite a seemingly popular DIY repair site article suggesting them. There may be nothing wrong with the joystick itself for other projects, but they do not function correctly in said controllers. This joystick has a deadzone (approx. 10 deg) and then they gradually move up the range to about 0.3 (float value between 0.0 to 1.0) whereby they then have a small range of motion all the way up to 1.0 creating jerky movement. They are not nearly as smooth as the original joysticks nor have the proper range of motion.
I replaced the left joystick of my controller with this joystick. In Project Cars 2, the steering was jerky, which required constant left and right corrective steering to maintain control of the car. I then changed the in-game controller binds for the player character's free look between this joystick and the original joystick and immediately noticed the difference in smoothness between the two, with this joystick being jerky. I suspect the potentiometers in this joystick and the ones in another joystick I purchased off of an eBay seller which also has the exact same jerky movement, simply do not function correctly in an Xbox 360 controller.
I bought these despite having read other comments below that described the same problem. Also note that this joystick is different than the one I bought off of eBay and also different from the photograph displayed by sparkfun. The ones I received have black potentiometers with brown innards. The eBay version has green potentiometers, similar to the ones in sparkfun's advertisement. Finally, the supplied nubs do not fit through the hole of an Xbox 360 controller. You'll have to use your originals, which do fit these joystick's plastic stems or buy new ones.
Your only choice may be to buy such replacements and replace their potentiometers with the originals, because they otherwise feel similar.
I downloaded the 3D files to aid in development of a project I have in mind, but I only have access to Blender. I found the objects to be very poor quality and cannot be rendered in their current state. They are fine for general purpose CAD applications, but not adequate for visualization. I'm working on correcting that at the moment. If there is any interest, I'll upload the corrected .blend file somewhere and post a link.
Can we get a datasheet for this? The 3D models of the joystick and board do not match up.
Can these joysticks go in both directions simultaneously? For example, could it be in a position where both vertical and horizontal are all the way to the side, or can the vertical pot only turn when the horizontal is in the center.
Yes they can work at same time, just tested
Here is some simple code for the arduino
/* Released to public domain */
const int selectPin = 2;
const int joystick_xPin = A0;
const int joystick_yPin = A5;
int oldX = 0;
int oldY = 0;
int oldSelect = 0;
void setup()
{
pinMode(selectPin, INPUT);
digitalWrite(selectPin, HIGH);
Serial.begin(9600);
}
void loop()
{
int joystick_x;
int joystick_y;
int select;
joystick_x = map(analogRead(joystick_xPin), 0, 1023, 1, 20);
joystick_y = map(analogRead(joystick_yPin), 0, 1023, 1, 20);
select = !digitalRead(selectPin);
if((oldX != joystick_x) ||
(oldY != joystick_y) ||
(oldSelect != select)){
Serial.print("joystick X: ");
Serial.print(joystick_x);
Serial.print(" joystick Y: ");
Serial.print(joystick_y);
if(select){
Serial.print(" select");
}
Serial.println("");
oldX = joystick_x;
oldY = joystick_y;
oldSelect = select;
}
delay(10);
}
Man, I just spent way too much time mentally flowcharting my way through the exact same thing, and my result wasn't nearly as clean!
(In the interests of openness, mine included a second, completely unnecessary pair of X and Y ints, then checked them against each other rather than just using the analog inputs themselves.)
I bought one of these to replace a busted one in a wireless XBOX 360 controller and it works perfectly! These are exactly the same as the ones in the 360 controller and even the original xbox and Dual-shock PS1/2/3 controllers. This is the only site that I could find that sells these. I was able to repair a $50 controller for $4! Thanks for carrying these guys!
If you're interested in how to fix one I made an Instrucable on Instructables.com. You can see it here:
http://www.instructables.com/id/How_to_replace_a_broken_analog_joystick_on_an_XBOX/
I should mention this does not work with the PS3 six-axis, while basically identical the footprint on the six-axis is slightly smaller such that it won't line up correctly. I have not tried a ps3 dual-shock yet.
This looks like the datasheet, http://www.p3america.com/pp/802.htm.
Wow! Yep - that looks just like the one we sell. They are ever so slightly different, but same dimensionally.
I bought 2 of these to fix my old xbox 360 controller. They look good and feel fine, but they have problems: The one I have installed as my left stick randomly just does berserk and keeps on sending the same signal until I wiggle it around (example: in racing games, it doesn
t matter if Im keeping a left or right turn, the car suddenly starts turning right ). The right one just needs a little, tiny, insignificant nudge in order to start sending signals all over the y axis (in NFS HP,for example, it switches between normal, centered, camera and rearview camera at 10-20 times per second. <br /><br />
Soldering was correct and over-watched by an experienced person so that
s not the problem.<br />
I truly regret buying them... but being a cheap ass I thought I
ll spend less repairing it than buying a new controller. I was proven wrong because of crappy, low quality parts. <br /><br />
Maybe I`ll think twice before buying parts from here.
We've literally sold thousands of these and only had a few problems.
If you get a bad one, just contact customerservice@sparkfun.com and we'll take care of it. I've personally used a half-dozen or so of them without any problems.
I'm having the exact same problem. I actually bought two of these for a school project and after spending forever trying to troubleshoot the problem with my ADC, I finally found out its the joysticks.<br />
<br />
These things are BAD! I bought two and both are bad.<br />
1. The range on these things is maxed out after only pushing the stick half way either direction. It is also not a smooth ramp, but it goes up slowly and then jumps up like 30%.<br />
<br />
2. The center contact doesn't work. When the joystick is resting in the center, the Vout contact actually is left 'open'. You have to wiggle it to make sure that you can actually read a value off of it.<br />
<br />
I don't know if the people who got these earlier got a way different batch, but the two I got are absolutely terrible. I wish I knew who made them.<br />
<br />
Sparkfun, I suggest you do some testing on this product.
I also bought one of these that is defective. One axis is fine, the other randomly drops to ground.
I was able to fix the damaged axis by popping off the pot and slightly bending part of the small metal ring-like piece. This may work with other defective joysticks but is definitely fiddly.
I too have an issue with this item. I ordered two of them and spent a lot of time trying to figure out why my input kept jumping around on the x axis for both of them but was rock solid for the y axis. Turns out it was this component, I removed them and tested them outside of the circuit and they still gave weird readings on the x axis (at center they had resistance in the mega-ohms. All the way left they gave more or less 0 ohm but sometimes would spike for no reason. All the way right and they would give more or less 10k ohm but would spike for no reason.
Sparkfun customer service quickly & politely took care of my problem. Its bound to happen from time to time when you buy cheap cheap electronics that you get a dud. I instead bought a replacement off-brand PS2 controller for just a little more than what two of these cost and they seem to work just fine.
Actually, It might be sort of 10K - the data sheet for the part says "10K +/- 30%"
It does appear that the description may be wrong. i measure the pots at about 5K, not 10K and it centers at between 3.5K and 4K depending on the axis. It appears good for simple direction indication, but you will have to work out the scale if you want some linear indication of position. I am measuring .25K min, 3.5K center, 4.8K max. Is there any kind of adjustment possible on these units? Thanks.
This thumbstick is EXACTLY the same as the one out of a PS2 controller. I didnt buy this 1 but I bought the breakout board sold here on sparkfun for it and used a thumbstick I removed from an old PS2 controller. They really are exactly the same. I also made a quick video if anyone wants to see it in action: http://www.youtube.com/watch?v=gvvu--1sdhg
Could we have a datasheet for this? Thanks!
Do you really need a datasheet? it's two potentiometers and a button...
Thanks for your explanation Captain Obvious but I am more interested in the mechanical dimensions bit of the datasheet, so I can create a footprint out of it while I wait for them to be delivered, not all of us use Eagle you know...
Well, as long as I'm the captain, I figured I'd throw it into Eagle for you and get some dimensions while we wait. Assuming the center of the part is the origin, pins are at the following dimensions:
Mounting (.045" holes for mounting)
x y
-0.3 -0.26
0.3 -0.26
0.3 0.26
-0.3 0.26
Pot1 (.025" holes)
-0.4 0.1
-0.4 0.0
-0.4 -0.1
Pot2 (.025" holes)
-0.1 -0.4
0.0 -0.4
0.1 -0.4
Switch1 (.025" holes)
-0.12 0.3
0.13 0.3
0.13 0.5
-0.12 0.5
Hope that helps -
Also it's be nice to know what range of resistances the pots go through, 'cause I'll be betting they don't go to the ends of travel.
Sweet!
Does this do up-down-left-right-push, or just up-down-left-right? Basically, does it have a button on the bottom for when you push downwards (vertically)? If, not, I might attach a button to the bottom of the joystick.
Hi i'm kinda new to circuitry and was wondering would anyone describe to how to wire one of these so i can control the direction of a servo motor and when i press down turn on/off a led. Would appreciate it allot thanks.
Basically this is 2 potentiometers, one for each axis. Each potentiometer will have 3 pins. Hook up GND to one end, VCC to the other end and the middle pin goes to an analog pin on your microcontroller. Have your microcontroller read the analog voltage. Once the microcontroller knows what voltage you have you can use that to tell it how to move the servo. If you are looking for more basic information on electronics including how potentiometers work, check out the Sparkfun Inventor's Kit. If you have any other questions feel free to email techsupport@sparkfun.com
How easy is it to remove the springs? I want it to hold the setting and not return to center.
I bought this fucking piece of shit to the Brazil has more than 4 months and this fucking thing didn't arrive yet!
How would one mount this to a project box? Will it sit flush to the bottom of the black plastic, or will there be a gap exposing the circuitry underneath?
is it made by Alps?
Definitely not at this price.
I was having trouble with having high values for the center/idle position, while using 5V. Hooked Vcc up to the 3.3V on my Teensy 3.1 and now it works great. I'm getting 509/524 for center values now.
is it possible to take out one of the springs? I need to replicate a R/C remote for a quadcopter. I dont want the spring tension bringing one of the axis to center. Rather I want it to be "settable"
For about $2 more, you could just buy the actual PS2 controller which would have two of these, a board to mount them on, and a rumble motor. :) https://www.sparkfun.com/products/10330
Hi, does anyone have an algorithm to share to transform the output into something more linear?
Thanks!
Does anyone know where I can buy some plastic enclosures that fit these and the breakout boards? they work great in my project but look like crap with the exposed board and wires.
Hi All,Does anyone know where I could buy joystick used in Nintendo Wii Nunchuk Controller? Its a lot smaller compared to the one sparkfun has and doesnt have the button press. It would be great if sparkfun could get it in stock :) . Appreciate it. Thanks!
How easy is it to remove the springs? I want it to hold the setting and not return to center.
Are the pins long enough to put in a bread board?
I replaced the right thumbstick in a 360 controller with one of these and there is a HUGE deadzone in the center. I had to move the stick over halfway of the full travel distance to see any change on-screen.
This was the case in both the X and Y direction.
info: pressing down the joystick returns LOW for the button, not HIGH :) i needed some time to find that out...
Thanks, I was having trouble with that, but then I realized the SEL was connected to GND and not VCC on the breakout board.
Hi,
I wrote a convenient C# driver targeting the netduino for this and other similar analog joysticks.
You can find the details here: http://fabienroyer.wordpress.com/2011/01/09/connecting-an-analog-joystick-to-a-netduino/
Cheers,
-Fabien.
Are these supposed to be linear? or at least something close to linear?
I have one and on a 10bit scale, I get 506 in the center and it is repeatable over many spring returns. However, the scale is almost usable. I was trying to get a slow/medium/fast out of it so i was simply dividing each half by 3 with a small dead zone in the middle. I thought it was broken for the longest until I started looking at numbers again. I go from 506 to 1021 within about the first 3 degrees of movement. From there it is basically maxed to the end. Same in the other direction and the same for the other axis. I have semi faked two speeds out of it but it is very sketchy where that second one picks up since I am having to look for values between 492 and 4 for example. Anything less than for is my fast that sketchy.
Any advice?
I don't have access to a PS anything controller (I'm a 360 man myself) and I can't remember if the 'boot' around the bottom is flexible or not. In other words, will it give if the cutout is only as big as the shaft travel?
The PS2 controllers had insets to accomodate the height. I won't have that option and I'm not sure I like the idea of giant hole in the top of the case to accomodate all the movement. If that 'boot' is flexible, it will make my life much easier.
Answered my own question. I had a look at a PS2 controller today. The whole top 'hat' is plastic. The top is textured which i didn't realize until tonight. That is a nice feature.
Also, there was a link somewhere above me to a datasheet that shows the minimum hole size. I find that I am going to be challenged to fit this stick in my case but I think it will squeeze. I may have to go a little higher than the daasheet shows.
Ordering one today!
Just say YES to the breakout board.
If you are using this for any hobby stuff I would get the breakout board. This will not fit in a breadboard or perfboard. its a great piece, but just spring for the breakout unless you want to solder wire scraps to the leads.
Bought 2 of these and 1 got the y burned. Tested the other here and the middle sometimes gets 330 and haves a dead point that marks 0. When I pull up the x or y, I get ~1010, but when I pull it down I get 0, and 0 at the middle too. It'm impossible to control something in this conditions...
:(
wow, bought two of these and when the x wordked well, but the y potentiometer, when I put it to the max, I can see inside the potentiometer, a little "explosion", some spark inside it, and after that, a smoke, and finally, the pot got burned...<br />
<br />
Don't know what happened, but I don't know if this gonna happen to the other...<br />
<br />
:(<br />
<br />
(there's no pins soldered together and nothing wrong in the cirtuit)
I used this in a project and it worked great, until it had to perform. These joysticks died 15minutes before a competition and left me dead in the water.<br />
<br />
It might have been my own fault as I didn't include a current limiting resistor. However a datasheet of some sort would have been nice to let me know how much current these can take.
So the rest of us know, how much voltage/current did you run through it?
My power source was from a LM317, so I was capped at 1.5A at 5V.
I had two configurations, the first was a 560 before and after the joystick. which if memory serves is 4.5ma. The second configuration was only a 3.3K before the joystick, which is only 1.5mA.
But from my research most joysticks are either 50mA or 5mA rating (.1W or .01W). So take that as you will.
does anyone have any ideas on how to mount this to a plywood controller?
Anybody have a good idea on a hole size for mounting through a case?
My first attempt at that led to some trimming of the plastic doohickey to keep it from snagging.
Look at the Eagle files for the joystick shield. It has all the dimensions we used.
Wow it doesn't pay to go to sleep. Wake up and they are back out of stock again :)
Sleeping is over-rated.
But don't worry, we have a lot more coming.
This is true. Being at the other end of the world means we sleep at different times.
I was actually seconds away from placing an order when the site went into maintenance mode and I decided I couldn't stay up all night refreshing the page.
This is a pretty cool part, although it is difficult to mount, even with the breakout board. As far as I can tell it cannot be mounted under a surface, you need another surface under it to mount to. But, nonetheless, a fantastically simple dual pot + button setup.
An interesting form of user input. I have measured what it can do and documented it, available at: http://wp.me/pQmjR-h8
nice job!
Are these actually 10kohm pots? I have a pair, and they center at 3.5 kohms and range from 200 ohms to almost 5k ohms.
In case anyone's interested, I built a library for the arduino for this part. It's hosted on google code @ http://code.google.com/p/arduino-joystick/
I guess I should have read the comments beforehand, because I spent all last night writing my own library...
let me know if you have any good features or anything you'd like to add to the library. I don't mind merging or adding :)
Well, you can take a look at it at http://isomk.sdf.org/arduino.html - it's actually a pretty simple interface, nothing fancy by any means.
When will these be back in stock?
Is it spring loaded "return-to-center"?
A fair amount of effort in the RC community has been taking pots from the PS2 controllers and REMOVING that capability (traditionally on a dual-stick RC, your "turn" joystick is spring loaded, but the "throttle" joystick isn't. Or something like that...)
It's spring loaded, but the spring can be removed without too much difficulty by popping the back off and pulling the spring. Without the spring it's pretty lose. Not so bad that it'll move without being touched, but if I was wearing it and I jumped, it would definitely move. There might be a simple way to add friction to the system, but for my application I didn't need it.
Yes - spring loaded. Unit returns to center.
Very nice component, I hope you will restock them.