ATmega128RFA1 Dev Board Hookup Guide
This Tutorial is Retired!
This tutorial covers concepts or technologies that are no longer current. It's still here for you to read and enjoy, but may not be as useful as our newest tutorials.
 jimblom
Arduino Compatibility
Everyone loves Arduino! The simplified IDE and host of libraries and supporting code make it an awesome place to start prototyping. The ATmega128RFA1 shares a lot in common with the popular ATmega328 used on the Arduino Uno, so it seems reasonable that we should be able to program the board using the Arduino software. There are just a few extra steps which need to be taken to do so.
First, if you haven't already, download and install Arduino. Make sure you download the latest version of Arduino - 1.6.0 or higher! The addon we'll install will assume that's the version you're using.
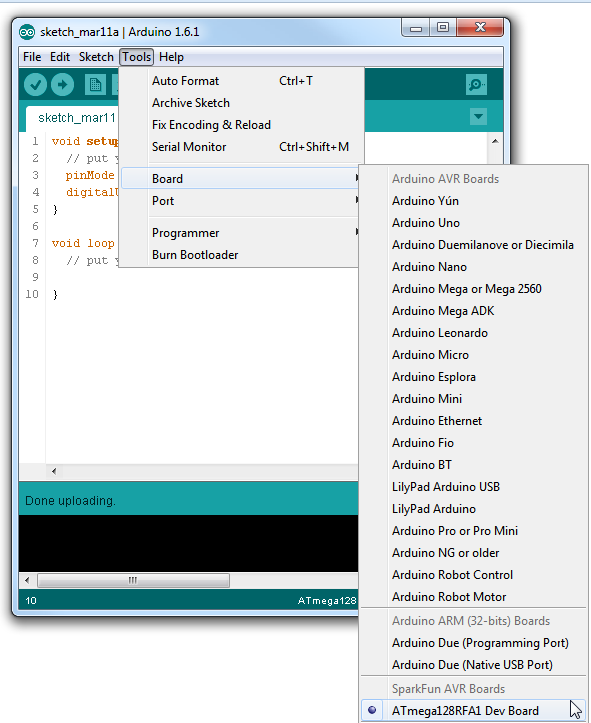
Add the Board Definitions File
To enable the ATmega128RFA1 in your Arduino IDE, you'll need to add a board definition. Download the ATmega128RFA1 arduino addon by clicking the button below:
The "hardware" folder from that download should be added to your Arduino sketchbook. Normally the sketchbook will install to your documents/Arduino folder.
This directory contains a boards.txt file which defines the ATmega128RFA1 Dev Board, and adds a selectable option under the Tools > Board menu. When you open the Arduino IDE (close and reopen it if it's already open), this option should be added to the menu:
Pin Mapping
After you've added ATmega128RFA1-compatibility to your Arduino IDE, you can take advantage of all of the wonderful libraries you may have grown acustomed to, including Serial, SPI, and Wire. In addition to that each pin is mapped to a unique pin number, which you can invoke all of your digitalWrite, digitalRead, analogWrite, and analogRead needs upon.
The addon defines all of the ATmega128RFA1's pins as singular numbers. Just as Arduino has pins 0-13, and A0-A6, this development board has pins 0-25, and A0-A7. Here's how the pins are mapped out:
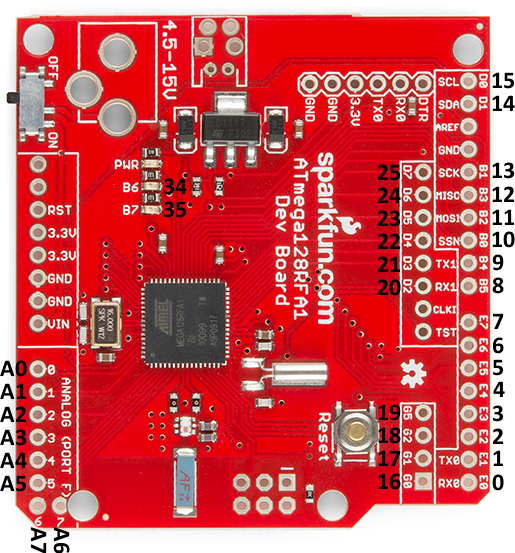
There are a few pins with PWM functionality -- 3, 4, 5, 8, 9, 19, 34, and 35 -- which you can use for analogWrite. Note that pins 34 and 35 are not broken out to pins. They're only connected to on-board LEDs.
The SPI, UART, and I2C pins are where you'd expect them to be on an equivalent R3-or-later Arduino Uno. There is a second UART -- UART1 -- on pins D2 and D3.