Experiment Guide for the Johnny-Five Inventor's Kit
 rwaldron
 reconbot
 D___Run___
 lyzadanger
 Shawn Hymel
Experiment 2: Multiple LEDs
Introduction
In Experiment 1 of the Johnny-Five Inventor's Kit (J5IK), you learned how to blink and pulse a single LED with a Tessel 2. In this experiment, you'll learn how to control multiple, colorful LEDs with Johnny-Five to create animated variations on a simple "Cylon effect." This article dives into structuring looping logic for your projects using Johnny-Five and JavaScript fundamentals.
Preflight Check
Whoa there, Turbo! If this is your first experiment with the Johnny-Five Inventor's Kit (J5IK) and the Tessel 2, there are a few things you gotta do first:Suggested Reading
The following tutorials provide in-depth background on some of the hardware concepts in this experiment:
- What is a Circuit? -- This tutorial will explain what a circuit is, as well as discuss voltage in further detail.
- Voltage, Current, Resistance, and Ohm's Law -- Learn the basics of electronics with these fundamental concepts.
- LEDs (Light-Emitting Diodes) -- LEDs are found everywhere. Learn more about LEDs and why they are used in so many products all over the world.
- Resistors -- Why use resistors? Learn more about resistors and why they are important in circuits like this one.
- Polarity -- Polarity is a very important characteristic to pay attention to when building circuits.
Parts Needed
You will need the following parts for this experiment:
- 1x Tessel 2
- 1x Breadboard
- 6x LEDs (One of each color: red, orange, yellow, green, blue, purple)
- 6x 100Ω Resistor
- 7x Jumper Wires


Hardware Hookup
Its now the fun part! It's time to start building your circuit. Let's take a look at what goes into building this circuit.
| Polarized Components | Pay special attention to the component’s markings indicating how to place it on the breadboard. Polarized components can only be connected to a circuit in one direction. |
Build the Multiple-LED Circuit
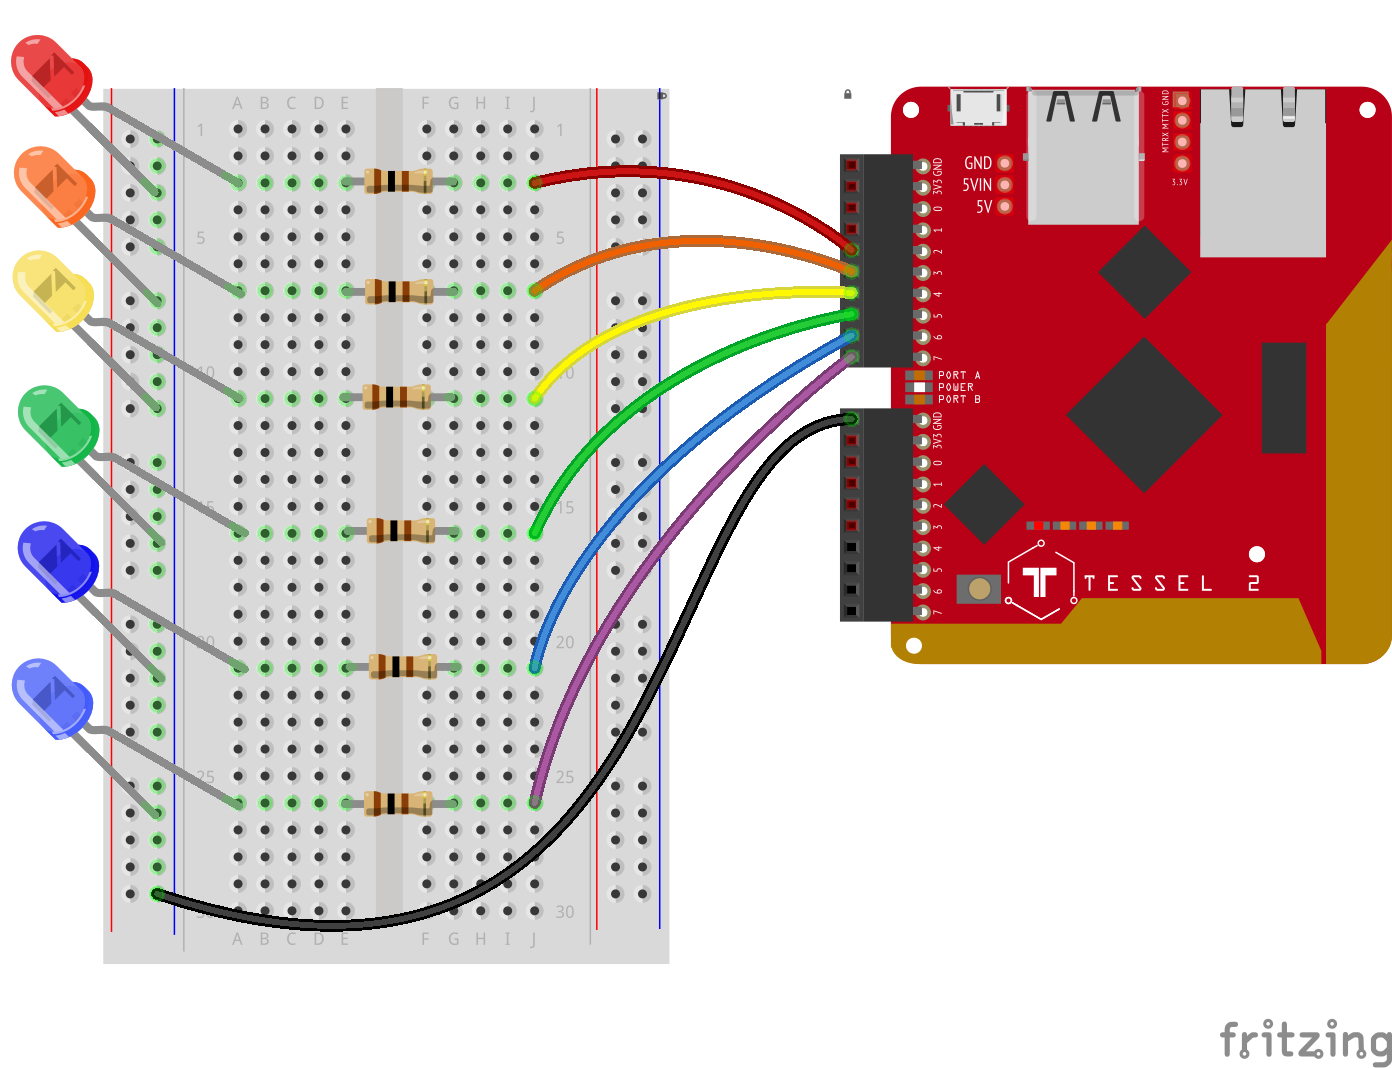
- Connect the LEDs to the breadboard. Make sure to connect their cathode legs to sockets in the ground column in the power rail.
- Plug in the 100Ω resistors in terminal rows shared with the anode legs of the LEDs, spanning the central notch.
- Connect jumper wires between the resistors and the Tessel 2. You may find it helpful to use colors that correspond to the LED's color.
- Use a jumper wire to connect the ground power rail of the breadboard to the Tessel 2's GND pin.
Lighting Up LEDs Side-to-Side
Open your favorite code editor, create a file called side-to-side.js and save it in the j5ik/ directory. Type — or copy and paste — the following JavaScript code into your side-to-side.js file:
language:javascript
var five = require("johnny-five");
var Tessel = require("tessel-io");
var board = new five.Board({
  io: new Tessel()
});
board.on("ready", () => {
  var leds = new five.Leds(["a2", "a3", "a4", "a5", "a6", "a7"]);
  var index = 0;
  var step = 1;

  board.loop(100, () => {
    leds.off();
    leds[index].on();
    index += step;
    if (index === 0 || index === leds.length - 1) {
      step *= -1;
    }
  });
});
Before you run this on your Tessel 2, pause for a moment. Can you tell what the program will do?
Type -- or copy and paste -- the following command into your terminal and press enter:
t2 run side-to-side.js
Once the program starts up, your multiple-LED circuit should light up in a pattern like this:
Exploring the Code
Before continuing, we recommend that you've read Experiment 1: Exploring the Code.
The side-to-side program lights up LEDs in the following pattern:
- From lowest pin number to highest pin number, turn on one LED at a time every 100 milliseconds, then:
- From highest pin number to lowest pin number, turn on one LED at a time every 100 milliseconds, then:
- Repeat from step 1.
Collections of LEDs With the Leds Class
Instead of instantiating each LED as its own object separately using the Led class (as we did in Experiment 1), we can create a single collection that contains all of the LEDs in one swoop:
language:javascript
board.on("ready", function() {
  var leds = new five.Leds(["a2", "a3", "a4", "a5", "a6", "a7"]);
});
Johnny-Five's Leds constructor takes an Array of pin numbers and creates an Led object for each of them. Each of these Led objects can be accessed and manipulated from the container-like leds object. Instances of the Leds class behave like Arrays but have some extra goodies (they're described as "Array-like objects").
Read up on JavaScript Arrays if the concept is new or you're feeling rusty.
Looping in Johnny-Five
To turn on LEDs one at a time, we need some way of creating a loop that executes every 100 milliseconds. We're in luck. Board object instances have a loop method that can do just that! Convenient!
language:javascript
board.on("ready", () => {
  board.loop(100, () => {
    // ... This function gets invoked every 100 milliseconds
  });
});
The function (in this case, an arrow function]) passed as the second argument to loop will get invoked every 100 milliseconds. Now, let's see what needs to happen in that loop.
Lighting Up, Lighting Down
Here's what we need to accomplish in each invocation of the loop callback function:
language:javascript
board.on("ready", () => {
  var index = 0;
  var step = 1;

  board.loop(100, () => {
    leds.off();            // 1. Turn all of the LEDs off
    leds[index].on();      // 2. Turn on the "next" active LED
    // ...                 // 3. Determine what the next active LED will be
  });
});
In step one, all LEDs are turned off. Leds instances have an off method that will turn off every Led in its collection. Easy peasy.
The variable index holds the index of the next LED that should get turned on. The initial value of index is 0. Why 0? Each Led in leds can be accessed by its numeric index, like an Array:
| Reference | LED |
|---|---|
leds[0] |
Led object controlling red LED on Port A, Pin 2 |
leds[1] |
Led object controlling red LED on Port A, Pin 3 |
leds[2] |
Led object controlling red LED on Port A, Pin 4 |
leds[3] |
Led object controlling red LED on Port A, Pin 5 |
leds[4] |
Led object controlling red LED on Port A, Pin 6 |
leds[5] |
Led object controlling red LED on Port A, Pin 7 |
The first time the loop executes, index is 0, and it will turn on leds[0], which is the first (red) LED on Port A, Pin 2:
language:javascript
leds[index].on();
Step 3 sets us up for the next time the loop function executes. The value of index needs to be set to the index of the next LED that should turn on. This is what the step variable helps us with. Add step to index to get the index of the next LED to light up:
language:javascript
board.on("ready", () => {
  var index = 0;
  var step = 1;

  board.loop(100, () => {
    leds.off();            // 1. Turn all of the LEDs off
    leds[index].on();      // 2. Turn on the "next" active LED
    index += step;         // 3a. Add `step` to index
  });
});
At the completion of the first invocation of the loop callback function, index will hold the value 1.
During the second invocation, the second, orange LED (leds[1]) will light up. index will be incremented to 2.
And so on, lighting up red, orange, yellow, green, blue ... But then we get to the purple LED (Port A, Pin 7) at index 5. There is no Led element at leds[6], so what do we do now? Well, we can flip the sign of step, changing its value to -1:
language:javascript
board.on("ready", () => {
  var index = 0;
  var step = 1;

  board.loop(100, () => {
    leds.off();            // 1. Turn all of the LEDs off
    leds[index].on();      // 2. Turn on the "next" active LED
    index += step;         // 3a. Add `step` to index
    if (index === leds.length - 1) { // 3b. If we're at the highest index...
      step *= -1; // ...invert the sign of step
    }
  });
});
Now invocations of the loop callback function will decrease (decrement) the index value, and the LEDs will light up in reverse order. When the index gets down to 0 — the first LED — we need to swap the sign of step again:
language:javascript
board.on("ready", () => {
  var index = 0;
  var step = 1;

  board.loop(100, () => {
    leds.off();            // 1. Turn all of the LEDs off
    leds[index].on();      // 2. Turn on the "next" active LED
    index += step;         // 3a. Add `step` to index
    // If we are at the lowest OR the highest index...
    if (index === 0 || index === leds.length - 1) {
      step *= -1;
    }
  });
});
Using board.loop with the leds can be adapted in various ways to change the way the LEDs light up. Let's try a few variations.
Variation: One-by-One On, One-by-One Off
Now we'll light up each LED one at a time and keep them on as we go; the display will loop as:
- From lowest pin number to highest pin number, turn on each LED and keep it on.
- From highest pin number to lowest pin number, turn off each LED and keep it off.
- Repeat from step 1.
Open your favorite code editor, create a file called one-by-one-on-off.js and save it in the j5ik/ directory. Type — or copy and paste — the following JavaScript code into your one-by-one-on-off.js file:
language:javascript
var five = require("johnny-five");
var Tessel = require("tessel-io");
var board = new five.Board({
  io: new Tessel()
});
board.on("ready", () => {
  var leds = new five.Leds(["a2", "a3", "a4", "a5", "a6", "a7"]);
  var index = 0;
  var step = 1;

  board.loop(100, () => {
    leds.off().slice(0, index).on();
    index += step;
    if (index === 0 || index === leds.length) {
      step *= -1;
    }
  });
});
All of the changes are confined to the loop callback function. There's one line doing much of the heavy lifting here:
leds.off().slice(0, index).on();
This single line turns all of the LEDs off and then turns on all LEDs between 0 and the current index. slice is an Array method that returns a chunk of an array between the start and end indexes provided (leds isn't an Array, remember, but it acts like one, so it also has a slice method).
As in the previous example, this script will flip the sign on step when it reaches either end of the leds collection.
Run the script by typing -- or copying and pasting -- the following command in your terminal:
t2 run one-by-one-on-off.js
Once the program starts up, your LEDs circuit should display something like this:
Variation: One-by-One On, Clear and Repeat
Now let's simplify that same program: light up each pin, one at a time, and then turn them off; the display will loop as:
- From lowest pin number to highest pin number, turn on each LED and keep it on.
- Once all the LEDs are on, turn them all off
- Repeat from step 1.
Open your favorite code editor, create a file called one-by-one-clear-repeat.js and save it in the j5ik/ directory. Type -- or copy and paste -- the following JavaScript code into your one-by-one-clear-repeat.js file:
language:javascript
var five = require("johnny-five");
var Tessel = require("tessel-io");
var board = new five.Board({
  io: new Tessel()
});
board.on("ready", () => {
  var leds = new five.Leds(["a2", "a3", "a4", "a5", "a6", "a7"]);
  var index = 0;

  board.loop(100, () => {
    if (index === leds.length) {
      leds.off();
      index = 0;
    } else {
      leds[index].on();
      index++;
    }
  });
});
Again, there is very little to change here, so we'll skip right to the operations within the call to board.loop(...).
language:javascript
board.loop(100, () => {
  if (index === leds.length) {
    leds.off();
    index = 0;
  } else {
    leds[index].on();
    index++;
  }
});
The semantics for this program are slightly different from the previous examples. Because we're always lighting LEDs up in the same direction — lowest to highest index — we don't have to deal with the logic for swapping the sign on a step variable. Instead, a simple increment of the index value on each invocation of the loop callback function is all we need, resetting it to 0 when we run out of LED indexes.
- If the
indexequals the number of LEDs in theledscollection,- Turn all
ledsoff. - Set the
indexback to0.
- Turn all
- Else,
- Turn the
ledat presentindexon. - Increment the
index.
- Turn the
Type — or copy and paste — the following into your terminal:
t2 run one-by-one-clear-repeat.js
Once the program starts up, your LEDs circuit should display something like this:
Variation: Collision
Changing gears a bit, this next program will light LEDs from the middle, out, and back (there will be two LEDs lit at a time); the display will loop as:
- From the first to the last and the last to the first, by pin number, light the LEDs one at a time.
- Repeat from step 1.
Open your favorite code editor, create a file called collision.js and save it in the j5ik/ directory. Type — or copy and paste — the following JavaScript code into your collision.js file:
language:javascript
var five = require("johnny-five");
var Tessel = require("tessel-io");
var board = new five.Board({
  io: new Tessel()
});
board.on("ready", () => {
  var leds = new five.Leds(["a2", "a3", "a4", "a5", "a6", "a7"]);
  var index = 0;
  var step = 1;

  board.loop(100, () => {
    leds.off();
    leds[index].on();
    leds[leds.length - index - 1].on();

    index += step;

    if (index === 0 || index === leds.length - 1) {
      step *= -1;
    }
  });
});
This example contains logic more in line with the first few variations again — turning on the correct LED and then determining what the next LED's index will be:
- Turn all
ledsoff. - Turn the
ledsatindexand its counterpart on. - Update the
indexwithstep(either1or-1). - If
indexequals0, orindexequals the number that corresponds to the last possibleledin theledscollection, flip the sign ofstep.
Type — or copy and paste — the following into your terminal:
t2 run collision.js
Once the program starts up, your LEDs circuit should display something like this:
Building Further
- Try writing your own algorithms for other patterns not shown here.
Reading Further
- JavaScript -- JavaScript is the programming language that you'll be using:
- Node.js -- Node.js is the JavaScript runtime where your programs will be executed.
- Johnny-Five -- Johnny-Five is a framework written in JavaScript for programming hardware interaction on devices that run Node.js.