Experiment Guide for the Johnny-Five Inventor's Kit
 rwaldron
 reconbot
 D___Run___
 lyzadanger
 Shawn Hymel
Experiment 7: Animating LEDs
Introduction
In Experiments 1 and 2 you learned how to control one LED, and then several LEDs, using the Johnny-Five Led blink(), on() and off() methods. We also quickly looked at pulse(), which is essentially a prepackaged, commonly used "animation" for LEDs. In this experiment, you'll learn how to do basic LED fading and then make use of built-in easing functions.
Preflight Check
Whoa there, Turbo! If this is your first experiment with the Johnny-Five Inventor's Kit (J5IK) and the Tessel 2, there are a few things you gotta do first:Suggested Reading
The following tutorial provides in-depth background on some of the hardware concepts in this experiment:
Parts Needed
You will need the following parts for this experiment:
- 1x Tessel 2
- 1x Breadboard
- 3x Standard LEDs (one each of red, green and blue)
- 3x 100Ω Resistors
- 4x Jumper Wires


Hardware Hookup
The circuit below is a simplified version of Experiment 2; each LED is wired in the same way, but we are using three LEDs so you can focus on the programming aspects of animation.
| Polarized Components | Pay special attention to the component’s markings indicating how to place it on the breadboard. Polarized components can only be connected to a circuit in one direction. |
Build the Multiple-LED Circuit

- Connect the LEDs to the breadboard. Make sure to connect their cathode (shorter) legs to sockets in the ground column of the power rail.
- Plug in the 100Ω resistors in terminal rows shared with the anode (longer) legs of the LEDs, spanning the central notch.
- Connect jumper wires between the resistors and the Tessel 2. You may find it helpful to use colors that correspond to the LED's color.
- Use a jumper wire to connect the ground power rail of the breadboard to the Tessel 2's GND pin.
Fading In
Open your favorite code editor, create a file called fade-in.js and save it in the j5ik/ directory. Type—or copy and paste—the following JavaScript code into your fade-in.js file:
language:javascript
var five = require("johnny-five");
var Tessel = require("tessel-io");
var board = new five.Board({
  io: new Tessel()
});

board.on("ready", () => {
  var leds = new five.Leds(["a5", "a6", "b5"]);
  var index = 0;

  var fader = () => {
    if (index < leds.length) {
      leds[index++].fadeIn(1000, fader);
    }
  };
  fader();
});
Type—or copy and paste—the following into your terminal:
t2 run fade-in.js
What You Should See
Exploring the Code
Once the board has emitted the ready event, instantiate a new Leds object and a variable called index, with an initial value of 0:
language:javascript
var leds = new five.Leds(["a5", "a6", "b5"]);
var index = 0;
Next, create a function called fader:
language:javascript
var fader = () => {
  if (index < leds.length) {
    leds[index++].fadeIn(1000, fader);
  }
};
First, fader() checks that the value of index is less than the total number of LEDs in leds, meaning that it is a valid index for one of the Led objects leds contains. Then, it will do this:
language:javascript
leds[index++].fadeIn(1000, fader);
All righty, there are a few things going on in that line. Let's start with index++. That little chunk means "look up the current stored value of this variable, then, afterward, increase its stored value by 1".
leds[index++].fadeIn(...) invokes fadeIn on leds[index], but if we were to look at the value of index afterward, it would have increased by 1. Basically, this saves us a line; the following is equivalent:
language:javascript
led[index].fadeIn(...);
index = index + 1;
Right. Now the arguments being passed to led.fadeIn:
language:javascript
leds[index++].fadeIn(1000, fader);
The first, 1000, is how long (in milliseconds) the fading-in should take. The second is a callback function to invoke once the fade operation is complete. The fader function passes itself as a callback function to led.fadeIn. This can feel mind-twisting if you're new to it, but is perfectly safe and common. It's called asynchronous recursion.
The next time fader is called, the index has incremented by 1!
| Call | index | LED |
|---|---|---|
| 1 | 0 | Red |
| 2 | 2 | Green |
| 2 | 3 | Blue |
| 4 | 3 | N/A |
The fourth time fader is called will be the last—the test for index < leds.length will fail.
Lastly, to kick off the async recursion that will light these LEDs up, we must call fader() explicitly:
language:javascript
fader();
Variation: Fading In, Fading Out
Instead of leaving the LEDs turned on, let's fade them in and then out again, before moving on to the next LED. Open your favorite code editor, create a file called fade-in-out.js and save it in the j5ik/ directory. Type—or copy and paste—the following JavaScript code into your fade-in-out.js file:
language:javascript
var five = require("johnny-five");
var Tessel = require("tessel-io");
var board = new five.Board({
  io: new Tessel()
});

board.on("ready", () => {
  var leds = new five.Leds(["a5", "a6", "b5"]);
  var index = 0;

  var fader = () => {
    if (index < leds.length) {
      leds[index].fadeIn(1000, () => {
        leds[index++].fadeOut(1000, fader);
      });
    }
  };
  fader();
});
Type—or copy and paste—the following into your terminal:
t2 run fade-in-out.js
What You Should See
Starting with the red LED, each LED will:
- Fade in, lasting one second.
- Fade out, lasting one second.
- Move onto the next LED.
Exploring the Code
The changes are all contained within part of the fader function:
language:javascript
leds[index].fadeIn(1000, () => {
  leds[index++].fadeOut(1000, fader);
});
Let's step through this. First, leds[index] has its fadeIn method invoked. fadeIn is told to take 1000 milliseconds (a second) to do the fading. A callback function is provided for fadeIn to invoke once the fading-in is all done. In this callback function, fadeOut is invoked on leds[index] (and index is incremented). The fading-out is set to take one second, and told to invoke fader when it's through, starting the whole cycle again on the next index.
Variation: Cross Fading
This time, instead of waiting for the previous LED to fade out, the next LED in the Leds instance will fade in at the same time as the previous one is fading out. Open your favorite code editor, create a file called cross-fade.js and save it in the j5ik/ directory. Type—or copy and paste—the following JavaScript code into your cross-fade.js file:
language:javascript
var five = require("johnny-five");
var Tessel = require("tessel-io");
var board = new five.Board({
  io: new Tessel()
});

board.on("ready", () => {
  var leds = new five.Leds(["a5", "a6", "b5"]);
  var index = 0;

  var fader = () => {
    if (index > 0) {
      leds[index - 1].fadeOut(1000);
    }
    if (index < leds.length) {
      leds[index++].fadeIn(1000, fader);
    }
  };
  fader();
});
Type—or copy and paste—the following into your terminal:
t2 run cross-fade.js
What You Should See
Starting with the red LED, each LED will:
- Fade in over one second.
- Move onto the next LED. Fade out the previous LED while fading in the current LED.
Exploring the Code
Again, no changes to the initial setup, but a new piece has been added before the (index < leds.length) condition:
language:javascript
if (index > 0) {
  leds[index - 1].fadeOut(1000);
}
This fades out the previous LED (if there is one). There's no callback function provided because we don't need one. That LED is done.
Next, the current LED is faded in:
language:javascript
leds[index++].fadeIn(1000, fader);
This time, fader is passed as a callback to start the next cycle (fading this LED out, fading in the next LED...) after this LED is done fading in.
Introducing Easing
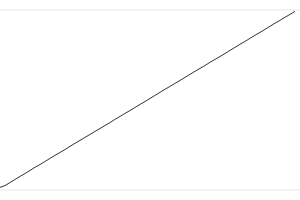
led.fadeIn and led.fadeOut apply a mathematical algorithm that determines the amount of brightness to change over time. fadeIn and fadeOut don't actually fade in and out linearly; that is, there's an easing function applied to make the fading feel more natural and smooth. By default, the easing function used is out sine (though, if you want, there is an available easing function linear that does what it sounds like it would do). out sine, graphically, looks like this:
What other easing functions can we use?
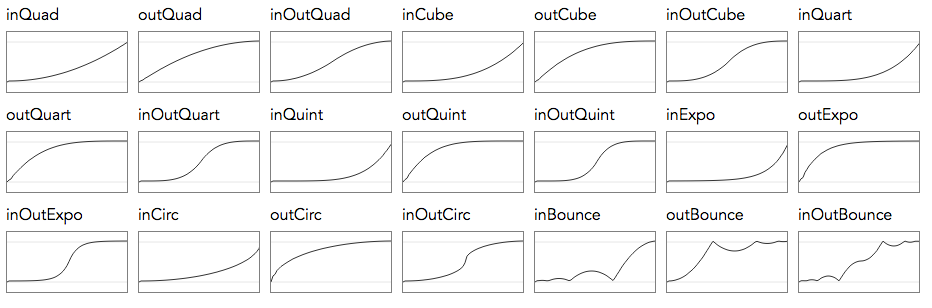
So, what do those look like? Let's write some code and find out. Open your favorite code editor, create a file called fader-easing.js and save it in the j5ik/ directory. Type—or copy and paste—the following JavaScript code into your fader-easing.js file:
language:javascript
var five = require("johnny-five");
var Tessel = require("tessel-io");
var board = new five.Board({
  io: new Tessel()
});

board.on("ready", () => {
  var leds = new five.Leds(["a5", "a6", "b5"]);
  var duration = 2000;

  var fader = () => {
    if (!easingFunctions.length) {
      process.exit();
    }
    var easing = easingFunctions.shift();

    leds.fadeOut(500, () => {
      leds.fadeIn({ easing, duration }, fader);
    });
  };

  fader();
});

var easingFunctions = [
  "linear",
  "inQuad",
  "outQuad",
  "inCube",
  "outCube",
  "inOutCube",
  "inQuart",
  "outQuart",
  "inOutQuart",
  "inQuint",
  "outQuint",
  "inOutQuint",
  "inExpo",
  "outExpo",
  "inOutExpo",
  "inCirc",
  "outCirc",
  "inOutCirc",
  "inBounce",
  "outBounce",
  "inOutBounce",
];
Type—or copy and paste—the following into your terminal:
t2 run fader-easing.js
What You Should See
All three LEDs will simultaneously demonstrate each easing function.
Exploring the Code
The first major difference in this program is the list of easing functions that follows the board's ready event handler registration. Those functions are built in to Johnny-Five.
Within the board's ready event, and after the instantiation of the Leds object, we've declared a duration variable, with a value of 2000. This is going to be used as a time value in milliseconds.
language:javascript
var duration = 2000;
Next, the familiar fader function definition. However, the internal operations have changed. The program is designed to iterate through each easing function and display it as an "animation" of our leds:
language:javascript
var fader = () => {
  // 1
  if (!easingFunctions.length) {
    // 1.1
    process.exit();
  }
  // 2
  var easing = easingFunctions.shift();

  // 3
  leds.fadeOut(500, () => {
    // 4, 5
    leds.fadeIn({ easing, duration }, fader);
  });
};
Here's what it does:
- It checks that there are entries remaining in
easingFunctionsarray. - If not, then there's nothing left to do, so it exits the program.
- It Removes the first entry in the
easingFunctionsand shifts the remaining entries to the beginning. This is accomplished by calling theshift()method of theeasingFunctionsarray. - It fades out all of the
ledsover 500ms. Since we're passing a number as the first argument tofadeOut, the default easing function will be used. (We could pass an object that specifies an easing function for fading out if we wanted). The second argument is a callback function to invoke when thefadeOutoperation completes. - Once that operation completes, and the callback function is invoked, the next operation is an invocation of the
leds.fadeIn(...)method with two arguments: an object containing properties specifying both aneasingand adurationin milliseconds for which the operation should run, and a callback function, which also happens to be ourfaderfunction. This means that once thefadeIneasing operation completes, thefaderfunction is called, which starts us back at step 1 of this list.
Note: leds.fadeIn({ easing, duration }, fader) is functionally equivalent to leds.fadeIn({ easing: easing, duration: duration }, fader). The former uses object property shorthand.
Animating with Keyframes
So far you've been working with higher-level abstraction of easing capabilities; now it's time to see how that capability is implemented. Johnny-Five provides another class called Animation that produces instances for controlling one or more components. To give you an idea of what the Animation class can provide, take a look at this mind-blowing project, created by the author of the Animation class, Donovan Buck:
What you're seeing in the video is a series of static gaits, executed by "animating" the position of 18 servos. Animations are built from one or more segments.
segments can be defined with many optional properties to tweak the behavior, but the most basic and important options are:
| Option | Description | Default |
|---|---|---|
duration |
the duration of the segment, in milliseconds |
1000 |
cuePoint |
Array of values between 0 and 1, representing the proportional time points along the duration of the segment for each keyframe | [0,1] (this argument may be omitted if there are only two keyframes) |
keyFrames |
Array of values representing keyframes. Required. | |
onComplete |
Callback function to invoke when segment animation is complete |
A keyframe defines the state of the component at a given snapshot in time. In the case of LEDs, the most relevant state attribute is intensity, the brightness of the LED scaled to [0, 100].
Let's take a look at a simplified version of the animation that ran for our fader programs. Open your favorite code editor, create a file called keyframes-fade-in.js and save it in the j5ik/ directory. Type—or copy and paste—the following JavaScript code into your keyframes-fade-in.js file:
language:javascript
var five = require("johnny-five");
var Tessel = require("tessel-io");
var board = new five.Board({
  io: new Tessel()
});

board.on("ready", () => {
  var led = new five.Led("a5");
  var animation = new five.Animation(led);

  animation.enqueue({
    duration: 2000,
    keyFrames: [
      { intensity: 0 },
      { intensity: 100}
    ],
    oncomplete() {
      console.log("Done!");
    }
  });
});
Type—or copy and paste—the following into your terminal:
t2 run keyframes-fade-in.js
What You Should See
The red LED will fade in.
Exploring the Code
language:javascript
var animation = new five.Animation(led);
A new animation instance is created, and it is passed the led object. That's what we'll be animating.
language:javascript
animation.enqueue({
  duration: 2000,
  keyFrames: [
    { intensity: 0 },
    { intensity: 100}
  ],
  oncomplete() {
    console.log("Done!");
  }
});
animation.enqueue(...) is used to add the animation segment (defined in the passed object) to the animation queue. This causes it to start playing, as it is the only animation in the queue and queues are auto-play.
When the animation is complete, "Done!" will be displayed in the console.
Animating Multiple LEDs with Keyframes
Open your favorite code editor, create a file called keyframes-multiple.js and save it in the j5ik/ directory. Type—or copy and paste—the following JavaScript code into your keyframes-multiple.js file:
language:javascript
var five = require("johnny-five");
var Tessel = require("tessel-io");
var board = new five.Board({
  io: new Tessel()
});

board.on("ready", () => {
  var leds = new five.Leds(["a5", "a6", "b5"]);
  var animation = new five.Animation(leds);

  var animateForever = () => {
    animation.enqueue({
      duration: 2000,
      cuePoints: [0, 0.05, 1.0],
      keyFrames: [
        [ {intensity: 100}, {intensity: 0}, {intensity: 100}],
        [ {intensity: 0}, {intensity: 100}, {intensity: 0} ],
        [ {intensity: 100}, {intensity: 0}, {intensity: 100} ],
      ],
      oncomplete() {
        console.log("Do it again!");
        animateForever();
      }
    });
  };
  animateForever();
});
Type—or copy and paste—the following into your terminal:
t2 run keyframes-multiple.js
What You Should See
The two outer LEDs will animate in one style, while the inner LED will have a different animation. Each time the animation repeats, "Do it again!" displays in the console and the animation is enqueued and played again.
Exploring the Code
First, the code instantiates a new Leds object with three Leds. It passes that Leds object when instantiating a new Animation object:
language:javascript
var leds = new five.Leds(["a5", "a6", "b5"]);
var animation = new five.Animation(leds);
The animateForever function enqueues a segment object:
var animateForever = () => {
  animation.enqueue({
    duration: 2000,
    cuePoints: [0, 0.05, 1.0],
    keyFrames: [
      [ {intensity: 100}, {intensity: 0}, {intensity: 100}],
      [ {intensity: 0}, {intensity: 100}, {intensity: 0} ],
      [ {intensity: 100}, {intensity: 0}, {intensity: 100} ],
    ],
    oncomplete() {
      console.log("Do it again!");
      animateForever();
    }
  });
};
The cuePoints are not distributed equally. The second keyframe cue point is at 0.05 (instead of 0.5, which would be an even step). Thus: the second keyframe will apply very quickly after the first. Then there is a longer gap between the second and third keyframes (0.05 to 1.0).
The keyFrames here is a 2-dimensional Array (an Array of Arrays). Each individual keyframe Array applies to one LED. The first and third LEDs share the same keyframes (bright, dark, then bright again) while the second LED is inverted (dark, bright, dark).
The oncomplete function logs a message to the console and then invokes animateForever again. The animation loops and loops ...
Building Further
- Experiment with more elaborate, longer-running keyframe sequences.
Reading Further
- JavaScript -- JavaScript is the programming language that you'll be using:
- Node.js -- Node.js is the JavaScript runtime where your programs will be executed.
- Johnny-Five -- Johnny-Five is a framework written in JavaScript for programming hardware interaction on devices that run Node.js.