- Home
- Product Categories
- Development Tools
- ProtoSnap - Pro Mini


ProtoSnap - Pro Mini
Replacement:DEV-10889. In the latest revision, we've added some helpful silkscreen to show you how everything is connected. This page is for reference only.
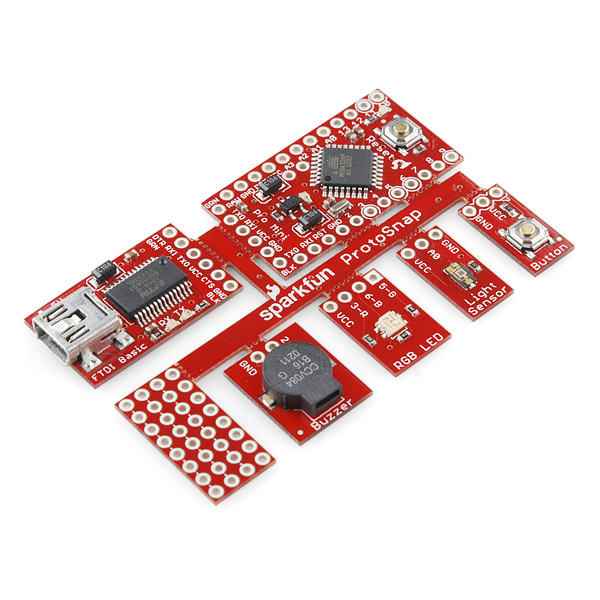
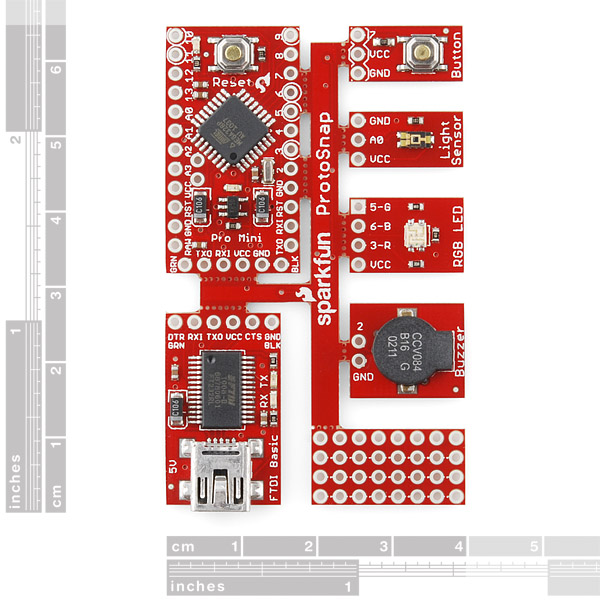
The ProtoSnap is an Arduino-compatible development platform aimed at teaching the basics of Arduino programming as efficiently as possible. It requires zero assembly, wiring, or soldering, so you can jump right into programming the ProtoSnap to control LEDs, buzzers, light sensors, and more. There's even a small prototyping space so you can add your own parts!
Once you’ve gotten a firm grasp of the programming, you can snap off the individual components of the ProtoSnap for use in future projects. Those components include an Arduino Pro Mini microcontroller platform and an FTDI Basic Breakout to program it.
The ProtoSnap Pro Mini comes loaded with the Arduino Optiboot bootloader and performs the same as an Arduino UNO when loading code so educators can combine it with MiniBloq or MODKit to reach students with no programming experience.
Note: The first 3 rows of the protoboard are bussed together so you can use the for GND, VCC, or whatever else you need to connect together.
Included on the Board:
- 1 x Arduino Pro Mini 5V/16MHz (With Optiboot)
- 1 x FTDI Basic Breakout 5V
- 1 x Buzzer
- 1 x RGB LED
- 1 x Light Sensor
- 1 x Push Button
- 1 x Protoboard
ProtoSnap - Pro Mini Product Help and Resources
LED Cloud-Connected Cloud
February 22, 2016
Make an RGB colored cloud light! You can also control it from your phone, or hook up to the weather!
Comments
Looking for answers to technical questions?
We welcome your comments and suggestions below. However, if you are looking for solutions to technical questions please see our Technical Assistance page.
Customer Reviews
No reviews yet.
What a great idea. So hard not to snap this thing into pieces right away.
...I wish I could snap the sensors off easily and just have the FTDI and the Arduino. FTDI is the first to go :(
Wow, awesome product. Wish it had been available when I was a beginner, I can't really justify the price now that I've advanced passed the basics.
I would almost just buy this to add a Red Pro Mini to my collection.
I got a noob question here. I own a Simon kit and would like to program it. Can I use the usb to serial converter on this board to program the Simon without snapping the usb to serial converter off? Is it possible to simply connect wires to the pads on the usb to serial and the simon pads in order to program it?
As long as you can keep the ProtoSnap in reset, it should work. If you snap the FTDI off, put male headers on the ProtoSnap and the Simon and a set of female socket headers on the FTDI. This is a common method to run multiple devices from 1 FTDI
My protosnap appears to be working, but can you please tell me which board I should select in the tools menu of sketch_nov23a?
Select "Arduino Uno" under the Tools > Board menu. Like this.
Also, if you haven't checked out yet, give the Getting Started Guide a try.
Have fun!
I am using this as an intro to electronics/programming course. It is a great tool. Some tricks I have had to overcome...but really easy to get folks involved. I am, however, having problems with putting a 9 volt battery onto the board. I am going into the RAW with the +9, and GND to the -9. It seems to behave poorly and several students have fried the regulator. Is there a trick I should be aware of ??? Thanks.
The reason you are frying regulators is because you are putting 18 volts to the critter (+9V + -9V = +18V) which is beyond the regulator's power dissipation rating. Even the full sized Uno boards recommend no more than +12V, with a recommendation to lean more toward +9V.
this is excellent! ...any plans on making a 3.3v or even, netduino version??
not sure about the .netduino, but there is a voltage selector jumper on the underside of the FTDI board.
It would appear from the schematic that I can power this from a 9v battery at the raw voltage input. Is that correct?
Just received my ProtoSnap ProMini. I got a paper slip with it telling me to visit www.sparkfun.com/ProtoSnapProMini
That URL doesn't work, gives me a 404 error. Guess you need to add a redirect to http://www.sparkfun.com/tutorials/303
Sorry about that! We're fixing it right now. And yes, it just redirects to tutorial 303, as seen above.
Got Win7 64-bit. Didn't see a separate Arduino for 64-bit, so got the 32.
After install, no pop-up window on connection, asking to install USB driver. However, it did find some other drivers (RS232c ? and another one.)
Right now, the board sits connected, RGB cycling, and the red power light on next to the Arduino chip.
Should I continue? Do I have the right s/w or drivers? Will I smoke this thing with the wrong s/? First time on hardware since '71. Been a few changes...
I am excited, getting mine Monday, any suggestions on what I should build? I was thinking a breathalyzer would be a useful item. I am going to FRYS tomorrow to get some resistors bread board and air quality sensor.
Very cool concept, but seems pricey to get people started with Arduino (& should a beginner smoke the MCU, you can't just toss a new one on easily).
It was $20 here but I understand it was a fund raiser.
I'd pay $30, but not $45.
A pro-mini alone is almost $20. Add in an FTDI and all the other boards, it comes up less than buying everything separately, and it comes with a nice guide and code to get you started.
The price may come down as we build these in larger quantities.
The $20 price was just a good round number, but wasn't at all intended to be representative towards a retail offering.
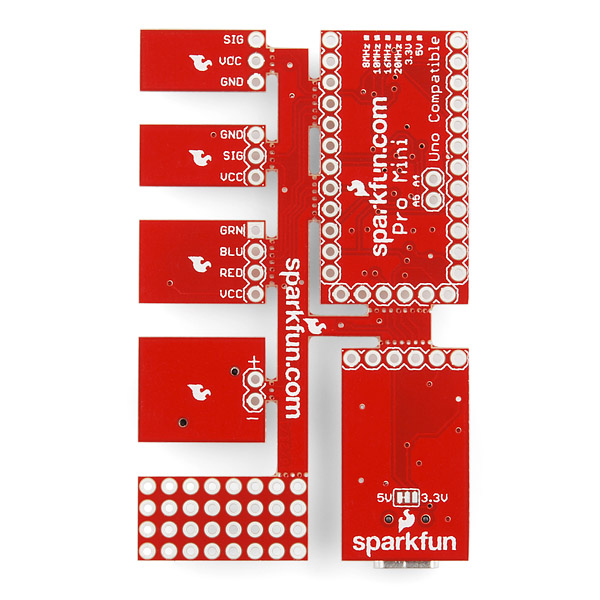
I'm just beginning, haven't had a chance to get anything plugged in, and have read some tutorials on basic electronics so this may seem like a really noobie question: Where is GND on the RGB LED PCB?
I don't see it on the pictures or in the schematic yet if the LED lights up as part of the code then I figure it's got to be there somewhere. Or are those electrons being vented out to the atmosphere (as opposed to the LED using them all of them up so there's no need for GND)?
I'm one of those types that likes to get something quickly working first to build my confidence so I already ordered one - then it's onto breadboarding!
Each color has a ground. So, there's VCC (voltage) and then 3 other pins, one for each color (which is the ground for each color).
I thought I understood this but something isn't computing...
It appears that GND is in the PCB but doesn't have a through hole for a wire when the LED has been snapped off. Seems the other sub-PCBs have a GND hole on them.
In other words, if I disconnet the LED PCB from the ProtoSnap, solder wires to the holes, and connected it to my Arduino UNO, how I hook up GND?
Check the schematic on page 2. You will be connecting VCC, digital 3, 5, and 6.
Ahhh. A little explanation goes a long way. Thanks!
Sure! Yeah, check out page 2 of the schematic, you'll see how it connects to the respective digital pins, and a shared voltage pin.
FYI:
The getting started guide link is borked.
I can't login right now, but the link should go here
Very innovative concept. I guess that will sell very well, and many other bundles will follow.
I wonder why there seems to be so much wasted space between the boards. All that space could be used for a bigger protoboard.
The space allows you to break off boards individually while avoiding accidentally removing other boards.
Maybe the Getting Started Guide (when the link will be corrected) should add the following mention:
"This device should not be manipulated with boxing gloves. Don't snap off the items while drunk or high on stuff. Do not use on a rollercoaster. Not intended for people with giant hands or fused fingers. Snapping off the individual boards in complete darkness might lead to creative but unpredictable results."
To clarify, for us noobs :) - It appears we need to purchase an FTDI cable, separately, for our programming purposes, correct?
It comes with the FTDI breakout board, all you need to program it is a mini USB cable.
correct, any old usb-mini cable will work, like from a cell phone, digital camera, etc.
Got it, thank you Hunternet!
Just as a word of advice, you should add a header package for this. Because once somebody takes it apart they still have to be able to connect them somehow.
This outta do it for ya, Papa Smurf.
Link
out of stock already?
neat, 4-5ish breakout boards in one! :D
Cool! I want one, has to wait until next order.
We have these in stock, but are just waiting for the system to update. We should show stock of these by Friday morning. Thanks!
Robert, the Getting Started Guide link goes to the FTDI Basic Product. Needs a quick fix. :)
I can't login right now, but the link should go here
How would i program it to supply battery power to this camera: https://www.sparkfun.com/products/11171 using the light sensor