- Home
- Product Categories
- Sound
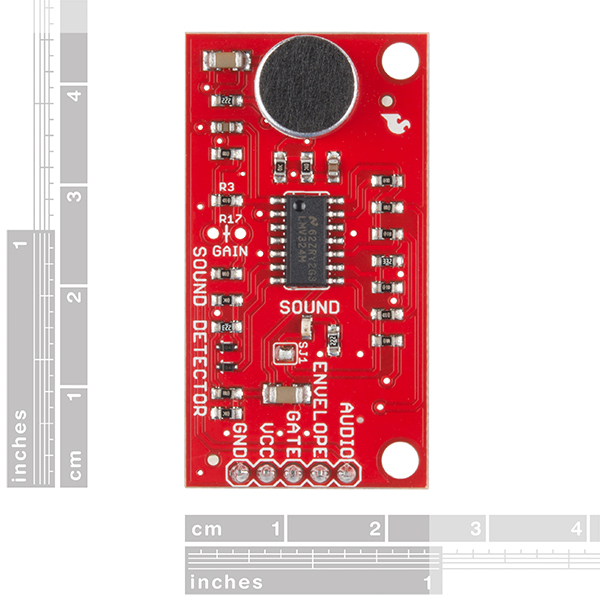
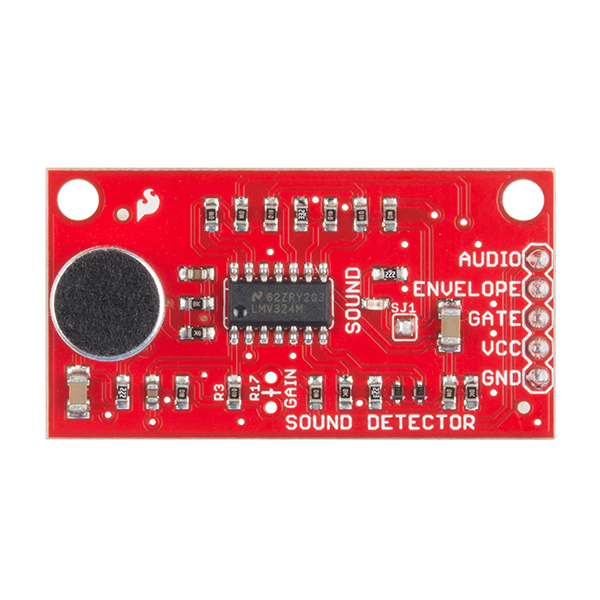
- SparkFun Sound Detector (with Headers)


SparkFun Sound Detector (with Headers)
The SparkFun Sound Detector is a small and very easy-to-use audio sensing board with three different outputs. The Sound Detector not only provides an audio output, but also a binary indication of the presence of sound and an analog representation of its amplitude. The three outputs are simultaneous and independent, so you can use as many or as few as you want at once.
The envelope output allows you to easily read amplitude of sound by simply measuring the analog voltage. Gain can be adjusted with a through-hole resistor to change the threshold of the binary (gate) output pin as well. Check the hookup guide below for more information about setting gain.
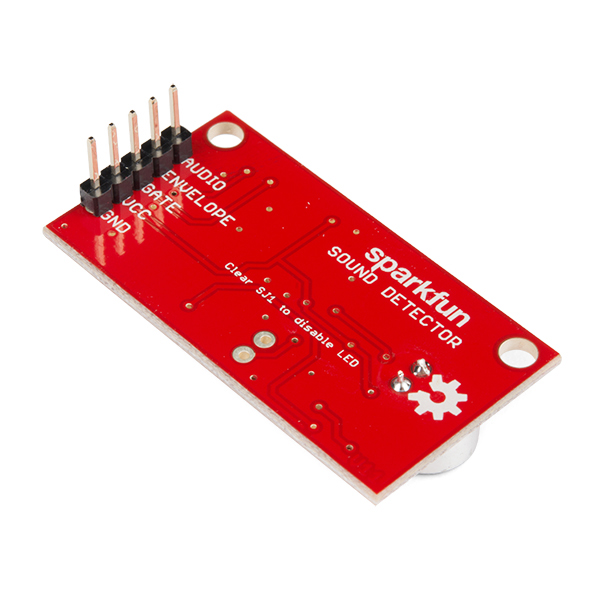
Each of the three output signals is present on the pre-soldered 0.1" header at the edge of the board. They are active simultaneously. If you aren’t using one in your particular application, simply leave that pin disconnected.
- Schematic
- Eagle Files
- Hookup Guide
- Datasheet (LMV324)
- GitHub
SparkFun Sound Detector (with Headers) Product Help and Resources
Sound Detector Hookup Guide
February 27, 2014
The Sound Detector is a microphone with a binary output. This guide explains how it works and how you can use it in your projects.
Hackers in Residence - Sound and Motion Reactivity for Wearables
October 3, 2014
How to consciously wear light-up and and sound reactive clothing.
Sound Reactive EL Wire Costume
December 31, 2015
Learn how to make your EL wire costumes sound reactive in this project tutorial.
Rotary Switch Potentiometer Hookup Guide
April 30, 2015
How to use the Rotary Switch Potentiometer breakout board, with some sample applications.
Clap On Lamp
November 28, 2017
Modify a simple desk lamp to respond to a double clap (or other sharp noise) using parts from the SparkFun Inventor's Kit v4.0.
Hackers in Residence: The Sound Visualizer Pt. 2
May 7, 2015
An addition to a previous project, this time using a PC and a custom Java app to create your own music visualizer using a RGB LED matrix.
Interactive LED Music Visualizer
May 31, 2016
Use an Arduino and the SparkFun Sound Detector to create visualizations on Addressable RGB LED strips.
Hackers in Residence - The ElectricBone
June 25, 2014
Drum machines and keyboards have been the standard for making digital music, but how do you make electronic music if you're trained to play the trombone? One of our Hackers in Residence, Carlos Mello, took it upon himself to find a solution to that very question.
Core Skill: Programming
If a board needs code or communicates somehow, you're going to need to know how to program or interface with it. The programming skill is all about communication and code.
Skill Level: Rookie - You will need a better fundamental understand of what code is, and how it works. You will be using beginner-level software and development tools like Arduino. You will be dealing directly with code, but numerous examples and libraries are available. Sensors or shields will communicate with serial or TTL.
See all skill levels
Core Skill: Electrical Prototyping
If it requires power, you need to know how much, what all the pins do, and how to hook it up. You may need to reference datasheets, schematics, and know the ins and outs of electronics.
Skill Level: Rookie - You may be required to know a bit more about the component, such as orientation, or how to hook it up, in addition to power requirements. You will need to understand polarized components.
See all skill levels
Comments
Looking for answers to technical questions?
We welcome your comments and suggestions below. However, if you are looking for solutions to technical questions please see our Technical Assistance page.
Customer Reviews
4.8 out of 5
Based on 6 ratings:
1 of 1 found this helpful:
Very easy to use.
This was very easy to use. I wanted to monitor the volume of sound coming from my furnace and send IR signals to my TV speakers. The envelope setting was a very easy way to get the volume level of sound. I also looked at the audio and gate options which were equally as easy to use.
I had first tried to use a MEMS microphone breakout and had some difficultly because the voltage range was very low between high and low volume. That microphone would also drift in readings so I had to make rolling adjustments. I did learn a lot from struggling with that microphone.
I think if you are getting started and not familiar or ready for making amplifiers or making adjustments to readings, this is a very nice option.
1 of 1 found this helpful:
Good
This guy is just what I needed. It found it a little too sensitive, which I consider better than not sensitive enough.
Useful and Flexible Board!
I bought this board to measure low amplitude sound on an oscilloscope, so I am using only the audio output at this point. I particularly liked the extensive documentation that SparkFun provides around gain adjustment. Since I wanted to boost the gain above 100X, I desoldered and removed R3 and added a two pin header to R17. Then I was able to mount the detector on a breadboard and wire a 100K resistor in series with a 1 MegOhm potentiometer to give me continuously variable gain from 100X to 1000X. It works very well!
Take note of SparkFun's advice about providing the detector clean 5V power. I was using what turned out to be a very noisy modified cell phone charger for power and that was causing problems as the documentation pointed out. I switched to a battery pack and that made a big difference.
This is a really useful board. The only improvement I could suggest would be to add variable gain control on-board, but it is really easy to do it yourself on a breadboard.
little sound detector
Great little circuit. Used them before and they are reliable and easy to use.
This Device Is Great, With Caveats
Much better frequency range than the MEMS device, excellent signal. Caveats: 1. VCC isolation is necessary if one employs frequency filtering of the analog output. Best to sacrifice a diode drop in voltage to prevent instability of downstream filters. 2. The literature states that it should be operated at 5V for best performance, but I have blown up two devices at this operating voltage with a DC bench power supply; I believe it is sensitive to inrush current. Put a current choke in the VCC path.
does the job well
I take out the microphone and directly wire in audio. I use the audio envelope as an input to an Arduino. Lowered the gain with a 20K resistor.
Hi, Can this be used to capture low decibel sounds ( sound that is not audible to human ears) like internal organs sound?