- Home
- Product Categories
- WiFi
- SparkFun ESP8266 Thing - Dev Board (with Headers)

SparkFun ESP8266 Thing - Dev Board (with Headers)
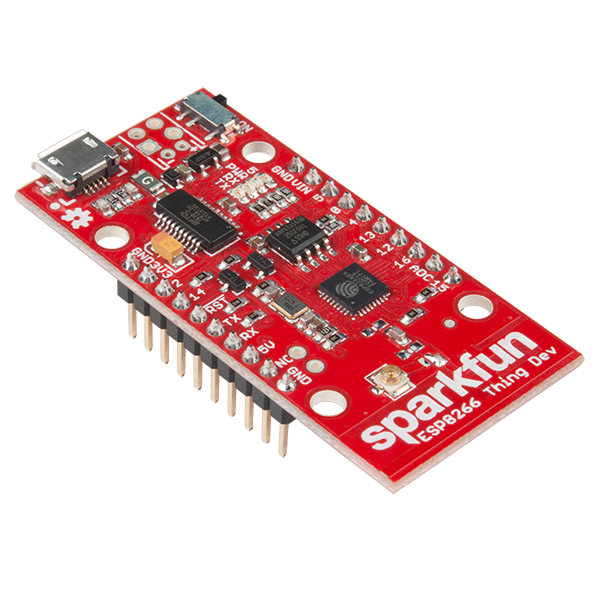
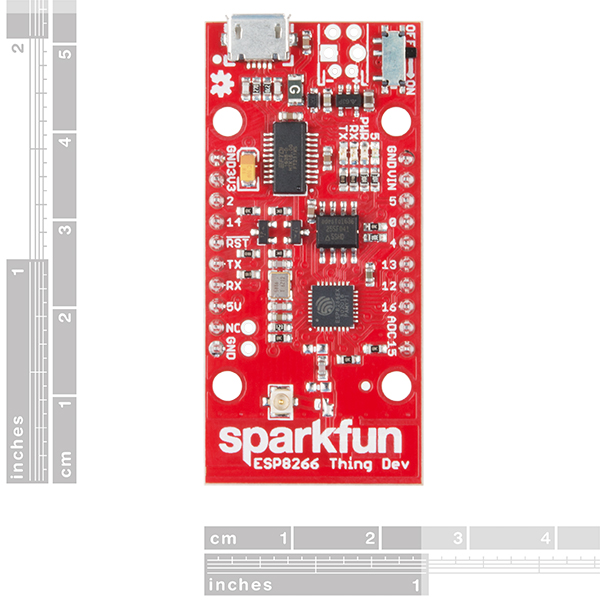
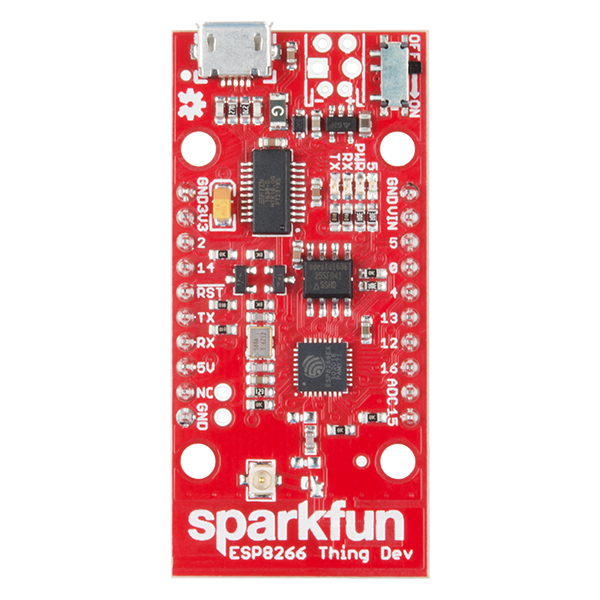
This is the SparkFun ESP8266 Thing Dev Board --- a development board that has been solely designed around the ESP8266, with an integrated FTDI USB-to-Serial chip. The ESP8266 is a cost-effective and very capable WiFi-enabled microcontroller. Like any microcontroller, it can be programmed to blink LEDs, trigger relays, monitor sensors or automate coffee makers. With an integrated WiFi controller, the ESP8266 is a one-stop shop for almost any internet-connected project. To top it all off, the ESP8266 is incredibly easy to use; firmware can be developed in Arduino and uploaded over a simple serial interface. The ESP8266 Thing Development Board breaks out all of the module’s pins with pre-soldered headers, and the USB-to-serial converter means you don’t need any peripheral components to program the chip. Just plug in a USB cable, download the Arduino board definitions, and start IoT-ing.
Why the name? We lovingly call it the “Thing” due to it being the perfect foundation for your Internet of Things (IoT) project. The Thing does everything from turning on an LED to posting data and can be programmed just like any microcontroller. You can even program the Thing through the Arduino IDE by installing the ESP8266 Arduino add-on.
The ESP8266 Thing Development Board is a relatively simple board. The pins are broken out to two parallel, breadboard-compatible rows. The USB connector sits next to an optional power supply input, and an ON/OFF switch --- controlling power to the ESP8266 --- sits next to that. And LEDs toward the inside of the board indicate power, charge and status of the IC. The ESP8266’s maximum voltage is 3.6V, so the Thing has an onboard 3.3V regulator to deliver a safe, consistent voltage to the IC. That means the ESP8266’s I/O pins also run at 3.3V; you’ll need to level shift any 5V signals running into the IC. If your project requires a power source other than USB, the Thing Dev Board includes footprints for a 2-pin JST, 2-pin 3.5mm screw terminal, or a simple 0.1"-pitch 2-pin header. Unlike the original ESP8266 Thing, the ESP8266 Thing Dev Board does not have a built-in LiPo charger.
The Thing Dev Board even includes a PCB trace antenna as a default WiFi antenna. It’s cost-effective and works really well! If you need to connect a more sensitive antenna, or need to route outside an enclosure, a U.FL connector is also available on the board. Some soldering will be required to get the U.FL connector functioning, but instructions can be found in the Hookup Guide we have written for the dev board.
Note: We've provided a few Example Sketches to experiment with on your SparkFun ESP8266 Thing Development Board. These sketches can be found in the Hookup Guide in the Documents section below!
- All module pins broken out
- Onboard FTDI USB-to-Serial
- 802.11 b/g/n
- WiFi Direct (P2P), soft-AP
- Integrated TCP/IP protocol stack
- Integrated TR switch, balun, LNA, power amplifier and matching network
- Integrated PLLs, regulators, DCXO and power management units
- Integrated low-power 32-bit CPU could be used as application processor
- +19.5dBm output power in 802.11b mode
- Pre-Soldered Headers
- Schematic
- Eagle Files
- Hookup Guide
- ESP8266 Powered Propane Poofer
- ESP8266 Community Forum
- GitHub (Design Files)
- GitHub (Arduino Library)
- Graphical Datasheet
SparkFun ESP8266 Thing - Dev Board (with Headers) Product Help and Resources
ESP8266 Powered Propane Poofer
March 15, 2016
Learn how Nick Poole built a WiFi controlled fire-cannon using the ESP8266 Thing Dev Board!
LED Cloud-Connected Cloud
February 22, 2016
Make an RGB colored cloud light! You can also control it from your phone, or hook up to the weather!
LuMini 8x8 Matrix Hookup Guide
January 24, 2019
The LuMini 8x8 Matrix (APA102-2020) are the highest resolution LED matrix available.
ESP8266 Thing Development Board Hookup Guide
November 5, 2015
An overview of SparkFun's ESP8266 Thing Development Board - a development board for the Internet of Things.
Choosing an Arduino for Your Project
December 11, 2017
Examining the diverse world of Arduino boards and understanding the differences between them before choosing one for a project.
Introduction to MQTT
November 7, 2018
An introduction to MQTT, one of the main communication protocols used with the Internet of Things (IoT).
Internet of Things Experiment Guide
November 23, 2016
The SparkFun ESP8266 Thing Dev Board is a powerful development platform that lets you connect your hardware projects to the Internet. In this guide, we show you how to combine some simple components to remotely log temperature data, send yourself texts and control lights from afar.
Three Quick Tips About Using U.FL
December 28, 2018
Quick tips regarding how to connect, protect, and disconnect U.FL connectors.
Using Home Assistant to Expand Your Home Automations
May 9, 2019
An introduction to Home Assistant, an open source home automation hub.
Core Skill: Programming
If a board needs code or communicates somehow, you're going to need to know how to program or interface with it. The programming skill is all about communication and code.
Skill Level: Rookie - You will need a better fundamental understand of what code is, and how it works. You will be using beginner-level software and development tools like Arduino. You will be dealing directly with code, but numerous examples and libraries are available. Sensors or shields will communicate with serial or TTL.
See all skill levels
Core Skill: Electrical Prototyping
If it requires power, you need to know how much, what all the pins do, and how to hook it up. You may need to reference datasheets, schematics, and know the ins and outs of electronics.
Skill Level: Rookie - You may be required to know a bit more about the component, such as orientation, or how to hook it up, in addition to power requirements. You will need to understand polarized components.
See all skill levels
Comments
Looking for answers to technical questions?
We welcome your comments and suggestions below. However, if you are looking for solutions to technical questions please see our Technical Assistance page.
Customer Reviews
4.5 out of 5
Based on 8 ratings:
1 of 1 found this helpful:
LOTS of reviews, comments for "this"
Don't be fooled! There are LOTS of comments and reviews for "this" device... if you head over to https://www.sparkfun.com/products/13711 which is THIS, but without the headers! Out of 69 reviews, 30 were 4 star, 28 were 5 star, 09 Mar 19.
I love the device. Yes, you can get ESP8266s with more memory... but I run a webserver reporting sensor readings out of one of these. What do you want more memory for?? And yes, you can buy 8266s more cheaply. But do you get a RELIABLE 8266? With these features? With extensive documentation EXACTLY right for THIS variant? And easy, reliable dispatch of things you order, without silly p&p charges? Etc. Let's say you buy one for a third of the price of this. How much hassle is more hassle than saving $10 is worth??
For my webserver... full code available for download...
http://sheepdogguides.com/elec/misc/esp8266/Esp8266-Arduserver.htm
That software is "stable"... I haven't had to tweak it since January 2017.
Go to...
http://mon7nc.dyndns.org:1202/
.. to see what the webserver is reporting right now. It will tell you two temperatures, the count reached by two counters inside the ESP8266 (they count... independently of any software... the pulses seen on two inputs) and the state of a digital input. Oh. And you can turn an LED on the ESP8266 on or off.
But it gets better. Although the code in the ESP8266 SERVER is unchanged since Jan 17, my "FarWatchWatcher" software has been upgraded recently. Now there are two versions. They are free Windows programs which automatically read the Arduserver from time to time, and produce a datalog, graph, and an .jpg of the graph... which can be served by any (bigger) websever which has access to the jpg. (Or maybe even via an ESP8266 websterver? Haven't tried that yet!)
For FarWatchWatcher...
http://sheepdogsoftware.co.uk/ssfw004_kitfork.htm
For an example of the ESP8266, FarWatchWatcher, and a Windows webserver working togehter...
http://Mon7nc.dyndns.org
Most of that comes from other software, but the second graph, the one with "FW004" in the legend at upper left, comes, ultimately, from one of these devices, from a Sparkfun ESP8266.
0 of 1 found this helpful:
Great!
Very useful micro controller.
A weak ESP8266 board
The flash size on the board was far too small. A blank Arduino sketch used up 52% of the flash. Because of the insufficient flash size I was unable to flash firmware over the air, which is important for the product I am developing.
You can add a battery connector to use a lithium battery, but the board lacks the capability to charge a connected battery or easily check the state of charge.
The reset switch is very cumbersome and a button would have been much more appropriate, because of how often I had to hard reset the esp8266.
This board is good for tinkering but not at all appropriate for creating IoT products with potential end users.
Great for prototyping direct ESP8266 implementations
Was the perfect board for me to jump from the functionality of the "bare" WiFi module (https://www.sparkfun.com/products/13678) to the full capability of the ESP8266 with all GPIO available.
Works great!
Good little board. Works well for its intended project.
0 of 1 found this helpful:
From bag to server in no time
It was no trouble to open the bag the Thing came in, download the Thing plugin for Arduino's IDE, program it via the Arduino IDE, and see it serving a "hello" message in my PC's web browser. The library is so much easier/better to use than the old AT command set interface to the ESP8266 - now I see why people love this chip.
B+
Difficult to program, but works like a charm once you get it going.
I just tried out one of these that I bought from one of the company retail connections, (Micro Center Brooklyn NYC), using several of the examples that were either provided to the ESP8266 people via SPF itself, or via ESP8266 people to SPF, and those three convinced me that this was a good selection.I had previously attempted to use the original ESP8266 boards for some ideas using third-party breakout boards, (Not anything designed by our hosts.) and found them difficult to use.
In this case this development board which came with headers, down pointing for a breadboard, is well documented. As for the possibility of trying out the suggestions that the One Who Walks with Sheep and Sheepdogs offers, as for an onboard webserver for it, that's next.
A little more documentation on the I/O pins would be helpful. I'm not sure what I need to do to use Pin 2 (vs. other pins) as an input pin: when I connected an input to it, the ESP8266 repeatedly reset until I disconnected it. Luckily it worked when I used Pin 15 instead of Pin 2.
I had trouble getting the WiFi to connect to a router until I re-read the ESP8266 library documentation that said the background code must be called frequently. I found the problem was a delay(5000); that was in my Sketch's setup(). Removing that delay() call made everything work great. So note: you must not have delay() values over (about) 1 second - even before you make any calls to the ESP8266 library.
So far, I'm delighted with this board.
FYI: the on-board LED, connected to pin 5, is Active Low rather than the usual Arduino Active High on-board LED. That is, when you digitalWrite(5, LOW) the on-board LED turns ON rather than off.
Looking at the schematic confirms that the on-board LED is connected between Vcc and the I/O pin rather than Gnd and the I/O pin. Keep that in mind if you want to connect anything to ESP8266 pin 5.
I'd like side-by-side list of the differences between the Thing Dev Board and the Thing. I didn't notice the Dev doesn't have a LiPo charger (yes, I see that lack is mentioned in the description). Is the following the complete list of differences? LiPo Charger: yes Thing / not Dev; FTDI interface: yes Dev / Not Thing; Pre-soldered headers: yes Dev / not Thing.