- Home
- Product Categories
- Kits
- SparkFun Gram Piano Kit

SparkFun Gram Piano Kit
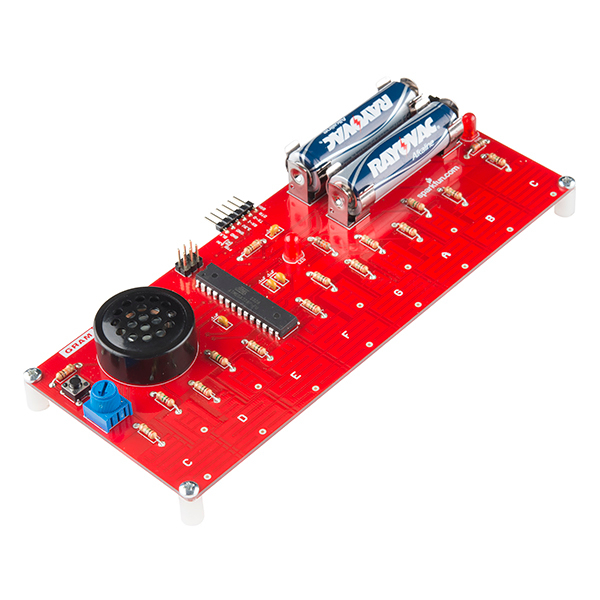
Pianos are heavy and can take about a year to make. What if you could have one that weighed only a few grams and took a very small amount of time to construct? The SparkFun Gram Piano is a beginners soldering kit that, once assembled, gives you with a musical keyboard that will leave you feeling like a modern day Mozart. This kit provides you with the ability to play an octave worth of notes using the capacitive touch keys, no strings or hammers required! The pre-installed software also lets you play a melody with the press of a button and switch octaves using a soldered potentiometer.
The Gram Piano is a simple through-hole kit with a fair part count, making it ideal for beginning solderers looking for a little more challenge. Like our other soldering kits, building and playing with this kit will teach you various skills related to soldering, electronics, and programming.
Note: Be sure to check out the Quickstart Guide in the Documents section below for helpful tips and assembly instructions.
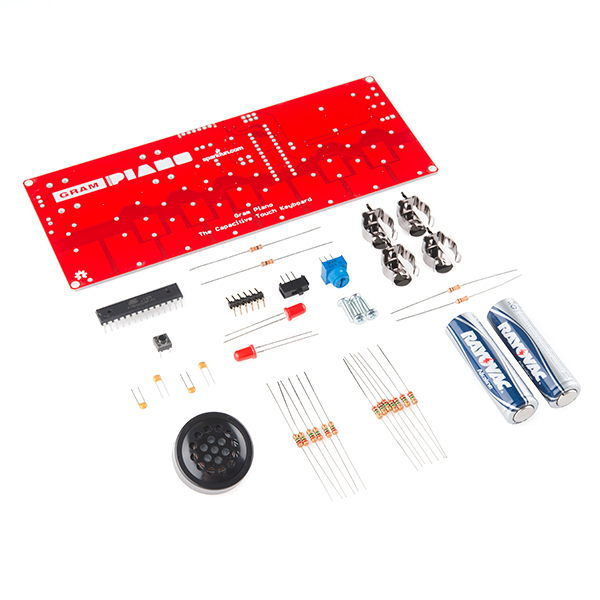
- 1x Gram Piano PCB
- 1x PCB Speaker
- 1x ATMega328P AVR Microcontroller
- 1x Mini Power Switch
- 1x Mini Push Button
- 1x 10k Ohm Trimpot
- 1x 6-pin Right-Angle Header
- 2x 330 Ohm Resistor
- 2x 10k Ohm Resistor
- 2x 5mm LED - Red
- 2x AA Battery
- 4x AA Battery Holder
- 4x 0.1uF Capacitor
- 4x 3/8" 4-40 Phillips Screw
- 4x 3/8" 4-40 Nylon Standoff
- 13x 2M Ohm Resistor
- [Schematic](http://cdn.sparkfun.com/datasheets/Kits/Gram Piano.pdf)
- [Eagle Files](http://cdn.sparkfun.com/datasheets/Kits/Gram Piano.zip)
- Datasheet (ATMega328P)
- Quickstart Guide
- GitHub (Design Files & Example Code)
- Product Video
SparkFun Gram Piano Kit Product Help and Resources
Core Skill: Soldering
This skill defines how difficult the soldering is on a particular product. It might be a couple simple solder joints, or require special reflow tools.
Skill Level: Rookie - The number of pins increases, and you will have to determine polarity of components and some of the components might be a bit trickier or close together. You might need solder wick or flux.
See all skill levels
Core Skill: DIY
Whether it's for assembling a kit, hacking an enclosure, or creating your own parts; the DIY skill is all about knowing how to use tools and the techniques associated with them.
Skill Level: Noob - Basic assembly is required. You may need to provide your own basic tools like a screwdriver, hammer or scissors. Power tools or custom parts are not required. Instructions will be included and easy to follow. Sewing may be required, but only with included patterns.
See all skill levels
Core Skill: Electrical Prototyping
If it requires power, you need to know how much, what all the pins do, and how to hook it up. You may need to reference datasheets, schematics, and know the ins and outs of electronics.
Skill Level: Rookie - You may be required to know a bit more about the component, such as orientation, or how to hook it up, in addition to power requirements. You will need to understand polarized components.
See all skill levels
Comments
Looking for answers to technical questions?
We welcome your comments and suggestions below. However, if you are looking for solutions to technical questions please see our Technical Assistance page.
Customer Reviews
5 out of 5
Based on 1 ratings:
Sweet!
I made this kit for a 3yr old kid, and she loved it!
I was pleasantly surprised when the PCB was bigger than what I was expecting. I did use an IC socket instead of soldering the AVR chip directly to the board. I also used a vertical 6 pin programming header because I did not want anything sticking out from the sides. One thing to note is that there is no reverse polarity protection so make sure you insert those batteries in the right way as indicated.
Two minor suggestions: 1) A louder speaker would have made this more fun (perhaps not for the parents) 2) A hole for a standoff in the middle of the board would help support it better when pressing hard on the keys, but this is easily fixed by gluing on a standoff
Looking forward to the day she hears the built in song somewhere and realizes that she has heard it before.
Thanks for the great review. And good tips for future revisions if we make a new version in the future. Thanks for sharing and happy hacking!
I wish this would be brought back because I am going to start electronics soon. (I hope I get some kits for Christmas) This looks so cool!!
It would be awesome if it could connect to a computer like a microphone!
Wow. IMHO, the price is fine! It's like taking yourself and three friends to McDonalds, for something that will far outlast french fries and burgers and might even be more fun -- not to mention tekonogically cool. (Or three cocktails at a public bar, right?) Goodness. This is 2014. Anything under $50 is a steal! Plus, you get SparkFun's ongoing support. If you made this board yourself, using the cheapest suppliers available, you would be very hard pressed to better the price. Be realistic guys. Sheesh.
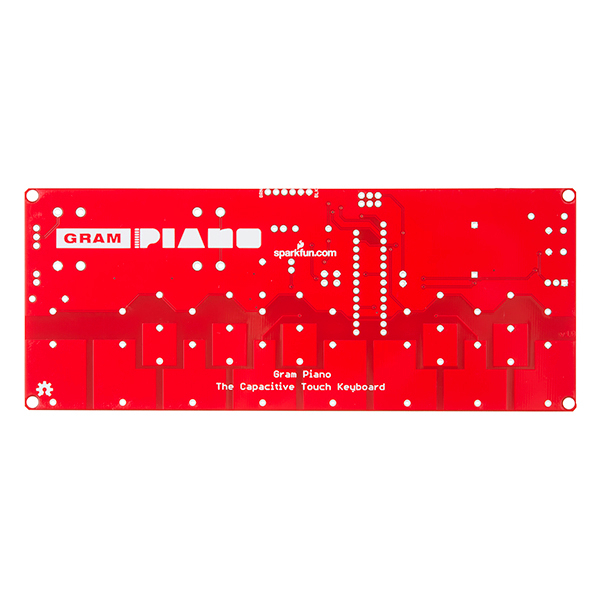
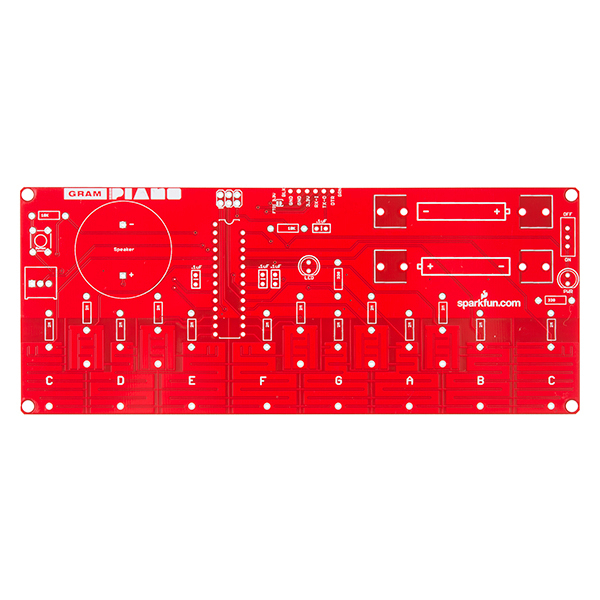
I must be missing something... where are the keys?
They are built into the PCB itself. Take a look at this picture.
Note: The ICSP 2x3 male header pins are not included in this kit. You can reprogram the Atmega328P chip using a programmer but that is not necessary since there is a bootloader on the Atmega328P chip to upload code. You can upload code through the FTDI port.
What are the settings you used to reprogram with the FTDI port (programmer, board, etc.)? I can't get anything to work. Thanks in advance!
Just need the standard setup (Arduino IDE, USB cable and an FTDI basic). Make sure you have power switch turned on during programming.
Alternatively, if you want to power the board from the FTDI header itself, you need to close the nearby jumper with solder. Just make sure not to try to power the board from the batteries and the FTDI at the same time.
Kit video done by me :)
----------------- GRAM Piano -----------------
Nice work, plbreith corrected your URL so it goes direct to the vid. You might consider updating it so others can more easily view your video.
I tweaked your URL: https://www.youtube.com/watch?v=MQvAJpbaNNM very nice vid! tnx.
Thanks.
I have grandkids in elementary school who play piano but have not "soldered" or programmed. Could they play this board without programming if I help them with the soldering? With one octave I know it will be very limited, but I am hoping I can get them interested in programming, and soldering. The portability of this board suggests it could interest them.
Yes, if you help them with the soldering, they can play music with the board without programming (it comes pre-programmed). By default, you can use the blue potentiometer to select between three octaves.
Cool kit, but I'm finding the price hard to justify.
It is a very large PCB though, so I guess a good portion of the expense is simply in that.
Don't think of it as buying a electronic piano, because you can certainly buy a much better, commercially made one for less than $35. Think instead of what you are really buying when you buy an electronics kit, the opportunity to learn and to obtain something fairly unique and hand made.
This price is pretty reasonable if you understand and take full advantage of what you are buying. Study the code and schematics, learn the theory of operation, and understand the design decisions and compromises that went into creating the product. If you already know all that, roll your own from scratch. If you don't want all that, buy the comparable, and cheaper, toy from K-Wal-Get.
Kits like these are a gateway into the world of electronics, engineering, programming, and design. They are a cheap way of gaining the benefit of the knowledge and experience of the designers, and picking up some skills. But electronics kits are generally not a cheap way to get an electronic tool or toy.
Build kits to get something unique and to gain the skills to build your own, even more unique creation. But don't think of them as an economical way of getting a new electronic toy.
what price WOULD work for you?
yeah, big PCB is a large part of the cost...
The price is fine. PCB + ATMega328P flashed + bits, pieces, packaging. Code created by Sparkfun. All adding up to a keyboard a kid could learn and put together for under 40 bucks? Its fine.
Some people (such as below) expect you to challenge the market at China engineering costs and development. Yes, an ATMEGA328P can be grabbed for about 3.65 with no bootloader from China in small quantities. But local ATMega328P with something flashed? Your looking at 7 bucks or so.
Reality is, the price will never be low enough for everyone :)
I'd say a lot of the price goes into the ATMega328P. But yes, a bit out of my price range too.
atmegas aren't that expensive... Like $3.50 or so. If you mean the code on it, then maybe.