- Home
- Product Categories
- LED Drivers
- FemtoBuck LED Driver

FemtoBuck LED Driver
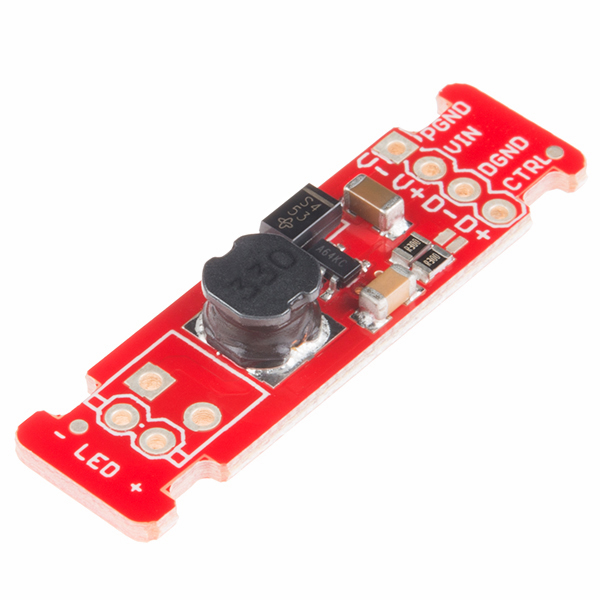
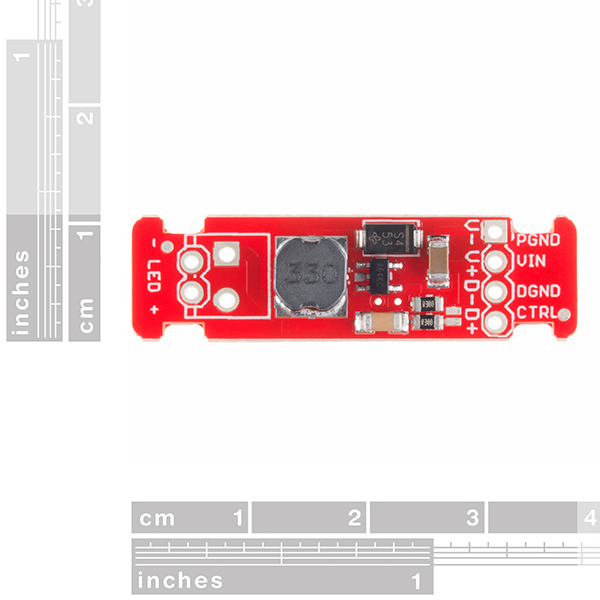
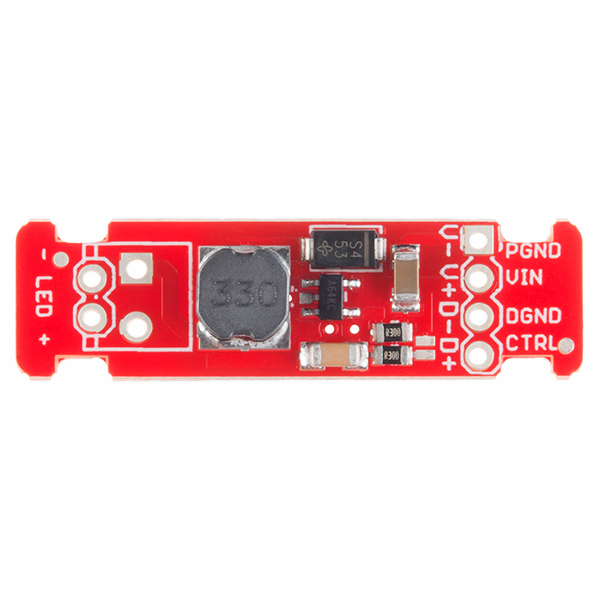
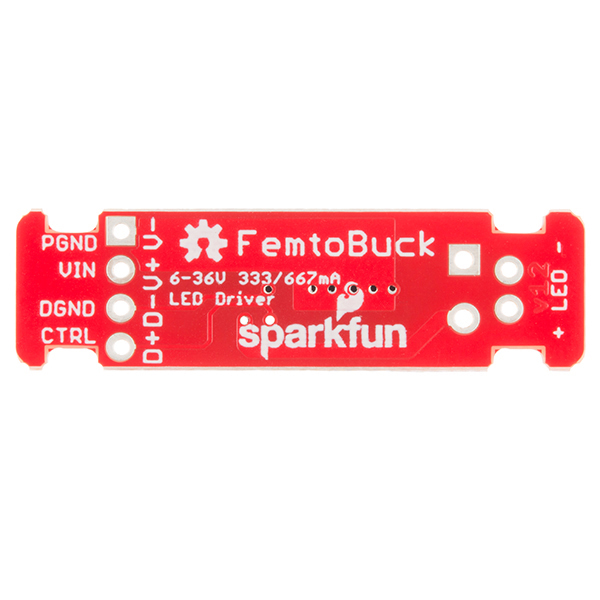
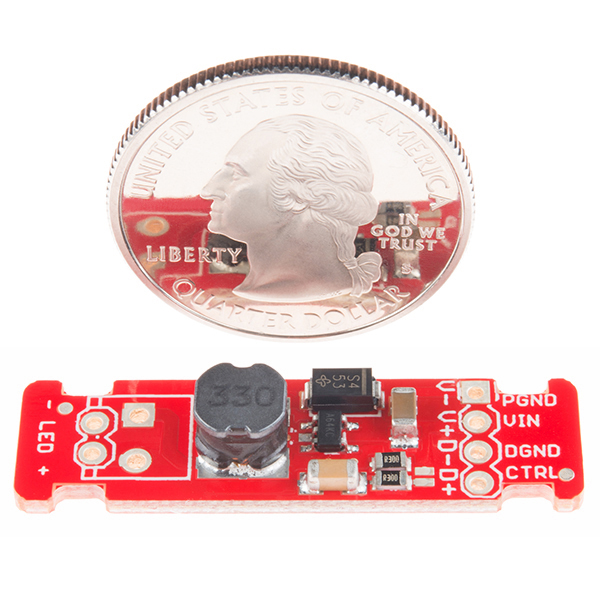
This is the FemtoBuck, a small-size single-output constant current LED driver. Each FemtoBuck has the capability to dim a single high-power channel of LEDs from 0-350mA at up to 36V while the dimming control can be either accessed via PWM or analog signal from 0-2.5V. This board is based off of the PicoBuck LED Driver, developed in collaboration with Ethan Zonca, except instead of blending three different LEDs on three different channels the FemtoBuck controls just one.
For the FemtoBuck, we’ve increased the voltage ratings on the parts to allow the input voltage to cover the full 36V range of the AL8860 driver. Since the FemtoBuck is a constant current driver, the current drawn from the supply will drop as supply voltage rises. In general, efficiency of the FemtoBuck is around 95%, depending on the input voltage. On board each FemtoBuck you will find two inputs for both power input and dimming control pins and an area to install a 3.5mm screw terminal. Finally at either side of the board you will find small indents or "ears" which will allow you to use a zip tie to secure the wires to the board after soldering them down. This version of the FemtoBuck is equipped with a small solder jumper that can be closed with a glob of solder to double the output current from 330mA to 660mA.
- Schematic
- Eagle Files
- Hookup Guide
- All About LEDs
- Datasheet (AL8860)
- GitHub (Design Files)
FemtoBuck LED Driver Product Help and Resources
Touch Potentiometer Hookup Guide
October 22, 2015
Learn how to use the SparkFun Touch Potentiometer to control lighting, volume or other inputs in your daily life.
FemtoBuck Constant Current LED Driver Hookup Guide v13
December 10, 2015
The FemtoBuck board is a high-efficiency, single-channel constant-current LED driver.
Want more current?
If you want to get more current then 660 as described in the hookup guide the replacement resistor equation solves for this, use calculated resistor value to place one smd resistor of that value in place of the two current resistors on the board.
Do NOT solder the jumper.
Core Skill: Soldering
This skill defines how difficult the soldering is on a particular product. It might be a couple simple solder joints, or require special reflow tools.
Skill Level: Rookie - The number of pins increases, and you will have to determine polarity of components and some of the components might be a bit trickier or close together. You might need solder wick or flux.
See all skill levels
Core Skill: Programming
If a board needs code or communicates somehow, you're going to need to know how to program or interface with it. The programming skill is all about communication and code.
Skill Level: Noob - Programming will be limited to basic drag and drop interfaces like ModKit or Scratch. You won't be writing code, but you will still need to understand some basics of interfacing with hardware. If you?re just using a sensor, it's output is analog.
See all skill levels
Core Skill: Electrical Prototyping
If it requires power, you need to know how much, what all the pins do, and how to hook it up. You may need to reference datasheets, schematics, and know the ins and outs of electronics.
Skill Level: Rookie - You may be required to know a bit more about the component, such as orientation, or how to hook it up, in addition to power requirements. You will need to understand polarized components.
See all skill levels
Comments
Looking for answers to technical questions?
We welcome your comments and suggestions below. However, if you are looking for solutions to technical questions please see our Technical Assistance page.
Customer Reviews
4.9 out of 5
Based on 19 ratings:
2 of 2 found this helpful:
Great little LED driver
Just what I was looking for, a small constant current driver for my COB and LED lights. The solder jumper allowing double the current is great, or I can simply replace the resistors and get up to 1A out of it if I so choose. Haven't noticed any substantial heat buildup at all, so it's a very efficient driver. Love the package size most of all since it can be fully enclosed in standards shrink tubing, and has indents for zip ties for easy attachment.
Awesome little dimmer module
I needed a very small form-factor dimmer with which to drive some 12 volt LED tape, and this thing was just the ticket! I powered it with two 9 volt batteries wired in series. For control, I tapped into V in with a small potentiometer (Sparkfun product # 9806) and used that with a couple of resistors to make a variable voltage divider.
All in all, it worked very well for the project and gave me a tiny dimming controller suitable for embedding into a hand-held theatrical type prop. My only complaint would be that there weren't any example circuit diagrams on how to use it with an analog voltage, but that turned out to be fairly easy to figure out on my own.
Very cool, works great!
Wired this up with 5 of the 3W warm white LEDs, a switch, and a cheap 24VDC power supply from ebay. About $25 total cost, plus a couple of hours to wire and mount components with hot glue. Slipped the femotobuck into heatshrink tube. With the default 330mA drive, this provides plenty of light for under our kitchen cabinets. My wife is happy, and that's all that really matters...
0 of 1 found this helpful:
Everyone wants one!
I hacked together a prototype "hat light" last weekend, and now everyone at work wants one. Used two 18650 cells, a pair of 1 watt LEDs, the FemtoBuck LED Driver, a toggle switch, and way too much hot glue... I work as a mechanic, and spend most of my time under trucks, and got tired of holding a light with one hand, and trying to work with the other. Seemed every time I needed a light, I also needed both hands. This is the perfect solution. Super efficient, too, have gone almost a week of normal use, on the first set of batteries. That would be 3 to 4 hours per day typically. Life is good!
Cool build, and great use for this!
Does just what it says
It's small, it's simple, it's easy to hide in a piece of shrink tubing and it does exactly what it says it does. I don't think you can ask for more than that.
Worked well
I used it to power some of the 3W warm LEDs from a solar battery source for a long camping trip. Worked very well!
Excellent LED Driver!
I have used the Femtobuck on multiple projects. Primarily I use them with my robotics team to drive LEDs that illuminate Vision targets. The true advantage to the Femtobuck is that it provides a constant light output from the LED regardless of the battery voltage. Additionally, with the dimming control input, you can vary the output as needed. The physical layout of the board also makes it very simple to secure wiring with zip ties to the board. It would be nice if these were available in 10 packs.
Works a treat
Using 2 to drive Luxeon Rebel Stars as the landing lights on a giant-scale RC airplane. Using the 350mA option (open jumper) and a 2S LiFePO4 as the power source. Everything wired inline and covered with shrink. Wiring was easy and the LEDs are painfully bright.
The landing lights are simple on/off so I didn't get to use the onboard dimming bits.
Worked perfectly
For my application I required 25 mA so I removed the two 0.3 resistors and threw in a 10 that I had lying around. Worked exactly as expected. Very nice and compact.
Works great. Easy to wire.
The FemtoBuck is quite small, but easy to wire. I used a 10K pot for the control and it is perfect for the 3W LEDs.
NOTE: My FemtoBuck is in a tight space over a ProTrinket. When I operate the 3W LED the my RGB light strip flickers. It is not a problem for me since I will never operate both at the same time. I could move or shield the FemtoBuck to fix the issue.
Works as advertised.
This works as advertised. My only request would be that it have additional resistors to allow current values up to the maximum that the driver can handle, which I think is 1 Amp. 600mA max is OK for proof of concept, but I need to drive my LED harder, so I'll be making my own board with higher current capability.
Femptobuck
Great little led drives, no complaints
Excellent LED Driver!
Using it for computer controlled house LED downlights.
Got the job done!
My friend got a Brightech LED floor lamp for Christmas '17 and it failed. They sent him a new one and it failed. Third one failed. Fourth one still works. I used the FemtoBuck to replace the original driver/dimmer in the first failed lamp. For simplicity I used a DC control signal and found that I needed an isolated DC supply for that. The FemtoBuck would not allow me to share the ground of the original 18V DC wall-wart lamp supply between its power and digital grounds. I bought "DC-DC Buck Step Down Isolated Converter 9-30V 12V 24V to 5V 1A Voltage Regulator" on e-Bay for that. Then I bought some more FemtoBucks for the other failed lamps. Pleasure doing business with sparkfun!
Works like a champ!
Three of these babies run the 9W RGB LED blindingly bright. Love the tiny footprint, and the solder blob to upgrade output power to 660mA was a piece-o-cake. Driving these from the atto84 off two series 18650's with a 5V regulator enables just about anything I could want to do with a single Super-Bright LED in a finished package the size of a short stack of quarters (sans batteries). Thanks for the hook-up guides. Highly recommended.
Perfectly simple
Worked seamlessly on my project
Super tiny yet powerful
Fixed up my led magnifying lamp.
Works Great
I have some of the SparkFun 3W LEDS, and I'm using this to drive them for a sign. It works great, and is easy + reliable!
A Highlight
They are easy to install and use
Nice looking little board, and just the thing for a landscape lighting project I've got in mind.
One thing to consider for future board revs: Add a couple more solder jumpers so the resistors can be configured in series as well. That would provide a 3rd current option of ~167mA without requiring any additional parts.
Will this work as a current controller for changing speed of a 2V micro motor?
Hi there, it sounds like you are looking for technical assistance. Please use the link in the banner above, to get started with posting a topic in our forums. Our technical support team will do their best to assist you.
Unfortunately, your question appears to be outside the design scope for this product. Therefore, you may need to refer to the datasheet and schematic to figure that out on your own.
I can't quite tell from the data sheet, but if I use PWM at the CTRL pin, will it cycle the driven LED at the PWM rate, or will it stay on during the PWM off cycle and just adjust the current drive accordingly?
I'm trying to avoid flicker in the driven LED.
Hello! I am building a dimmable LED Light for a Raspberry Pi camera. Is this appropriate for that purpouse or will I get band effect? Thanks!
For technical assistance, please use the link above to post a new topic on our forum page.
Does the LED driver work with Raspberry Pi?
I haven’t gotten one of these drivers yet, but if the description is accurate you can fully control it with a RasPi with a single GPIO.
If I have a power supply of 42V, can I connect in series two femtobucks, where each one is driving some Leds in series for a total of 21V, 670mA?
No. You'd blow out both of the FemtoBucks.
Can anyone verify the minimum operating voltage? I want to drive one, 3 watt LED using a 2-cell LiFePO4 battery (6.4 volts nominal, 7.3 at full charge). The data sheet says 6 volt minimum, but the tutorial video says 7. If 6v is right, I should be fine.
Which is correct?
Thanks,
Randy
A quick test shows that it operates fine at 6.0V. It cuts out around 5.8V, so you should be fine at 6.4.
The control pin can be used to modulate some led at 38Khz for IR use? Thanks.
Thanks! I'll get a couple ordered.
I doubt it. Modulating the control pin is going to cause the driver to reduce its current output, but I don't believe it actually modulates the output, just changes the feedback set point.
Can I connect a single FemtoBuck to a bunch of LEDs in parallel? Specifically 3watt LEDs that are rated at a forward current of 600-700mA? I prefer a parallel circuit to one in series to keep the voltage low, but what happens to the current requirement? /---|>|----|>|----|>|-----\
12V +--I---|>|----|>|----|>|------I--+
---|>|----|>|----|>|-----/
Also, can the LEDs within the parallel branches that are in series be different? Thanks!
You can do this, but it's not recommended. You'll need one low resistance (1-2 ohm) high power (1-2W) resistor per leg, to provide a resistive element allowing the strands to have different LED forward voltages.
It's best if the LEDs on all branches are the same; the more different the forward voltages of the strings of LEDs are, the worse the balancing is.
When you do this, the drive current will be more or less evenly shared between strings.
Can I hookup two of these from the same power supply? I want to be able to drive more than 8 LEDs with a 20V power source.
You can hookup as many to one power supply as the supply can handle. They're about 95% efficient, which is to say, power out (Iout * Vleds) ~= 0.95(VsupplyIin). Solve for Iin.
I have problem using FemtoBuck LED Driver. Probably I have made some stupid mistake. After connecting the device to Arduino UNO (same as it was shown in tutorial - the only diff is D9-->CTRL) and 12V led stripe I cannot obtain linear dimming. So PWM values are from 0 to 255 while light intensity values I get are 0% for 0 PWM, 20% for 1 PWM, 21% for 2 PWM.... 100% for 255 PWM. I am unable to get "soft start" - only rapid on (with 20% LED intensity). Please help Michal
How do you know 20% light output corresponds to 1 count PWM?
Light output behaves in a non-linear fashion; the output of this is linear, that is, the current varies from 0 to 350mA in equal steps as you go from 0 to 255. Here's a StackExchange article about correcting for that.
This is my subjective observation - if I set manually PWM to 0 I got no light and when set PWM to 1 I got quite bright shining LED stripe. It is not important if this is 20% or 10% for me. For the current project I need to get soft start of the led stripe. This is the main purpose using FemtoBuck. It is not important if further fading out is linear either. I just got a black "hole" in brightness between 0 PWM and 1 PWM. I have no idea what could went wrong.
Michal
Does anyone know how much current the CTRL pin sinks when using it for dimming? My supply voltage is ~20V so I want to know how much power will be dissipated when I drop it down to 5V.
So after more datasheet digging I found that the CTRL internal resistance is 50 kOhm. Perhaps someone can verify my train of thought on this... since I = V/R = 2.5V/50 kOhm = 50 micro-amps? Is that the max current that would be sunk by the CTRL pin?
And further, my supply voltage is 19.5V, if I drop it down through a 3.3V linear regulator and then use that voltage to control the dimming, would the power dissipated in the regulator be Watts = V * I = (19.5 - 3.3) Volts * 0.00005 Amps = 16.2 * 0.00005 = 810 micro-Watts. Does this sound right?
I've got a couple of these boards, they work great, very pleased. I have a particular application where I'd like to drive an LED fixture using these boards. The fixture has two channels: one blue, one white. Each channel is spec'ed for 24 watts max at 12v. I'm constrained to stay at the 12v voltage level in this application, so at least 2A would be needed per channel. Since the femtobuck can drive up to 660mA, would it be feasible to run 3 or 4 femtobuck outputs in parallel to drive a single channel? I'm very curious if this would be a suitable idea or this is merely a terrible, horrible, & foolish idea. Thanks fellow Sparkfunians!
I was looking through the hookup guide and in the section titled "Connecting to an Arduino or Compatible Board" and it very clearly states "Note that the LEDs are wired separately to each FemtoBuck! This is very important; the output of each FemtoBuck must be completely isolated from any other!" So if I understand your question correctly, I think that wouldn't work.
I haven't tried it; I'm curious as to whether it would work or not, though. I feel like it might do some weird stuff; the fact that the two (or more) devices wouldn't be synchronized in frequency or in phase might mean that you'd get weird currents flowing in odd places.
That said, if your lamp specifies 24W at 12V, it is almost certainly not a bare LED, but a lamp designed to be attached to a 12V power rail. If that's the case, you don't need a buck driver, just a 12V power supply.
"Hookup Guide" link:
https://learn.sparkfun.com/tutorials/femtobuck-constant-current-led-driver-hookup-guide-hi-power-version
is broken.
Looks like the link got moved to https://learn.sparkfun.com/tutorials/femtobuck-constant-current-led-driver-hookup-guide-v12