FemtoBuck LED Driver

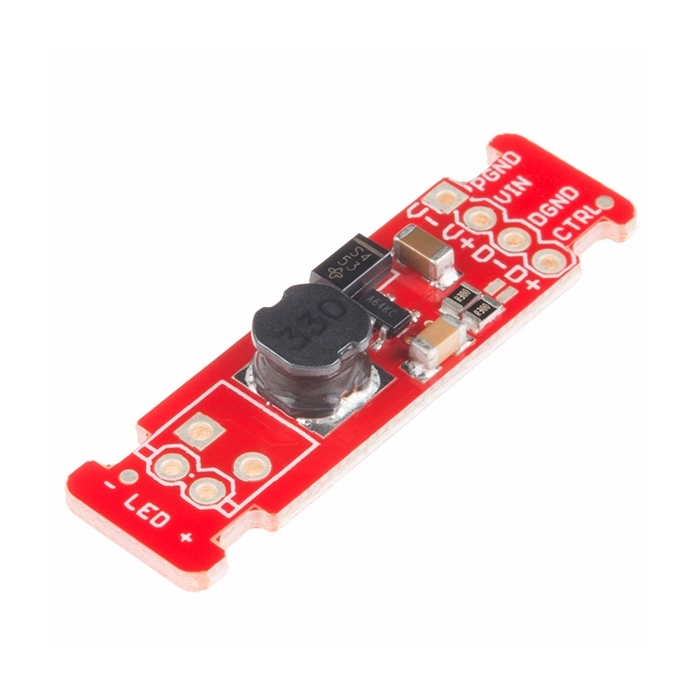
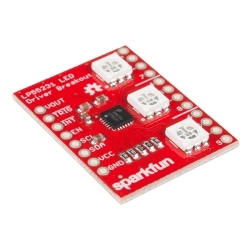
This is the FemtoBuck, a small-size single-output constant current LED driver. Each FemtoBuck has the capability to dim a single high-power channel of LEDs from 0-350mA at up to 36V while the dimming control can be either accessed via PWM or analog signal from 0-2.5V. This board is based off of the PicoBuck LED Driver, developed in collaboration with Ethan Zonca, except instead of blending three different LEDs on three different channels the FemtoBuck controls just one.

For the FemtoBuck, we’ve increased the voltage ratings on the parts to allow the input voltage to cover the full 36V range of the AL8805 driver. Since the FemtoBuck is a constant current driver, the current drawn from the supply will drop as supply voltage rises. In general, efficiency of the FemtoBuck is around 95%, depending on the input voltage. On board each FemtoBuck you will find two inputs for both power input and dimming control pins and an area to install a 3.5mm screw terminal. Finally at either side of the board you will find small indents or "ears" which will allow you to use a zip tie to secure the wires to the board after soldering them down.

FemtoBuck LED Driver Product Help and Resources

Touch Potentiometer Hookup Guide

October 22, 2015

Learn how to use the SparkFun Touch Potentiometer to control lighting, volume or other inputs in your daily life.

Core Skill: Soldering

This skill defines how difficult the soldering is on a particular product. It might be a couple simple solder joints, or require special reflow tools.

2 Soldering

Skill Level: Rookie - The number of pins increases, and you will have to determine polarity of components and some of the components might be a bit trickier or close together. You might need solder wick or flux.
See all skill levels


Core Skill: Programming

If a board needs code or communicates somehow, you're going to need to know how to program or interface with it. The programming skill is all about communication and code.

1 Programming

Skill Level: Noob - Programming will be limited to basic drag and drop interfaces like ModKit or Scratch. You won't be writing code, but you will still need to understand some basics of interfacing with hardware. If you?re just using a sensor, it's output is analog.
See all skill levels


Core Skill: Electrical Prototyping

If it requires power, you need to know how much, what all the pins do, and how to hook it up. You may need to reference datasheets, schematics, and know the ins and outs of electronics.

2 Electrical Prototyping

Skill Level: Rookie - You may be required to know a bit more about the component, such as orientation, or how to hook it up, in addition to power requirements. You will need to understand polarized components.
See all skill levels


Comments

Looking for answers to technical questions?

We welcome your comments and suggestions below. However, if you are looking for solutions to technical questions please see our Technical Assistance page.

  • Member #463537 / about 9 years ago / 2

    I would very much like to have you put a second current sense resistor on the board, a .143 ohm. Then with a combination of solder jumpers and cutable traces, have the ability to have a 350 MA output, 700 MA or 1amp. I think it should be possible to design the board so it had both resistors mounted with the default being the .3 ohm and 350 ma output. Cut a trace and add a solder jumper, 700 ma. Leave the trace and add the jumper, 1 amp output.

  • Rob Purser / about 9 years ago / 2

    Need a Fritizing Part for the FemtoBuck? I created one, and it's available on GitHub.

  • Kelly Lofgreen / about 9 years ago / 1

    Hi, does it make sense to put a fuse on this thing? I've got an outdoor lighting application. I know this controls for a target current, but what if there is a short (ex on the output pins of the driver)? I would think it would be fine & not overheat or damage the driver, but just checking.

    • SFUptownMaker / about 9 years ago / 1

      My gut says it wouldn't matter, at least on the output, and that the output current is going to remain at the set point even if the output is shorted. Let's find out!

      <pretend some time is elapsing here>

      Seems okay to me. Driving 4 LEDs from an 18V supply, I measured 330mA with the LEDs in, and 300mA when I shorted across the output. Even if you do short the output, you shouldn't see current exceeding the nominal, so even if a shorted output IS bad for the IC, there's no way to use a fuse to protect the IC.

  • Member #705380 / about 9 years ago * / 1

    I'm having trouble with oscillation on what is (I think) an inductive load. It's a gas regulator valve expecting 100 to 400mA current, but it seems to bounce partially open/closed at ~10Hz unless I ramp up the current very slowly. Power supply is a switching 12V 3A voltage source.

    Edit: I solved the oscillation(output ripple) in my inductive load by increasing the capacitance that was in parallel with the load(Sparkfun C1). According to the AL8805W5 datasheet, increasing capacitance on the output will increase startup delay, but that didn't matter for my application. A change from 1uF to 4.7uF did the trick.

  • TacticalSnack / about 9 years ago / 1

    Anyone hear a whiney noise under load when you’re PWM'ing this thing? I’ve got 5 of the cool white led’s with al pcb’s hooked up in series.

    • SFUptownMaker / about 9 years ago / 1

      The FemtoBuck is a switching regulator, so it is very possible that you could be hearing harmonics of the switching frequency or a beat frequency of your PWM signal mixing with the switching signal.

      That squeal can come from a couple of places; it's usually either a cermaic capacitor behaving as a piezoelectric element or the coils in an inductor vibrating as the magnetic field changes.

      If it really bothers you, you can try a few things: potting the inductor in epoxy may help, or perhaps alter the PWM frequency a bit.

      • TacticalSnack / about 9 years ago / 1

        Thanks. I tried lowering the PWM freq, bad idea. Will try bumping it up next.

  • KD5PFF / about 9 years ago / 1

    Does anyone have the dimensions for this board? I wish sparkfun still included the aprx dimensions in the pictures....

  • Member #489794 / about 9 years ago / 1

    What side of the PCB to solder to? The one with the copper on it. If there is copper on both sides, then either side will work. For a professional product like this, it most likely has "through-plated" holes so it doesn't matter which side gets soldered. For home-done PCBs, if they are double-sided, you will have to solder both sides because it is hard to do through-plated holes.

  • markmandp / about 9 years ago / 1

    I know this is a silly question, but what side of the PCB do you solder to?

  • Member #483937 / about 9 years ago / 1

    i am planning to power 3 leds in series, but i would like to supply a little less than 350ma because of heat on the leds. How can i calculate a different sense resistor value? is there a formula somewhere?

    • SFUptownMaker / about 9 years ago / 1

      I_LED = 0.1/R_sense

      It's supposed to be on the PDF of the schematic but it's not. I'll get that fixed.

  • Max O'Lydian / about 9 years ago / 1

    The FemtoBuck LED driver! I was so excited at the propect of picking up a teragross of these babies for about 15 cents! Imagine my disappointment at the $7.95 price tag...

    Oh well, guess I'll just have to scale back my super-death-ray project a tad to keep within budget...

  • Member #482131 / about 9 years ago * / 1

    If I have connected a SF 3W RGB LED to this and powered it with 3.7V Lith battery and only see the LED blink on momentarily what is the issue? I duplicated this configuration using other lipos such as this 3.7V Turnigy to no avail however I did see it working a few times I first tried it.

    Update: It isn't the batteries, I've tested and used them all in different applications.

    • M-Short / about 9 years ago / 1

      I've actually been playing with this setup as well. What I realized was that the FemtoBuck requires 6V. 4AAs work ok, but 1 Lipo won't

      • Member #482131 / about 9 years ago / 1

        ok, touching the jumper wires to a 9V does the trick at least for 1 3W LED test

  • dwavo / about 9 years ago / 1

    i tried one out. basically vary the voltage on the control pins and dim the LEDS. but if i buy five of the 3W leds i would need five of the femtobuck or around $9.60 per light assembly.

    it would have been nice if the femtobuck would manage five of the LEDS (4 amps) and have a service factor that is a little higher (rather than running at max).

    you'll need to mount this to a larger board. the terminals are small. note that the holes are centered at .01" - so you can fasten to a breadboard - kind of. be sure to put strain relief on - the wires will break right off.

    overall seems like a nice product but it won't even drive the 3W lights at max.

    • SFUptownMaker / about 9 years ago / 3

      Two things to note: 1. You can power five LEDs from one FemtoBuck; you need a power supply that's ~1-2V higher than the sum of the forward voltages. 2. 350mA is a common forward current limit for LEDs. That's why we use it. We're working on a higher voltage version (really, that just means "sourcing a sense resistor and getting it in the system"). We can't, however, make a blanket "3W" device, since the FemtoBuck is a constant current device and the power delivered to the LED will thus depend on the forward voltage of the LED.

  • D3add3d / about 10 years ago / 1

    Would it be a bad idea to use this to drive LD form 16x DVD burner?

    • SFUptownMaker / about 10 years ago / 1

      Maaaybe. See, laser diodes are much different to LEDs. LEDs can handle brief spikes of overcurrent; when they get damaged, it's because they get too hot. Laser diodes are different. Any current beyond the device's limit will damage the facet, causing it to suffer immediate performance degradation followed by a swifter-than-normal aging.

      I can't guarantee that this device will never go beyond 350mA during the transient startup and shutdown conditions; I never tested that.

      Obviously, all of this supposes that the laser diode is rated for 350mA or greater. If not, it'll be a short trip. Also, note that laser diodes are extremely vulnerable to damage from static discharges and overheating during soldering.

  • Member #558051 / about 10 years ago / 1

    Driving the 3 watt warm white and cool white LEDs with the femtobuck I'm surprised to find the brightness is still good and the integral heat sink is adequate at the reduced 350 mA level.

    Since LEDs are more efficient when they run cooler / at reduced current, for some applications it may make sense to use a 3W LED at a 1-1.5 watt level. I think I'll double up on LEDs instead of modifying the driver board for higher output current...

  • unmanaged / about 10 years ago * / 1

    how can I control the "control" without a micro controller.... i want to use a reed switch to sudo-pwm the control but how could I get the voltage correct within the range of the "control" input voltages.... I could work it out but does the buck stop here lol what is the MAX voltage for the dimming inupt ... in the guide it just states that above 2.4 is 100%

    EDIT after some RTFM it is -0.3 to 6v on the datasheet for CTRL can someone DCK this for me

    • unmanaged / about 9 years ago / 1

      so I could use a 9v battery and a zener diode @ 3v to get it down to 6 volts and pass it to the reed switch

  • Member #515021 / about 10 years ago / 1

    Can this be used with an led strip such as https://www.sparkfun.com/products/12021? Is there another product that would do something similar for an led strip? If not can you make one?

    • SFUptownMaker / about 10 years ago / 1

      No, and kind of but not really.

      This is a constant current driver- it pushes ~350mA through whatever load you put on it (if it can- it's not magic and the supply needs to be capable of at least 350mA of current and at least a couple of volts above the forward voltage of the LED(s) you attach to the output). Those strips are constant voltage: they provide an appropriate current to the LEDs when they're powered by 12V.

      With this, if you increase or decrease the voltage to the FemtoBuck, the current through the LED(s) will remain the same (again, within limits set by the acceptable max voltage of the FemtoBuck (36V) and the total minimum forward voltage of the stack of LEDs). With those strips, increasing the voltage increases the current.

      It's possible to put a transistor on the cathode of the strip and PWM the gate or base of the transistor to switch the current on and off, but the total current load is dependent upon the number of LEDs on the strip. Add an LED, you add some current.

      Both types have their place, of course.

      • Aristobulous / about 10 years ago / 1

        But let's say you remove the current limiting resistors from the equation. In practice would the current divide equally across several paralleled sections of LEDs in series... If you do the math on the number of sections needed to adequately sink the source current...

        • SFUptownMaker / about 10 years ago / 1

          Doesn't really work.

          In any system of LEDs in parallel, or strings of LEDs in parallel, the path with the lowest forward voltage will hog all the current. Consider three strings in parallel: one with a total forward voltage of 7.0V, one at 8.0V and one at 9.0V. The Femtobuck will increase its output current until 350mA flows into the load. That'll be something like 7.0V, plus a smidge. You're still well below the voltage needed to forward-bias the other strings of LEDs and get current to flow, so they won't light up, and the 7.0V string gets all the current. Most likely, that's going to kill that string, pretty quickly, since you were only planning on giving it 115mA or so.

          The weakest LED in the string will fail. Then, the 8.0V string will light up, and the weakest LED there will fail. Finally, the 9.0V string will light up and the weakest of those LEDs will fail.

          All of that may happen so quickly that it looks to you as though all the LEDs turned on and then immediately off. OR you may have time to scratch your head about it for a bit before the first one fails.

          It's possible to even out the current through the strings using...resistors! Of course, that results in some wasted energy, but it can be worth it. Still, if you're going to do that, you'll want to select LEDs that have very similar forward voltages; trying to overcome more than a couple tenths of a volt isn't fun.

          • dr2chase / about 9 years ago / 1

            And it is worse than you describe -- forward voltage is highest on a cold LED, so if one string's Vf is fractionally lower than the others, it comes on first, warms up first, falls even lower, and really hogs all the juice.

          • Aristobulous / about 10 years ago / 1

            Yep, I see where my thinking was wrong. I was not considering the voltage side of things and the minor differences there, just the current side. So when the buck starts its cycle, it ramps the voltage until it gets a closed circuit then feeds/allows a 350mA draw down the line?

            • SFUptownMaker / about 10 years ago / 1

              That's close enough for a first-pass approximation of how it works.

  • Aristobulous / about 10 years ago / 1

    So, instead of one big beefy LED let's say I wanted to run a number of smaller LEDs off the buck in place of series resistors to save on heat and efficiency. If I have 3v LEDs and want to drive them close to 30mA, by my math if I have them in sections of three in series I can parallel link 12 sections together with a current draw of around 29mA per section with a 12v power source. Is there an issue with the buck having to sink the remaining 3~3.5v?

  • Madbodger / about 10 years ago / 1

    "Datahseet"?

  • Member #608243 / about 10 years ago / 1

    I'm confused (not uncommon). Can this drive multiple 3w leds in series? I watched the video on the LEDs with the terrarium lighting and it looked like he was driving more than a single led on a FemtoBuck.

    • ljb / about 10 years ago / 1

      I ordered some of these from amazon: http://www.amazon.com/gp/product/B00LWRFLQS/ref=oh_aui_detailpage_o02_s00?ie=UTF8&psc=1 anr replaced the current sense resistor to power the 3w leds. It works great. It's not easy to do it with a regular old soldering iron, but it can be done.

    • SFUptownMaker / about 10 years ago / 1

      Yes, it can. So long as the sum of the forward voltages is less than the supply voltage, minus about 1V, the Femtobuck can drive an arbitrary number of LEDs (limited by the 36V supply, of course).

      For example: say you've got white LEDs with a forward voltage of 3.4-3.6V, and a nice, beefy 36V power supply. You could light up to nine of them in series (9 x 3.6 = 32.4) with one Femtobuck. Notice that if you added one more, you'd hit 36V exactly, and the Femtobuck needs a little voltage overhead to work. Also notice that if you were to select for LEDs with lower forward voltage (at the 3.4 end instead of the 3.6), you could light up 10 just fine. That would just mean that you'd need to buy more than you need and throw some away- probably not worth it.

      Finally, note that I used the high end of the range of forward voltage for the calculation. Better safe than sorry, in this case- if you count on them being at the low end, they won't be.

  • effgee / about 10 years ago / 1

    so, no mounting holes ?

  • Member #607448 / about 10 years ago / 1

    Could this be used to light up HB-LEDs LXH8-FW30-3 LED, LUXEON T, 197LM, 3000K XRCWHT-L1-R250-006E5 LED, SMD, WHITE Osram LED MOD, WHITE, 1000LM, 3000K

    Thank you.

    • SFUptownMaker / about 10 years ago / 1

      The FemtoBuck can be used to light up any LED that can handle 350mA (or more) of current.

  • BigJon / about 10 years ago / 1

    All the 3W LEDs you stock are rated at 700mA. But this unit only provides 350mA. To get the full brightness from the 3W LEDs you need to desolder the surface mount resistor and change it ? Or have I misunderstood ? Perhaps you could stock different current rated units, or put a through hole resistor on the board for easy resistor changes. Thanks.

    • Member #558051 / about 10 years ago / 1

      You might try the 3W LEDs running at approximately half power first. They still put out a lot of light, and in addition they run cooler and with higher luminous efficacy so you get more lumens per watt. In some applications, it may make sense to just double up on LEDs instead of running each at their maximum. This may or may not help, but I'm pleased with the output of the 3 watters at about 1.5 watts.

    • SFUptownMaker / about 10 years ago / 1

      No, you're right on. An 0805 isn't particularly painful to swap out, and in fact, you can just add a resistor in parallel with the one that's on there now.

      This was designed well before we were even looking at the 700mA LEDs. We'll likely do something in the near future to accommodate those 700mA ones, though.

      • Member #607345 / about 10 years ago / 1

        The size of this is great! I'm looking to do some heat-sink experiments while driving 3 leds @1A each.

        Unfortunately, I need to power it from a single 18650 rechargable battery (3.7V), which is quite a bit less than the minimum 6V required by the AL8805W5. A SEPIC style converter would have been ideal. Any suggestions on driving constant 1A@ 3.7V in a similar small form factor?

        • SFUptownMaker / about 10 years ago / 1

          Hm. That's a tougher question.

          I'd be tempted to use a linear solution, if you can find one that has a low enough dropout voltage. Maybe something based on an LM317 or something similar? A lot of those have high dropout voltages (1.2-1.5V), so that may not work, depending on the forward voltage of your LED.

          I'll consider this a request for a new product, though.

Customer Reviews

4.7 out of 5

Based on 10 ratings:

Currently viewing all customer reviews.

1 of 1 found this helpful:

Used 8 to drive 48 3W LEDs

I used 8 of these to control 48 of the 3W LEDs in my Internet connected fundraising sign. Works great! I had 6 LEDs arraigned in 2 parallel chains of 3, and fed it 12V. Did a great job keeping all the LEDs in the system at the same intensity. Works just as described. It's be nice to have an alternate version that can drive the 3W LEDs at the full rated power without modification.

Works Great

Nice and easy to get going, it's like someone's holding my hand! Just one thing, anyone have noise under load when you're PWM'ing this thing? I've got 5 of the cool white led's with al pcb's hooked up in series.

Works great!

I bought this for adding approach lights to my car. A FemtoBuck and a couple of 3W warm white LEDS. It works great on the bench and if it ever stops snowing or warms above freezing it will get a proper install. Thank you!

Modified to my needs and working fine

I changed the R1 resistor to 0.2 ohms to boost it to 500mA output then added a circuit to adjust the CTRL pin with a pot from 0.5V to 2.5V for some under cabinet lighting. The pot adjusts brightness approx. half to full brightness which is what I wanted. Works great although upping the R1 resistor to 0805 size instead of 0603 would make it easier to replace since there is real estate on the PCB for it.

Efficient and easy to dim

Dims easily with an ATtiny85 microcontroller. Appears to be very efficient.

Works perfect, boosting LED current difficult (for me)

used this with a couple of 3W Aluminum PCB LED's - like suggested in the video - to build a simple light for the kitchen counter. Only four stars, because with would not be able to replace sense resistor for boosting the LED current. The resistor is much too small for my soldering skills. It would be perfect, if I could add a through hole resistor.

exactly what i needed

was trying to build led light for my work area, and this works perfectly.

Worked well to drive an unknown string of led's

I used the femtobuck to drive an unknown qty (probably 20-25) multicolor led's. It works well, and does not even get warm. I'm supplying 9vdc to the femtobuck.

Awesome product!

A nice little board that works exactly as advertised. I'm using it to drive two high power LEDs and dim them via radio control and I have zero problems with it.