- Home
- Product Categories
- Robotics Kits
- SparkFun RedBot Basic Kit


SparkFun RedBot Basic Kit
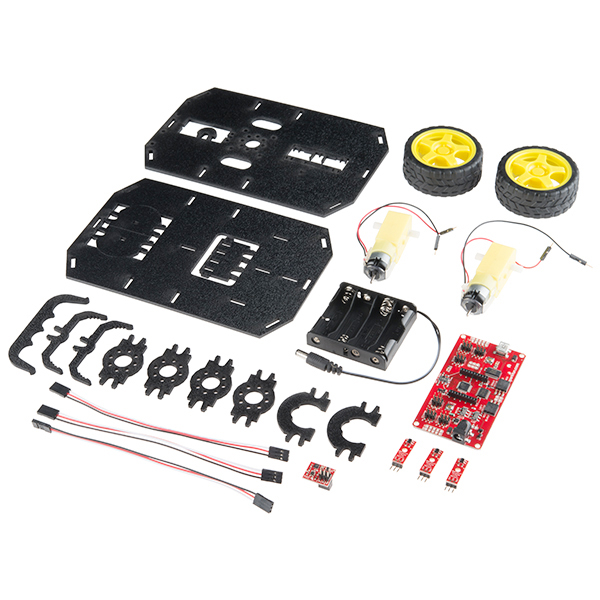
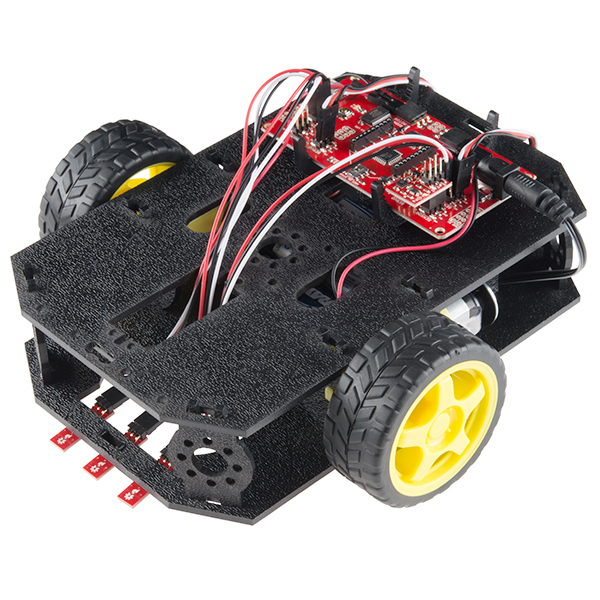
Welcome the RedBot Basic Kit, a robotic development platform capable of teaching two motor robotics and sensor integration! This kit comes with our RedBot Mainboard, the Shadow Chassis, a handful of sensors, and everything required to get it moving.
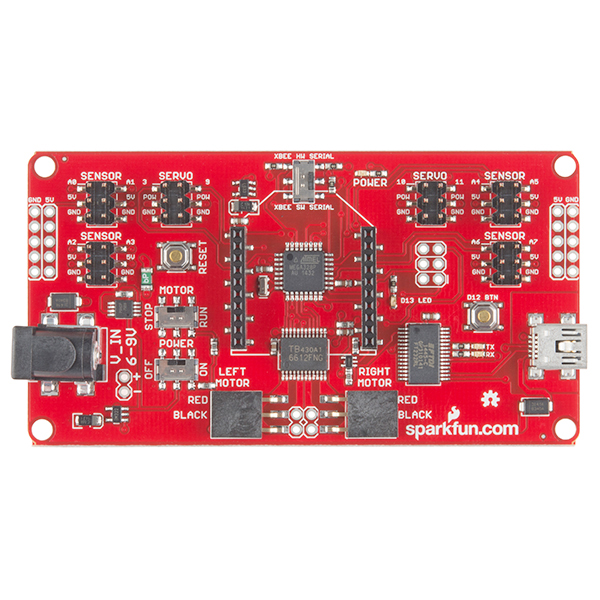
The RedBot Mainboard is a modular robotic development platform that works with the Arduino IDE. The RedBot is a motor driver and Ardiuno combination with various headers and connections, eliminating the need to stack multiple shields to get desired functions all on one board. By simply connecting a USB mini-B cable, you can program it in the Arduino IDE using our example code, or your own.
The Shadow Chassis is an economical robot platform with a lot of versatility. It features two gearmotors with 65mm wheels and a caster. The chassis plates and mounts are cut from ABS plastic and utilize the Actobotics 0.77" and 1.50" hub patterns for sensors, controllers, power, etc. Simply snap each panel together and you’ll be able to attach everything in no time by simply snapping the parts together! The chassis does require some basic assembly but detailed instructions can be found in the Documents section below.
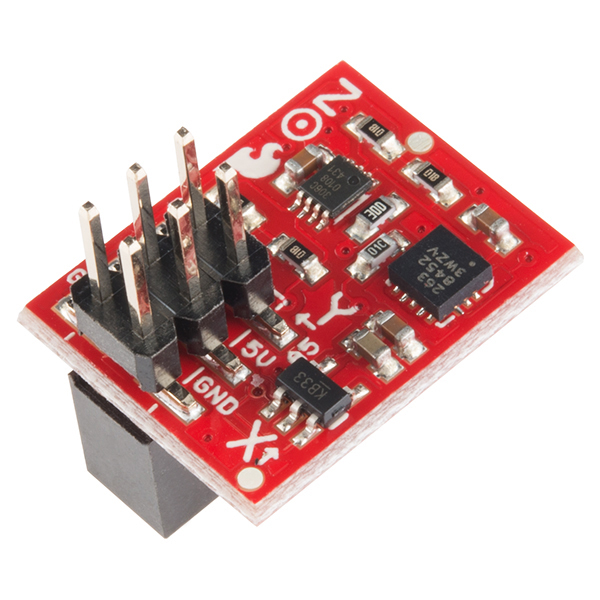
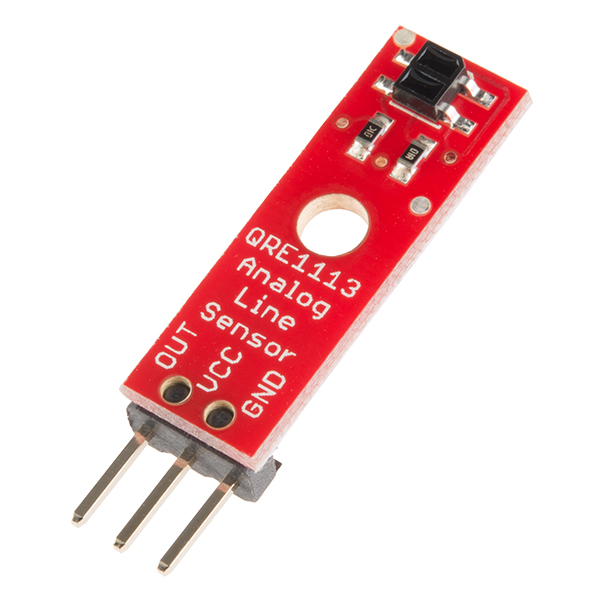
Rounding out the group are three Line Follower Sensors and one Accelerometer Sensor. The Line Follower sensor gives your robot the ability to detect lines or nearby objects using infrared light. The Accelerometer sensor provides bump and motion detection by measuring acceleration forces on the x, y, and z axes.
The RedBot Kit won't be able to operate on Mars but it will definitely fuel your curiosity about robotics!
Note: This kit ships without batteries. You will need 4 AA batteries to get rollin'.
Note: The Experiment Guide in the Documents section below includes full example to code to get your RedBot functioning and moving as quickly as possible.
- Schematics:
- RedBot Mainboard
- [Accelerometer](https://cdn.sparkfun.com/datasheets/Robotics/RedBot Accelerometer_v12.pdf)
- Line Follower
- Eagle Files
- RedBot Arduino Library
- Shadow Chassis Assembly Guide
- SparkFun Inventor's Kit for RedBot Experiment Guide
- Wishlist
- GitHub (Example Code & Design Files)
- GitHub (Library)
SparkFun RedBot Basic Kit Product Help and Resources
Assembly Guide for RedBot with Shadow Chassis
May 28, 2015
Assembly Guide for the RedBot Kit. This tutorial includes extra parts to follow to go along with the RedBot Inventor's Kit tutorial.
Experiment Guide for RedBot with Shadow Chassis
May 28, 2015
This Experiment Guide offers nine experiments to get you started with the SparkFun RedBot. This guide is designed for those who are familiar with our SparkFun Inventor's Kit and want to take their robotics knowledge to the next level.
Wireless Gesture Controlled Robot
April 25, 2019
Control the RedBot wirelessly based on the movement of your hand using an accelerometer, Arduino, and XBees!
Core Skill: Robotics
This skill concerns mechanical and robotics knowledge. You may need to know how mechanical parts interact, how motors work, or how to use motor drivers and controllers.
Skill Level: Noob - You will be required to put together a robotics kit. Necessary parts are included and steps will be easy to follow. You also might encounter basic robotics components like bearings, mounts, or other hardware and need a general idea of how it goes together.
See all skill levels
Core Skill: DIY
Whether it's for assembling a kit, hacking an enclosure, or creating your own parts; the DIY skill is all about knowing how to use tools and the techniques associated with them.
Skill Level: Noob - Basic assembly is required. You may need to provide your own basic tools like a screwdriver, hammer or scissors. Power tools or custom parts are not required. Instructions will be included and easy to follow. Sewing may be required, but only with included patterns.
See all skill levels
Core Skill: Programming
If a board needs code or communicates somehow, you're going to need to know how to program or interface with it. The programming skill is all about communication and code.
Skill Level: Rookie - You will need a better fundamental understand of what code is, and how it works. You will be using beginner-level software and development tools like Arduino. You will be dealing directly with code, but numerous examples and libraries are available. Sensors or shields will communicate with serial or TTL.
See all skill levels
Core Skill: Electrical Prototyping
If it requires power, you need to know how much, what all the pins do, and how to hook it up. You may need to reference datasheets, schematics, and know the ins and outs of electronics.
Skill Level: Competent - You will be required to reference a datasheet or schematic to know how to use a component. Your knowledge of a datasheet will only require basic features like power requirements, pinouts, or communications type. Also, you may need a power supply that?s greater than 12V or more than 1A worth of current.
See all skill levels
Comments
Looking for answers to technical questions?
We welcome your comments and suggestions below. However, if you are looking for solutions to technical questions please see our Technical Assistance page.
Customer Reviews
4 out of 5
Based on 9 ratings:
2 of 2 found this helpful:
Versus Previous Redbot: Some Pluses and Minuses
I have one of the red Redbots from a year or so ago. Today I did a class using the current Shadow 'bots.
The assembly of the new version went really well. I'd allocated a number of hours to get it put together but the two students - 14 year olds - completed it in just a couple hours.
We then tested the units. The motors worked fine. I'm not happy with the IR line sensors. They are not firmly mounted so wiggle both vertically and horizontally. The vertical movement is enough to make a change in the analog input reading. More importantly, they are quite a bit higher than those on my other 'bot. On a white surface my original 'bot gets readings of less than 100. The Shadow version gets white readings over 500 and sometimes over 600. Under the conditions we were running the 'bots that was sufficient since black readings were over 900. But under less ideal conditions this may be a problem.
I should mention that the red versions sensors are a bit low. I've seen them hang up on black tape that has a bump or bubble.
Also note the Shadow version is significantly wider than the red version. I had to adjust the test track so they wouldn't run off the edge of the board.
The kids are satisfied and the units work fine. But be aware that the IR sensors may be sensitive to the running environment.
7 of 8 found this helpful:
Cool kit, but...
The RedBot is a cool kit. It's simplicity of use especially being able to readily upload the code makes the RedBot a powerful introduction to programming and robotics. One change I would like to see is the ability to write code instead of relying on the libraries. For example, rather than using the libraries it would be helpful to know what ports the motors and other sensors are linked to on the main board. Other than that, great kit. I will be purchasing them again.
The Redbot is getting much better
I purchase these for our college mobile robotics course, the ones I got for last year were so fragile and broke when the students were handling them. This years version (BlackBot) is much better and easy to assemble and disassemble as needed. There is good hole support for servo and sensors, the servo hole is a nice size to fit pretty much any standard servo, we CNC'd our own servo adaptor plate for the mini servos. It would be nice if the motor speed encoders were included in the kit - These are also much better this year. Wire routing management could probably be improved to give the robot a better appearance.
Great learning tool
This is such a great tool for my students to use while learning robotics. Nothing is hidden, all the guts are exposed and practically everything can be tinkered with.
Really Happy!
i am trying to learn about robotics and this is serving as a very good way to learn to build my own autonomous robot.
Fun toy to teach programming
Easy to set up, fun and well thought out experiment guides that get progressively more challenging.
Only thing that could be improved is the documentation for getting the Arduino IDE up and running has drifted a bit from the latest versions. Was simpler to just install from the Arduino website and google how to get the board set up.
Great for teaching a first timer!
Used this to get my Nephew excited about programming, robots, and micro controllers. After snapping the pieces together, we loaded up the code and starting playing.
Within 15 minutes he was coming up with all sorts of ideas that he wanted to try! After 25minutes he was pushing me aside because he'd gotten the basic idea of how to program it and wanted to do it on his own! GREAT!
For those looking for a ball caster that would replace the horrible nub caster on this, look at this caster. This turns much smoother and without the horrible noise.
Weboide's advice is very true. The plastic nub used for the third wheel in the kit causes a lot of problems, including a sound much like fingernails on a chalkboard. The caster wheel solves the problem for a few extra dollars and attaches well with superglue or hot glue.
This may be the wrong place to do this, but one comment mentioned they would love to see what ports on the chip are used for what (in order to write their own functions). Sparkfun includes a board schematic on this product page. It's well organized, check it out and you can figure out what pins are used and what are free so you can create your own add-ins
The experiment guide actually has a section that mentions what each pin goes to for this reason. You are correct thought, you can also take a look at the schematic for a quick reference as that should have all the information as well.
Here are the correct pins -- at least the ones that I think are relevant:
TB6612FNG Dual H-Bridge DC Motor Driver
XBee Port with HW/SW Serial Switch