- Home
- Product Categories
- Monochrome
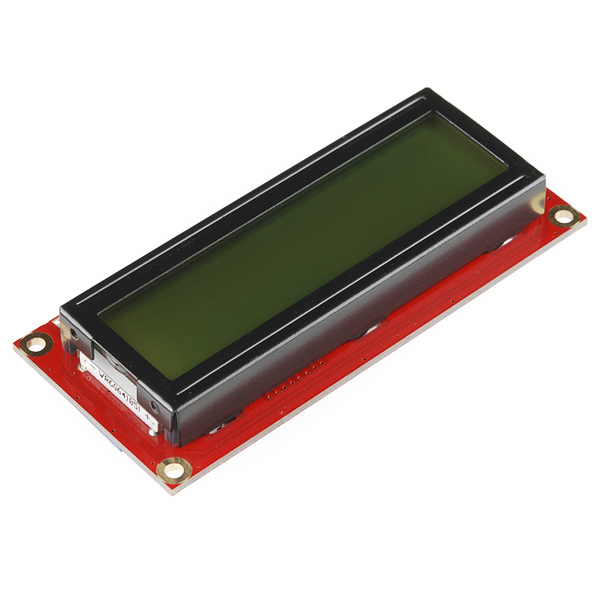
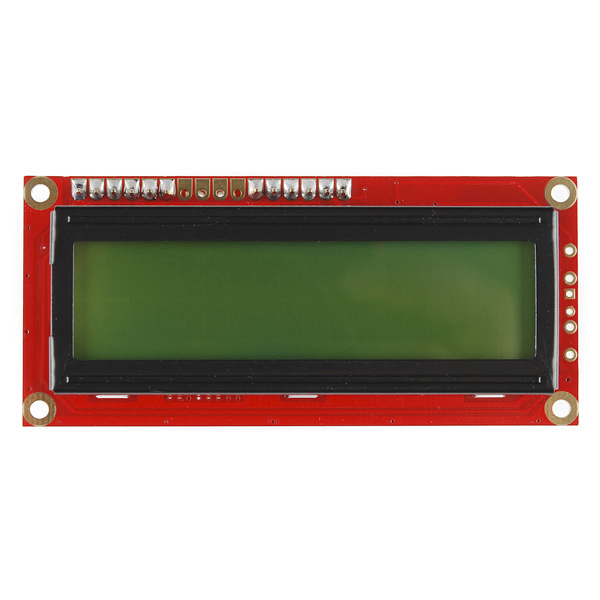
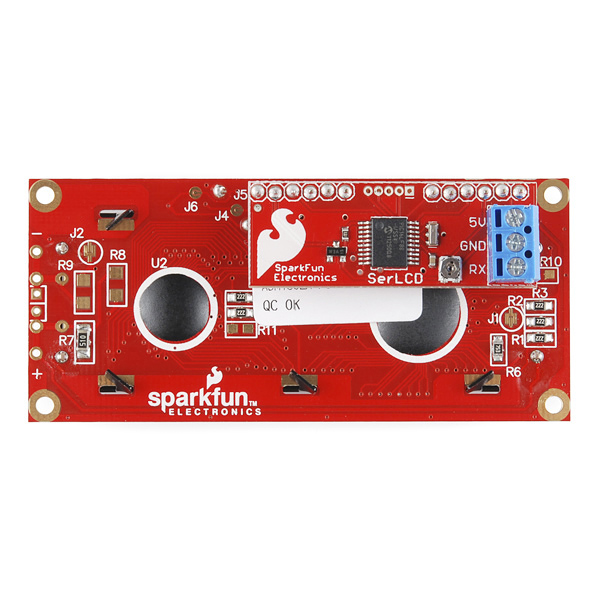
- SparkFun Serial Enabled 16x2 LCD - Black on Green 3.3V

SparkFun Serial Enabled 16x2 LCD - Black on Green 3.3V
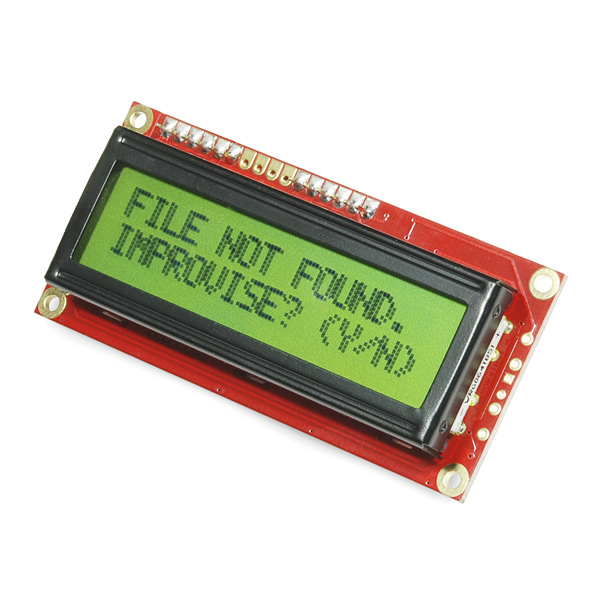
The serial enabled LCD allows you to control a parallel based LCD over a single-wire serial interface. Included in this product is a black on green 16x2 LCD connected to our serial backpack. The backpack, based around a PIC16LF88, takes a TTL serial input and prints the characters it receives onto the LCD. The installed firmware allows for a number of special commands so you can clear the screen, adjust the backlight brightness, turn the display on/off, and more.
Communication with SerLCD requires 3.3V TTL serial at a default baud rate of 9600bps (8-N-1). You can adjust the baud to any standard rate between 2400 and 38400bps. The power, ground and RX pins are all broken out to a 3.5mm pitch screw terminal.
SerLCD has the ability to dim the backlight to conserve power if needed. There is also a potentiometer on the backpack to adjust the contrast.
Note: Though the silkscreen may say '5V', this is a 3.3v Serial LCD. Connect to a 3.3v power source.
- PIC 16LF88 utilizes onboard UART for greater communication accuracy
- Greater processing speed at 10MHz
- Incoming buffer stores up to 80 characters
- Backlight transistor can handle up to 1A
- Pulse width modulation of backlight allows direct control of backlight brightness and current consumption
- All surface mount design allows a backpack that is half the size of the original
- Faster boot-up time
- Boot-up display can be turned on/off via firmware
- 1.425x3.15" - 1" Thick
SparkFun Serial Enabled 16x2 LCD - Black on Green 3.3V Product Help and Resources
PIC-Based Serial Enabled Character LCD Hookup Guide
May 29, 2018
The PIC-based serial enabled character LCD backpack is a simple and cost effective solution for interfacing to character Liquid Crystal Displays (LCDs) based on the HD44780 controller. The backpack simplifies the number of wires needed and allows your project to display all kinds of text and numbers.
Core Skill: DIY
Whether it's for assembling a kit, hacking an enclosure, or creating your own parts; the DIY skill is all about knowing how to use tools and the techniques associated with them.
Skill Level: Noob - Basic assembly is required. You may need to provide your own basic tools like a screwdriver, hammer or scissors. Power tools or custom parts are not required. Instructions will be included and easy to follow. Sewing may be required, but only with included patterns.
See all skill levels
Core Skill: Programming
If a board needs code or communicates somehow, you're going to need to know how to program or interface with it. The programming skill is all about communication and code.
Skill Level: Rookie - You will need a better fundamental understand of what code is, and how it works. You will be using beginner-level software and development tools like Arduino. You will be dealing directly with code, but numerous examples and libraries are available. Sensors or shields will communicate with serial or TTL.
See all skill levels
Core Skill: Electrical Prototyping
If it requires power, you need to know how much, what all the pins do, and how to hook it up. You may need to reference datasheets, schematics, and know the ins and outs of electronics.
Skill Level: Competent - You will be required to reference a datasheet or schematic to know how to use a component. Your knowledge of a datasheet will only require basic features like power requirements, pinouts, or communications type. Also, you may need a power supply that?s greater than 12V or more than 1A worth of current.
See all skill levels
Comments
Looking for answers to technical questions?
We welcome your comments and suggestions below. However, if you are looking for solutions to technical questions please see our Technical Assistance page.
Customer Reviews
3 out of 5
Based on 3 ratings:
0 of 1 found this helpful:
Works well, easy to use but bulky
No complaints regarding the functionality. I don't give it 5 stars for 2 reasons: 1) expensive (but solved my problem, so I can't complain) and 2) the daughterboard with the serial driver, attached behind the display, is rather bulky, which may complicate many installation scenarios. The pictures in Sparkfun don't reveal this issue. If the photo from behind was taken at an angle and not straight down you'd see the daughterboard and screw terminal add approximately 1/2 inch to the depth of the display.
Easy start to using a display
It was pretty easy to get up and running with the Serial enabled display. I have had difficulty getting some of the commands to work such as changing the splash screen and the back light, but for quick and dirty prototyping, this is a definite time saver.
As the previous reviewer mentioned the daughter board and the screw terminals are bulky. In my situation, it is not an issue.
Waste of time with Arduino Uno
I thought the three wire interface would be very simple, however to use this with an Arduino Uno you need to give it 3.3v and also use a LLC to communicate at 3.3v TTL. Even after giving it the correct voltage, TTL voltage, and baud rate the screen did not work correctly. I tried two screens and neither worked. I tried using a different Arduino and it still did not work. I would not buy this again.
Sorry about that! The 3.3 volt version was made specifically for use with a 3.3 volt system rather than a 5 volt system like the Uno. but we do have a 5 volt version that works great with an Uno or other 5 volt micro controller.
I have ported LiquidCrystal library for use with the serial LCD you can look at my code here. Still working on finishing all the documentation. But putting up for now hopefully someone will find it usefull.
http://arduino.cc/playground/Code/SerLCD
-Thanks
For every Serial.print() , I get a bunch of || characters printed on the display after the actual text. Anyone know what I'm doing wrong here?
I've set Serial.begin(9600); in my sketch.
Edit: Sorry, for every Serial.println(), two || appears instead.
How should I properly send it a CR/NL ?
Try resetting the baud rate. If you have it connected while you upload a sketch, funny things can happen. Reset the baud rate, disconnect it while you upload code, and try again.
I just ordered this and all I have to do is solder on leads or headers for the wiring right.
It comes with a screw terminal, so no soldering required to get it up and running!
According to the datasheet this is a 5v connection device. Not sure where the 3.3V comment comes from.
"Only three wires 5V, GND and Signal are needed to interface to the LCD."
This is a good easy-to-use display, but a little hard to read when wearing polarized sunglasses, so not ideal for use in a vehicle or outdoors. The white/black version works better in those applications.
I see that this device works with a 3.3V supply, but will it also work with a 5.0V supply?
Thanks
I checked with tech support they said "the board should only be powered at 3.3V." and that "It is equipped with low voltage circuitry that is not intended to take 5V"
I'm new to this and found the datasheet unclear and inconsistent about how to clear screen etc.
Serial.print(0x7C, BYTE);
Serial.print(0x01, BYTE);
Just wasn't doing it!
Several hours of searching finally answered the question! to clear the screen you use this;
Serial.print(0xFE, BYTE);
Serial.print(0x01, BYTE);
A really useful explanation and more info is to be found here;
http://www.arduino.cc/playground/Learning/SparkFunSerLCD
No author mentioned, but thanks whoever you are! :-)