
HAB Launch - S1
I would like to tell you about my two day HAB adventure in hopes you can learn from some of my successes and failures. I'm not going to outline my entire process, a more detailed HAB tear-down from a different launch was covered in the SparkFun HAB tutorial series.
In late July of 2011, Natalie and I set out to Ault, CO to launch my first HAB (dubbed S1). Natalie, being my supportive girlfriend, tagged along to help and was enthusiastically ready to watch me fail.
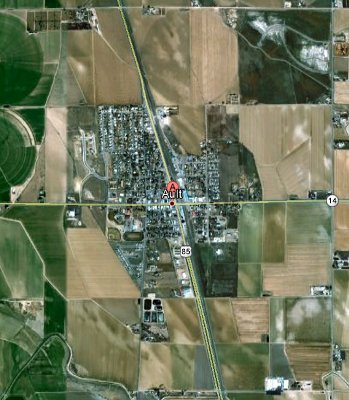
As we arrived in Ault, I quickly realized Google Earth makes things look waaaay bigger than they really are. I thought Ault City Park was at least a grassy field, but after 5 seconds of searching the city from end to end, we found a sign for 'East Ault City Park', which turned out to be a dirt pile next to some warehouses.

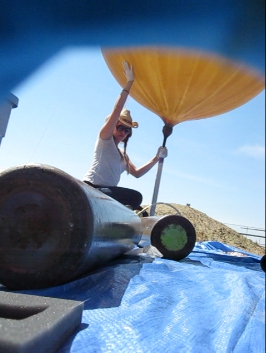
The balloon I used was the cheap military type you can find on Ebay. However, the balloon didn't come the way it looks in the picture above. What I did there was cut off a huge flaccid piece of rubber from the underside, making the inflated balloon much lighter with more lift. Having no idea what I chopped off, but feeling good that nothing was leaking, we continued inflating the balloon.
This is a shot from my camera inside the payload box with two 125 ft^3 helium tanks in the foreground and one Natalie in the background.
Filling the balloon is a delicate process. The lack of grass and searing 100+ degree heat in Ault City Park didn't help the fact you must keep the balloon from touching anything sharp or dirty. We used a tarp on the ground to keep the balloon off of the dirt, which increased the surface temperature by about 15 degrees. We used plastic gloves to keep our hands nice and warm (also to not get deadly hand grease on the balloon).
Most importantly, you don't want to fill the balloon with too much He because the balloon will not reach its full height (hopefully ~90,000 feet) and will pop too soon. If you fill the balloon too little, you might not have enough lift to reach full height. Make sure you fill the balloon with just enough He to provide lift for your entire setup.
Here is a rough calculation:
I used about 175 ft3 of helium to fill the balloon. 1 ft3 of He has about 28 grams of lift, so 175 ft3 has about 4900 grams of lift at sea level, slightly less at higher elevations. The balloon weighed about 2280 grams after my epic modification, and my payload weighed about 2500 grams (be sure to include the weight of everything in this step). Combined, this is less than the free lift of the balloon, 4900 grams.
Before we let this thing go, let me talk a bit about the parts I used.
Parts
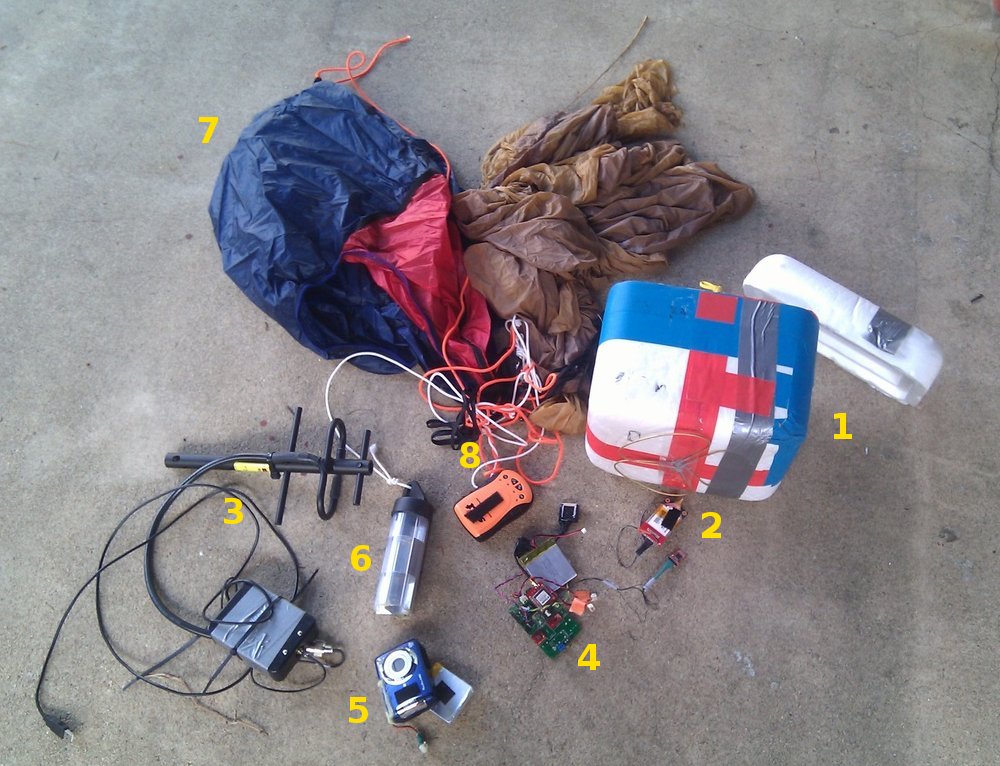
Here is a picture of my entire setup. This is everything that went up with the balloon (except for item 3).
- I used a foam cooler for my payload box. It didn't have any attachment points, so I had to press and tape parachute cord through the box for the anchor to the balloon. Duct tape helps cover everything up and hold things together for a short period of time, but remember, duct tape is actually somewhat heavy compared to some other types of tape.
- Next is the radio tracking system. Notice the wheel antenna mounted to the bottom of the box. I used an omni-directional wheel antenna with a good amount of gain in the vertical direction, pointing down, and a 1 Watt Xbee as the transmitting radio. As the balloon rises, it also moves along the ground pushed by winds/convection. This makes designing an antenna difficult, since you want to focus the transmitter's power at your receiver (not into outer space or directly at the ground) to save battery power. The wheel pattern allows for horizontally polarized waves off of the edges and a cone shape off of the bottom. This should allow me to track the balloon from the underside and at an angle when the balloon starts moving across the ground.
- I used a Yagi antenna to receive the signals from the transmitter. This was connected to another 1 Watt Xbee and a 5V FTDI Basic. I put everything in a nice enclosure with a USB cable coming out. Now, I can just plug the receiver into USB, open a serial terminal program, and see what information my balloon is sending.
- The flight computer (green board) consisted of a custom designed PCB from BatchPCB, an ATmega328 powered at 3.3V, an ADXL345 accelerometer (for orientation), an HMC5843 magnetometer (for heading), a BMP085 temperature and pressure sensor (for elevation), a Copernicus GPS module (for position and backup elevation), an OpenLog (to record anything I don't get on my radio), and a tri-color status LED (so that I know everything is running from outside the box). The computer, as well as the radio and camera, were all powered separately with single cell 2000mAh LiPo batteries. Here is my code for the atmega328 and here are my PCB design files.
- The blue camera at the very bottom of the picture had a LiPo battery hacked onto the power plug and the camera ran a CHDK intervalometer script, so it continually took pictures and video.
- The silver-ish cylinder in the middle of the picture is the radio reflector. The FAA requires you to use one, so that radar/airplanes can see your balloon. I chopped the unit down to a few corners of reflectors, which still does the job.
- This is the recovery parachute. It was tied in between the payload and balloon with about 5 feet of line separating them. The brown mess to the right is the popped balloon.
- And most importantly, in the center of the picture is the SPOT locator. This device sends position messages (unfortunately not altitude data) to a dedicated webpage every 10 minutes. This was my back-up recovery device and, in my opinion, is essential in any HAB.
The Flight and Recovery
Here is what my flight computer was reporting as I let it go:

$(number of satellites),(time),(latitude),(longitude),(altitude from GPS),(altitude from pressure),(temperature),(heading),(acceleration),(one sec tick)@
From the start, my accelerometer and pressure/temperature sensor were not working (had to be something with the I2C communication). I had bugginess with the pressure/temperature sensor during testing, but never the accelerometer, I swear. Both of these sensors are not critical, so I let it fly.
I actively tracked the balloon for about 20 minutes before the GPS started to lose its lock and other sensors starting failing. It wasn't until about 40 minutes into the flight before I completely lost radio contact. In the 40 minutes, I did get some really interesting data. The entire time the payload was spinning mad. The heading was all over the place and the number of satellites was changing indicating the GPS antenna was possibly moving considerably.
As soon as I could not track the balloon with my radio system, I tried to get an internet connection to look at my SPOT locator. Luckily Natalie's phone uses Verizon, so I was able to get spotty internet out in eastern CO. My TMobile couldn't find even find a cell.
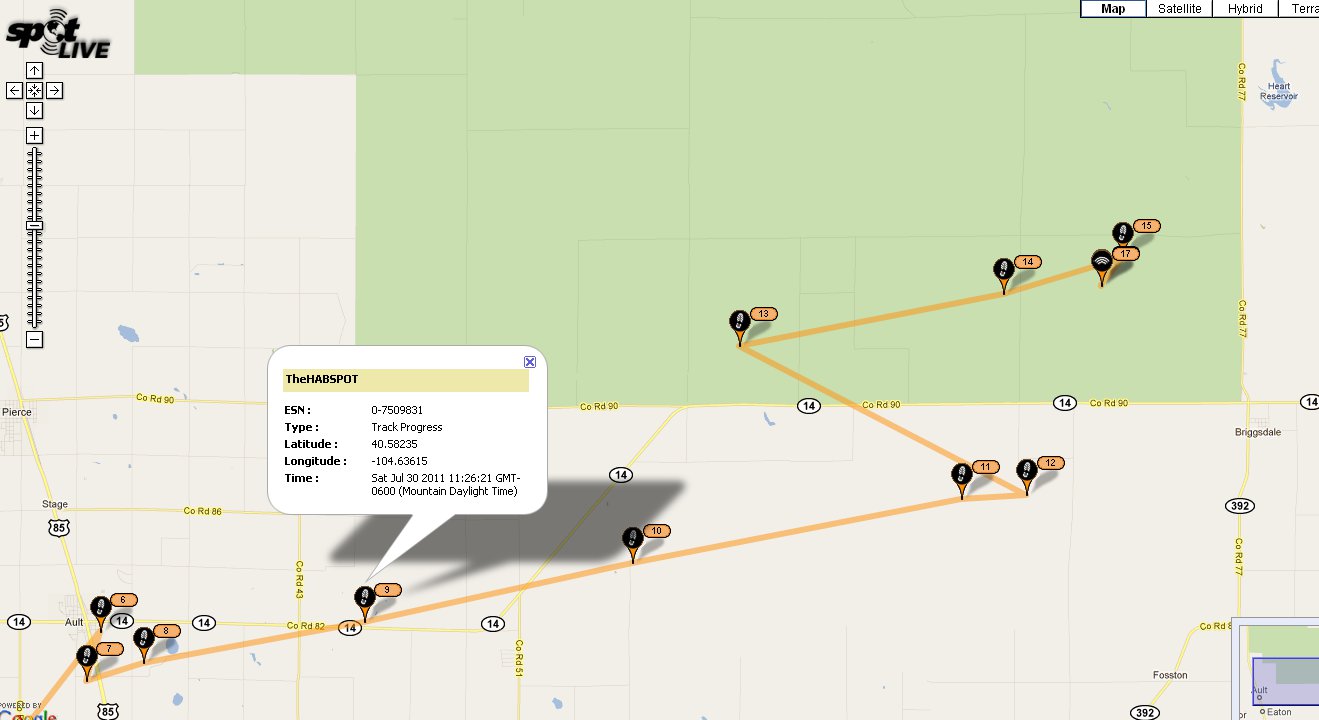
We continued to track using SPOT and eventually ended up in the middle of the desolate Pawnee grasslands. The track shown above shows the complete flight, according to SPOT.
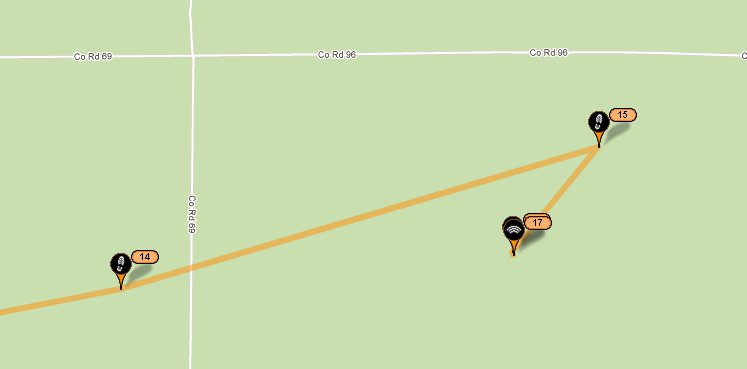
Here are the last three tracks I received from the Spot locator. This was really weird because the last waypoint is a 'Check-In' message, which means that one of the buttons on the unit was hit! I assumed this meant there was a crash landing. However, I wasn't completely sure if this was the true landing point or not, since the Spot locator does not give elevation. Regardless, we immediately went to the last waypoint. It took us about 30 minutes to hike to what we thought was the landing. Our searching was not successful, we ran out of water, and it was getting late. We returned to the car completely tired from driving and hiking all day in the heat. We decided to go home and analyze the positions I had recorded from the SPOT locations, where we searched, and the data I received from the radio.
Once I got home, I calculated the time of the flight and it closely resembled the modeled flight (habhub.org). I then made sure the 'Check-In' notification was in fact due to a button hit. Also, I found out, after looking over maps and GPS positions, we were searching in the incorrect spot, we were about 500 meters off. After I figured all of this out, I realized I had to go back the next day and do a better search.
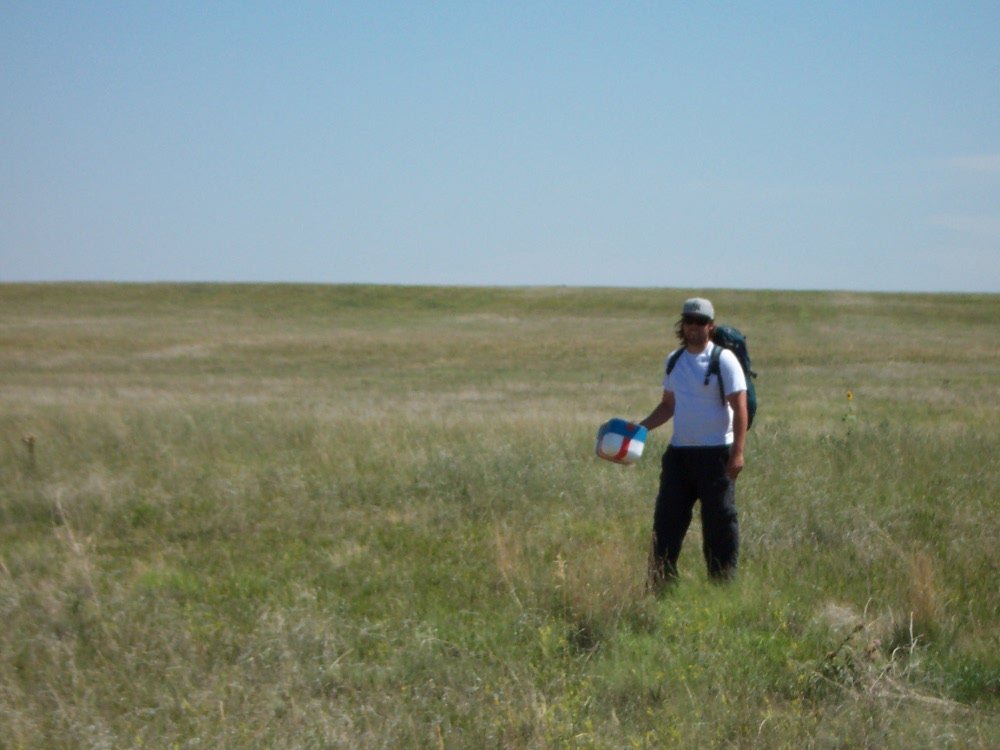
The next day I drove up to the Pawnee and headed directly for the spot where I now thought it was located. After about 30 minutes of walking I saw the payload in my binoculars, success! The picture above shows you the conditions I was searching in, dry, hot, barren grasslands. Actually, the grasslands are anything but barren. To the naked eye, you see nothing, but look through some binoculars and there is wildlife EVERYWHERE. I kept thinking the white rumps of the pronghorns and antelope were the payload box.
When I found the payload, I was so excited I forgot to take pictures and I immediately ripped open the box to see what was on the camera only to be completely disappointed that I didn't capture the entire journey. I did notice that when I approached the payload, the flight computer, GPS, and radio were all ON and working! The parachute wasn't tangled and the payload box had a small depression on the corner and that was it. It didn't seem like a hard landing at all!

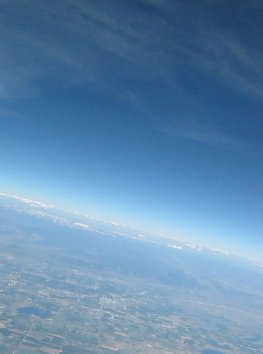
The best shots I got from the video (sorry, crappy resolution). You can somewhat make out the Rocky Mountains in the right image.
Unfortunately, the camera cut out at about the same time as the radio and I am not sure why. Maybe the low temperature was affecting the batteries? I didn't use a heater. The pictures above were the best I got and are at about 9,000-10,000 meters or 30,000 feet. No better than the shot you get outside of your airplane window.
The surprises didn't start revealing themselves until I looked at the OpenLog data.
The first thing I noticed is that the main board computer kept running through the entire journey, however everything else seemed to be out. Surprisingly, the GPS cut back in at about 2000 meters (about 600 meters above ground)! This was very interesting, since now I could see how fast the payload hit the ground. I calculated about a 3-4 m/s descent rate during that time, which is about what is expected with a working parachute. The accelerometer, pressure and temperature sensors were dead the entire journey, so the only data I had to work with was GPS, heading, and time.

The next thing I found was a lone waypoint from the GPS cutting in at about 19,000 meters (about 60,000 feet)! No way! This also happens to be about at the ITAR elevation limit for civilian GPS.
But where was this lone waypoint logged on the trip? Did the balloon go higher?
I started analyzing the data more. I immediately noticed the GPS position was not correct. Hmm. I found out there was a bug in my code, so that all of the longitude and latitude values were off by a factor (simple bug in my parsing that didn't show itself until a move in coordinates). It didn't matter, because I had a time stamp and heading data. I compared the time stamps with the SPOT times and also plotted the heading data to see how rough the ride was. The lone waypoint was right before the balloon reached its apex. Minutes before the waypoint, the magnetometer (used for heading) was quiet for the most part, then moments after the lone waypoint, the magnetometer started changing a bunch! This seems to indicate the top of the trajectory and the balloon bursting. I think I can safely say I reached at least 60,000 feet!
Lessons Learned
There were so many things that went wrong, yet so many things went right, no doubt I learned a bunch, so I would count this mission as a success! In addition, the fact that I did recover everything in "working" condition means I must do this again. Here are a few brief notes on what I did correct and what I need to do next time.
- The time stamp in my reporting was hugely important. The timer on my flight computer kept running throughout the entire flight, while everything else failed. At least I could see when things failed and when things fired back up.
- Use a better GPS and GPS antenna. If I ever want to actively track the balloon, I will need a GPS that can deal with a lot of erratic movement. A GPS with more tracking channels (the Copernicus only uses 12) and a multi-directional antenna might help.
- I did not include a heater to keep the batteries warm. I think this was one of the reasons why some of the systems died, especially the cameras. I will for sure include one in the next flight.
- Better radio antenna. I can always improve this. I am not sure if the clover leaf configuration for the transmitting antenna is the best option. The payload moves considerably, I might need something with a larger beam width.
- If I did in fact reach 60,000 feet, I probably needed a little more He in the balloon. The balloon I used could of been filled with a lot more He, since I was designed to carry much more weight.
- More testing and more testing. Hot, cold, high, low, different locations, the more the better....
Have any suggestions? Leave them in the comments below. We'd also love to hear about any of your HAB attempts.
First of all, congratulations on getting your payload back! My apologies for double-posting (I posted on the blog article first), but I thought that perhaps this information would be more useful here.
I’ve flown nearly 100 HAB missions, about half of those with the xTend radios, and have experienced none of the issues that have been described by the SF staff… they’re fantastic radio modules, and I’ve achieved >50 mile links while maintaining compliance with the FCC regs on EIRP (for 900 MHz, the max allowed is 36 dBm). There are a couple of things that can bite you, though.
For example, if your RF symbol rate is set to 115,200 bps, you lose 10 dBm of receiver sensitivity, which is a big deal. For extremely long range links, you definitely want to use the 9,600 bps symbol rate. Note that this is not the serial port data rate, which is set separately, but the rate at which the radio transfers information over the air. Another big deal is the choice of antenna on the payload. The wheel antenna is essentially isotropic (as mentioned previously), which means that you’d wind up with 0 dBi of gain, which doesn’t make sense for a balloon payload. For essentially all of the flight, you’re going to be looking up at the balloon, which means that any power radiated up into space (away from you) is wasted. A groundplane installed on your payload behind your wheel antenna should give you 2-3 dBi of additional gain, and a good patch antenna with approx 65 degree 3db beamwidth horizontal and vertical usually provides 6-9 dBi of gain (be careful with the EIRP limits, though – 1000 mW is 30 dBm, so you can only legally use 6dBi of antenna gain at full power).
Along with the antenna, the polarization relationship of the tx/rx antennas makes a big difference, as well. For example, the horizontal polarization of the wheel antenna is only evident when you’re looking at the antenna “edge-on;” otherwise, you’re essentially dealing with a circularly polarized antenna (as mentioned previously). The 6 dB yagi that you have in the picture is a linearly polarized antenna, which, when paired with a circularly polarized antenna, gives you 3 dBi of loss immediately.
I enjoy using a link margin calculator from AFAR communications (here: http://www.afar.net/rf-link-budget-calculator/). If you select distance mode, the results are telling. I typically aim for about 15-20 dB of fade margin when using the xTends (a generous noise floor). At a center freq. of 915 MHz, and setting the fade margin to 15 dB, the difference between the 115k and 9.6k theoretical distance (using 30 dBm Tx pwr, 0 dB of Tx cable loss and antenna gain, 6dBi rx antenna gain, 3 dBi rx cable loss (polarization), and the rx sensitivity from the datasheet) was 12.8 miles @ 115k RF symbol rate and 40.5 miles @ 9.6k RF symbol rate. When you remove the polarization loss, put a 6dBi antenna on the balloon side, use the 9.6k rate with a 20 dB fade margin, the theoretical distance is 64.1 miles, which is in keeping with my experience with the xTend’s performance.
Yes! Thank you! This is great information!
I have used your venus GPS module ( http://www.sparkfun.com/products/11058 ) many flights without any issues. I think getting the antenna a few inches away from the electronics helps.
As for the antenna's I used some circular polarized patch antennas for your 1W digi transceivers. Then the rotating doesn't bother the reception. I would recomend getting a Amateur technician license (no code and the test is easy). Then you can use APRS and use all of their repeaters. I actually have a website (http://www.s3research.com/flightdata/) that logs all of the balloon flights that I find in the APRS stream. They are all over the world. Maany of them are fascinating. The longest launched in California and landed in the Mediterranean sea.
Seems like it may be worthwhile to add a couple of thermistors taped to the battery packs, so you can tell for certain whether they were getting too cold.
Now. It's some time after your flight, but congrats! I had my first flight January 16th 2011 (look at my blog here) .I used exactly the same balloon. Actually my flight was more adventrous as I landed in the middle of the swiss alps: No great planes here! I used cheap GPS trackes and had hevy troubles. Actually I want to use a copernicus GPS for a second flight, but I have some other project to finish before. I got about 11Km data link from a 22mW xBee with spider antenna on TX and biquad on rx. sadly high power xBees are strictly forbidden here and the 915Mhz Range is reserved for cellular. I used the HAb board from Sparkfun that is discontinued nou and it was reall useful. As my onboard logging GPS failed the pressure informatiosn where the only indication of the altitude reached. maybe I will fly again, but I want to use an autopilot and some kind of high speed glider, as I don't want to land close to the 2nd longest european river and a highway again (that happaned in my first flight). HAB here in Europe andspecially Svitzerland is really new, and I was (I guess) the 3rd one doing this here. Some other points: - I used too much He (ybout 3 m3... no idea how much in cubic Ft as we don't use body parts to measure things here ;-)), so the ballon bursted too early. Anyway around 22'500m. But I wanted to reach at least 30'000. I had a climb rate of 6m/s. - Heating the box was a good idea. But some hand hheaters bags where enough. No need of some electrical heating. I tested in the freezer for 24hrs at -18C.
Trying to work out where to place this comment - here will do.
Awesome work!
Here's an idea: why not have the entire output of the transmitter be NMEA, with proprietary sentences (prefixed $P) for sensor data etc? That way, you could log one file - and plug it into any NMEA compatible software (e.g. Google Earth) - plus write your own software that lets you plot various things against position, time and such without having to transform the file at all. Also, you'd then have a complete log of everything the GPS module output - potentially handy especially in the case of fix issues. And, even at 9600bps, you have plenty of time to insert your own sentences.
I'll admit - this is biased: I developed something similar during a uni project (a HAB) and that was how we did it, and it worked pretty well (eventually). I was thinking of producing a "standard" set of proprietary sentences and software that will read HAB tracks (live and recorded), such this software can be used with other HAB setups that transmit in the same manner, and be able to treat different sensor types appropriately (using the right units, etc)
I'm prepping for my first HAB launch and thinking about future launches... that being the case, does anyone have any thoughts on if/how I could get internet access in my HAB balloon payload? I'm looking at something like a Raspberry Pi (raspberrypi.org) with internet access for a live broadcast etc. Could a 4g USB modem stick work or is the distance just too far from the towers etc.?
Any thoughts?
Not sure if this the best place to post this or if its even going to get read, but is there any news on how the current helium shortage effects HAB launches.
The thing is it may not get better. Once we are out of helium its gone as supplies get lower its not going to be available for even party balloons since its needed for medical and industrial needs.
I'm not really sure, but it sounds like it's time to try H2!
I use hydrogen and with proper safety procedures it works quite well. :)
I've flown around 400 HAB missions. My first flight 25 years ago (8/15/1987) was the first HAB flight in the US back carrying film and video cameras with live TV transmissions. I've had great success with the 9XTend radios set for 1 watt. And as DaveP states, going with 9600 bps instead of the 115,200 bps will greatly increase your range. The link you show for the 1 watt XBEE shows a 50 milliwatt XBEE unit on 915 MHz. The range for that will be around 20 miles or less and not enough range for a typical high altitude balloon flight. However, I have had some success using the 100 milliwatt XBee Pro XSC unit (http://www.sparkfun.com/products/9087) from over 20 miles or more directly from a high altitude balloon to another XBee unit on the ground using a high gain yagi on the ground. The Copernicus GPS module that you used will work very well for high altitude ballooning, however you have to program the module for "AIR" mode otherwise it will fail above 27,000 feet. Once programmed for AIR mode it should work up to 162,000 feet. Another factor that will help prevent GPS failure is to keep digital cameras well away from the GPS antenna, the EMI created by the digital camera will desense the GPS unit enough to keep it from working. - Bill Brown WB8ELK http://www.wb8elk.com
"...had to be something with the I2C communication"
Forgot to bring along one of these? http://www.sparkfun.com/products/8938
With point 5 of lessons learned, according to the eBay seller you want to use the minimal amount of gas at lift-off to get maximum altitude. It allows the balloon to expand more (as air pressure gets less) before exploding. If you start with too much it has nowhere to go!
Great project, look forward to further successes!
The cloverleaf antenna has virtually no gain (almost isotropic) and is circularly polarzied -- which is ideal for this application - however, you'd likely have gotten much better results if you'd used a helical on your groundstation since the yagi is linearly polarized so you'll not realize its full stated gain when receiving a CP signal.
Helicals are a piece of cake to make -- check out the guys at FPVlabs.com, they have plenty of discussion on such things over there.
Sounds great, I have been wanting to make 1 since I found one from the NWS in the water. What method do plan to use for heating in the future?
See the discussion between myself and stilldavid in the early comments.
LOL you didn't even succeed with a normal camera? I put a polaroid camera in a few months back (also made with SF stuff ofcourse). http://www.polaroidsfromspace.com/
My idea of success is different than yours. It was my first launch, so I am just happy that I recovered the thing. :)
EDIT: I am guessing it could of been because I didn't heat the batteries in the payload. Any thoughts?
Don't let Zaman rag you too much. His imaging didn't work very well during the middle of his TED speech (http://www.youtube.com/watch?v=kShT_Z3GJSU). :)
I've done seven launches (http://www.TheTalon.SmugMug.com/misc/space) and I've never heated the batteries. Did you use lithium?
I agree with Aaron -- any time you recover your hardware in working order it's a success! It means you can do it again...
SFE needs a downvote button. Downstar?
I am thinking an air activated hand warmer might be a good way to keep a battery warm.
To add on to a1ronzo's comment, keep in mind that any single-use chemical hand warmer relies on oxygen in the air to sustain its exothermic reaction. When the payload gets above 30-40k feet it will be rendered ineffective, so keep that in mind when looking for the devices.
Also, single-use Lithium batteries keep their discharge curve to -40°, so that's a great option as well.
Oh.. Reusable too... :D
Check this out. This should work for you.. http://www.snapheat.com/SNAP_HEAT/How_it_Works.html That link is just an example. I used to have a few of these type of packs. The bond forming process of crystallization is exothermic. No need for oxygen...
:D
What is a good way to heat your payload? Heating via convection shouldn't work that well either if you can't maintain STP in the payload. It seems there would need to be a heater actually physically touching each battery. What have you used?
An insulated box is plenty, though power resistors can be used. So long as the payload is well secured and doesn't allow airflow through it, the contents will maintain a pretty steady temperature. In my three launches, the internal payload temperature has never dropped below about 50°F or so. In fact, during one ascent, the sun heated the interior well past 100°F!
I've always used a 7805 or 7803 voltage regulator - which outputs a small amount of heat in its conversion - as my only heat source. If you are worried, hook up a power resistor to a thermostat circuit and a big power supply and you're good to go. The resistor will output heat even in a vacuum, just be sure it's hooked up to a PID or some other control mechanism so it's not on all the time draining your limited battery.
Edit: Also, I exclusively use the Energizer E2 Ultimate Lithium batteries. (warning, PDF link!) They keep their discharge curve down to -40°, so cold is a non-issue for the power supply. It's still nice to know that your camera/circuit/whatever else isn't getting cold, but it's nice to not worry about the power supply.
Hmm. I used a linear reg on the control board as well and it heated nicely during radio broadcasts. I don't think the majority of the heating is convective though (at least at altitude)?
So then why do the hand warmers not work if there is pressure for convection? I understand they will stop producing heat as O2 drops, but at that point the internal temp should be maintained given there is enough pressure and insulation in your payload. However, I always thought that there won't be much pressure at altitude for convective heating because the payload would quickly outgas (unless it is air tight).
I guess I am confused as to how exactly the heat is transferred.
This seems to point to radiative heat transfer and since in my last two launches the electronics were mounted within the styrofoam (blocked from IR), that might not work for some applications.
I think heating will depend a lot on how your payload is constructed.
EDIT: FYI, the second payload I built had power resistors attached to the batteries, and that seemed to work fine. Although that system was very simple, just 3 GPS units, openlogs, and batteries, all completely encased in styrofoam.
I'm going to take a stab at this and answer my own questions. Please someone check my work, I could be way off.
How much convective heating is lost at 100,000 feet compared to STP (standard temperature and pressure, ground level)? We are assuming the payload is not air tight and will out gas to the outside environment relatively quickly (which, I think most hobby HABs will do, maybe not).
The equation we want to work with is Newton's Law of cooling, which actually is analogous to electric capacitance and resistance. Anyway:
dQ/dt = kA(Tout - Tin)
dQ/dt = rate of thermal energy emitted, in watts
k = specific heat capacity (this can be converted into the common R-value)
A = cross sectional area (we are estimating for 2-D, doesn't matter anyway)
Tout = temp outside heater
Tin = temp of heater
If we compare the system of the heater surrounded by STP, with the system of a heater surrounded by atmosphere at 100,000 feet, we only need to compare the ratio of the specific heat capacities (all other values will be the same). Also, we assume that Tout - Tin is constant for both systems meaning we want to maintain the same temperature in the payload (Tin is just the temperature of the heater).
So, after looking up the specific heat capacities for air at STP and 100,000, I get:
k = 0.026 @ STP
k = 0.016 @ 100,000ft.
Dividing those you get a factor of 2 or there is half as much thermal conductivity at 100,000, than there is at STP. This means when you do your calculations for power provided by your heater (in Watts, dQ/dt), you will need to double the power to heat the payload at the same rate, at least at 100,000ft. The insulation in your box should improve these numbers somewhat, but if the box isn't air tight, I would think the pressure would equalize rather quickly.
Also, this law is only for convective heating. This doesn't include radiative heating. And radiative heating is negligible in this situation anyway (i.e. plug in the numbers to the Stefin-Boltzmann law and it comes out to 10s of microWatts).
TL, DR. You can drop a heater into the payload without it touching (conductive heating) the stuff you want to heat. Or use the heat from a linear regulator like stilldavid and I did. Radiative heat is negligible. Just keep in mind, at altitude and if you don't have an air tight box, your heater is half as efficient as it is at STP, due to the lack of pressure at altitude (compared to STP).
Yes. I have heard of others using these and I think they work well. The issue that I see is that you have use them within hours, so that means that you have to assemble your payload within hours. Sometimes it is nice to have your payload all closed up, with power switch, charging jacks, etc. exposed well before the launch, so you can completely test the system before letting go.
I have a suggestion..
Can you talk about what to choose as your launching location?
Because I'm in Pennsylvania, and want to know how far west I need to go so I don'y need a boat/sub. ;P
There's a really neat HAB flight predictor here: http://habhub.org/predict/. Put in your location, launch time, and other data, and it will predict the ground track from launch to landing. It should give you an idea of whether you'll end up in the water or not.
Thanks Mike! It would appear it will land 20miles of the coast of Atlantic city!!! O_o
I totally misread your comment. Thanks Mike for the backup.
Although, habhub.org is already linked in the tutorial, I called it the CU flight predictor, which isn't the correct name, so I changed it to habhub. Thanks.
No worries dude!
P.S. I also misread your comment.. :P
Good question. The regulations as to where you can launch HABs is surprisingly lax. Refer to FAA Part 101, specifically look at section '101.13 Operating Limitations'.