- Home
- Product Categories
- Temperature
- SparkFun IR Thermometer Evaluation Board - MLX90614

SparkFun IR Thermometer Evaluation Board - MLX90614
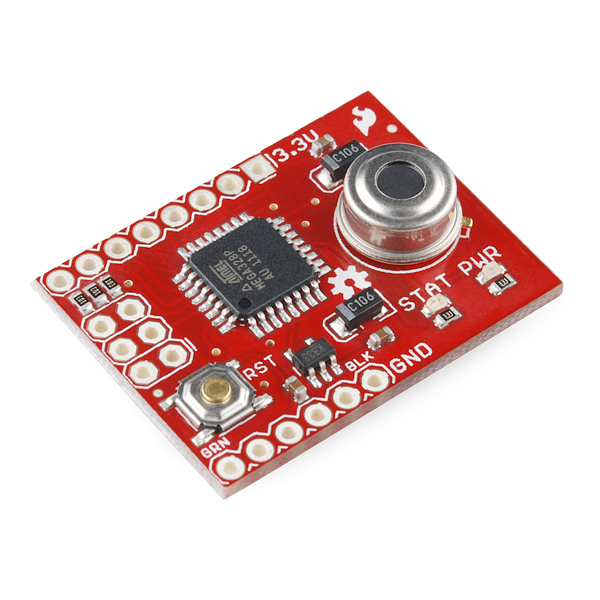
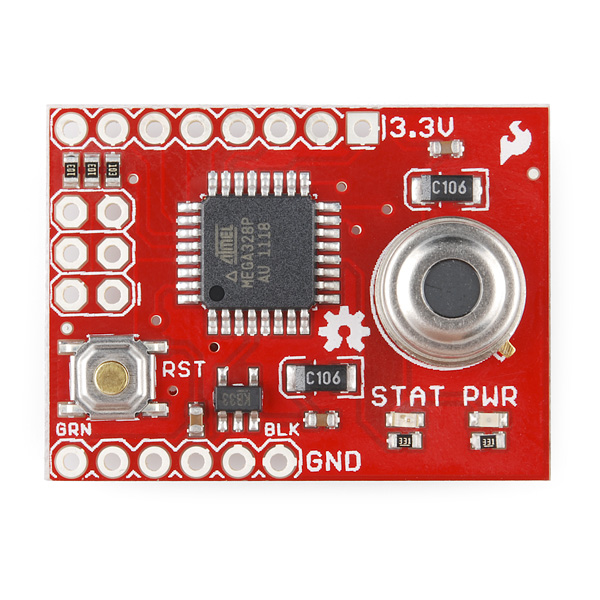
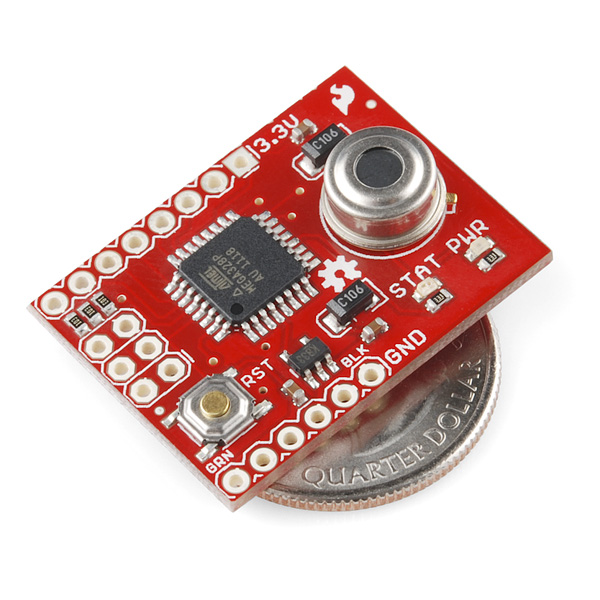
This is an evaluation board for the MLX90614 IR Thermometer. The sensor is connected to an ATmega328 running at 3.3V with a STK500 (Arduino) 8MHz bootloader. Code can be loaded through the FTDI basic interface and the Arduino environment.
The MLX9061 sensor is a high precision, small size, single zone IR thermometer with an optional SMBus (two-wire) or PWM interface. The ATMega328 comes with demo code that gives a temperature readout in degrees F at 38400bps. You can use a 3.3V FTDI Basic to connect to the board.
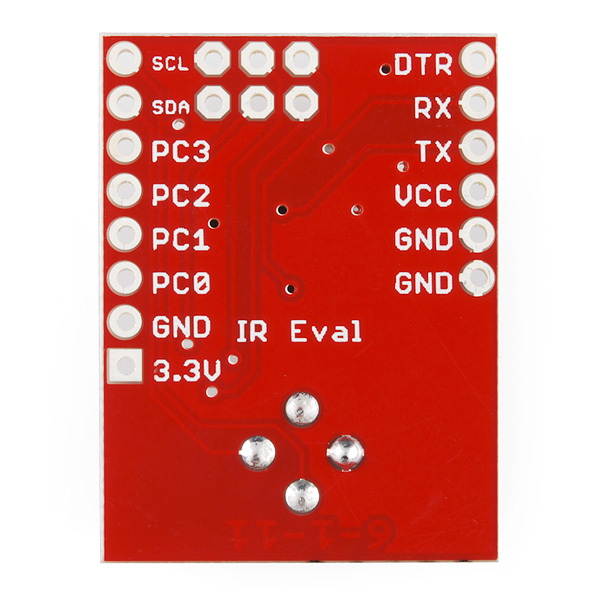
This revision corrects the silkscreen error on the FTDI header. We've also added pull-up resistors to the I2C lines.
- ATMega328 w/ 8MHz STK500 (Arduino) bootloader
- MLX90614 IR sensor, 3V version
- Power and status LEDs
- Schematic
- Eagle Files
- Hookup Guide
- Datasheet (MLX90614)
- GitHub
SparkFun IR Thermometer Evaluation Board - MLX90614 Product Help and Resources
MLX90614 IR Thermometer Hookup Guide
October 29, 2015
How to use the MLX90614 or our SparkFun IR Thermometer Evaluation Board to take temperatures remotely, over short distances.
Core Skill: Soldering
This skill defines how difficult the soldering is on a particular product. It might be a couple simple solder joints, or require special reflow tools.
Skill Level: Noob - Some basic soldering is required, but it is limited to a just a few pins, basic through-hole soldering, and couple (if any) polarized components. A basic soldering iron is all you should need.
See all skill levels
Core Skill: Programming
If a board needs code or communicates somehow, you're going to need to know how to program or interface with it. The programming skill is all about communication and code.
Skill Level: Rookie - You will need a better fundamental understand of what code is, and how it works. You will be using beginner-level software and development tools like Arduino. You will be dealing directly with code, but numerous examples and libraries are available. Sensors or shields will communicate with serial or TTL.
See all skill levels
Core Skill: Electrical Prototyping
If it requires power, you need to know how much, what all the pins do, and how to hook it up. You may need to reference datasheets, schematics, and know the ins and outs of electronics.
Skill Level: Noob - You don't need to reference a datasheet, but you will need to know basic power requirements.
See all skill levels
Comments
Looking for answers to technical questions?
We welcome your comments and suggestions below. However, if you are looking for solutions to technical questions please see our Technical Assistance page.
Customer Reviews
5 out of 5
Based on 1 ratings:
2 of 3 found this helpful:
Fun sensor
I bought this evaluation board to play around with while I had a few days off from work. I also bought the Micro OLED display, as shown in the hookup guide. There was very little information on how to actually get the OLED interfaced with this board, but I managed to figure it out after a few false starts. With the OLED connected and a Lipo battery as a power supply, I found myself checking the temperature on all sorts of things. How hot is my soup? What is the temperature of that window? How hot is that heat Sink? Anyway, kind of fun, much more so with the OLED display, and even a tad bit useful to boot.
Anyone managed to hook MLX90614 Evaluation board with MICRO OLED breakout display in SPI Mode, please reply to this comment need your help! Also, When I am compiling the example code named MLX90614_Serial Demo in Arduino IDE I face the below error: Arduino: 1.8.13 (Mac OS X), Board: "Arduino Uno"
/private/var/folders/lm/_yd7wz4x21vfrn9rjpxtbz480000gn/T/AppTranslocation/479406B4-7227-4C12-852C-1CE8C77B7B8A/d/Arduino.app/Contents/Java/arduino-builder -dump-prefs -logger=machine -hardware /private/var/folders/lm/_yd7wz4x21vfrn9rjpxtbz480000gn/T/AppTranslocation/479406B4-7227-4C12-852C-1CE8C77B7B8A/d/Arduino.app/Contents/Java/hardware -tools /private/var/folders/lm/_yd7wz4x21vfrn9rjpxtbz480000gn/T/AppTranslocation/479406B4-7227-4C12-852C-1CE8C77B7B8A/d/Arduino.app/Contents/Java/tools-builder -tools /private/var/folders/lm/_yd7wz4x21vfrn9rjpxtbz480000gn/T/AppTranslocation/479406B4-7227-4C12-852C-1CE8C77B7B8A/d/Arduino.app/Contents/Java/hardware/tools/avr -built-in-libraries /private/var/folders/lm/_yd7wz4x21vfrn9rjpxtbz480000gn/T/AppTranslocation/479406B4-7227-4C12-852C-1CE8C77B7B8A/d/Arduino.app/Contents/Java/libraries -libraries /Users/evansoo/Documents/Arduino/libraries -fqbn=arduino:avr:uno -vid-pid=0000_0000 -ide-version=10813 -build-path /var/folders/lm/_yd7wz4x21vfrn9rjpxtbz480000gn/T/arduino_build_883984 -warnings=none -build-cache /var/folders/lm/_yd7wz4x21vfrn9rjpxtbz480000gn/T/arduino_cache_699043 -prefs=build.warn_data_percentage=75 -prefs=runtime.tools.avrdude.path=/private/var/folders/lm/_yd7wz4x21vfrn9rjpxtbz480000gn/T/AppTranslocation/479406B4-7227-4C12-852C-1CE8C77B7B8A/d/Arduino.app/Contents/Java/hardware/tools/avr -prefs=runtime.tools.avrdude-6.3.0-arduino17.path=/private/var/folders/lm/_yd7wz4x21vfrn9rjpxtbz480000gn/T/AppTranslocation/479406B4-7227-4C12-852C-1CE8C77B7B8A/d/Arduino.app/Contents/Java/hardware/tools/avr -prefs=runtime.tools.arduinoOTA.path=/private/var/folders/lm/_yd7wz4x21vfrn9rjpxtbz480000gn/T/AppTranslocation/479406B4-7227-4C12-852C-1CE8C77B7B8A/d/Arduino.app/Contents/Java/hardware/tools/avr -prefs=runtime.tools.arduinoOTA-1.3.0.path=/private/var/folders/lm/_yd7wz4x21vfrn9rjpxtbz480000gn/T/AppTranslocation/479406B4-7227-4C12-852C-1CE8C77B7B8A/d/Arduino.app/Contents/Java/hardware/tools/avr -prefs=runtime.tools.avr-gcc.path=/private/var/folders/lm/_yd7wz4x21vfrn9rjpxtbz480000gn/T/AppTranslocation/479406B4-7227-4C12-852C-1CE8C77B7B8A/d/Arduino.app/Contents/Java/hardware/tools/avr -prefs=runtime.tools.avr-gcc-7.3.0-atmel3.6.1-arduino7.path=/private/var/folders/lm/_yd7wz4x21vfrn9rjpxtbz480000gn/T/AppTranslocation/479406B4-7227-4C12-852C-1CE8C77B7B8A/d/Arduino.app/Contents/Java/hardware/tools/avr -verbose /Users/evansoo/Documents/Arduino/libraries/SparkFun_MLX90614_Arduino_Library-master/examples/MLX90614_Serial_Demo/MLX90614_Serial_Demo.ino /private/var/folders/lm/_yd7wz4x21vfrn9rjpxtbz480000gn/T/AppTranslocation/479406B4-7227-4C12-852C-1CE8C77B7B8A/d/Arduino.app/Contents/Java/arduino-builder -compile -logger=machine -hardware /private/var/folders/lm/_yd7wz4x21vfrn9rjpxtbz480000gn/T/AppTranslocation/479406B4-7227-4C12-852C-1CE8C77B7B8A/d/Arduino.app/Contents/Java/hardware -tools /private/var/folders/lm/_yd7wz4x21vfrn9rjpxtbz480000gn/T/AppTranslocation/479406B4-7227-4C12-852C-1CE8C77B7B8A/d/Arduino.app/Contents/Java/tools-builder -tools /private/var/folders/lm/_yd7wz4x21vfrn9rjpxtbz480000gn/T/AppTranslocation/479406B4-7227-4C12-852C-1CE8C77B7B8A/d/Arduino.app/Contents/Java/hardware/tools/avr -built-in-libraries /private/var/folders/lm/_yd7wz4x21vfrn9rjpxtbz480000gn/T/AppTranslocation/479406B4-7227-4C12-852C-1CE8C77B7B8A/d/Arduino.app/Contents/Java/libraries -libraries /Users/evansoo/Documents/Arduino/libraries -fqbn=arduino:avr:uno -vid-pid=0000_0000 -ide-version=10813 -build-path /var/folders/lm/_yd7wz4x21vfrn9rjpxtbz480000gn/T/arduino_build_883984 -warnings=none -build-cache /var/folders/lm/_yd7wz4x21vfrn9rjpxtbz480000gn/T/arduino_cache_699043 -prefs=build.warn_data_percentage=75 -prefs=runtime.tools.avrdude.path=/private/var/folders/lm/_yd7wz4x21vfrn9rjpxtbz480000gn/T/AppTranslocation/479406B4-7227-4C12-852C-1CE8C77B7B8A/d/Arduino.app/Contents/Java/hardware/tools/avr -prefs=runtime.tools.avrdude-6.3.0-arduino17.path=/private/var/folders/lm/_yd7wz4x21vfrn9rjpxtbz480000gn/T/AppTranslocation/479406B4-7227-4C12-852C-1CE8C77B7B8A/d/Arduino.app/Contents/Java/hardware/tools/avr -prefs=runtime.tools.arduinoOTA.path=/private/var/folders/lm/_yd7wz4x21vfrn9rjpxtbz480000gn/T/AppTranslocation/479406B4-7227-4C12-852C-1CE8C77B7B8A/d/Arduino.app/Contents/Java/hardware/tools/avr -prefs=runtime.tools.arduinoOTA-1.3.0.path=/private/var/folders/lm/_yd7wz4x21vfrn9rjpxtbz480000gn/T/AppTranslocation/479406B4-7227-4C12-852C-1CE8C77B7B8A/d/Arduino.app/Contents/Java/hardware/tools/avr -prefs=runtime.tools.avr-gcc.path=/private/var/folders/lm/_yd7wz4x21vfrn9rjpxtbz480000gn/T/AppTranslocation/479406B4-7227-4C12-852C-1CE8C77B7B8A/d/Arduino.app/Contents/Java/hardware/tools/avr -prefs=runtime.tools.avr-gcc-7.3.0-atmel3.6.1-arduino7.path=/private/var/folders/lm/_yd7wz4x21vfrn9rjpxtbz480000gn/T/AppTranslocation/479406B4-7227-4C12-852C-1CE8C77B7B8A/d/Arduino.app/Contents/Java/hardware/tools/avr -verbose /Users/evansoo/Documents/Arduino/libraries/SparkFun_MLX90614_Arduino_Library-master/examples/MLX90614_Serial_Demo/MLX90614_Serial_Demo.ino Using board 'uno' from platform in folder: /private/var/folders/lm/_yd7wz4x21vfrn9rjpxtbz480000gn/T/AppTranslocation/479406B4-7227-4C12-852C-1CE8C77B7B8A/d/Arduino.app/Contents/Java/hardware/arduino/avr Using core 'arduino' from platform in folder: /private/var/folders/lm/_yd7wz4x21vfrn9rjpxtbz480000gn/T/AppTranslocation/479406B4-7227-4C12-852C-1CE8C77B7B8A/d/Arduino.app/Contents/Java/hardware/arduino/avr Detecting libraries used... /private/var/folders/lm/_yd7wz4x21vfrn9rjpxtbz480000gn/T/AppTranslocation/479406B4-7227-4C12-852C-1CE8C77B7B8A/d/Arduino.app/Contents/Java/hardware/tools/avr/bin/avr-g++ -c -g -Os -w -std=gnu++11 -fpermissive -fno-exceptions -ffunction-sections -fdata-sections -fno-threadsafe-statics -Wno-error=narrowing -flto -w -x c++ -E -CC -mmcu=atmega328p -DF_CPU=16000000L -DARDUINO=10813 -DARDUINO_AVR_UNO -DARDUINO_ARCH_AVR -I/private/var/folders/lm/_yd7wz4x21vfrn9rjpxtbz480000gn/T/AppTranslocation/479406B4-7227-4C12-852C-1CE8C77B7B8A/d/Arduino.app/Contents/Java/hardware/arduino/avr/cores/arduino -I/private/var/folders/lm/_yd7wz4x21vfrn9rjpxtbz480000gn/T/AppTranslocation/479406B4-7227-4C12-852C-1CE8C77B7B8A/d/Arduino.app/Contents/Java/hardware/arduino/avr/variants/standard /var/folders/lm/_yd7wz4x21vfrn9rjpxtbz480000gn/T/arduino_build_883984/sketch/MLX90614_Serial_Demo.ino.cpp -o /dev/null -DARDUINO_LIB_DISCOVERY_PHASE Alternatives for Wire.h: [Wire@1.0] ResolveLibrary(Wire.h) -> candidates: [Wire@1.0] /private/var/folders/lm/_yd7wz4x21vfrn9rjpxtbz480000gn/T/AppTranslocation/479406B4-7227-4C12-852C-1CE8C77B7B8A/d/Arduino.app/Contents/Java/hardware/tools/avr/bin/avr-g++ -c -g -Os -w -std=gnu++11 -fpermissive -fno-exceptions -ffunction-sections -fdata-sections -fno-threadsafe-statics -Wno-error=narrowing -flto -w -x c++ -E -CC -mmcu=atmega328p -DF_CPU=16000000L -DARDUINO=10813 -DARDUINO_AVR_UNO -DARDUINO_ARCH_AVR -I/private/var/folders/lm/_yd7wz4x21vfrn9rjpxtbz480000gn/T/AppTranslocation/479406B4-7227-4C12-852C-1CE8C77B7B8A/d/Arduino.app/Contents/Java/hardware/arduino/avr/cores/arduino -I/private/var/folders/lm/_yd7wz4x21vfrn9rjpxtbz480000gn/T/AppTranslocation/479406B4-7227-4C12-852C-1CE8C77B7B8A/d/Arduino.app/Contents/Java/hardware/arduino/avr/variants/standard -I/private/var/folders/lm/_yd7wz4x21vfrn9rjpxtbz480000gn/T/AppTranslocation/479406B4-7227-4C12-852C-1CE8C77B7B8A/d/Arduino.app/Contents/Java/hardware/arduino/avr/libraries/Wire/src /var/folders/lm/_yd7wz4x21vfrn9rjpxtbz480000gn/T/arduino_build_883984/sketch/MLX90614_Serial_Demo.ino.cpp -o /dev/null -DARDUINO_LIB_DISCOVERY_PHASE Alternatives for SparkFunMLX90614.h: [SparkFun_MLX90614_Arduino_Library-master@1.0.3] ResolveLibrary(SparkFunMLX90614.h) -> candidates: [SparkFun_MLX90614_Arduino_Library-master@1.0.3] /private/var/folders/lm/_yd7wz4x21vfrn9rjpxtbz480000gn/T/AppTranslocation/479406B4-7227-4C12-852C-1CE8C77B7B8A/d/Arduino.app/Contents/Java/hardware/tools/avr/bin/avr-g++ -c -g -Os -w -std=gnu++11 -fpermissive -fno-exceptions -ffunction-sections -fdata-sections -fno-threadsafe-statics -Wno-error=narrowing -flto -w -x c++ -E -CC -mmcu=atmega328p -DF_CPU=16000000L -DARDUINO=10813 -DARDUINO_AVR_UNO -DARDUINO_ARCH_AVR -I/private/var/folders/lm/_yd7wz4x21vfrn9rjpxtbz480000gn/T/AppTranslocation/479406B4-7227-4C12-852C-1CE8C77B7B8A/d/Arduino.app/Contents/Java/hardware/arduino/avr/cores/arduino -I/private/var/folders/lm/_yd7wz4x21vfrn9rjpxtbz480000gn/T/AppTranslocation/479406B4-7227-4C12-852C-1CE8C77B7B8A/d/Arduino.app/Contents/Java/hardware/arduino/avr/variants/standard -I/private/var/folders/lm/_yd7wz4x21vfrn9rjpxtbz480000gn/T/AppTranslocation/479406B4-7227-4C12-852C-1CE8C77B7B8A/d/Arduino.app/Contents/Java/hardware/arduino/avr/libraries/Wire/src -I/Users/evansoo/Documents/Arduino/libraries/SparkFun_MLX90614_Arduino_Library-master/src /var/folders/lm/_yd7wz4x21vfrn9rjpxtbz480000gn/T/arduino_build_883984/sketch/MLX90614_Serial_Demo.ino.cpp -o /dev/null -DARDUINO_LIB_DISCOVERY_PHASE Using cached library dependencies for file: /private/var/folders/lm/_yd7wz4x21vfrn9rjpxtbz480000gn/T/AppTranslocation/479406B4-7227-4C12-852C-1CE8C77B7B8A/d/Arduino.app/Contents/Java/hardware/arduino/avr/libraries/Wire/src/Wire.cpp Using cached library dependencies for file: /private/var/folders/lm/_yd7wz4x21vfrn9rjpxtbz480000gn/T/AppTranslocation/479406B4-7227-4C12-852C-1CE8C77B7B8A/d/Arduino.app/Contents/Java/hardware/arduino/avr/libraries/Wire/src/utility/twi.c /private/var/folders/lm/_yd7wz4x21vfrn9rjpxtbz480000gn/T/AppTranslocation/479406B4-7227-4C12-852C-1CE8C77B7B8A/d/Arduino.app/Contents/Java/hardware/tools/avr/bin/avr-g++ -c -g -Os -w -std=gnu++11 -fpermissive -fno-exceptions -ffunction-sections -fdata-sections -fno-
Hi there, it sounds like you are looking for technical assistance. Please use the link in the banner above, to get started with posting a topic in our forums. Maybe someone in the community can help you there. (*Please note that our TS team does not provide consultation on custom code.)
That being said, that appears to be an incomplete print out of the compilation process (i.e. the end seems to be missing). As a tip, I would work on getting the eval board to display text on the OLED display first before trying to do it all at once.
Again, it sounds like you are looking for technical assistance. Please use the link in the banner above, to get started with posting a topic in our forums. Our technical support team will do their best to assist you; however, please note that our TS team does not provide consultation on custom code.
That being said, the hookup guide for this product lists the pin equivalents to the Arduino Uno that are available as well a how to program the board. There is a picture of one of our engineers (at the end of the hookup guide) with utilizing the MicroOLED in the fashion you are asking... so, I am assuming it is possible. Again, please post further questions in our forum.
Why don't you bring out the remaining ATMega328 pins ? There would be more than adequate space to do so on the existing side rows and it would make this board way more useful at zero added cost.
You guys have all the source files with Eagle, just open it up, add those pads and get it made using the low cost PCB Fab house!
Most people will be interfacing this to another microcontroller anyway. I guess they couldn't justify bringing out the other pins.
Why when there is every capability already on this board? Any breakout board should break out any and every pin available... even on a sensor such as this (I know it's not listed as a BOB). My 2 cents...
I completely agree. If there is no incremental cost (a few additional pads), then there is now downside to doing so. The fact that this is Arduino-based, and they included the ISP header says this board is designed to be mod'd. So why not more of the unused GPIOs too?
All designs are trade-offs with specific goals. The goals for this board were to create a very small "smart sensor", not a general-purpose microcontroller board (we have other products that are much better suited to that task). Note that we did break out a few of the pins for your use, and don't forget that additional pins are present on the 6-pin programming header.
Squeezing on 8-10 more header pins looks doable at zero incremental cost. Clearly with the sensor, it's never going to be a general processor board but as an eval module, having more pins = good. I really don't understand the reasoning. Maybe there is a bigger picture you could enlighten me on.
Also, which version of the MLX90614 do you have on it?
I understand their reasoning, while I certainly understand everyone's opinion, they wanted to create a sensor not a Swiss army knife.
No really, I just don't believe every tool needs to be a Swiss army knife, even if it is trivial to do so. Some times it just complicates things, remember the old adage: K.I.S.S. -- Keep it simple stupid.
+1 Especially if you want any chance of mounting this is in a useful position. An Arduino-sized IR thermometer board would be very useful... for measuring the temperature of something directly above it.
It's the BAA version (3V, one zone, filter inside). Your points are all well-taken, we'll try to be better about this in the future. In the meantime, this board does give you access to the UART, I2C, SPI, and four analog/digital pins for your hacking enjoyment.
This is way easier to implement (code) with the IOIO board.
http://demos-ioio-irthermometer.blogspot.com/
http://youtu.be/3GkSte5QZ0g
Which type of MLX90614 is used with this evaluation board? In the data sheet, there are multiple parts MLX90614 ABB etc
Several others have asked that on this page; it's the BAA version.
I have bought one of these evaluation boards and an ftdi basic. Using a raspberry pi I found that getting temperature readings was almost a plug and play exercise. It was a lot easier than I thought it would be.
I have a question. Is the 90614 sensor weatherproof? I want to use one for an outdoor application. Do I need to enclose the sensor and if so what sort of 'window' would I need so that I get the temperature of what I want to measure rather than the temperature of the window itself?
Great idea: those sensors are always a slight pain to work with. However, why use an ATmega328? Would an ATtiny(85) not have been a better choice for such a "smart sensor" board?
I have question??? How i can connect this evaluation board to PC or LCD to show temprature.???
Sorry for the late delay. An FTDI board will work well to connect this to a PC over USB. For an LCD, you could update the code on the sensor board itself and then attach it directly to a serial-enabled LCD.
Hello all, i know this sensor is different from MLX90614ESF. I don't see that sparkfun sells any of theses. I find them on some other websites but they don't have the evaluation board set up. Also does anyone know if the code would be the same for the MLX90614ESF.
Thanks
Thanks a bunch, a 1ronzo. I have been a machinist for over 30 yrs, and am now learning to automate things and learning to program and electronics stuff. Kinda like slogging through ankle deep mud, LOL! I want to learn it on my own, but it is real nice to have a little help. People like you and all the good, smart folks on these forums are awesome to me!
What I mean is, can I program the eval board for digital output?
Yes. The board includes an FTDI header and the stk500 (arduino) bootloader. This means you can load sketches with the arduino IDE, just select the 'Arduino Pro (3.3V, 8 MHz) w/ ATmega328' in the board menu. However, the example code loaded on the board is not written in Arduino (sorry about that!), so you will need to write your own code. But never fear! Someone else has already done it.
This eval board works great, with an FTDI Basic I can get a scrolling temp readout using the Arduino program. I am new at this, can I get an output or two using the PC0 thru PC3? Specifically, light a remote LED and activate a servo. I
m using Arduino 1.01 and the IC2 files to try to get an output at a certain temperature. Im learning, but I`m stumped. I can run all this through an Arduino Uno, but would like to know if I could do it just using the eval board.So, I will have to run this eval board thru an Arduino to get temp info? I have it wired with FTDI basic cable.
This board outputs the temperature data through the TX serial line (on the atmega), so you can read it with either another uC or the FTDI Basic. You should be able to plug the board into a 3.3V or 5V FTDI Basic and immediately see temperature data streaming in a serial port at 38400.
I purchased this and can't grok how to use it yet. The example code isn't an arduino sketch and looks like it might be the demo code mentioned in the product description? Not sure what to do with it. While I can hook up a 3.3V FTDI basic to this eval board I'm not sure what to do next? When I connect a terminal to this port at 38400bps should it just be printing out temps? Would love to be pointed in the right direction! Thanks in advance for any help!
UPDATE Super easy, connect 3.3v / GND, Arduino pin A5 to SCL and A4 to SDA, and follow the instructions a bildr.org (basically, download the I2CMaster library and upload the .pde sketch, and connect your terminal at 9600b and start pointing the sensor at different temperatures!).
What is the size of the board? I don't have eagle installed... One interesting Data to put in all PCB boards description in the store, is the width and heigth of them... I always need it to put in 3D programs Like SolidWorks... Thanks!
Exactly which version of the sensor are on these boards? The MLX90614xCH has a FOV of ~20 deg, while the MLX90614xAA has a FOV of ~175 deg. That's a huge difference when you're trying to calculate spot area.
MLX90614ESF-BAA
I hate to ask a dumb question, but here goes. What pins ARE available for external use on the board? That is, if I am trying to build a small controller using just this board (not the targeted application I know but it is SO tempting with all those extra controller cycles just laying there begging to do something). What pins could I use post-programming? Talk to me like I am 5. Thanks.
As far as this particular board goes, we haven't broken out all of the pins, but there are a number of them available for your use. The best place to find this information, for any of our products, is in the schematic.
If you open the schematic (PDF link above), you'll see several multi-pin "parts" labeled J1, JP1, and JP2. These are the three headers on the board; the rows of holes ready to solder wires or header pins to. Referring back to the schematic, any signal going to any of these headers is available for your use. (They are labeled on the backside of the board except for the SPI programming header, the layout of which you can find in the schematic itself).
As I mentioned above, the available pins include the UART, I2C, and SPI ports, and four analog/digital pins. It should be noted that if you really need access to a particular pin that's not already broken out, it's difficult but possible to solder fine wires directly to the chip. We've all had to do that at one point or another. Happy hacking!
That sounds like plenty of pins for a simple temperature controller. I was not sure if any of the available pins might interfere with the operation of the micro. Thank you.