- Home
- Product Categories
- Development Kits
- SparkFun Arduino Pro Mini Starter Kit - 5V/16MHz

SparkFun Arduino Pro Mini Starter Kit - 5V/16MHz
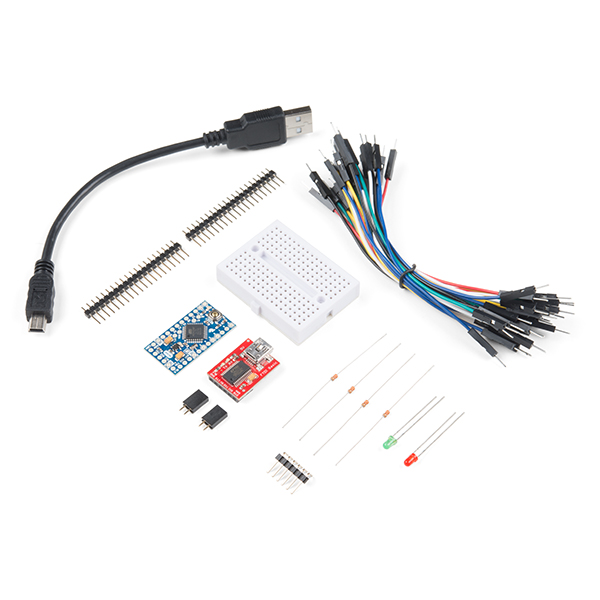
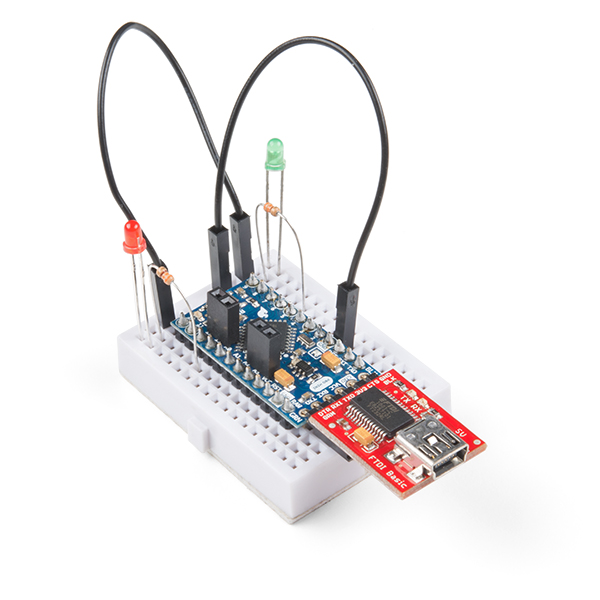
What's blue, thin, and comes with everything you need to get started? The Pro Mini 5V Starter Kit! The Pro Mini is SparkFun's minimal design approach to Arduino running at 5V with a 16MHz bootloader. The Arduino Pro Mini does not come with connectors populated so that you can solder in any connector or wire with any orientation you need.
The Arduino Pro Mini in this kit works well with the FTDI Basic Breakout which is why we included one in the starter kit. The voltage regulator on board accepts voltage up to 12VDC. If you're supplying unregulated power to the board be sure to connect to the "RAW" pin and not VCC. The latest and greatest version of this board also breaks out the ADC6 and ADC7 pins as well as adds footprints for optional I2C resistors.
This kit not only includes the Pro Mini and FTDI board, but 40 male headers, six right angle male headers (great for the FTDI connection), two sets of 2-pin female headers for the offset A6/A7 and SDA/SCL pins, a tiny breadboard, jumper wires, and even a couple of LEDs with resistors to get you blinking right away. We also included a six inch, mini-B USB cable for your FTDI board, this cable is short but mighty and works well with this tiny setup, but if you need a longer one check your USB cable drawer or the hookup accessories below.
- Arduino Pro Mini 328 - 5V/16MHz
- FTDI Basic Breakout - 5V
- USB Mini-B Cable - 6"
- Break Away Headers - Straight (40 pins)
- Break Away Headers - Right Angle (6 pins)
- Female Headers (2 pins) x2
- Breadboard - Mini Modular (White)
- Jumper Wires Premium 4" M/M (30 pack)
- LED - Basic Red 3mm
- LED - Basic Green 3mm
- Resistor 330 Ohm 1/6th Watt PTH x2
Pro Mini
- ATmega328 running at 16MHz with external resonator (0.5% tolerance)
- 0.8mm Thin PCB
- USB connection off board
- Supports auto-reset
- 5V regulator
- Max 150mA output
- Over current protected
- Weighs less than 2 grams!
- DC input 5V up to 12V
- On board Power and Status LEDs
- Analog Pins: 8
- Digital I/Os: 14
- 0.7x1.3" (18x33mm)
SparkFun Arduino Pro Mini Starter Kit - 5V/16MHz Product Help and Resources
Using the Arduino Pro Mini 3.3V
September 5, 2013
This tutorial is your guide to all things Arduino Pro Mini. It explains what it is, what it's not, and how to get started using it.
SparkFun USB to Serial UART Boards Hookup Guide
February 18, 2016
How to use the SparkFun FTDI based boards to program an Arduino and access another serial device over the hardware serial port, without unplugging anything!
Core Skill: Soldering
This skill defines how difficult the soldering is on a particular product. It might be a couple simple solder joints, or require special reflow tools.
Skill Level: Noob - Some basic soldering is required, but it is limited to a just a few pins, basic through-hole soldering, and couple (if any) polarized components. A basic soldering iron is all you should need.
See all skill levels
Core Skill: Programming
If a board needs code or communicates somehow, you're going to need to know how to program or interface with it. The programming skill is all about communication and code.
Skill Level: Rookie - You will need a better fundamental understand of what code is, and how it works. You will be using beginner-level software and development tools like Arduino. You will be dealing directly with code, but numerous examples and libraries are available. Sensors or shields will communicate with serial or TTL.
See all skill levels
Core Skill: Electrical Prototyping
If it requires power, you need to know how much, what all the pins do, and how to hook it up. You may need to reference datasheets, schematics, and know the ins and outs of electronics.
Skill Level: Rookie - You may be required to know a bit more about the component, such as orientation, or how to hook it up, in addition to power requirements. You will need to understand polarized components.
See all skill levels
Comments
Looking for answers to technical questions?
We welcome your comments and suggestions below. However, if you are looking for solutions to technical questions please see our Technical Assistance page.
Customer Reviews
5 out of 5
Based on 1 ratings:
Great little kit
The kit contains everything needed to connect to a PC and test the Arduino Pro Mini. With a little soldering and the sample code I was working within hours.