
OpenLog Landing Page
Welcome to OpenLog!
The OpenLog is an amazing little board that can store or "log" huge amounts of serial data. It can act as a black box to store all the serial data that your project generates, for scientific or debugging purposes. What is this good for? Here are a few examples:
- What sensor values are your robot actually measuring?
- What temperature did your [anything] reach when you weren't around to monitor it?
- What acceleration did your model rocket experience?
- Where has my GPS receiver been?
And almost anything else you can think of.
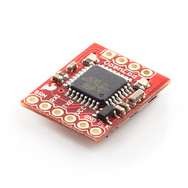
It's smaller in person
Quickstart
Here's one way to use an OpenLog with the factory-default settings, but note that the OpenLog is very versatile and supports other settings and ways to connect to it.
Solder your desired headers to the OpenLog (see below).
Plug a micro-SD card into the socket on the back of the OpenLog.
Connect a power supply (3.3V to 12V) to the VCC / GND headers.
Connect your project's serial output (9600 baud TTL-level) to the RXI header.
Send any serial data to the OpenLog. This could be sensor readings, GPS data, warnings, anything.
When you're done sending your data, wait half a second for the OpenLog to save the last bit of data, and remove power.
Remove the micro-SD card from the OpenLog, and look at it on your computer.
There should be one (or more) files on the card named e.g. "LOG00001.TXT". The OpenLog will create a new file each time it runs; the highest-numbered file is the most recent log. Open it on your computer, and you'll see all the text that was sent to the OpenLog!
Tools and supplies you'll need
- Micro-SD card
- FTDI Basic Breakout and mini-USB cable, or FTDI cable
- Soldering iron and solder
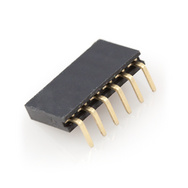
- 6-pin female header
- M-M jumper wires OR
- FTDI Crossover Board and right-angled headers
Soldering headers onto the OpenLog
You can solder any headers or bare wires you like to the OpenLog. If you'd like to plug it into a male FTDI header as found on many of our products, we recommend using a 6-pin, right-angle female header (PRT-09429). If you haven't soldered before, it's easy, see our tutorial on the basics.
The easiest way to solder the female header to the OpenLog is to put it underneath the board, with the pins pointing up.
Solder all six pins, and you'll be ready to go! (You don't need to connect to the other four pins, they are used to load the initial firmware onto the board.)
Sending data to the OpenLog
The OpenLog has the same pinout as an FTDI Basic Breakout, allowing you to connect it to the same devices. This makes it very easy to log data from those devices; just program the device to send text or binary data to the serial port.
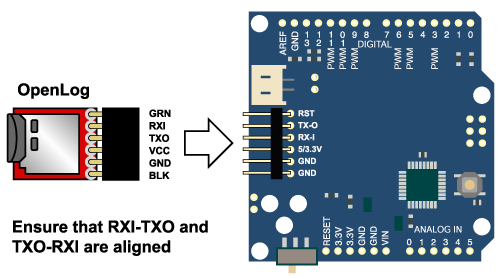
TIP: When plugging the OpenLog into a device's FTDI port, do pay attention to the pin labeling to ensure that you're plugging it in correctly. In particular, match up TXO to RXI, and RXI to TXO. In many cases, the micro-SD card socket will be facing up.
You can also use jumper wires to connect the OpenLog to your system. The minimum required pins are VCC (3.3V to 12V), GND, and RXI (3.3V or 5V).
Retrieving data from the OpenLog
There are two ways to retrieve data from the OpenLog:
You can pull out the micro-SD card and read it with your computer.
Power down the OpenLog before removing the micro-SD card. To ensure that you get the last bit of data, wait five seconds after the last data is sent before powering down. This delay gives the OpenLog a chance to write the last partial buffer of data to the card.
When you examine the card with your computer, you will see one or more files on the card named e.g. "LOG00001.TXT". The OpenLog will create a new file each time it powers up; the highest-numbered file is the most recent log. Open it with a text editor, and you'll see all the text that was sent to the OpenLog!
You can use a terminal program to connect directly to the OpenLog, and use the "command mode" to dump the data over the serial link. More on this below.
Configuring the OpenLog
Note that this is a quick overview, for full information visit the OpenLog Wiki.
There are two ways to configure the OpenLog. You can edit the config file on the micro-SD card, or you can access the built-in command mode.
Config file
After you use the OpenLog at least once and examine the micro-SD card, you will find a file called CONFIG.TXT on it. If you edit this file, you will see that it contains a set of comma-separated numbers, followed by a text legend:
9600,26,3,0,1,1
baud,escape,esc#,mode,verb,echo
You can edit this file in-place with a text editor, and the next time the OpenLog is powered up, it will use the new settings.
baud: a standard communications rate; 115200 is the max, 9600 is the default.
escape: the ASCII character used to switch from logging mode to command mode (see below). The default, 26, is CTRL-Z.
esc#: the number of times you need to enter the above character to enter command mode.
mode: changes the way OpenLog behaves on powerup. 0 = new log (the default), 1 = sequential log, 2 = command mode.
verb: short for "verbose"; 1 = print out extra debugging info, 0 = be quiet.
echo: controls whether characters are echoed back to the sender in command mode. If you can't see what you're typing, set this to 1.
Command mode
You may also connect directly to the OpenLog and interact with it through a built-in command system. One advantage of this method is that you don't have to remove the micro-SD card to retrieve the stored data.
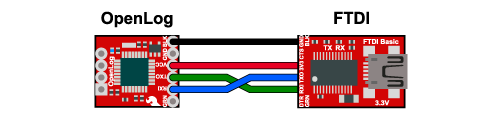
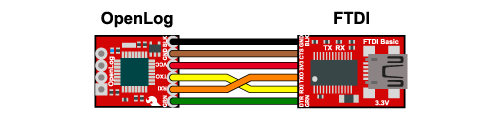
Note that If you want to access the OpenLog this way, you cannot plug it straight into an FTDI board, as the TX and RX pins are reversed. (This is what allows it to be plugged into the same devices you'd normally plug an FTDI into.)
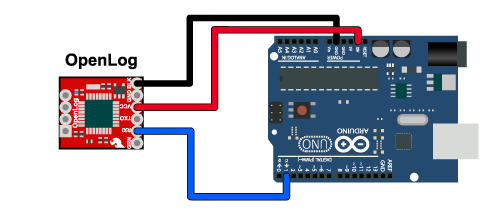
There are two easy solutions to this. One is to use four jumper wires to connect from an FTDI board or cable to the OpenLog. Connect power and ground straight across, but cross the TX and RX lines as shown in the below diagram:
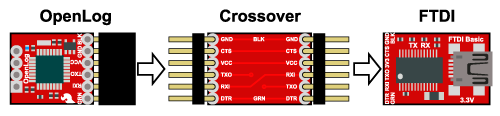
The other solution is to use Sparkfun's Crossover breakout board, which is a handy little board that makes the above connections for you:
Using command mode
Open a terminal program (such as TeraTerm or CoolTerm) to the OpenLog, using the baud rate you've most recently used. (If you haven't changed it, the default is 9600bps.)
Enter CTRL-Z three times, and a ">" prompt should appear. The OpenLog will now respond to a handful of typed commands. If you ever need help, type '?' and press enter. You will get a page listing the available commands:
OpenLog v3.11
Basic commands:
new <file>                 : Creates <file>
(etc.)
Commands are available to create, delete, and examine files and directories and alter the behavior of the OpenLog. Documentation on all the commands is available at the OpenLog Wiki command page.
Two of the more useful commands are:
ls: short for list (that's a lowercase L, not a one), will give you a listing of all the files on the micro-SD card.
read filename: will print out the contents of a log file. If you tell your terminal program to save the output of this command, you won't have to remove the micro-SD card from the OpenLog to retrieve the data.
See the OpenLog Wiki for much more information.
Tips:
This is just the tip of the iceberg; lots more information is available at the OpenLog Wiki.
The OpenLog is particularly useful when a wireless data link would be too expensive or difficult to set up.
If you write your serial data into the OpenLog as comma-separated values (CSV), you can open the file using a spreadsheet program to make data analysis much easier.
Don't insert or remove the micro-SD card while the OpenLog is powered up. Always remove power first. (Especially don't swap cards without powering down first, or corruption requiring a reformat is likly to occur.)
OpenLogs are loaded with the latest firmware version as they're lovingly manufactured. Occasionally we'll update the firmware to add features and fix bugs. (And since it's open source, you can make your own changes as well!) You can update the firmware yourself using the instructions on the OpenLog Wiki.
(Note that when programming the board, you will need to make all six connections to the FTDI, or use the Crossover board which does this for you.)
The OpenLog may drop characters at 57600 baud and above if the write-speed limit of the micro-SD card is exceeded. You can reduce or eliminate this problem by keeping the baud rate as low as possible, inserting delays in the sent data if possible, using a faster class of card, and using a freshly-formatted card. More at the Wiki.
If the blue LED flashes 3 times when you power up, there is a problem with the micro-SD card. Ensure that you've formatted it to FAT32 (and that there's actually a card in the socket!)
If you forget what baud rate (speed) you've set the card to, you can regain control by tying the RXI pin to GND and powering up. Wait until the LEDs are blinking in unison, then power down and remove the jumper. When you power back up, the OpenLog will be running at the default 9600 baud with 3 x CTRL-Z escape characters.
Questions?
If you have questions or problems, first check the OpenLog Wiki, and if that doesn't help, please don't hesitate to contact us.
Have fun!
-Your friends at Sparkfun.
Is it possible to adjust the modification date generated for each new file on the SD card? As it is, mine always dates files as being modified on Jan 1, 2000.
Hi i am in project where i need to save 10 variables of 2 byte in only 1ms, and i have to repeat the procsses each time.
Would OPENLOG work with me? What de you advice me?
thnx.
Hi there, it sounds like you are looking for technical assistance. Please use our forum, to get started with posting a topic. Our technical support team will do their best to assist you.
Is it possible to record video?
Can the data be logged in a .dat format instead of the .txt format?
For anyone wondering how to send Ctrl+z three times on a mac:- 1. Open the Terminal. 2. type vi ctrlz.txt. 3. press the 'i' character once. 4. type ctrl+z three times - you will see ^Z ^Z ^Z appear. 5. press the Esc key once. 6. type :wq (colon w q) and hit enter. 7. In CoolTerm, choose the menu Connection > Send text file. 8. Navigate to your user's directory (has a house icon). 9. Select the ctrlz.txt file. 10. Click OK. You are now in command mode
What if I have two sensors. The first is Gyro over I2C connection and the other sensor is ADXL335 accelerometer connected over 3 analog input pins. I wanna save these sensors data on a 1 GB micro-SD CARD using OpenLog. Any detailed instructions will be appreciated.
Thanks.
Just have your Arduino sketch out-put the data from either (any) sensor to the same Serial port, the one you have the OpenLog connected to.
Confusing for beginners.... example: "Open a terminal program (such as TeraTerm or CoolTerm) to the OpenLog...." what??? You have hotlinks describing what a microSD card is, but how about an example of how to open a terminal program to the openlog....
Appreciate the Instructional...! Getting it into "Command Mode" has Been an issue for me.. Otherwise it has been Creating Log-Files Perfectly. I was trying to solve my questions by ordering a FTDI-Basic but am happy there are other ways I can access command mode. (changing the Config-file "Mode" setting to 2) So Big thanks for your Write-up!!! Vince Negrete
I had a slight issue getting into command mode too through a terminal. I notice I have you hold control and mash z very quickly to get command mode to work.
Exactly... Speed-mashing like a Video-Game was always very successful-4-me.. LOL! It was as-though the Serial command was going through RF and only making it through noise 20% of the time... ???
I was just happy to find a Work-around.