- Home
- Product Categories
- Development Tools
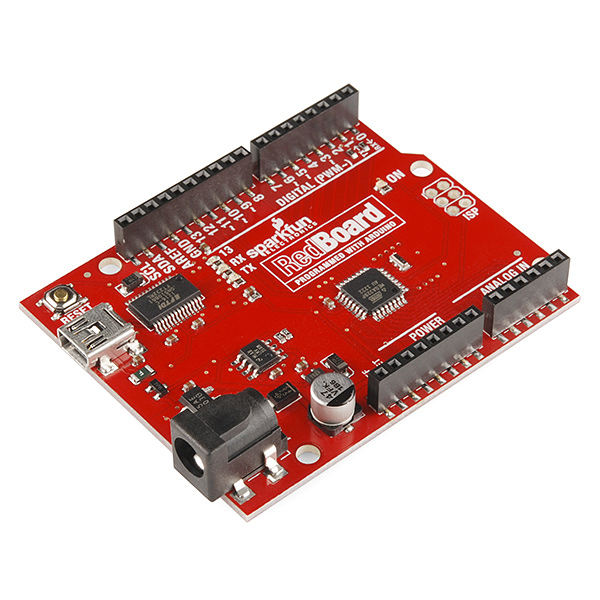
- RedBoard - Programmed with Arduino


RedBoard - Programmed with Arduino
At SparkFun we use many Arduinos and we're always looking for the simplest, most stable one. Each board is a bit different and no one board has everything we want, so we decided to make our own version that combines all our favorite features. The RedBoard combines the simplicity of the UNO's Optiboot bootloader (which is used in the Pro series), the stability of the FTDI (which we all missed after the Duemilanove was discontinued) and the R3 shield compatibility of the latest Arduino UNO R3.
The RedBoard can be programmed over a USB Mini-B cable using the Arduino IDE: Just plug in the board, select "Arduino UNO" from the board menu and you're ready to upload code. RedBoard has all of the hardware peripherals you know and love: 14 Digital I/O pins with 6 PWM pins, 6 Analog Inputs, UART, SPI and external interrupts. We've also broken out the SDA, SCL and IOREF pins that showed up on the UNO R3, so the RedBoard will be compatible with future shields.
You can power the RedBoard over USB or through the barrel jack. The on-board power regulator can handle anything from 7 to 15VDC. Check out the related items below for a compatible wall-wart power supply.
Not sure which Arduino or Arduino-compatible board is right for you? Check out our Arduino Buying Guide!
Note: The ISP headers on the RedBoard have been left unpopulated. If you would like to add a 2x3 connector they can be found here.
- ATmega328 microcontroller with Optiboot (UNO) Bootloader
- USB Programming Facilitated by the Ubiquitous FTDI FT232RL
- Input voltage - 7-15V
- 0-5V outputs with 3.3V compatible inputs
- 14 Digital I/O Pins (6 PWM outputs)
- 6 Analog Inputs
- 32k Flash Memory
- 16MHz Clock Speed
- All SMD Construction
- R3 Shield Compatible
- Red PCB!
RedBoard - Programmed with Arduino Product Help and Resources
Easy Driver Hook-up Guide
May 5, 2015
Get started using the SparkFun Easy Driver for those project that need a little motion.
Reducing Arduino Power Consumption
November 10, 2016
A tutorial about different ways to reduce the current draw for your next Arduino project the easy way.
Soil Moisture Sensor Hookup Guide
January 29, 2021
A quick hookup guide and project to get you started with the Soil Moisture Sensor from SparkFun.
Core Skill: Programming
If a board needs code or communicates somehow, you're going to need to know how to program or interface with it. The programming skill is all about communication and code.
Skill Level: Rookie - You will need a better fundamental understand of what code is, and how it works. You will be using beginner-level software and development tools like Arduino. You will be dealing directly with code, but numerous examples and libraries are available. Sensors or shields will communicate with serial or TTL.
See all skill levels
Core Skill: Electrical Prototyping
If it requires power, you need to know how much, what all the pins do, and how to hook it up. You may need to reference datasheets, schematics, and know the ins and outs of electronics.
Skill Level: Competent - You will be required to reference a datasheet or schematic to know how to use a component. Your knowledge of a datasheet will only require basic features like power requirements, pinouts, or communications type. Also, you may need a power supply that?s greater than 12V or more than 1A worth of current.
See all skill levels
Comments
Looking for answers to technical questions?
We welcome your comments and suggestions below. However, if you are looking for solutions to technical questions please see our Technical Assistance page.
Customer Reviews
No reviews yet.
Why? Why Sparkfun? You did such a beautiful job of making this board completely flat on the back. Couldn't you give us some surface mount pads for adding the ISP headers? Seriously that is the ONLY thing even remotely nit-pickable about this board. Good job :)
A very nice board. My only comment would be on the choice of the USB connector. I still prefer the older, larger, square type B connectors over the mini and micro where there is room for them (and there IS room on this board!). The mini style connectors are headed the way of the dinosaurs. I've read up on the difference and it seems that the micro style are better for several reasons. They actually last longer (can stand more insert/removal cycles) by something between 5-10 to 1 over the mini (500 cycles vs 5000 cycles). The micro style connector relies on the plug to have a locking spring, the mini style as part of the socket. Better to have to replace the cable than the socket when the spring goes bad! Micro style connectors have one disadvantage, they were designed to mount on the edge of the board inside of a cutout (they were designed for use in thin phones and mp3 players). Surface mount styles are available, but they are not as robust and often rip off the board, but there are styles with through-hole mounting ears!
Thanks for posting the schematic and board files! I'm using them as a starting point to design my own Arduino clone using the ATMEGA1284P chip. Why nobody has done this yet is beyond me. (There are proto boards using this chip out there, but not in an Arduino compatible footprint.)
I prefer Mini-B on anything/everything. Doesn't everyone have like eleventy-billion mini-B cables in their stash? Mine multiply. Micro-Bs aren't common enough yet. I detest that Arduino uses B. The few square B's I have are being used by printers and large external hard drive enclosures. Long live mini-B!
+1 to this. Micro or regular...never mini!
"Why nobody has done this yet is beyond me" HAHA, I just finished mine, except the silk screen layer.. Just popped on here to grab the schematic to check my wiring for the ftdi. I'll have mine up on batch PCB in a few days..
Uses a 1284 DIP all through hole except VR, and FTDI. Just over the footprint of a uno, but smaller than a mega. All pins broken out and should be Arduino shield compatible.
Here is a link to the board on BatchPCB named it Mega Jr, 1284.
https://batchpcb.com/pcbs/110133
Feedback is excellent. Thank you! We're constantly debating the micro vs mini vs B issue. We're working on a better microB footprint but for now, miniB was the more robust solution. As with all things SparkFun, we'll make the RedBoard better over time. Just keep poking us ;)
And good luck with your project!
My vote is for mini USB, but that might be because I have so many mini cables. Micro seems so delicate. (although I've never broken one. yet.) Maybe if you have room, put the pads down for both and only populate one?
I know I am in the minority here, but I have never broken a Mini, but I have broken two micro connectors.
I prefer the mini, but I know where the world is going, and my multitude of mini cables are going to waste.
Not that there is an official vote, but my preference is to avoid the micro USB connector as much as possible. Without some sort of case around them to protect the thin metal, it is extremely easy to break them. I've never had a problem with the more robust mini connector and I have far more mini cables than B and micro. For me, it would be a major disadvantage to have a micro connector.
That's absolutely correct, the micro is designed for many more use cycles but NOT designed for any side force whatsoever.
Ah, the good old mini vs micro debate. How long before someone does both on one board?
Definitely mini. Don't know if it's just me, but I tend to have TONS of mini, yet almost no micro. Besides the UNO R3 uses mini
UNO R3 Uses the Standard B.You might be thinking of the Leonardo? But that uses Micro.
What happened to allowing arduino day backorders?
There's a malfunction in the back-order system. Apologies for the day's sale not going smoothly.
I ordered 2 reds, 2 pro mini 5v, thanks
SPARKFUN! Y U NO BREAK OUT FTDI PINS?
Seriously, this would be a perfect board to drive this huge LED sign I have, but to get the timing to work, it needs hardware flow control. On the Duemilanove there was an unpopulated header that gave you access to the DSR pin. The ATmega8u2 on the Uno is just too slow to keep up with the data rate (over 1mbps).
And for those nay-sayers who claim such a high data rate is impossible on an Arduino, here's a video of the sign working with a Duemilanove: http://tinyurl.com/bcop5yt
Impressive, the sign takes serial input i assume?
They do have a board that you solder and I does break out the FTDI pins.
With all lower-priced Arduino boards currently out of stock at Sparkfun, can someone recommend a reputable source for the same? Trying to get a board for the project that is due next week. Looked at Adafruit, but wasn't impressed with the selection. Thanks!
Your email said back orders allowed!!! how come I cant place an order for it????
We're experiencing a malfunction in the back-order system. We're sorry for the added frustration.
Wow those went out of stock FAST! LOL
Enter a reply..they dint sell anything they just took it out the site it was a false advertisement .
Folks, I love this board, I have several of them, however yesterday trying to use the WiFi shield, I see that is not working ... I wonder if it is because I need to solder the ICSP headers ??? On my Arduino Leonardo with the ICSP headers, the WiFi shield works OK. Thanks. AC/.
PS: I found the problem myself, reading carefully the instructions of the WiFi whiled, it is clear that the communications is thru the ICSP headers and not thru the pins 10-13. I ordered the headers to Sparkfun.
My 2 cents? This is my favorite Uno substitute, to the point that I prefer it to the Uno now. The Mini-USB is robust, yet doesn't touch the underside of your shields (use Kapton tape on your real Arduino's!). And the FTDI can't be beat. My "proper" Uno's regularly run into weird serial issues, but these are rock solid.
To anyone that might be as frustrated as I was trying to get shields like the ethernet shield working with the Redboard. For reasons unknown to me this board does not have the ICSP / ISP / SPI header pins propagated and it will not work. You will get 255.255.255.255 or 0.0.0.0 any time you try to set an IP. Do yourself a favor and put some headers on here (it SHOULD come with some so you can at least add them). I happened to have something that would work laying around but didn't want to solder something I wasn't sure I needed. Can someone from SFE explain why they decided, because I know you guys must have had a reason, to not add or include these pins?
Sorry for the pain! Remember, you can always solder in an ISP header if you need it.
Here's the reasoning behind not including the ISP header:
1) Because there are no through hole components on the board and adding the ISP pins would make a flat board not flat (and add an extra manufacturing step)
2) In our research 97% of folks don't need to reflash the board.
We noticed that Arduino is now getting SPI from the ISP pins rather than the historical ISP pins which causes problems with a few shields (the ethernet shield is the only one I am aware of). In a future rev we will add a 2x3 SMD header that should solve these issues.
Hope this helps a little!
I second the need for the header pre-populated, or at least a note in the product description letting newbies know that you need the header to use an ethernet shield. I spent about 4 hours beating my head against the proverbial monitor last night (though the lcd would likely have just moved out of the way...) before finding a reference in a forum post (not the documentation or the example code, which still references the historical pins...) that the libs are now using the ISP pins, and therefore it is not compatible with the redboard without a soldering iron... Scrounging through my scrap bin for some extra headers now...
I have you beat on hours, but luckily had some headers! THANKS FOR POSTING!
Gotta say, I'm liking the improvements: however, I would /really/ prefer a switching vreg, not a linear, even if it would cost $5 extra.
Hey, just another crazy idea. The atmega328 in the surface-mount package has ADC6/7 pins, but these are no-connects in the redboard's schematic. Why not route these to arduino pins A4/5 with surface mount jumpers (connected at the time of manufacture) to atmega pins ADC4/5.
As shipped this looks like it would be fully arduino-compatible (hm, possibly excepting input impedance of A4/5, so complicate the bridge a bit so folks affected by this can sever ADC6/7 from A4/5) but once the jumpers are cut you have 8 ADCs available, or you can use 2-wire serial and 6 ADCs simultaneously, all within the UNO R3 form factor.
Ascii schematic in case it clears things up (same for PC5/ADC7/A5/SCL):
with (-|-) representing a 3-way surface mount jumper (SJ2 or SJ2W) manufactured with all pads connected.
That would be nice but not very compatible. I recently experienced with an ATMega328 SMD and I wanted to use A6 and A7 as digital outputs (like any other analog pin). I turns out that this is impossible : these two pins can only be used as analog inputs…
But if you leave a jumper to leave it up to the user, it might be possible…
I had a strange issue this morning with this board. Not sure what happened, but worth a feedback. :)
My Arduino was no recognized by Windows8 anymore. I tried several USB cables, changing USB port, in vain. Then, I unplugged all the links between red board and breadboard, and it worked again. I had some wires on "+5V", "GND", "A0" and "A1". I have no idea why such a behavior. I do not think it is related to my circuit, as when i re-plugged everything, it worked well.
Hello! I was looking to code and reflash the FTDI chip on this board to turn it into a joystick. Where can I find the code already on the chip so that I can turn it back into an arduino when i'm done?
The LEDs connected to Rx and Tx I understand, the "ON" LED is to indicate the presence of 5 volts, but the LED connected to SCK is this meant to be a "heart beat" indicating that the chip is functional? Or is it just a random programmable LED?
Pretty much. It's the "Hello, world" LED. Great for blinking to make sure your board is working, and is programmable. It can also be used here and there for simple debugging.
Just got a redboard, wondering what the easiest way to get it to send keystrokes to my computer is. My understanding is that the Leonardo can do this natively, but the redboard cannot...?
Yeah, USB HID projects (like sending keyboard presses or mouse movements) are usually better-suited for the Leonardo because the microcontroller on there has native USB.
I've seen a few examples of HID on the RedBoard or similar Arduino's. Check out Nick's awesome Rotary Keyboard project, which uses the Virtual USB Keyboard example by Practical Arduino to emulate USB HID.
I’m trying to use Redboards with the Ardumoto shield. When I put the shield on, it comes right down on top of the barrel jack, and I can’t put it on all the way. Any ideas?
sorry for duplicate
Just found out that I need to set the fuses on the 328 so eeprom data is persistent across resets. Can I set these just like the uno? Thanks.
How much longer do we have to wait for the awesome redboard to be available to us again? I need to make an order and its killing me! Thank you!
The flat bottom allows me to attach this thing to the magician chassis without standoffs. Genius.
Why backorders are closed? :(
Contrary to what the Arduino Day page said, I am not allowed to back order this product. Why?
nevermind - arduino day problem fixed - thanks!
wow. they had 700 red boards in stock.. and I waited all night to get one and as soon it turns 12am they change their stock to zero.. wow what a lie..
This like an Uno Pro.
Stay with mini-b... And add an ISP.
Breakout ADC6 and ADC7 pls.
This is a great board and I really appreciate the thought that went into it. Thanks!
Really like this board.
Does anybody knows where to get the Arduino Header connectors from? I can only find: https://www.sparkfun.com/products/11544 and https://www.sparkfun.com/products/11543 but the pins are alternating. Where do I get the ones from which are used on the red board?
Thanks, Michael.
I loved the board. But it only worked for about a month. It started saying Access Denied on occasion, and now it will not allow me to upload sketches at all. And has been in that state for a week. My advice, buy a true arduino.
There seems to be no shortage of threads about "Access denied" with genuine Arduino boards for that matter: https://www.google.com/search?q=access+denied"+site:arduino.cc perhaps one of them holds the answer to your problem. For what its worth, I suspect any Access Denied error is due to a Windows software issue, and unlikely to stem from any difference between the genuine Arduino Uno and this board.
It is a nice theory. However I have 3 other boards that have never exhibited the issue. Side-by-side, the red board fails and the official Uno works on two different computer systems on 1.0.1, 1.0.5 and 1.5.5 beta. I'm still waiting for support to reply to my emails. Unfortunately yes, in my case, it seems to be only one specific redboard.
Also in the first 3 pages of the search you provided - only 1 entry matches the error and is unrelated as for me mine worked and gradually started failing over time.
I reflashed it this morning using an Uno, and this time the flashing worked: http://www.gammon.com.au/forum/?id=11635
The redboard is finally responding. Still no response from spark fun - but at least its working.
For a final project. I need a board that is short so that i can put a GLCD on top of it without it being too tall/bulky. I'm debating on whether to make a self made PCB board with a Atmega chip and all the other components on one board or buy a red board and taking out the DC jack, female headers and USB port and putting the GLCD right on top it insulating the bottom so no shorts happen. Would this be a good idea? Would it be too inefficient? Any thoughts or ideas would be appreciated. Thank you.
Has anyone used the Android ArduinoDoid IDE App with the Sparkfun RedBoard? If so, what settings do you use? I tried Pro/328/5v. Trying to upload the AnalogReadSerial example but it never seems to finish. This is my first experience with Arduino... so I don't know what to expect.
Having an issue where I have to press the reset button in order to upload, but time it just right (4s after I press upload in the IDE). Is there a fix for this? I read somewhere about corrupted firmware needing a reflash but I'm not sure where or how to do that.
I found out this work around after a bit of googling, but it doesn't seem to be mentioned anywhere in the sparkfun docs or in the SIK kit I bought.
Hmmm. You shouldn't need to hit the reset button to upload code; the Arduino IDE should be resetting the board automatically through a 0.1uF cap on the DTR line. You may have a hardware issue or problems with your OS (not toggling the DTR pin). Consider contacting tech support - they'll get you squared away.
Will this fit into standard arduino enclosures?
I just got my redboard as part of the Sparkfun Inventor's Kit.
I wanted to say that I had trouble finding the serial port with my linux laptop, which is running a bleeding-edge Ubuntu 13.04.
The symptom was that the Arduino Tools menu item "Tools | Serial Port" was grayed out.
I did this to fix the permissions of the USB port:
sudo chmod 777 /dev/ttyUSB0
After that the "Serial Port" menu immediately became not grayed out, turned to black enabled text and I could choose the portcorrectly and connect to my redboard.
The better solution to this is to add yourself to the dialout group, using this command:
sudo usermod -G dialout -a $USER
Ten to make your new group membership available, you will need to restart your login session or your terminal window, depending on how you launch the arduino GUI.
I recommend Linux users use Gnoduino.
Can this be programmed using visual basic?
Luv this board. Some folks using a newer Mac with OS X 10.8.x may have an issue seeing the FTDI show up in the Arduino IDE as an option under 'Tools>>Serial Port'. Download the most recent FTDI VCP driver from http://www.ftdichip.com/Drivers/VCP.htm for a fix.
I love it all! except the 9v jack. its just tall enough to offset my shield, and my OCD. EDIT: just looked again, its actually because the female headers are shorter
Does this board actually use a crystal oscillator or is it just an inaccurate ceramic resonator?
The BOM calls Y1 a 16MHz resonator, so I'm guessing it's the less expensive and less accurate part. A typical* resonator has .5% tolerance, or 7.2 minutes/day, so it's a poor solution for timekeeping needs.
*typical = first 16MHz SMT resonator I read a datasheet for
Can this board tolerate being powered by the barrel jack while a computer is hooked up to the USB port for programming?
Yes, this board has the same functionality as the Arduino Uno: USBVCC is gated to +5V when VIN (barrel jack voltage) is below a threshold. Have a look at the "Comparator / 3.3V Regulator" section of the schematic as compared to the Arduino Uno reference schematic.
Will there be a kit version of this RedBoard?
There are two now. The SIK v3 & the new rev of the Starter Flex Kit both include the RedBoard.
I should have been more specific. I meant a kit like the RedBoard - PTH Kit.
We don't have plans to kit this board. It would be all SMD parts. Good for a few people but it's faster for us just to build the thing rather than kit and label tiny SMD parts. If you're looking for a kit to learn how to SMD solder checkout the Simon Says SMD Kit or Simon Stenciling Kit. Both run on an ATmega328 so you'll be able to reprogram them to your heart's content.
From Wikipedia:
It's the type B connectors that should no longer be used.
What is the package for the resonator on this board? I can't seem to find anything like it on digikey.
Edit: It looks like the CSTCE16M0V53Z-R0 fits the pads pretty well, ill order a few and see.
Any tips on how to get eagle 5.6.0 free version to route this board? It seems to not want to route to those SMD headers, whether in autoroute or follow-me mode. I wanted to try modifying the board design with some of the ideas mentioned in this thread, but (re)routing everything is quite a chore.
There were a number of significant upgrades from Eagle V5 to V6; I'm guessing that the feature that's missing is the ability to have arbitrary pad shapes, but it could be something else. I'd try grabbing one of the V6 freeware versions and see if it works any better.
Is this board a 3.3 volt board or a 5 volt board?
Sorry for the confusion! Board runs at 5V. All IO is at 5V. Board has both a 5V and a 3.3V regulator on board to provide 3.3V on the 3.3V labeled pin.
5V according to the schematic. Color me confused that they don't explicitly mention this in the bullet points.
Good point. Added a bit to the description. Hope this clears it up: 0-5V outputs with 3.3V compatible inputs
I'm new to 3.3V sensors. You seem to be saying that I can use the output of such sensors as inputs to Redboard, correct? Uno would not work with such sensors?
These are just suggestions, but Jepler nailed it - good idea, simple to impliment. How about also 1) Status LEDs on edge fo board so you can see them with a shield fitted 2) 0.1" PTH protoype area since there is plenty of board space free using the SMD 328p
I will never buy another arduino board untill they correct the odd distance between the IO connectors. What were you thinking? Why are you still making new arduinos based on an erratic design? To hell with the backward compatibility, why keep a non standard layout distance based on an error? Move ON make a new design based on a standard pin distance so we can make our own shield with a regular perf board. Those who have the non standard pinout can still use the special developed bent connectors or a shield adaptor. Problem solved. STOP making new boards based on an error!
You might find this post http://arduino.cc/forum/index.php/topic,22737.0.html of interest. In particular, the final entry, as it is by the person that made the error.
fantastic board but it would be better with DIP atmega328
We worried about that as well. In the hundreds of boards we've attempted to destroy, the ATmega usually survives with the regulator needing attention. Not always the case, but usually :) We also get the feeling that SMD ATmegas will be supported by Atmel longer than DIP. When we weighed the pros and cons, SMD won by a slim margin.
How much power is it permitted for the LM1117 regulator to dissipate? Here's my back of the envelope calculation:
With 15V in and 200mA 5V out (atmega328p absolute maximum DC current is 200mA), dissipation in the regulator is probably around 9V*200mA = 1800mW (assuming 1V dropped by diode D1, which is probably an overestimate). I don't have much confidence in my ability to measure the heatsink area from the pictures, but the most optimistic values from Table 1 of the lm1117-n datasheet is 66°C/W for 1in² copper on the top side, or a rise of 119°C. At an ambient of 25°C this is just barely below the absolute maximum junction temperature of 150°C. You certainly can't draw the same 500mA as you can from USB.
If we assume 1800mW is OK, then at the lower end of input voltage you could draw 900mA as you're only dropping around 2V in the regulator.
I wonder how much sparkfun calculated it would cost to change from a linear regulator to a switching regulator; it would be great for a lot of uses if the board could supply 500mA under all conditions and (say) 1A when powered by an external 7-15V/1A DC power supply. A guy can dream, can't he?
You can try to pull a lot more than 200mA through the linear regulator -- there's more than the ATmega that sources from it. Anything that you have hanging off of the 5V rail comes from the voltage regulator output also (if that's where you're getting your power).
You don't have to use the barrel jack and the Vreg on the Arduino if you're intent on not warming the planet (phhhht). Bring your own (switching or otherwise) regulated 5V to the party and feed it into the 5V pin on the POWER header. So in the end, you're not precluded from having your Arduino powered by cool, clear, (perhaps not, depends) clean switching power. If you only care about blowing your 1117 and you insist on bringing it 15V, you can knock it down closer to 5V yourself before it gets there.
This may have already been indirectly answered, if so I apologize. With the choice of the FTDI chip for usb does that mean that the usb connection can be used independently of and simultaneously with the serial from pins 0 and 1?
If you take a gander at the schematic, the Arduino's pin 0/1 are connected to the FTDI chip as well as to the header. As a consequence, whatever the Arduino transmits will be received by the PC as well as by whatever is attached at pin 1. If something is connected at pin 0 it will override anything transmitted from the PC, as there is a resistor (1kΩ) between the FTDI chip's TX output and the Arduino RX input.
I think this is true of most (all?) Arduino-compatible boards except the Leonardo, which is the one that uses a USB-capable Arduino (atmga328u4) as the main chip. This leaves pins 0/1 free when communicating with the PC.
Thank you for the FTDI, addressing my biggest Uno complaint. Not sure about the durability of the SMT headers when pulling shields off, sometimes they can really grab in there, time will tell.
This is a question, not a criticism: Why use the FTDI when there are chips with built-in USB functionality?
And later on: Ok so FTDI is a more robust solution, especially with high speed applications in mind - thanks.
we specifically wanted to use the FTDI. It gives us less hassles than the alternatives.
As a specific example, I have a sketch (well, it's actually written in assembly and built with gcc at the commandline) that transmits flat-out at 200kB/s for weeks without hiccup. In one run I streamed about 900GB of data. As far as I'm aware, the USB-based Arduinos are not capable of this feat; they start losing serial data well before reaching this speed.
It's no wonder: at this rate, a 16MHz AVR only gets 80 cycles per byte transmitted. It took careful planning and cycle counting to achieve the 200kB/s rate. (This uses a 2MHz serial rate, the highest rate common to a 16MHz AVR and the FTDI chip)
(The application is transforming biased bits from a hardware noise source into a high-entropy data stream; under a modest assumption about the noise source and the hash, the data stream can be shown to contain .9998 bits of entropy per bit of output. 200kB/s is a substantially higher rate than other similar designs I've found on the internet.)
I'd like to give my 2cents too about FTDI: the reason i really like it is that you can use it as a simple virtual com port but you can also use their libraries to transfer data and in that case you can refer to a device using the name instead of a com port number. This is very nice in my opinion as plugging a device in a different port will create new (different) virtual com ports and i always have to check which port was assigned.
What is the name you use - is it set by the device, by the code, or by the driver?
Thanks
Thank you for your endorsement Robert, it's nice to know that you like our product. The RedBoard is an excellent board - love the total SMT approach, I've ordered a few to have a play with. Fred Dart - FTDI
One of the reasons I got a teensy a while back (and admittedly sat on it indefinitely, stupid adult responsibilities) was the available class-compliant midi (and others) configuration.
Wile it seems the FTDI chips are more robust, is there a good way to get such boards to show up as midi devices?
I would actually love to see the cheapest class-compliant implementation of a USB MIDI interface with an SPI, one-wire, or serial implementation. It would likely be redundant, but definitely fit into the shortcuts-as-products strategy.
If you make a 3.3V version of this, consider the FT230X! It's cheaper AND smaller. Maybe...just maybe...worth a level conversion circuit too.
The FT230x is pretty awesome! But, yeah, the 3.3V max kept it off this design - for now at least. We've definitely got it on our radar though.
I was slight puzzled by this at first - true the FT230X and the other X-family chips can output 3.3V max, however their inputs are 5V tolerant so it shouldn't be a problem to interface them to a 5V ATMEGA328 for example. On checking our website and datasheet it seems this rather important fact has been obscured - I'll get the team to fix this, oops! Kudos all for bringing this to my notice. One possible exception - if using the DTR# pin to pulse reset of a 5V MCU, Arduino style - in that configuration I'd recommend buffering that one signal to 5V level to ensure a clean reset. You'd need a FT231X in that case as the FT230X doesn't bring out that signal. Thanks all... Fred Dart - FTDI
Can I always go by UNO specs to know physical limitations of the board such as the following three questions which are: How many medium servos can be powered with the max 15 volts, two? How do I power the board on a battery, 9 volt? How many LEDs can be powered in parallel per pin, 3? Thanks!
A bit late, but your questions are a bit arbitrary. It really depends a lot on the servo, but the limitation is really your power source, which may or may not include the voltage regulator on the boards (if you need 5V). As for powering the board from a 9V battery, on both the Uno and the Redboard you can connect the battery to the barrel jack connector using an adapter or connect it to the Vin pin. As for LED it depends on the LED and how bright you want it. This is actually limited by the fact that the pins on the ATMega328 can only output 40mA, that will be split between all the LEDs on that pin, at some point they will start becoming noticeably dimmer, but how dim you are willing to let them go is up to you. You probably won't even notice the dimming much though until you start getting under at least 10mA per LED.
You can go by specs in which the RedBoard's limitations should parallel the UNO's, but for all these questions, I would find it more efficient to just test out. That said, off the top of my head: I haven't tried multiple servos..so can't help there; to power the board w/ a 9V, you just need a 9V to barrel jack adapter (https://www.sparkfun.com/products/9518), and as far as LEDs/pin, you can get way more than 3 when in parallel, typically, but it'll vary depending on type/color of LED.