- Home
- Product Categories
- Biometrics
- Fingerprint Scanner - TTL (GT-511C1R)

Fingerprint Scanner - TTL (GT-511C1R)
Fingerprint scanners are awesome. Why use a key when you have one right at the tip of your finger? Unfortunately, they're usually unreliable or difficult to implement. Well not anymore! We've found this great fingerprint module from ADH-Tech that communicates over TTL Serial so you can easily embed it into your next project.
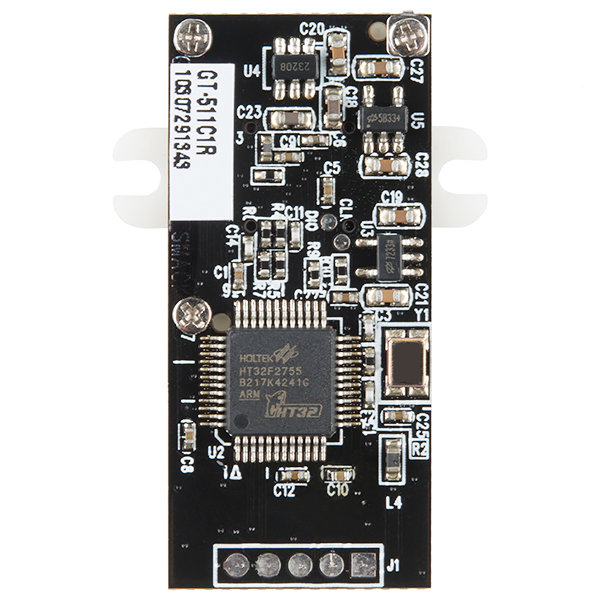
The module itself does all of the heavy lifting behind reading and identifying the fingerprints with an on-board optical sensor and 32-bit CPU. All you need to do is send it simple commands. To get started, just register each fingerprint that you want to store by sending the corresponding command and pressing your finger against the reader three times. The fingerprint scanner can store different fingerprints and the database of prints can even be downloaded from the unit and distributed to other modules. As well as the fingerprint "template," the analyzed version of the print, you can also retrieve the image of a fingerprint and even pull raw images from the optical sensor!
This is the more economical version of the GT-511 which has a decreased memory capacity (compared to the GT-511C3). The module can only store up to 20 different fingerprints but is capable of 360° fingerprint recognition and download and upload templates using serial interface. If you are on a budget and need only a small number of fingerprints stored, this is the perfect option for you!
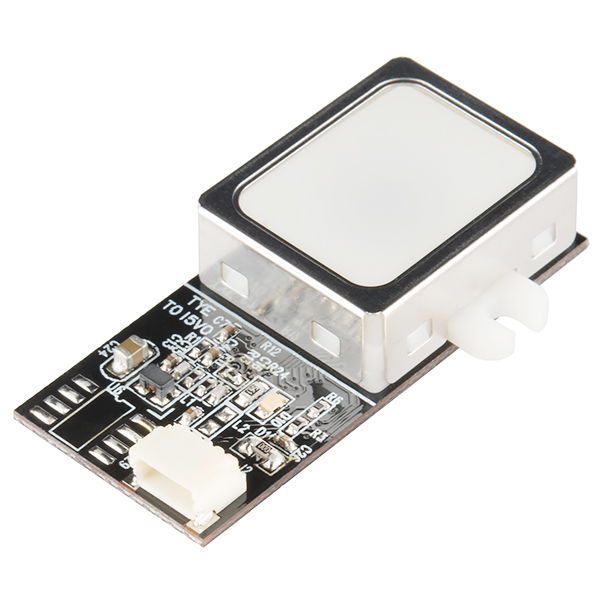
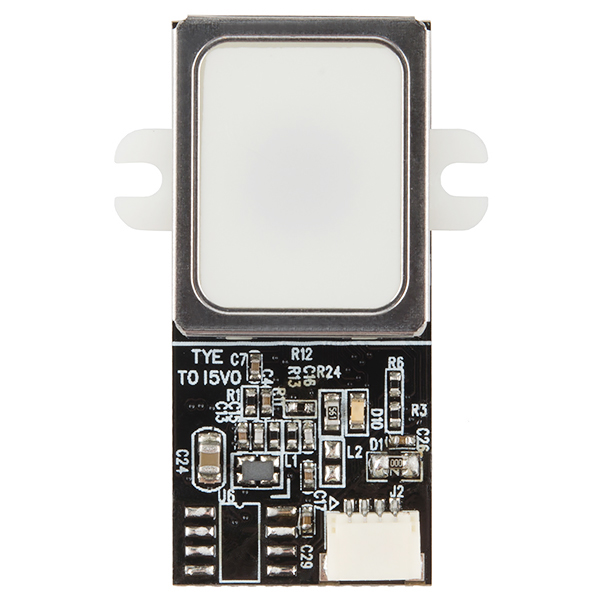
The module is small and easy to mount using two mounting tabs on the side of the sensor. The on-board JST-SH connector has four signals: Vcc, GND, Tx, Rx. A compatible JST-SH pigtail can be found in the related items below. Demo software for PC is available in the documents below, simply connect the module to your computer using an FTDI Breakout and start the software to read fingerprints!
Note: The module does not come with a cable, if you do not have a 4-wire JST-SH pigtail, you can add PRT-10359 to your cart, or check in the Recommended Products section below.
- High-Speed, High-Accuracy Fingerprint Identification using the SmackFinger 3.0 Algorithm
- Download Fingerprint Images from the Device
- Read and Write Fingerprint Templates and Databases
- Simple UART protocol (Default 9600 baud)
- Capable of 1:1 Verification and 1:N Identification
- 360° Fingerprint Recognition
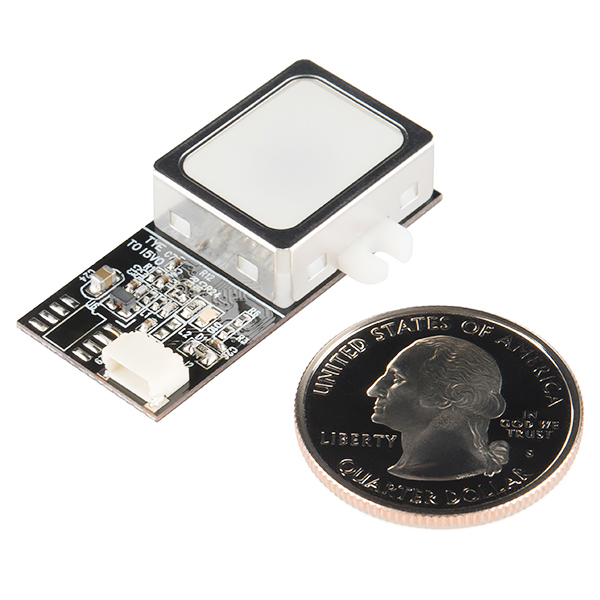
- 37 x 17 x 9.5 mm
- Hookup Guide
- Datasheet
- Demo Software
- Garage Door Opener Tutorial (Instructables)
- GitHub (Example Code)
Fingerprint Scanner - TTL (GT-511C1R) Product Help and Resources
Adding more fingerprints
For more fingerprints, it might be possible with the GetTemplate/Get Database to save an ID to a remote memory and then upload the fingerprint ID template/database saved with the SetTemplate/Set Database protocol commands. Try checking the SDK_DEMO.exe for more information on how to use those specific functions. The Arduino code does not utilize all of the protocol commands so you would need to write additional code in the Arduino library. There will be latency between your fingerprint scanner because you would have to do this for each template/database. The more fingerprint ID templates you have, the slower the fingerprint scanner will be able to recognize the ID.
We recommend contacting the manufacturer ADH-Tech for more information on how to do this with the firmware. Looking on their site, there is a fingerprint scanner that can hold 2000 fingerprint ID templates => http://www.adh-tech.com.tw/?22,gt-511c3-gt-511c5-%28uart%29 .
Comments
Looking for answers to technical questions?
We welcome your comments and suggestions below. However, if you are looking for solutions to technical questions please see our Technical Assistance page.
Customer Reviews
3.6 out of 5
Based on 10 ratings:
1 of 1 found this helpful:
It easy to get it working, easy to mount and connect. But less than 100% fingerprint recognition..
The power supply from 3.3 to 6 V is flexible, and the serial connection is an easy to use and reliable data bus.
I have used it to open my garage door, together with an Attiny84 and an home made PCB. It working really well, but neither my fingerprints nor my dad's one are recognized 100% of the time.
I would say 80% is a realistic result, enough for me, but for the price I would have imagined a better recognition. The Windows application works well (Demo Software), to enroll and get/save the database.
In your code on the micro be careful to add some delay (100ms) between two calls of the isFingerPressed() method: in this way the sensor seems to work really better. If no delay is added the sensor gets someway "flooded" with requests and the recognition percentage is worst...
The 360° fingerprint recognition is working good too.
10 of 10 found this helpful:
Cool Scanner, but...
... why not include the somewhat difficult to find JST SH Jumper 4 Wire cable with the unit? It is out of stock at SparkFun and twice as expensive elsewhere, not to mention the seperate shipping costs incurred! Otherwise the unit does exactly what it is advertised to do which is a great way for my robot to know which of my children it is speaking to! :-)
0 of 6 found this helpful:
no cable included
no cable included
You must purchase that cable separately - https://www.sparkfun.com/products/10359
Gets the job done
The GT511C1R gets the job done for the prototype or project requiring a fingerprint scanner. In my project, I can power on the system (arduino-controlled), scan a finger, and get an output in just a few seconds. Beware, if your fingers are cold and dry, it will likely not recognize your prints.
It is a little difficult to get started with the GT-511C1R and Arduino. Read through the datasheet and the library linked in the comments section so you understand what's happening with it. It was frustrating to get started in my case because I put the cart in front of the horse, so to speak. Slow down and read first!
I soldered a USB-micro breakout board to the connector pads on the bottom of the GT-511C1R so I could plug it directly into my PC to make sure it worked, but if you can figure out how to communicate with it via Arduino, you don't need to do this.
Keep the wires away from any noisy components like inductors, because it will interfere with serial communications. In my case, one of the wires was just over an inductor, and the Arduino could not turn on the GT-511C1R LED. Once I moved the wires, there were no issues.
not working with Arduino mega
i have connected finger power is working but i have run the code blue light is not bilking can please provide me Arduino mega with finger print proper diagram this finger print module it have lot of problem i have referred all the tutorial staff it not working please provide me proper diagram
Sorry you're having trouble getting it to sync up with the Mega. I'd suggest getting in touch with our tech support team, they should be able to help you out!
Best thing i have ever owned.
It's a very nice equipment and i like it very much. I also thank you very much for the safe delivery. I will always love to purchase things from your site. Thank you once again.
Disappointed
I am very disappointed in the access to libraries and the compatibility of the FPS with the Arduino products. In addition, the demo software doesn't work. I know that I am not the only one that has had these problems.
You might want to put more effort into the quality of the products, libraries, and all associated materials.
Hello!
Sorry to hear about the issues with the fingerprint scanner. Have you contacted our technical support department about the issues with the scanner? You can reach them at Techsupport@sparkfun.com - they're normally very good at helping to handle issues with this module.
It would be nice if there were a version with two parts connected by a cable (at least 4cm) so the "dumb" parts could be exposed and the "smart" parts could be on the secure side of whatever this is protecting. Otherwise, hacking in consists of listening to the serial connection and injecting your own "yes" response, right?
i have connected finger power is working but i have run the code blue light is not bilking can please provide me Arduino mega with finger print proper diagram this finger print module it have lot of problem i have referred all the tutorial staff it not working please provide me proper diagram
I have it connected properly, but the FPS only works when the Arduino is running on external power. I'll compile and load the fps_blink sketch to the Uno, unplug from USB and connect to my battery which powers both devices. The FPS LED blinks just fine.
However, if I connect the Arduino to USB to try and view the serial monitor, the serial communication is interrupted somehow and the blinking stops. Ive loaded the enroll sketch and can tell it at least partially works because the FPS LED is on solidly, but I cannot use the serial monitor as mentioned above so I'm kind of stuck.
I'm using this sensor to add fingerprint recognition to my front door. I have a few problems with it though. The demo software doesn't work, even after selecting the correct port and clicking open. I've wired it correctly with a voltage divider into an arduino uno using a JST-SH cable, but the software doesn't work for some reason. Another problem is that the arduino doesn't communicate with the sensor. When I downloaded the library and opened the sample blink sketch for the sensor it didn't blink. It blinks once when I connect it but otherwise it doesn't respond to any sketches from the arduino. I know that the sensor is receiving power because the little green light is on when I plug it in.
Another question that I have is which library do I use? The only ones that arduino recognizes as valid libraries are the ones for the GT-511C3. I've heard different responses from many people as to whether or not the one for GT-511C3 will work for the GT-511C1R.
Just to sum it up my 3 questions are:
You should read this tutorial for troubleshooting common issues with the fingerprint sensor => https://learn.sparkfun.com/tutorials/fingerprint-scanner-hookup-guide#troubleshooting.
What if I have hundreds of people I want to compare to. I am looking for a fingerprint reader that would handle an arbitrary number of users.. If I understand this reader correctly, I'd have to send in each stored template, compare with the freshly captured image, until I found the right stored template. Is there a reader available that will either just do a generic "print to GUID" that would be consistent, so I could store and compare GUIDs on the host side, or maybe a reader which has host based comparison routine that I could do on the host through a SQL server or something?
I did a project with one of these a while back where you first put in a PIN and then it would load up that persons template based on that pin. doing this adds an extra level of security and lets you store a lot of prints
Yeah.. That's the "right" thing to do, for sure, but my application was more about convenience than security. I had three organizations come to me for help with this.. One was a sunday school where they wanted the kids to check themselves in and out without having to carry or remember anything, and the others were a karate studio, and a neighborhood pool with similar application.. Device had to be fast, since we didn't want to cause a line..
Error Compiling Arduino Nano Sketch
FPS_GT511C3\FPS_GT511C3.cpp.o: In function
Command_Packet::GetPacketBytes()':
C:\Users\eduardo\Desktop\arduino-1.0.1\libraries\FPS_GT511C3/FPS_GT511C3.cpp:17: undefined reference to
operator new[](unsigned int)' FPS_GT511C3\FPS_GT511C3.cpp.o: In functionFPS_GT511C3::GetResponse()': C:\Users\eduardo\Desktop\arduino-1.0.1\libraries\FPS_GT511C3/FPS_GT511C3.cpp:735: undefined reference tooperator new[](unsigned int)'someone can help to solve this?
Sounds like your libraries aren't installed correctly. Check out the tutorial here for a refresher.
will the libraries and codes and examples for Gt511c3 and GT511C1 work on GT511C1R? as there are no separate codes and examples available for it (C1R) I am confused whether to use those of GT511C1 or those of GT511C3 also where do I find the 4 pin jumper in India :-(
Dear,
I bought the Finger Print Scanner (GT-511C3) I am developing a project where I need to store the biometrics on a server. Then need to check the biometrics registered in the database. I want to know how to store biometrics in a string to send to the server. I’m doing this with the Arduino Mega 2560
Thank U
hello, please i need serious help here, i bought the sensor and i have no idea how to check if it's working or not.
i have EasyPIC V7, how can i use it to connect the sensor to my laptop and run the sensor SDK file ? or can i use a serial to USB adapter ? please help ASAP !!
My fingerprint scanner did not come with a cable. It’s unusable without one. For a >$30 sensor, I expect better. I suggest you ship a cable with these in the future. What cable do I need to order?
I am having trouble getting this to work with a Basic Atom Pro. I am able to communicate with it and make the LED turn on but only with the TX pin disconnected. If it is connected, the Atom doesn't receive any data. I have tried a level translator for 3.3/5V and using that, nothing works. Has anyone gotten this to work with an Atom Pro? Any input would be greatly appreciated.
I got it working... I had to use the hardware uart serial port
The datasheet specifies USB v1.1 as a communication protocol. Does it mean that this module can be hooked up by USB directly? If so, anyone knows how? I got it running with UART but I find that downloading the fingerprint image is quite slow, even at 115200 (takes about 5 seconds)
can it be connected to a raspberry pi....... ??
EDIT: Fixed. Due to the misleading diagram, I had the pins wired backwards.
Keep in mind that the list is from left to right when the fingerprint scanner is face up and on the top edge of the board.
The list is of pins is on the final page of the Datasheet and the order is as follows:
Pin 1: TX (black wire)
Pin 2: RX (first white wire)
Pin 3: Ground (second white wire)
Pin 4: 5V (third white wire)
Remember that TX = transmitter and RX = receiver. So you wire the transmitter of the breakout board to the receiver of the fingerprint scanner and vice versa.
Here are some additional instructions for newbies like myself. To wire it to the FTDI, the order is as follows
Scanner TX (black wire) to FTDI RX (RX1)
Scanner RX to FTDI TX (TX0)
Scanner Ground to FTDI Ground (GND)
Scanner 5V to FTDI 5V
ORIGINAL POST: OK, I've tried a number of different things on two different scanners, and the demo still doesn't work. Initially I tried wiring the scanner directly to the breakout board as shown in the demo video. When that didn't work, I used a breadboard both with and without a 1.5k Ohm resistor.
What's confusing is that I can consistently see that the fingerprint scanner is getting power, and I know that I have the right serial port selected. The best I've been able to get so far is a blinking of the TX light on the breakout board when selecting "open" in the demo, so I know the command is going at least through there.
Could there be something wrong with the JST SH jumper? I've also noticed that the bottom of the fingerprint scanners becomes hot enough to burn, has anyone else had this happen?
Not sure if you still had an issue, but i believe I have figured it out. They recommend the 5V FTDI breakout board, and I experienced the exact same issue as you when using it. I ordered a 3.3V version and it immediately started working.
Hello, I've had the same original problem as you with this device and would only get the power button to light up and the TX light of the breakout board to flash when open is clicked. After consulting your advice I still can't get it to work? Can you give any other advice if possible please? Thanks :)
My fingerprint scanner did not come with a cable. It's unusable without one. For a >$30 sensor, I expect better. I suggest you ship a cable with these in the future. What cable do I need to order?
Sorry about the confusion on that! I'll see if we can get the note more clear in the description regarding purchasing the compatible JST-SH cable.
I suggest just include the cable, and up the price of the scanner $1.50 It's not like it can be used without it.
It's a hard balance. Since we don't repackage these from the manufacturer, kitting it up with the cable ups the price more than just the cost of the cable. That adds a lot of labor time for our kitting department, which then customers don't want to pay for either.
Hopefully you are all set though now with the cable. If you have any other questions, let us know!
The S&H costs more than the cable. Will have to wait for next order.
OK, cable arrived, but reading the sample sketches, it appears a 1k Ohm resistor is needed because this fingerprint unit is 3v logic. I feel that this should be prominently mentioned in the part description!
OK, so even though the sketch says a 1k Ohm resistor should be added (and mixes up rx and tx), the data sheet says this unit is 5v friendly. I have both the enroll and the ID sample sketches operating fine, with no resistor. Pin 1 on the fingerprint scanner (black wire) is TX and connects to RX on the Arduino (Pin 4 in sample sketch), and Pin 2 (RX) on the fingerprint scanner connects to pin 5 (TX) on the Arduino. Pin 3 on the Finger print scanner connects to Arduino Gnd, and Pin 4 to 3.3v or 5v. I'm using 5v on the UNO.
http://arduinotronics.blogspot.com/2014/10/fingerprint-scanning-with-arduino.html
Hello, I'm new to this world of biometrics and I was curious if it needs to be run at 3.3 or 5v because in the data sheet it says 3.3-6.
Wouldn't 3.3 - 6 mean any voltage from 3.3v through 6v ......
(solved) The data sheet is misleading, as explained by other members the pin1 is with arrow
Hi All, Is there a problem wiring directly to FTDI 5v directly? I seem to get my FPS burned by connecting TX-TX & RX-RX by an accident :-( Any opinion ?
The Datasheet does not specify which pin on J2 is pin1.(Should I assume the pin the arrow is pointing at in the datasheet is pin1?) . On the PCB, is pin1 the one on which J2 is printed (closest to the edge) or the one on which a triangle sign is printed? There is a J1 on the other side of the pcb - maybe the square means pin1 ? Help.
Thanks to another member , I think I have my answer. See : https://www.sparkfun.com/users/399764#comments
I have the GT-511C3 (https://www.sparkfun.com/products/11792) its great. Its easy to use once you follow the tutorials and get the concepts. Its recognition seems pretty sharp, I haven't tried anything else, but it is recognising quite effectively. I use the windows app to load my "fingers" into it, then flick a switch in my project to connect it back to the bare bones Arduino chip to do it's main job. As far as wiring it up, I use a voltage divider to drop the input to RX line as it is a 3.3V device. Works fine. The linked manufacturers datasheet is helpful - http://dlnmh9ip6v2uc.cloudfront.net/datasheets/Sensors/Biometric/GT-511C3_datasheet_V1%201_20130411%5B4%5D.pdf Theres really not alot to it as it is self contained. Just follow the guides, use the supplied Arduino library if thats your microcontroller of choice and off you go. No special fingerprint identification skills required!
Does this one need to have the lines (tx and rx) reduced to 3.3V like the older one? (Or is it just rx?) Are the back pads the same configuration? What I got for the old one is from left to right- shield (optional) , GND (black) , rx (green), tx (white) and 5V square (red) next to the J1 sign...
I still can't get my (GT-511C1) to work, do I have the wires right? Thanks!
From the description it looks like the main difference is that this cheaper model "... can only store up to 20 different fingerprints ..." . I haven't used this product yet, but planning on doing so .
Correct! Cheaper version. Fewer saved fingerprints. Now has 360° Fingerprint Recognition. :)
I have the previous model (GT-511C1), what is the difference to this update?
This guy got a firmware update that allows for 360° Fingerprint Recognition instead of just 30°. Also it can now download and upload templates using the serial interface.
what is 360 degree recognition.