- Home
- Product Categories
- Lasers
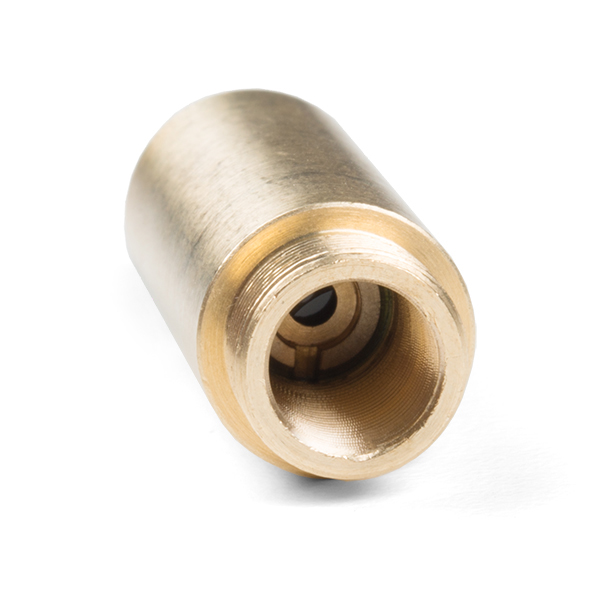
- Laser Module - Green

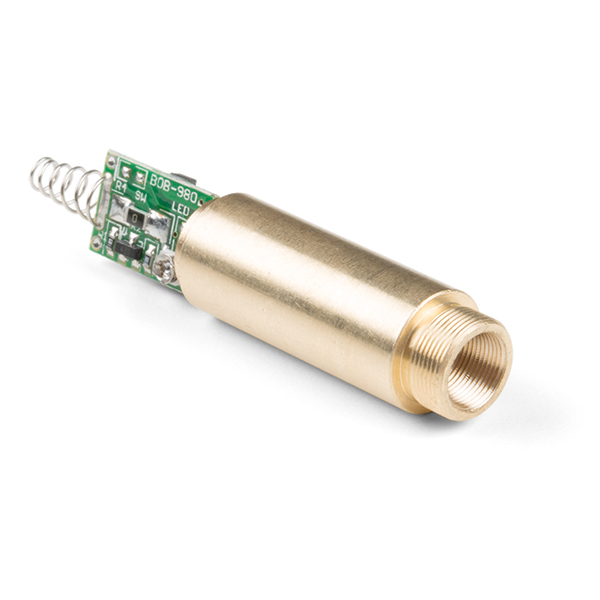
Laser Module - Green
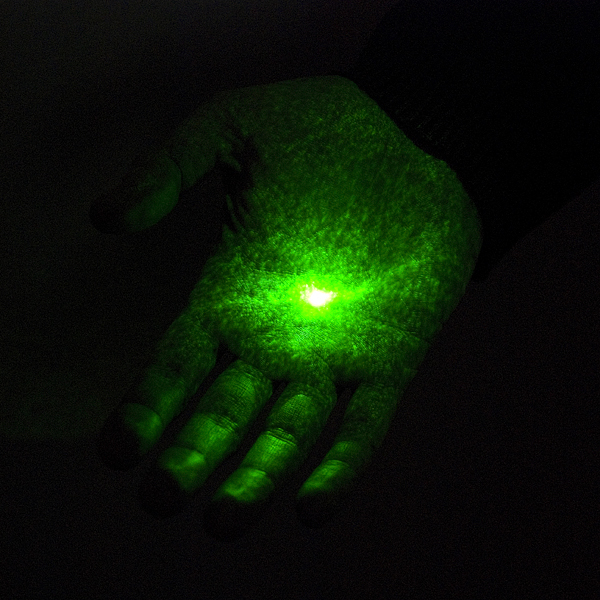
A very powerful 5mW green laser. Fun, but don't point in anyone's eyes! These units include two solder points for permanent connection. The trim-pot adjusts the output power but we don't recommend adjusting that as it's possible to overdrive the laser diode and burn it out. We were able to push the current up to about 400mA where things started getting toasty, and very bright.
- 532nm Green Laser
- 5mW output power (FDA Class IIIa)
- 2.5V to 4.5V input voltage
- Max current: 300mA
- 56 x 11.5mm
Laser Module - Green Product Help and Resources
3 of 3 found this helpful:
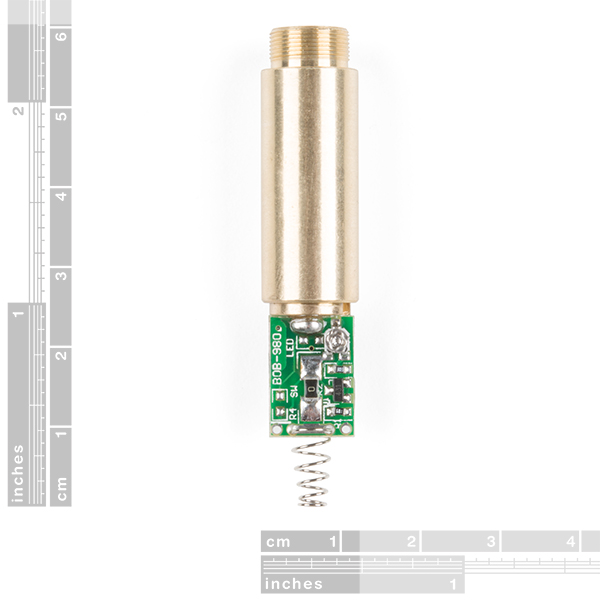
Pinout and Examples
Pinout
To power the laser:
Housing = Power (2.5V to 4.5V input voltage, max 300mA)

Spring = Ground
There are two plated through holes where you can also solder provide power. Try looking at this tutorial for more information:
[ https://learn.sparkfun.com/tutorials/gps-differential-vector-pointer#electronics-assembly ].
Note: Make sure that the potentiometer is not turned all the way down. The button is a momentary so the laser will only be on as long as you are pressing the button. The manufacture revised the board a little and removed the momentary button. There is now a partial silver metal enclosure around the laser too. You would still power it the same.
Example Project
The green laser was used in a project for the GPS Differential Vector Pointer https://learn.sparkfun.com/tutorials/gps-differential-vector-pointer. The section labeled "Electronics Assembly" shows what pins are needed to power the laser: 
Core Skill: Electrical Prototyping
If it requires power, you need to know how much, what all the pins do, and how to hook it up. You may need to reference datasheets, schematics, and know the ins and outs of electronics.
Skill Level: Noob - You don't need to reference a datasheet, but you will need to know basic power requirements.
See all skill levels
Comments
Looking for answers to technical questions?
We welcome your comments and suggestions below. However, if you are looking for solutions to technical questions please see our Technical Assistance page.
Customer Reviews
3.9 out of 5
Based on 11 ratings:
3 of 4 found this helpful:
An excellent device, but don't overtax it
This module puts out a powerful beam, providing roughly 5x more light in my application than a 7-candela LED! And I've only used it with a 3 V power supply (so far).
Note that it has a momentary-contact push button for a reason. If you operate it continuously for an extended period of time, the output dies off. I wasn't watching the clock, but I would guess that I ran it at least 10 mins. Fortunately, once it cooled off, it recovered back to its original self.
My test environment was sealed, and heat build-up was promoted by that. If you are going to run this module more than 2 minutes at a time (with at least another 2 minutes in between), then you need to pay attention to cooling. Having good air flow may be enough for extended use, I haven't experimented with that.
If you are going to run it at more than 3 V (other reviewers have run it at up to 4.5 V), then I would recommend either short duration with cooling periods or perhaps heat sinks and a fan.
All-in-all a very nice little part! Enjoy :-)
0 of 3 found this helpful:
no documentation/ hookup data
not only did the unit I received NOT have any data sheets included in the box, it didn't match the picture on the items page!
The only information I got was the other members giving pointers on how to hook it up.
Hi, Most all of our products do not ship with printed documentation. We do post all documentation we have on the product page. You can find the datasheet above. As for connections - To power the laser: Apply power to the Housing (2.5V to 4.5V input voltage, max 300mA) And the spring is Ground
Decent Laser, Very bright
I purchased this laser from both a Canadian distributor that linked to Sparkfun's link to the data sheet, as well as from Sparkfun directly. The laser I purchased from the Canadian distributor was their last in stock and was Identical to the one "previously" pictured here. The strange thing was the pot on the circuit board was set to deliver 380mA to the laser diode by default. I set it to 300mA and it was as dim as a regular red 3mW, 635nm laser pointer. I re adjusted the pot to deliver 350mA @ 3.25V and added active cooling. It seems to work fine now, albeit likely with a shorter lifespan.
UPDATE September 16, 2015. The picture above has been updated to match the laser I described, and purchased from Sparfun in my earlier review. One thing I want to add is that the Laser diode is only press fitted into the optical assembly, so you may want to add some epoxy or some other adhesive to keep it in place.
I tested the 4 modules I purchased from Sparkfun with the same 3.25V power supply, and all 4 of the modules purchased from Sparkfun draw 290mA of current, and are very bright. The beam is clearly visible in low light/darkness.
The only reason I didn't give these a 5 is because one appears to be faulty. The beam that exits the lens on that particular module appears to be multi mode, TEM10. (two oval shaped beams next to each other) with a noticeable break in the middle. I tried cleaning the lens but it is not dirt, I confirmed this by simply spinning the unit around, then it was a solid circle TEM00 beam.
I suspect something is loose in the barrel of the module, perhaps the Nd:YVO4+KTP was improperly mounted and came loose. So basically I have to make sure that particular module remains in a specific orientation in order to work properly. All in all, this is an excellent laser for the price.
Excellent Product
Works great. I purchased this to replace a broken laser that I had on a light projector. It works great but I can tell it is much brighter than the one I replaced this with.
It's Green, BRIGHT Green
Data sheet short on physical dimensions. No spec given on thread. (it is 10mm X .5) No connection details. Those things considered, it works well.
Very bright, heats up after a minute of use
The light from this laser was quite intense for the low power. It did heat up quite quickly with continuous use so it ended up not working for my application.
Very nice laser, sparse documents (read carefully!)
So first of all, don't over-power this laser. My honest advice is keep it comfortably under 4.5v to continue to have a working laser.
That said, with proper power it is bright, gives a lovely crisp beam, and definitely stands out from run-of-the-mill red lasers. I do wish there was a little more clear documentation on connecting it up, but to the credit of Sparkfun, their tech support was most excellent and friendly, and with that guidance, this really is a neat little part.
Oh, and just because - don't look directly at it, and don't shine it at planes. Makes the pilots grumpy.
Works great
I'm not using a light pen holder so I soldered to the little holes in the corners. They are not labeled show you need to use an ohm meter to check. Case is power, spring is ground. It would be nice to have a diagram(hint).
8 month follow up: I broke the the board because I pulled the power wire by mistake and pulled the pad off. I ordered another one and it works. I remembered I had laser diode driver left from another project and it worked. I'm editing because the board has an extra feature. It can be turned on/off with 5v TTL signal. Data com or PWM power adjustment???
https://www.aliexpress.com/item/635nm-650nm-808nm-980nm-TTL-Laser-Diode-Driver-Board-Drive-5V-Supply-50-300mA-Integrated-Circuits/32844979362.html
Good
Works well but do not overvolage at 5V will stop after 2 to 3 Min
Good pointer, one had a problem.
Mostly I love them.
However, one had it's focuser lens out of kilter.
Green Laser
I ordered this laser for my grandson's project. He was refining his installation of a laser in a body of a (plastic) nerf gun. The laser does not come with a ground wire,we soldered one on the body. He said that he tried the trim pot with no measurable difference. The image of the laser after installation was more like a triangle with a bright spot than a dot. There needs to be more explanations and cautions.
Sorry to hear you're having trouble. See the "Support Tips" section above for information on where you need to solder wires too if you need them. As for the shape of the beam, that has to do with the shape of the semiconductor inside the laser. Most semiconductor lasers don't have a round spot.
Previous posts about the spring being the positive power connection are wrong. The spring is negative and the aluminum housing and/or the laser lead connected to the pad indicated by the black Magic Marker marks on the aluminum housing is positive.
Jump the pads along either edge of the push button switch for continuous ON.
This is absolutely correct. After applying ground to the spring and power to the housing, the module produces a laser after the button is pressed, tested today(12/14/12).
(PORTED to TECH TIPS TAB)
-------------------- Tech Support Tips/Troubleshooting/Common Issues --------------------
Pinout
To power the laser:
There are two plated through holes where you can also solder provide power. Try looking at this tutorial for more information:
[ https://learn.sparkfun.com/tutorials/gps-differential-vector-pointer#electronics-assembly ].
Note: Make sure that the potentiometer is not turned all the way down. The button is a momentary so the laser will only be on as long as you are pressing the button. The manufacture revised the board a little and removed the momentary button. There is now a partial silver metal enclosure around the laser too. You would still power it the same.
Example Project
The green laser was used in a project for the GPS Differential Vector Pointer https://learn.sparkfun.com/tutorials/gps-differential-vector-pointer. The section labeled "Electronics Assembly" shows what pins are needed to power the laser:
This laser is safe as long as handled properly. As a word of caution though, this laser, like most green lasers, is a Nd:YVO4 + KTP laser which means the lasing wavelength is 1064nm and the output of the cavity is then frequency doubled (wavelength halved) to get 532nm. The vast majority of laser eye injuries I've heard of have happened near this wavelength by Nd:YVO4, ND:YAG, and similar mediums. That being said, any tampering (opening the package, removing the IR filter (assuming it has one), etc.) with the laser itself could be very detrimental to your health since 1064nm is very outside of our visible spectrum and you will not know the danger is present until it's too late.
Very nice and affordable laser!
Got it up to a measured 20 mW for a brief moment (didn't dare to burn it permanently). Can confirm that
"like most green lasers" should be "like most green laser pointers and other CW lasers" since a couple of different crystals can be used to convert to green laser from 1064nm, such as LBO and BBO, with LBO being the most common for high-powered pulsed green lasers. The conversion efficiency of KTP is very low in a pulsed laser so it is less desirable in industrial and scientific applications, but KTP operates more efficiently than the alternatives when a CW [continuous wave] source is present, such as the case with most laser pointers.
How to connect:
Spring = Ground
Metal Body = Positive
hi
yo.
I have seen a few comments on these losing power as they heat up, this is normal for a laser with no cooling, the crystal assembly is temp sensitive and is the diobe, all i did was add a heat sink to the brass part of the head and it restored most of the stability
I got this laser and it was really really bright. No way this is only 5 mW. More like several hundreds of mW.
It was drawing about 400 mA at 4 volts so it is drawing 1,6 W. It had a weary clearly visible beam and i could see the dot clearly many hundreds of meters away.
I guess mine must have been set at the max power when i got it then. And i guess that keeping it on this setting will shorten the life on it significantly?
Super awesome laser!! but where are the 2 solder points for permanent on?
Could this laser burn something like paper for say or is it not strong enough
In my experiance 5mw lasers do not burn through paper, sorry. But there are some amasing kipkay.com videos and you could find kipkay on Youtube too. I think the best video is the cheapy lighter laser burner!
A few questions:
- Can this be linearly amplitude modulated? Up to what frequency?
- Can we control the output power? Looks like there is some kind of pot on board.
Do not touch the operational end of the device. Do not look directly into the operational end of the device. Do not submerge the device in liquid, even partially. Most importantly, under no circumstances should you (static)
Hi can you recomend a low voltage drivers, able to control the laser via dmx? It's actually working fine with arduino (through USB) But I have to found some easiest way to control the lasers from a dmx interface. Any tips?? than you :)
Can anyone help me to get on this product?
Hi All, would this laser module handle being switched on and off every 250ms? What would be the fastest I could switch the unit on and off before I start to damage it?
Photos comparing this to the red laser card module. I attached it to 3x NiMH AAs (+ to the housing and ground to the spring) and, without adjusting the trimpot, measured 4.2v and 225-230mA. As everyone says, it's very bright; almost uncomfortable to look at the dot on white surfaces.
Has anyone rigged this to produce constant power? A constant current regulator helped, but the output power still fluctuates more than I can handle.
Does anybody know what the thread size/count is?
Is it normal that when hooked directly to 3v via battery pack that the light output is very high for about 1 second then steps down to a lower output? The lower output is still good, but I want the higher output.
You may want to consider adding a heat sink or even an active cooling Peltier module.
FYI, I just measured this module with a power meter and the laser outputs a 40mW beam when I hooked it up directly to a 3.3V source (running at 270mA). This is well outside FDA class IIIa, so be careful!
You should get something like this in the 445nm or 405nm wavelength. Or maybe just a normal pointer of that wavelength. To go with you guys' PHOTOLUMINESCENT PANELS!!
Is this beam visible indoors?
If you add dry ice to water then you can shoot the beam through it and view the beam indoors.
At 5mw, no.
Anyone knows what is the pulse width for this particular laser?
This is a CW laser.
Is it the same as this laser module?
Can anyone recommend a way to switch it on and off rapidly (e.g. turn it on and off with 50 microsecond transition times): it is simply best to just control the power input quickly? It's a wonderful product for our light scattering experiments. Thanks for reading.
I just lost all respect for Australia due to their anti-laser law :(
TO AUSSIE CUSTOMERS: you can import this. see here http://www.customs.gov.au/site/page4372.asp
scroll to the very bottom
Two questions! How do I power this laser, mine has two cables, one red and one blue and the spring. Red equals vcc and blue gnd? And the spring is? Secondly, I want to turn it on and off remotly with the IOIO board, is the board capable of providing the power? A 9V battery powers the IOIO.
Not to be really dumb, but where is v+ and ground? I assume the spring is one of them, but where is the other?
spring is the ground and you can use the casing as v+
I bought one of these, and it's awesome, but I have two questions.
1.) What is the best way to drive this? I've tried resistors in series to regulate the current, but it's a constant-current device, right? Any recommendations?
2.)When there's only ~160mA running through it, is it normal for it to act like an IR laser?
1) This (http://www.mouser.com/ProductDetail/Texas-Instruments/LM317KCT/?qs=TB/Q0sBK/Gcz1btw204Pbw==) will help regulate the current. Figure 9 in the data sheet has a schematic - adjust the resistor for different currents. 2) Watch out! There's no IR filter in this module.
Datasheet link returns 404
Cool... now lets get an inexpensive mirror galvanometer around here to have some real fun!
I bought this laser expecting it to be maybe a little stronger than a pointer laser (Boy, was i wrong)
At night I pointed this laser at the local water tower, and I could SEE the laser from 3/4 mile away!
Remember its a Class II Felony for pointing lasers at planes.
Be CAREFUL!
buy the monster module you want here. http://www.dealextreme.com/p/200mw-532nm-green-laser-module-3v-11-9mm-26891
but MAKE SURE you buy eye protection with these.. you need all three wavelengths 890nm, 1064nm and 532nm all in one.. get them at http://www.laserglow.com/AGF model # LSG-KTP-NF-6
The first two are at IR wavelengths, and sometimes manufacturers skimp on the IR-Blocking filters.. so it leaks and you'll never see it.. until your blind.. then you'll know!
be safe!
I want a laser w/digital pot :)
how longs does the diode last at 400ma?
Hi:
I have a 5VDC digital output from an embedded system board and want to power one of these lasers, I tried using simply a resistor in series to reduce the voltaje from 5V to 3.2 but is very unstable (light intensity changes in time) any other suggestions to interface with this laser?
Regards
Jaime
I've a little problem with mine, it's not green laser but an IR laser. Maybe it's the power source (I've used 200mA, 4.3V)?
Or something else, if anyone have an idea ?
How do you hook it up to power source?
Great laser, just as bright as the previous kind but please update the photos!
Does anyone knows what can I use as a receiver for this laser? I want to esasy detect just when the laser is On/Off. What things can I use for that? Thanks!
I just got my laser from the new batch, but its circuit layout is different from that pictured above. Mine doesn't have the two solder points, and the spring takes up the entire back of the board. How do I hook it up to power?
I am there with you Hoobens, I just got mine in today and noticed it was not the same as the description above. Using a meter and some trial and error I found (Sparkfun, please correct me if I am wrong) that the spring and the switch is the ground. If you look at the spot BETWEEN the switch and spring, you will see a silver pad, that is the Positive terminal. For permanent ON you will need to solder your ground to the two terminals to either side of the switch closest to the laser diode barrel. You will also have to figure out a way to solder to the silver pad between the switch and spring as well (I am still working on that).
Thanks for the tip. It turns out if you don't want to use that tiny pad near the button, you can also use the metal laser housing as the positive terminal.
Yes on the metal housing; I used copper tape to affix my positive lead to the metal housing and it worked like a charm. My negative lead is soldered directly to the spring.
Does sparkfun intend to ever sell these again? The last batch was awesome..
Out of stock? More please!
Would this be good for a laser pointer for stars, and slideshows? I've never really built a laser pointer before, but i would like to try.
I don't think this is bright enough for star watches. It would work for slideshows though.
Hi:
What if i power the module with 5 VDC, will it work ok?
Regards
Does the laser also have an infrared filter and can the pot also allow the power output to be lowered?
It can be lowered, but I don't think it has a filter.
Okay, hooked it up, and instead of a nice solid green dot, i got a dot surrounded by a scattering of green light. The scattered light pattern is awfully wide (~1 foot in radius from the center at about 6-8 feet distance) and noticeable; it just doesn't have that pinpoint dot feel like a laser should.
I think it's the lens; i've tried adjusting it up and down, but that doesn't make the pattern any better or worse, just rotates it on the wall. It looks really pretty, sure, but it's not what i had in mind, ya know?
Does anyone else think/know if it might be the laser's lens? As in, is my problem unique and could be solved with a new lens, or is this diffraction simply the norm and i had my expectations too high?
With SFE I would guess the former, but with my luck it's the latter. Anyway, somebody please clear this up for me.
Please contact tech support at techsupport@sparkfun.com. Thanks.
Are you getting more of these?, I love it and I definitely want to have a backup / spare. I want to wait till you have more before I order an Optoisolator breakout board to drive this on and off.
How do you use the momentary button? Power to the two solder points gives permanent on. Where do you connect to be able to use the button to excite the laser?
the spring is ground and you use the solder point for VCC but be sure to use a 3.3v regulated source as i burnt mine out and they aren't in stock right now
@NOTgate: You seem knowledgeable, so do you know where (I'm inside the US) I can find something like the module on dealextreme for the same price or less. I need something that works at around 5V. Also it should be capable of 100 mW. Its ok if I have to mod it to do that, when I said household I meant solar eclipse glasses (which block all near visible light, including IR and UV), in fact it is favorable if it is cheaper to do so. I need it mainly for the burning power. It will be turned on and off, being on for no more than 10 seconds. Lastly, cost constraints are present. I am $40 over budget (out of $120)so the cheaper the better, and if it is available on a site that offers electronic items like sparkfun or pololu that would be good (shipping costs come into play). Lastly, if I mod a laser when will I need a heat sink, for what, and of what type. If you answer I am greatly indebted to you, so thanks.
Whoa, careful with those goggles. You really want to get real safety goggles appropriately matched to the output of your laser. Eclipse glasses could be dangerous -- since they block almost all light, they open up your iris to its full extent (oops), suppress your blink reflex to bright lights (double oops), and they don't guarantee strong blocking of the specific wavelength of your laser (and if your laser is not firmly in the visible spectrum, how will you know whether they are actually effective at all at that wavelength?). The sun is a full-spectrum blackbody radiator, and eclipse glasses are trying to do an okay job suppressing the total power received across the whole spectrum, which is a very different task from strongly filtering a bright emission at a single laser wavelength. Most real materials have absorption spectrums with lots of peaks and notches. You don't want to find out the hard way that your glasses happened to have a notch at exactly 532nm.
Anyway, I'm not a physician, nor a laser technician, so I could be completely off-base. But please don't cut corners on safety.
Yes, the only thing solar eclipse glasses are good for are solar eclipse. Certified glasses are available from a company called Kentek. Here's a link to a wide selection: http://www.kenteklaserstore.com/laser-eyewear-search-tool.aspx#q%3DY2IzNzRiZDMtZmY1MC00M2JlLWIzNWItNjRmNzE4YmY4ODQy_ZWJlMzA0NDItODkyNS00Yjg3LTg2ZmUtMzc5N2M5ZmRhYjgy%26o%3D-1%26p%3D1%26i%3D15%26h%3D996%26l%3D29%26prot%3D0%26protMode%3D
If you want it in the US, a red or blu-ray laser module is best. Blu-ray (dark violet) modules are very good at burning, because they can focus to a very small point and can be absorbed more by most surfaces. A >100mW module (used) should cost you less than $30. Check out laserpointerforums.com. Start up a thread in the buy/sell/trade section asking for a "PHR-803T" module with a driver. The PHR thing is a diode that can safely output just above 100mW. The only problem is that the driver will probably be a rckstr, which if I remember correctly will want about 7.25 volts to power a blu-ray. A boost driver will be more expensive. You should also ask for a heatsink. I got my plain aluminum block heatsink for about $30 (I could have gotten a better deal). Ask for one of those too, you'll want one if you run it for more than 10 or so seconds and your duty cycle is more than say 10%. If you get a diode too hot it dies. Note:You can get more power out of a red laser for a cheaper price, but it depends what you want. Blu-ray is less visible but often much better for burning.
So, what if I required a laser that had a output up to 100-200 mW. I want to use it to send the light to a light to frequency converter, then that will tie into a microcontroller and cause my project to stop, turn, or whatever I decide to have it do. Where could I find such a laser? Thank you.
When I'm playing with lasers, I like to use class X safety goggles (glasses covered in duct tape).
Duct tape doesn't protect against high powered lasers, they just burn it in less than a second if properly focused. The next barrier is your retina. Eclipse goggles doesn't protect either, as they just burn too. Those are made to handle a broad spectrum emission with an overall low power density. With a laser, you're talking about power densities that are some orders of magnitude away from what you could receive from the sun, at a very specific wavelength. Same happens to welding glass or most other household items. So please, do take this seriously.
For the pot-modding dude: you won't get 100mW's out of this, it just aint gonna happen. Considering an optical efficiency of 15% being generous for such a cheap module, you'd need a 50mW pump diode to get 5mW's, and a 700mW pump diode to get 100mW. A 50mW rated diode just won't emit 700mW's. 100mW (15mW of total output) could be done, 200mW (30mW of total output) attainable for some hours, but above that, it would just burn.
Can you modify the potentiometer and/or overall output on this thing and if so, how? If not what cheap laser module can I use to achieve these powers, and where can I get it (preferably a site with other electronics like sensors and stuff)
@ NOTgate: - I need a CHEAP laser for a project I am over budget and I cannot afford a 100mW module.
- It does not need to last long, an hour of lifetime would be more than enough, but it needs to emit (infared included)approx 100 mW.
- I AM USING GOGGLES (clarification on what type of household material to use would be appreciated, though).
I doubt you'd get more than 10 minutes out of this thing if you cranked it to 100mW. Plus, you'd need a decent heatsink. If you're outside of the US, http://www.dealextreme.com/details.dx/sku.26890 is a good bet. Inside the US, http://www.o-like.com/index.php?main_page=product_info&cPath=2&products_id=16&zenid=9ff9737331b017d3eb6396e6fe05f859 . The second one is almost twice as expensive, but much higher quality and more reliable than the first one. And what do you mean, "what type of household material"? You should be using designated green laser goggles (red plastic) if you value your eyesight. Otherwise, expect to hear a loud pop when the inside of your eye boils and explodes in a couple of milliseconds. And PS if you want 100mW for the burning power, just get a ~250mW red diode in an aixiz module with a driver for about $30.
Can anyone speculate what type of receiver would I use If I was going to build a simple type of laser tag with this?
For laser tag, you'd want to use an IR laser because of less interference from the sun and if you wanted the green dot effect you could simply add this as a targeting laser and have it lined up with the IR one. If for some reason you must use green, maybe a bandpass filter and a photodiode? But the target would be really small...
DO NOT modify the pot on this to increase output power! Not only is it dangerous if you don't use goggles, but on top of that it will kill the laser module VERY quickly! "Pot modding" to increase power in green laser modules is frowned upon by laser enthusiasts for a reason. If you want more power, buy a more powerful module. And this will not be controllable by PWM or TTL because this uses a DDL driver, and DDL drivers do NOT like being modulated at high speeds. That said, have fun with this! Green laser light is MANY times brighter per mW than red laser light (4 to 40 times brighter depending on the person looking and distance from the laser dot).
Where would I get a laser that could be modulated? I'm looking for 300 or above kHz.
This is an awesome find! For while one could buy a full 5mw green laser pen at this price, it really is a worthless, hard to remove shell with $15 of electronics in it. Definitely buying one of these next payday.