- Home
- Product Categories
- Weather
- SparkFun Atmospheric Sensor Breakout - BME280

SparkFun Atmospheric Sensor Breakout - BME280
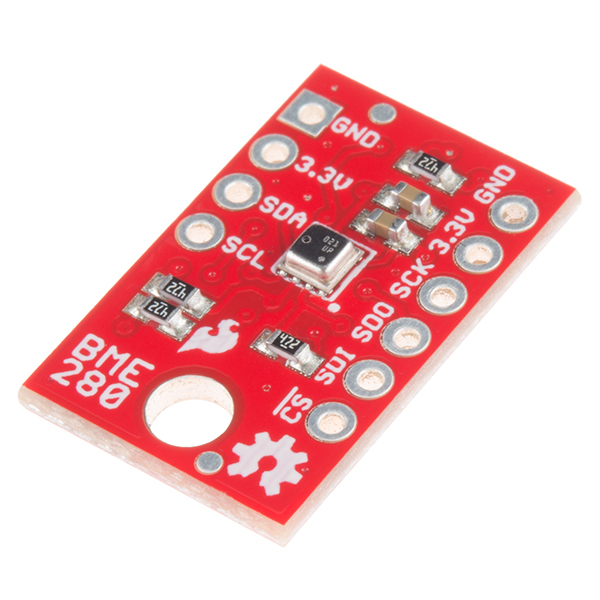
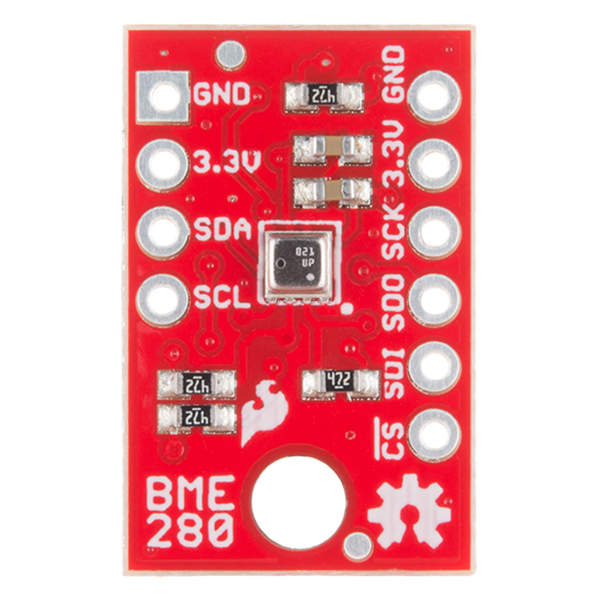
The SparkFun BME280 Atmospheric Sensor Breakout is the easy way to measure barometric pressure, humidity, and temperature readings all without taking up too much space. Basically, anything you need to know about atmospheric conditions you can find out from this tiny breakout. The BME280 Breakout has been design to be used in indoor/outdoor navigation, weather forecasting, home automation, and even personal health and wellness monitoring.
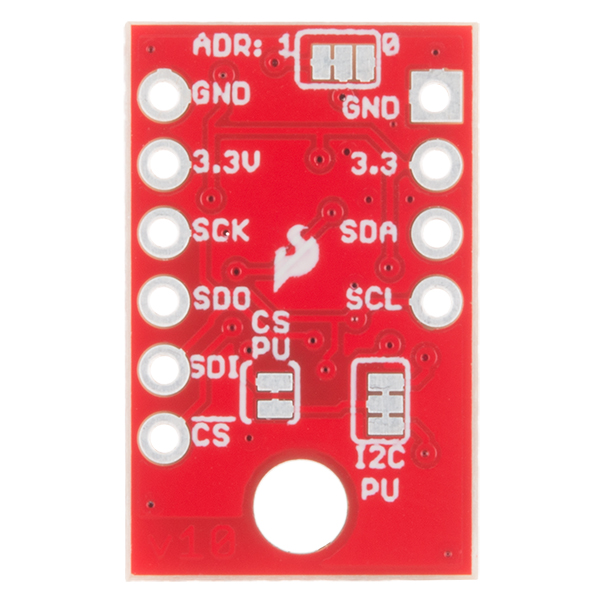
The on-board BME280 sensor measures atmospheric pressure from 30kPa to 110kPa as well as relative humidity and temperature. The breakout provides a 3.3V SPI interface, a 5V tolerant I2C interface (with pull-up resistors to 3.3V), takes measurements at less than 1mA and idles less than 5µA. The BME280 Breakout board has 10 pins, but no more than six are used at a single time. The left side of the board provide power, ground, and I2C pins. The remaining pins which provide SPI functionality and have another power and ground, are broken out on the other side.
Note: The breakout does NOT have headers installed and will need to purchased and soldered on yourself. Check the Recommended Products section below for the type of headers we use in the Hookup Guide! If you are looking for the SparkFun Atmospheric Sensor Breakout - BME280 with headers, it can be found here or in the Similar Products below.
- Operation Voltage: 3.3V
- I2C & SPI Communications Interface
- Temp Range: -40C to 85C
- Humidity Range: 0 - 100% RH, =-3% from 20-80%
- Pressure Range: 30,000Pa to 110,000Pa, relative accuracy of 12Pa, absolute accuracy of 100Pa
- Altitude Range: 0 to 30,000 ft (9.2 km), relative accuracy of 3.3 ft (1 m) at sea level, 6.6 (2 m) at 30,000 ft.
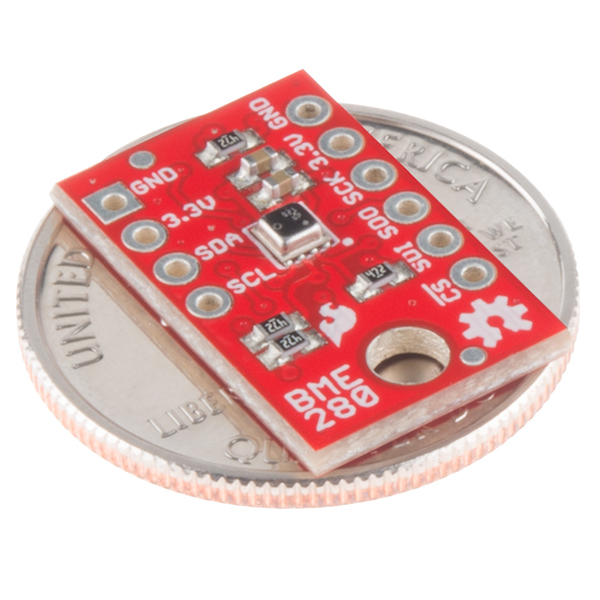
- Incredibly Small
- Schematic
- Eagle Files
- Hookup Guide
- Datasheet
- GitHub (Design Files)
- GitHub (Library & Example Code)
- Product Video
SparkFun Atmospheric Sensor Breakout - BME280 Product Help and Resources
Logging Data to Google Sheets with the Tessel 2
December 12, 2016
This project covers how to log data to Google Sheets two ways: using IFTTT with a web connection or a USB pen drive and "sneakernet" without.
CCS811/BME280 (Qwiic) Environmental Combo Breakout Hookup Guide
September 8, 2017
Sense various environmental conditions such as temperature, humidity, barometric pressure, eCO2 and tVOCs with the CCS811 and BME280 combo breakout board.
Experiment Guide for the Johnny-Five Inventor's Kit
June 28, 2016
Use the Tessel 2 and the Johnny Five Inventors kit to explore the world of JavaScript enabled hardware through 14 awesome experiments!
Photon Remote Water Level Sensor
June 2, 2016
Learn how to build a remote water level sensor for a water storage tank and how to automate a pump based off the readings!
Qwiic Atmospheric Sensor (BME280) Hookup Guide
August 21, 2019
Measure temperature, humidity, barometric pressure with the SparkFun Atmospheric Sensor Breakout BME280 (Qwiic).
Qwiic Kit for Raspberry Pi V2 Hookup Guide
December 29, 2022
Get started with the SGP40, BME280, VCNL4040, and microOLED via I2C using the Qwiic system and Python on a Raspberry Pi! Measure VOC Index, light, temperature, humidity, and pressure from the environment. Then display them on the microOLED, serial terminal, or the cloud with Cayenne!
SparkFun BME280 Breakout Hookup Guide
October 22, 2015
A guide for connecting the BME280 sensor to a microcontroller, and for using the SparkFun Arduino library.
1 of 1 found this helpful:
Module has an altitude cap.
This module is not suitable for high-altitude balloons, despite its perfect size. Only goes to 30,000 ft, while high-altitude balloons go to at least 60,000 ft (generally).
Core Skill: Soldering
This skill defines how difficult the soldering is on a particular product. It might be a couple simple solder joints, or require special reflow tools.
Skill Level: Noob - Some basic soldering is required, but it is limited to a just a few pins, basic through-hole soldering, and couple (if any) polarized components. A basic soldering iron is all you should need.
See all skill levels
Core Skill: Programming
If a board needs code or communicates somehow, you're going to need to know how to program or interface with it. The programming skill is all about communication and code.
Skill Level: Competent - The toolchain for programming is a bit more complex and will examples may not be explicitly provided for you. You will be required to have a fundamental knowledge of programming and be required to provide your own code. You may need to modify existing libraries or code to work with your specific hardware. Sensor and hardware interfaces will be SPI or I2C.
See all skill levels
Core Skill: Electrical Prototyping
If it requires power, you need to know how much, what all the pins do, and how to hook it up. You may need to reference datasheets, schematics, and know the ins and outs of electronics.
Skill Level: Rookie - You may be required to know a bit more about the component, such as orientation, or how to hook it up, in addition to power requirements. You will need to understand polarized components.
See all skill levels
Comments
Looking for answers to technical questions?
We welcome your comments and suggestions below. However, if you are looking for solutions to technical questions please see our Technical Assistance page.
Customer Reviews
4.8 out of 5
Based on 17 ratings:
3 of 3 found this helpful:
Makes a great accessory to my ESP8266 Thing
The BME280 worked right out of the box and appears to be very accurate. I use it on my weather station and the readings match the others in my area on the wunderground.com. The pinout of the i2c communications header is compatible with the ESP8266 Thing so all I had to do was plug it into the socket I had installed on the Thing, load the SparkFun BME280 Arduino library, and I was up and running.
1 of 1 found this helpful:
Great sensor, very easy to hook up and integrate in project!
I had no difficulty wiring the bme280 to my raspberry PI 3. Just used the python libraries to read the sensor. Highly recommend it!
2 of 3 found this helpful:
Reliable, accurate, small
Sensor seems to be fairly accurate, can be used via I2C or SPI, is fairly small, and works reliably. I couldn't have asked for more in an atmospheric sensor.
3 of 6 found this helpful:
wow! great resolution and works effortlessly
I connected the power and ground and the I2C interfacce. It worked out of the box with my Arduino redboard using the code I downloaded from the Sparkfun tutorial.
Then I modified the code to take successive readings of the temp, humidity and pressure channels as fast as possible, average them and print the results ever few seconds.
This dramatically reduced the noise and increased the resolution. I can track 0.1 degC changes, 1 foot elevation changes and about 0.5% rh changes.
Would have been truely effortless and instantly plug and play if the board came with a ribbon cable soldered in with pins on the other end to plug into the redboard. I had to take an additional 5 min soldering on the wires.
1 of 3 found this helpful:
Atmospheric Sensor
By the moment, I do only a little test over this sensor.
Normally Sparkfun gives us good information and examples for Arduino users.
But I normally use PIC16 microcontrollers and do my programs in assembler. Several elements have sufficient information for me; but others require some reversal engineering from the Arduino examples to discover how to use it. Then I prepare my programs.
In the future, it is possible to publish some information about the use of the devices without predefined libraries?
Sparkfun BME 280
This is the second BME 280 I bought. I used it to measure static pressure and it works great. Completed control over sensor via setting in the S/W. Good Job Sparkfun.
A bit humid
For my job I regularly use a hygrometer. Since getting this sensor I have learned that it is far more sensitive than the meter I use for work. After soldering on headers I use this with the Qwiic adapter and it runs beautifully. I'm new to coding and Arduino so getting this to work was awesome. 10/10 would buy again.
0 of 1 found this helpful:
Great sensor -- easy to use
Got one of these to experiment with as a replacement for DHT22. So far it's been a snap to work with (once I figured out which address it was using), and has been giving much better results than the DHT22. Super low power consumption as well.
Great Little Board
Performs as described and the documentation and sample code are excellent. The only complaint I have is not with the product, but with the shipping costs. It was the only item I ordered and could have been shipped 1st Class mail for far less than the $6+ I paid.
Ted
A man with two watches never knows what time it is.
This sensor works reasonably well. The board is fine and so is the documentation. I like that this sensor does pressure, humidity, and temperature. But what I did not realize is the temperature is not nearly as accurate as the pressure and humidity. The temp sensor is there primarily to allow the chip to calibrate the temperature and pressure sensors. The upshot is two of these sensors side by side read identical pressures and humidities, but were off by 1.5 degrees Celsius. If you need super accurate temperature, look to a different sensor.
BME worked as expected
This is an upgrade from the BMP280 which pressure and temperature; the BME280 also measures humidity. This board does I2C as well as SDI.
Easy to hookup this up. This requires 3.3v power supply. I checked the Humidity and Temp on the BME280 and found it close to other sensors.
My citizen science project doesn't require precision, more bracketing (humidity between 80-90%). This is an amazing little piece of hardware!
Worked like a charm
In Chandler Arizona we have had way too many days with days above 115 F. I connected the BME 280 to an Arduino Nano to collect data once a minute and send it to a MacBook Pro and used Python to create a real time graph of my AC run cycles for an 8 hour segment. By late in the afternoon they obviously had a difficult time completing a cycle. Looks like 2 AC units with more capacity in the fall.
Excellent product and so easy to use!
I was working with my dad to build a climate control system for a wine cellar and this has worked like a champ. We have one outside and one inside, both are working great across a range of typical environmental temperatures in Chicago. Accessing the module through a SparkFun board was dead easy and the responsiveness is great. I also appreciate the mounting hole. Like all of the SparkFun products I've gotten, this BME280 board is easy, reliable, and well designed!
BME 280
It works great in my project...
Accurate
I bought this to monitor weather data in my bedroom. The hookup guide wasn't too clear to me on how to get data from it (it was there, just not where I was expecting it) but I eventually got what I needed from it. I put it up against a digital thermostat--not physically--and the two read very close to the same temperature and humidity.
SparkFun Atmospheric Sensor Breakout - BME280
Dear,
The sensor that I bought with you, met all my expectations. I'm using it on a Raspberry Pi and it was very easy to implement this sensor on this board. My next project is to make this sensor work on a PIC16F877A, but from what I've been seeing on the internet, it's going to be easy to do this implementation.
I take this opportunity to thank you for the cordial service SparkFun has given to me during this purchase. They are to be congratulated.
Regards,
Reynaldo Silva
Hey everyone. There's a few comments here that have to do with the sensor being a few degrees high and I wanted to discuss it.
Specified Accuracy
I looked up datasheets on the various sensors this is being compared to. Here's the take-away:
TMP36: Specified accurate to +-2 degrees C DHT11: Specified +-2 degrees C MPL3115A2: +-1 degree C at 25C +-3 degrees C over full range BME280: +-0.5 degree C at 25C +-1 degrees C over full range
So, by manufacturer specification the BME280 is the most accurate.
Implementation Impact
Some of the discussion says that maybe the location in the circuit effects the temperature. Noting that self-heating could possibly effect the temperature, I devised a quick experiment to test this.
Here's the test data:
Conclusion
-MTaylor
I can confirm, that readings seems to be high compared to other I2C sensors. Since all available BME280 libraries give similar results i assume, there could be a misinterpretation of calibration values or a not yet discovered problem with the datasheet. I set up a small test on 3.3V bus with readings all 15s.
The documentation is lacking dimensions for the board. Makes it difficult to design a case which uses this board without first purchasing all the bits and then measuring by hand. That, or install Eagle and read the board files :(
Can Sparkfun please include a simple dimensions drawing in their documentation as a matter of routine?
These boards aren't compatible with 5 volts. I had several sensors burn out due to being connected to I2C on a MEGA 2560 without level shifting before I figured this out. See the BME 280 absolute ratings in the datasheet... it states Vdd and Vddio maximum is 4.25V and interface pins maximum is Vddio + 0.3V.
Hi there,
Would the BME280 sensor be suitable for use outdoors during the winter? I'm looking for a good sensor to deploy in the Canadian Arctic, which would remain outdoors for an entire year. I'd house the sensor within a radiation shield and cover all other electrical connections/components with silicone conformal coating. I'm just wondering if condensation might be an issue over time.
Cheers, A
Hi,
Why is SDO left floating, if you use I2C only? If you look at page 31 of the BME280 datasheet, it says:
It specifically says that it should not be left floating, but either connected to GND (0x76) or Vddio (0x77)
Any explanations for this choice?
It's not floating.
If you check the schematic you will see that it's pulled high by default through a 4.7K resistor. There's also a jumper on the board that allows you to set it high or low manually, or if you leave it high you can externally pull it low through the SDO pin on the edge of the board.
@CF - you are entirely correct! I don't know which Eagles I looked at, when I posted this! But if you leave it floating, the datasheet says it is "undefined", what does this mean? That you can't be certain which I2C address it has? Or it simply does not have one at all?
Just a quick note on the library. The hookup guide says that pressure is returned in kilopascals, but unless I'm deep under the ocean and nobody told me, it's just returning pascals.
I love how easy this device was to set up, and the built-in I2C/SPI support, but I, too, am finding the temp readings from this device to be consistently high, sometimes by as much as 9 degrees F. I have it connected via I2C directly to an ESP8266 thing (WRL13231), with the BME280 board hanging off the edge so it doesn't pick up heat from the thing, and I have two other thermometers sitting right next to it. The temps all rise and fall together, but the BME280 is between 5 and 9 degrees (F) high. The thing should be delivering 3.3v, so I don't think it's over voltage, and it's in a fairly breezy outdoor location so I also don't think it's surrounded by heated air. This is so far off I'm tempted just to call it defective or miscalibrated and order a replacement. It's a shame we can't somehow fix the calibration by taking known temps.
Is there a Particle Spark library for this module?
Could be a very simple question. Is this water resistant? I have a PVC rain tower. I want to know what the RH is inside. Obviously the board will get wet. I will use heat shrink on the wiring.
The datasheet says condensation is allowed, but I don't know if immersion will damage the sensor (or the breakout board).
Is there a Frizting file available for this? I can't find one, but it looks like the Hook-Up guide is using one.
There is! We're working to get our Fritzing parts included with the program but we're not there yet. I've gone ahead and added the part to the product github, which you should be able to download through github's web interface (or you can clone)
https://github.com/sparkfun/SparkFun_BME280_Breakout_Board/tree/master/Fritzing
Hey, thanks for the quick response! I appreciate you adding it to the github.
I got this breakout board (from a reseller in Germany) but all values are way off. Even the temperature shown by the BME280 is about 3 degrees Celsius higher than the real temperature and altitude is about 130 metres to low. Is there any calibration necessary before first use? I could not find any method for this in the library.
Accuracy should be about +/- 0.5 degrees C, so that's a little odd. Calibration happens from a set of factory programmed registers that the library reads out, then uses for calculations. The barometric readings are highly dependent on temperature, so both being off at the same time isn't so surprising.
The I2C_ReadAllData sketch displays the calibration words at the start. Even if you are using SPI (just change the .settings.commInterface and .settings.chipSelectPin lines), can you please send me the concatenated calibration words listing?
Mine looks like this:
Note: start code with 4 spaces for our markdown formatting.
Chiming in because I have the same problem! Consistently reading 2.5C to 3C warmer than actual (as measured with a TMP36, and a wall thermometer.)
Temp from my TMP36 sensor: 21.29C
Temp from BME280: 23.94C
Calibration words and first reading from BME280:
Hi Taylor, thanks for your reply, my calibration words are like this:
Today the temp is only about 2,5 degrees too high (measured with a DHT11 and a MPL3115A2) and altitude about 110m too low. Very strange. I just removed all other components from the breadboard, but still the same...
I also have one of these that is giving temperature readings that are 4.25 degrees too high.
I'm reading 28.40 degrees C instead of 24.7 (inside temperature shown on a weather station console)
However that's when plugged into headers on an ESP8266 Thing. When I instead place it at the end of a 30cm cable, the temperature difference comes down to within half a degree of my other reading.
My elevation is about 30m above see level, not 50m beneath it. However the pressure at sea level at the moment is not 1013.25 hPa as the library assumes. Adafruit's BME280 library takes the unknown current sea level pressure as an input to the altitude function.
And what about degradation due to permanent humidity (for example in a bathroom)? What do we need to do to protect this Shield against permanent humidity ? Other Humidity sensors (DHT...) have a life time less than a year before beginning to produce incoherent measurements. The other sensor RB-Dfr-460 seems designed to better resist against moisture in time. In other words , how to use it in a sustainable solution for at least 5 years ?
The datasheet says its humidity drift is typically 0.5%/year.
i know it depends on the part the board is built around, but it kills me that every i2c breakout has the pins in a different order.. it'd be so nice to plunk a bunch of them on some stripboard, or to be able to make up a bunch of standard cable assemblies
We have started to use a standard on all new boards (which this should follow) because we got sick of the same thing around here. Sometimes you will see additional pins as well, but SCL, SDA, VCC, and GND should all be in the same order on our new boards. We can't force everyone to use our standard, but I have a feeling people are starting to come up with their own anyway.
that's good news!
Why doesn't this come with the headers? Even when I order stuff from AliExpress it comes with headers (not pre-soldered of course), and that's like the sketchiest place to order electronics from. I love the idea of this breakout board, but when I have to buy two separate items just to get one physical sensor working somethings wrong...
If everything came with headers I'd have a heap of unused headers from soldering wires to my boards. The argument goes both ways and I like the option of getting to choose between headers and wires without clogging up my already overloaded heap 'o crap.
TheBurrito is completely correct: The main reason why there are no headers per-soldered onto this board is so that you, the end user, get the choice on what sort of connection you want. There are multiple types of headers to choose from, different wires (with and without terminated connectors), and it is a lot easier to solder something on than it is to de-solder that same thing off.
If you take a look at our past in-house assemblies you'll notice that most, if not all, of them are sold without headers for this same exact reason. So rest assured that nothing is wrong, we just don't want to make decisions for you that you may not agree with, however, we are sorry for the confusion in this matter. :)
Thank you for that. As a user looking at this I want to be able to decide how it is hooked up. Also I have a bunch of headers I can just use anyways.