- Home
- Product Categories
- Kits
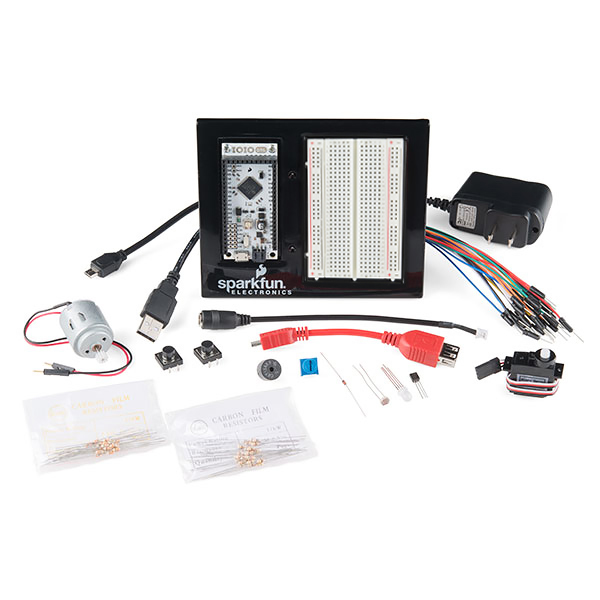
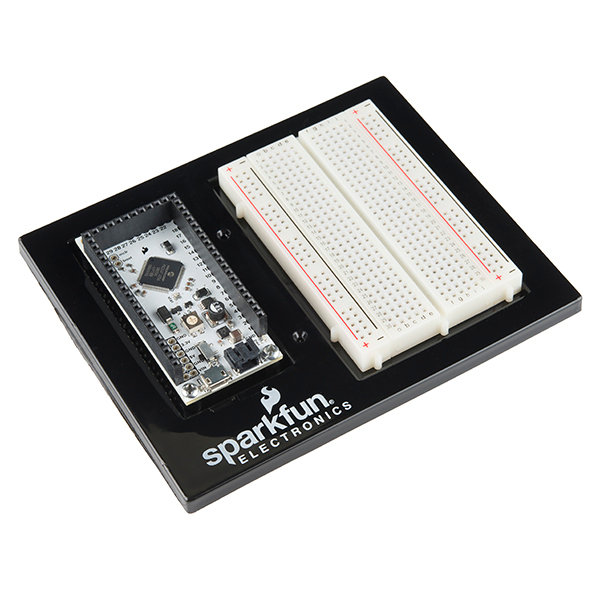
- SparkFun Inventor's Kit for IOIO

SparkFun Inventor's Kit for IOIO
Are you a Java or Android developer looking to add advanced hardware I/O capabilities to your Android or PC application? The SparkFun Inventor's Kit for IOIO (SIKIO) provides 7 projects, that allow you to control various pieces of external hardware with a IOIO-OTG (pronounced “yo-yo-O-T-G”), via an Android application! To put it simply, with this kit you will be learn to write Android applications that can read or control motors, sensors, LEDs, and more.
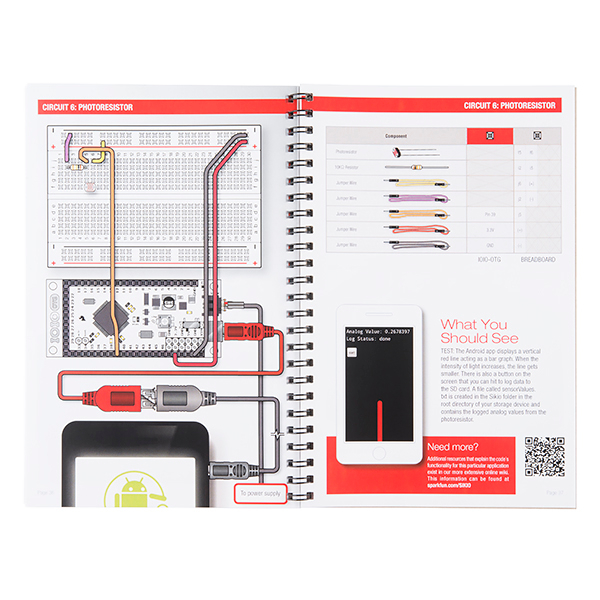
The full-color SIKIO Guidebook (included) contains step by step instructions of how to connect each circuit with the included parts. Full example code is provided and explained and even includes troubleshooting tips if something goes wrong.
The kit does not require any soldering and is recommended for people at an intermediate programming level; meaning we hope you have a foundation in writing code and know some basics about electronic hardware. Motivated beginners are welcome, but warned that it may be quite difficult especially if you are unfamiliar with the basics of programming.
Note: Please do not power your IOIO-OTG with 10V over longer wires. This may cause your board to fail.
Note: This product is a collaboration with Ytai Ben-Tsvi. A portion of each sales goes back to him for product support and continued development.
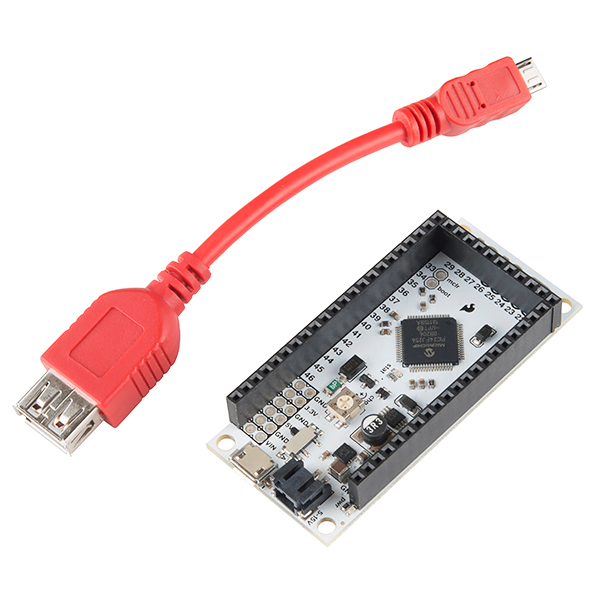
- IOIO-OTG Board
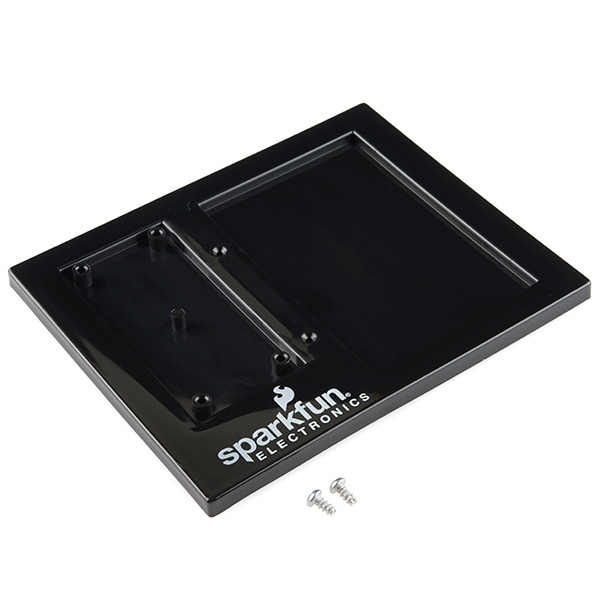
- IOIO-OTG and Breadboard Holder
- [SIKIO Guidebook](https://cdn.sparkfun.com/datasheets/Kits/SIKIO guide book_webversion.pdf)
- White Solderless Breadboard
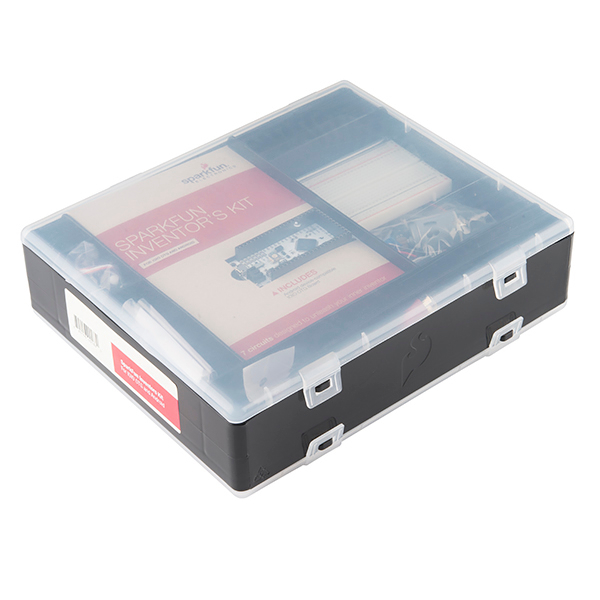
- Carrying Case
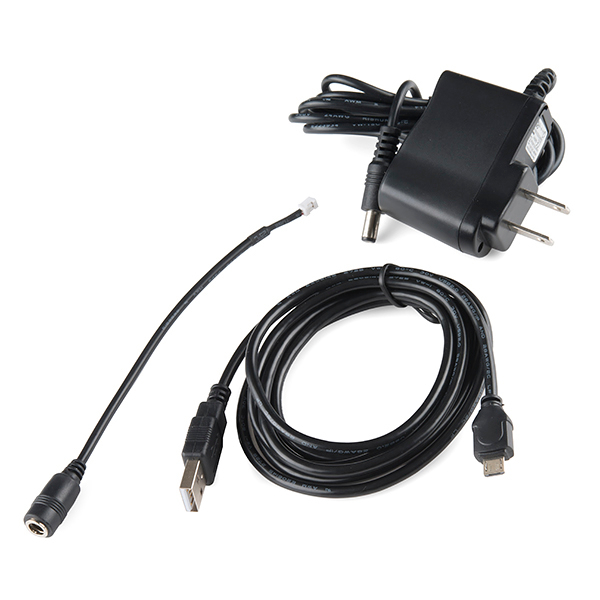
- 5V Wall Wart
- Barrel Jack to 2-pin JST
- SparkFun Mini Screwdriver
- 2N2222 Transistor
- 1N4148 Diode
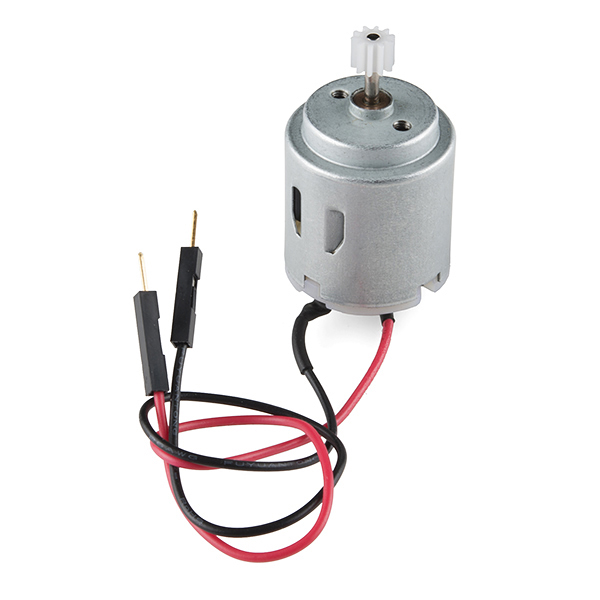
- DC Motor with Gear
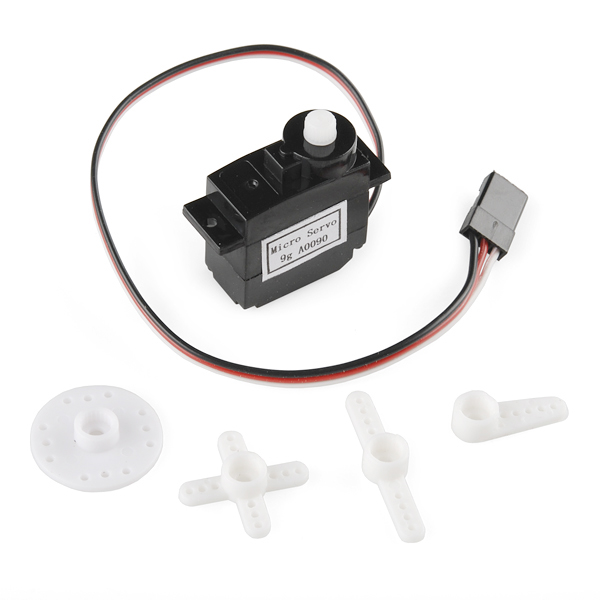
- Small Servo
- 4" USB OTG Cable
- 6' USB microB Cable
- Jumper Wires
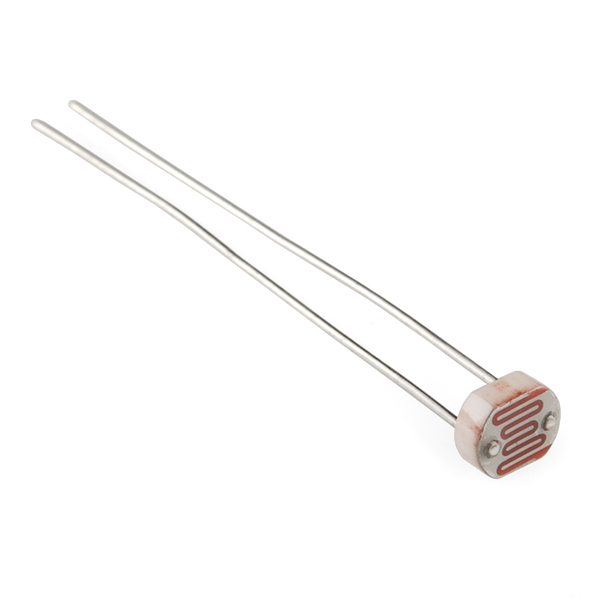
- Photocell
- Tri-Color LED
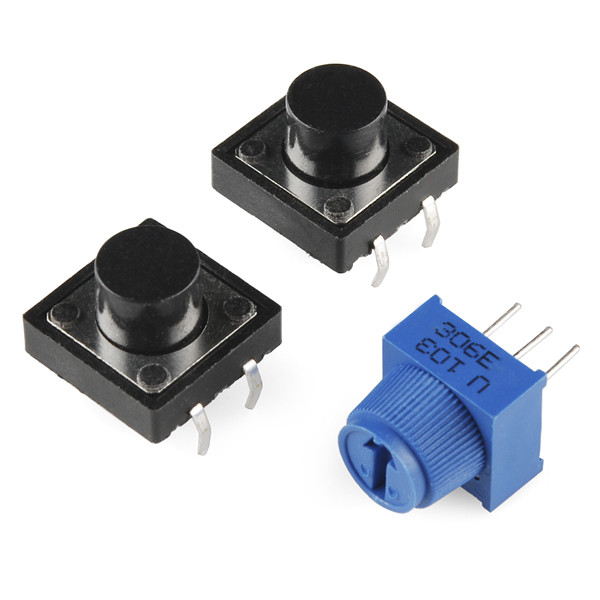
- 10K Trimpot
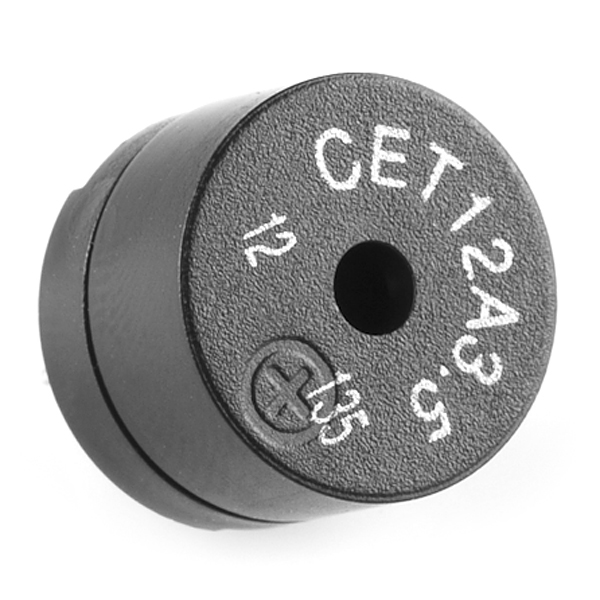
- Piezo Buzzer
- Big 12mm Buttons
- 330 and 10K Resistors
- [SIKIO Guide](https://cdn.sparkfun.com/datasheets/Kits/SIKIO guide book_webversion.pdf) (26MB File)
- SIKIO Online Guide (Installation Guide and Coding Reference)
- IOIO OTG Product Page
- [SIKIO Code Library](https://cdn.sparkfun.com/datasheets/Kits/SIKIO Guide Code.zip)
- IOIO-OTG Wiki
- Dimensional Drawing (Carrying Case)
- SIKIO Wish List
- Product Video
- Circuit 0: Quick Start
- Circuit 1: Tri-Color LED
- Circuit 2: Button and Potentiometer
- Circuit 3: Buzzer
- Circuit 4: Servo
- Circuit 5: Motor
- Circuit 6: Photoresistor
- Circuit 7: Camera
SparkFun Inventor's Kit for IOIO Product Help and Resources
Core Skill: Robotics
This skill concerns mechanical and robotics knowledge. You may need to know how mechanical parts interact, how motors work, or how to use motor drivers and controllers.
Skill Level: Noob - You will be required to put together a robotics kit. Necessary parts are included and steps will be easy to follow. You also might encounter basic robotics components like bearings, mounts, or other hardware and need a general idea of how it goes together.
See all skill levels
Core Skill: DIY
Whether it's for assembling a kit, hacking an enclosure, or creating your own parts; the DIY skill is all about knowing how to use tools and the techniques associated with them.
Skill Level: Noob - Basic assembly is required. You may need to provide your own basic tools like a screwdriver, hammer or scissors. Power tools or custom parts are not required. Instructions will be included and easy to follow. Sewing may be required, but only with included patterns.
See all skill levels
Core Skill: Programming
If a board needs code or communicates somehow, you're going to need to know how to program or interface with it. The programming skill is all about communication and code.
Skill Level: Experienced - You will require a firm understanding of programming, the programming toolchain, and may have to make decisions on programming software or language. You may need to decipher a proprietary or specialized communication protocol. A logic analyzer might be necessary.
See all skill levels
Core Skill: Electrical Prototyping
If it requires power, you need to know how much, what all the pins do, and how to hook it up. You may need to reference datasheets, schematics, and know the ins and outs of electronics.
Skill Level: Rookie - You may be required to know a bit more about the component, such as orientation, or how to hook it up, in addition to power requirements. You will need to understand polarized components.
See all skill levels
Comments
Looking for answers to technical questions?
We welcome your comments and suggestions below. However, if you are looking for solutions to technical questions please see our Technical Assistance page.
Customer Reviews
2.3 out of 5
Based on 3 ratings:
0 of 1 found this helpful:
Rather limited.
Not as interesting or useful as the Arduino kit. It is pretty much locked in and not much information on expanding beyond the scope of the projects in the kit.
It's ok but
Why use the processing IDE when there's eclipse or android studio?
poorly put together
The kit is a great idea (and a lot of fun!)but mine came with the wrong baseplate (the ioio-otg) does not fit. A simple detail, but makes a difference.
Hi, I'm sorry to hear about this issue. We'd be happy to help you get the correct base plate. Contact our customer support team and we'll see what we can do to help. Thanks
The designer of the board Ytai sent out a message to the IOIO users group https://groups.google.com/forum/#!searchin/ioio-users/frying/ioio-users/BOHxOMThwWw/ccV4mYwWhhcJ about the step down buck regulator frying issues. This is what he told the group and I last:
If you are having problems with getting Android Mode installed on Processing follow these directions:
Make sure that you have the Android Mode installed in the correct directory. You just need to unzip the attached file https://dl.dropboxusercontent.com/u/5898761/AndroidMode.zip that was explained from the Processing forums => http://forum.processing.org/two/discussion/comment/25645#Comment_25645 in the correct folder. This includes the Android Mode folder for both Windows and Mac OS X. You need to go to your documents folder and place the AndroidMode folder for your operating system into the Processing\modes directory. On my computer with a Windows 7 64-bit OS this is how it looks like:
Also, make sure that you have the correct configuration as stated in Step 2 - Configuring the Android SDK => https://github.com/sparkfun/SIKIO/wiki/Detailed-Software-Installation#step-2---configuring-the-android-sdk for the Android SDK. Step 2 should have been done before.
Re-open Processing, click on the drop down menu on the top right where it says “Java” and click on the “add mode” and install the Android Mode. You must direct it to the Android SDK folder wherever it is installed on your computer.
If you are having issues still, try these steps that a customer had tried:
The dropbox link is dead now. For the zip file, try downloading it from our Google Drive => https://drive.google.com/open?id=0B0jwgLkjMWzDdlZ6NDBvcFViUDQ.
QUESTION: I'm curious about this kit. I'm an experienced Java programmer and used to own the Arduino kit, bought for a grad school course. I'm wondering if the programming language for this IOIO kit is Java or Java-like as is Arduino. I'm playing around with Android programming again and the Arduinio coursework was a nice end to my degree (I really enjoyed it).
The Arduino is actually programmed in C, but the IOIO is programmed in Java. Check out the online guide in the documents section for information on the software installation and code.
Bought this package, IOIO board does not fully work, the STATUS LED never light when connected with USB or Wall Wart. Working with Sparkfun for a week now, not resolved yet.
Figured it out, this OTG board stat LED does NOT light when connected to power source. After upgrade the firmware to 0500, and Modify the HelloIOIO manifest file (set toggle to true instead of false), got it working. Lots of effort for a NuB :) Lastest application zip (0504 has bug in manifest file, it disables togglebutton).
The IOIO board is an awesome product. I'm glad SparkFun is now promoting it as a kit. We used one to create a robot that can recognize, track, and follow a specified color object as well as have the ability to avoid obstacles in its way. Here is the preliminary result:
http://youtu.be/vkvkfcqEUkk
How much of the guide and code library will be compatible with the original IOIO? I have not even cracked it open since I bought it, but this gives me a new ambition.
I don't have a definitive answer on this at the moment. This kit was designed and built around the IOIO-OTG. The original IOIO has been retired for at least a year now and I currently don't have one to test with. If it does work, I'm sure you have to at least upgrade to the latest firmware.
If it sold so poorly that it was retired over a year ago, why bring it back as a SIK? This would be good if it was Bluetooth instead of wired.
The original IOIO board was not a poor seller. It was only retired because the IOIO-OTG was the next version and a substantial upgrade to the original.
This kit uses the new board, the IOIO-OTG, not the now-retired, original IOIO. Also, I will agree that this would be cool to have with Bluetooth, but in addition to, not replacement of, the wired version. That said, this kit looks awesome! I'm looking forward to a free moment so I can get/play with it... Though, with University, that might not come for quite a while.
I'm still hoping/planning to get bluetooth working with this kit. There are a few technical hurdles I have to jump first however I do think it's doable.