- Home
- Product Categories
- Particle
- SparkFun Photon Micro OLED Shield


SparkFun Photon Micro OLED Shield
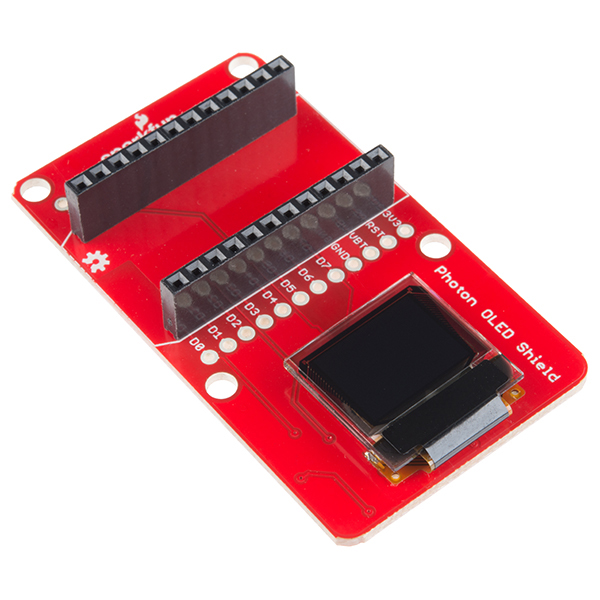
The SparkFun Photon Micro OLED Shield breaks out a small monochrome, blue-on-black OLED to use with your Photon module. It’s "micro", but it still packs a punch – the OLED display is crisp, and you can fit a deceivingly large amount of graphics on there. This shield is perfect for adding graphics to your Photon, displaying diagnostic information without resorting to serial output, and teaching a little game theory.
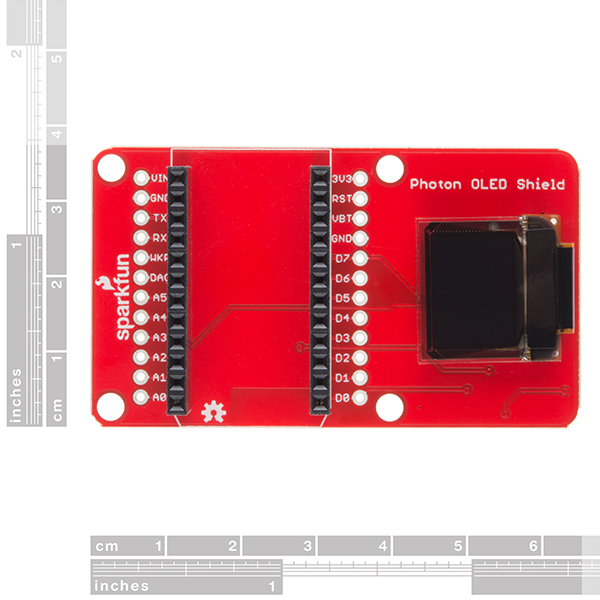
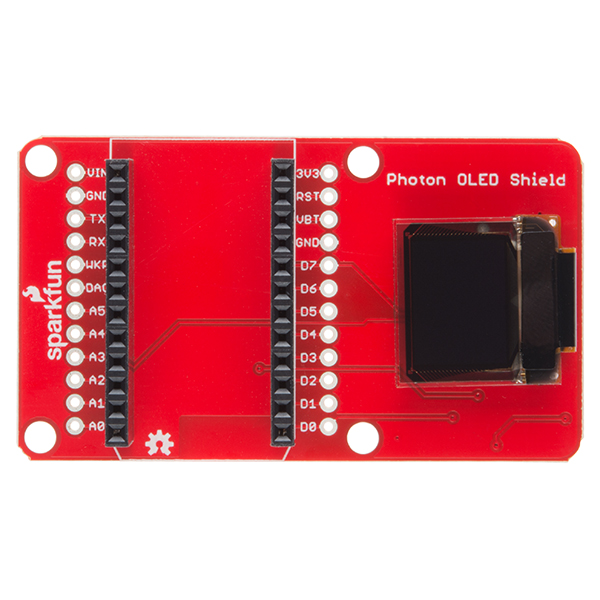
Speaking of, the screen on this breakout is only 64 pixels wide and 48 pixels tall, measuring 0.66" across. In total, the Micro OLED Shield provides access to 16 of the OLED’s pins. Fortunately, though, you’ll only need about half of them to make the display work. The SparkFun Photon Micro OLED Shield comes with the headers already soldered on, so you can plug and play!
The Particle Photon is a tiny WiFi development kit for creating connected projects and products. Sporting a 120Mhz ARM Cortex M3 and built-in WiFi, the Photon is not only powerful, but easy to use. The small form factor is ideal for IoT projects with cloud-connectivity.
Note: Not only can this shield operate with the Photon, it can also be used with the Particle Core! We understand that there are a ton of you out there who still haven't been able to get your hands on a Photon yet and would like to start playing with this shield now. If that person is you we hope we have obliged!
- Screen Size: 64x48 pixels (0.66" Across)
- Monochrome Blue-on-Black
- Headers and Connectors Pre-Soldered
- Compatible with the Photon and the Core
SparkFun Photon Micro OLED Shield Product Help and Resources
Photon OLED Shield Hookup Guide
July 2, 2015
The Photon OLED Shield has everything you need to add a small yet crisp OLED screen to your Photon projects. This hookup guide will show you how to get started.
Photon Development Guide
August 20, 2015
A guide to the online and offline Particle IDE's to help aid you in your Photon development.
Core Skill: Programming
If a board needs code or communicates somehow, you're going to need to know how to program or interface with it. The programming skill is all about communication and code.
Skill Level: Competent - The toolchain for programming is a bit more complex and will examples may not be explicitly provided for you. You will be required to have a fundamental knowledge of programming and be required to provide your own code. You may need to modify existing libraries or code to work with your specific hardware. Sensor and hardware interfaces will be SPI or I2C.
See all skill levels
Core Skill: Electrical Prototyping
If it requires power, you need to know how much, what all the pins do, and how to hook it up. You may need to reference datasheets, schematics, and know the ins and outs of electronics.
Skill Level: Rookie - You may be required to know a bit more about the component, such as orientation, or how to hook it up, in addition to power requirements. You will need to understand polarized components.
See all skill levels
Comments
Looking for answers to technical questions?
We welcome your comments and suggestions below. However, if you are looking for solutions to technical questions please see our Technical Assistance page.
Customer Reviews
3.5 out of 5
Based on 11 ratings:
2 of 2 found this helpful:
Awesome Product + two suggestions
I Love Love Love this product. I bought 2, one for each of my photons and another for a friend since it was so useful. I can't image using a particle without this $19 enhancement. That being said I two suggestions that would make it even more awesome!
This makes a great menu system when you combine it with a digital encoder. I would love to see a version with the option of a mounted digital encoder on the opposite side of the oled.
Put the oled on risers so it is at least flush with the top of the particle or better yet a few mm proud. That way if you mounted the whole thing on the under lid of project box the oled would be exposed flush with surface of the box provide you cut a window.
Very bad quality control.
The module is practically useless. The flex ribbon makes very poor contact to the glass panel, rendering the kit non working. You can only get it working by carefully wiggling of the flex cable.
Hi, Sorry to hear you got a bad unit. We do hand test each of the units to ensure the screen is displaying properly before release from our production floor. There is a chance your device managed to become damaged in transit to you. I'll contact you directly to discuss options for moving forward.
DOA
I have a variety of devices attached to my photon that are working fine, but this one was dead on arrival. I contacted customer support with a detailed note and got a reply asking if I had read the instructions and if I had tried the very thing I mentioned trying (and not working) in my original note. I politely pointed this out and have not heard back since then. Seeing the other review, I tried pushing on the ribbon cable and was able to get about 10 seconds of normal screen activity. It went blank after that.
A replacement has been arranged for you. Thanks
Display output is legible and crisp
Really nice addition to my Particle Core. Given the small size of the display, and my less-than-perfect vision, I was initially hesitant. The sharpness of the display makes even the smallest font size very usable.
Both the code library and examples were straight-forward to work with. No problems with intermittant display connections that others saw. All-in-all, good stuff.
Worked right out of the box.
Simple and easy to setup. Libraries are straight forward as well. It's small, but clear.
Easy! But small
An extremely easy-to-use way to add an OLED to your Particle Photon. But it is TINY. They didn't mis-represent its size, but it's smaller in real life than I'd imagined. I still managed to cram some fun onto it though: https://medium.com/@dgmltn/particle-weather-widget-6f01eac5ec6c
Easy-Peasy
This board is nicely made and does the job it's supposed to. No wiring errors- just pop in a Photon and Code away. I combined this board with a battery pack (SparkFun Photon Battery Shield) and it's working just fine.
Can't get it to work
I've tried the example code and only once I've been able to see the screen working. I have no idea why it's not consistently working with the Micro-OLED-Shield-Example.cpp nor with OLED-Cube.cpp...
Cool little display
This display is tiny but it packs in a surprising amount of information. It's ultra-sharp, bright, fast, versatile, easy to use, and absolutely cute as a bug.
I'm using it to display sensor values when I try out a new device. It's a lot more convenient than having to hook up a PC to use the serial console just to see what's going on.
Good job, Sparkfun.
Works ok, but watch out for burn in (out?)
All OLED displays will degrade over time. This one is no exception. Do NOT display static data long term. I made an RFID punchclock with this display. There are certain pixels that stay on most of the time (indicating its ready to scan) and those are clearly less than half the brightness of other pixels after about a year. This makes reading the display very difficult.
So it's a good little screen, but make sure you program some sort of screen saver or display control mechanism to limit/distribute pixel on-time.
This product has a design flaw IMO. If you want to use this in a project, and put that project in a box with the screen showing through a hole in the box, the design makes it impossible to do because of the way the Photon mounts, it pushes the display away from any surface you want to mount it to.
Here are my suggestions.. 1a: create a version that mounts the Photon on the back, behind the screen.
1b: in either that version or another version, cut the board in half. It is totally unnecessarily large. Again, if you want to mount the display in a box so it displays through a hole, valuable faceplate real estate is taken up by the overly large board. (In my case I need room for the RFID reader)
2: have a version that comes with the headers unsoldered. A slightly less attractive alternative to 1a/b is to allow the soldering of the headers to the back of the board and mount the Photon "upside down". (Requires manually installing headers pointing up on the Photon). At least then you can surface mount the display in a faceplate albeit with wasted faceplate real estate.
More a question than a comment... I'm working on a project where the OLED would be nice, but I need the headers on the backside of the board. If I ordered a large enough quantity, could you make a special run with the headers on the back?
Has anyone used the OLED library to any extent? I'm looking for usage of some of the shape functions, and need some help with the scripts...
Hey, ran a workshop recently using these and discovered that they work after the carbon foam has been removed. They come plugged into it to protect the pins, but it looks to me like there's enough conductivity that the crosstalk or drain or something's high enough to cause misbehavior. Foam off, good to go!
Thanks for this! I was wondering why nothing was happening!
I agree with the previous commenter. It is a second product, i purchased with the same OLED module, that simply doesn't work out of the box (first one is Edison OLED module, https://www.sparkfun.com/products/13035) . Very bad quality control on sparkfun's side. If you jiggle the flex ribbon a little, the module may come up, but most of the time it's dead. The issue is not on soldering the flex to the carrier board, but rather the way it is glued to the glass. I can see it wobble under the microscope, indicating bad adhesion.
I just got one of these in the mail and fired it up. I am really excited about it because it is perfect for so many projects. However, after popping in the Photon and powering it via the micro USB port on the Photon the OLED does not work with the sample code. It does not even light up. The default for the jumpers and the example code is SPI. Do I need to put a jumper across the VD/VB jumper since I am not using the battery shield? <---- Edit: The answer is no. I read the documentation and poured over the schematics for quite awhile to determine that jumper across VD/VB is not required. I squeezed the OLED as I was checking voltages around the board. There must have been a loose solder connection where the OLED ribbon connects to the board. It started working when I was squeezing it. It has worked since.