SparkFun XBee Wireless Kit

This is the SparkFun XBee Wireless Kit, the perfect box full of goodies to get you started using XBees. 
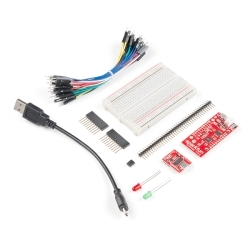
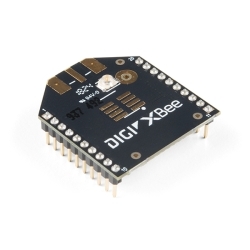
Inside this kit you will find two XBee Modules, one XBee Explorer, one Xbee Shield and a set of R3 headers to solder onto the shield. Our entire goal for the XBee Kit was to make wireless communication simple. Connect one XBee to the shield and your Arduino, connect the other XBee to the Explorer board and your computer, and you'll be able to seamlessly pass serial data to and from your Arduino wirelessly! Using this connection, you can transmit remote sensor data, or send data from your computer to update a scoreboard, or drive a robot from your keyboard!

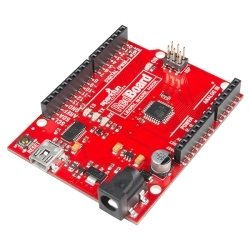
The XBee Shield mates directly with an Arduino Pro or USB board, and equips it with wireless communication capabilities using the popular XBee module. This is SparkFun's own design and is a distant relative to the official XBee Shield from Arduino.

The serial pins (DIN and DOUT) of the XBee are connected through an SPDT switch, which allows you to select a connection to either the UART pins (D0, D1) or any digital pins on the Arduino (D2 and D3 default). Power is taken from the 5V pin of the Arduino and regulated on-board to 3.3VDC before being supplied to the XBee. The shield also takes care of level shifting on the DIN pin of the XBee.

The board also includes LEDs to indicate power and activity on DIN, DOUT, RSSI, and DIO5 pins of the XBee. The Arduino's reset button is brought out on the shield, and a 12x11 grid of 0.1" holes are available for prototyping.

Note: If you are using these outside of the United States, please check with your local laws regarding radio communication.

Note: The boards in this kit cannot source the power required for the Cellular XBee line. It will only work with the 802.15.4 XBee variants like the ones included in this kit.

  • Kit allows for simple serial cable replacement
  • Modules support data rates up to 115200bps
  • DIN and DOUT pins of XBee can be connected to either the UART pins or any digital pin on the Arduino (D2 and D3 default)
  • 3.3V power regulation and level shifting on-board
  • 12 x 11 grid of 0.1" spaced prototyping holes
  • Reset button
  • Power, DIN, DOUT, RSSI and DIO5 indicator LEDs
  • Arduino R3 Footprint

SparkFun XBee Wireless Kit Product Help and Resources

Wireless Gesture Controlled Robot

April 25, 2019

Control the RedBot wirelessly based on the movement of your hand using an accelerometer, Arduino, and XBees!

XBee Shield Hookup Guide

June 5, 2014

How to get started with an XBee Shield and Explorer. Create a remote-control Arduino!

Having issues using the XBee shield on your Arduino? Make sure that you check these things:

1.) Check that the XBee_Serial_Passthrough.ino file is upload to the Arduino Uno with Atmega328P

2.) Check that the switch is flipped ot the DLINE

3.) Check your connections (i.e. your solder joints)

5.) Check your power.

4.) Ensure that the settings are set to the correct configuration to send data with your XBee.

5.) If you are using an Arduino Mega, make sure to use the pins that are able to do software serial communication https://www.arduino.cc/en/Reference/SoftwareSerial.

6.) If you are using a Arduino Leonardo or any board with an Atmega32U4, make sure that you are using the correct function to send data. Serial.print() just pipes data to the Serial monitor while Serial1.print() sends data through the UART. This is explained on the product page for the Arduino Leonardo https://www.arduino.cc/en/Main/ArduinoBoardLeonardo and in this code => https://learn.sparkfun.com/tutorials/pro-micro--fio-v3-hookup-guide#example-1-blinkies

7.) If XCTU can't find the XBee on the COM port your board is hooked up to, your operating system is probably toggling the DTR pin when it opens the COM port you selected. When the DTR pin is pulled low, the Atmega328 will reset. Therefore, while XCTU is looking for the XBee on the COM port, the Arduino is resetting and inhibiting any communication with the pass through code.

  • To work around this, tie the Reset pin to the 5V pin, pulling DTR high so the the Uno doesn’t reset while XCTU looks for the XBee. (You, still need to upload the pass through code to the Uno before adding the shield and jumper wire.)

Core Skill: Soldering

This skill defines how difficult the soldering is on a particular product. It might be a couple simple solder joints, or require special reflow tools.

1 Soldering

Skill Level: Noob - Some basic soldering is required, but it is limited to a just a few pins, basic through-hole soldering, and couple (if any) polarized components. A basic soldering iron is all you should need.
See all skill levels


Core Skill: Programming

If a board needs code or communicates somehow, you're going to need to know how to program or interface with it. The programming skill is all about communication and code.

2 Programming

Skill Level: Rookie - You will need a better fundamental understand of what code is, and how it works. You will be using beginner-level software and development tools like Arduino. You will be dealing directly with code, but numerous examples and libraries are available. Sensors or shields will communicate with serial or TTL.
See all skill levels


Core Skill: Electrical Prototyping

If it requires power, you need to know how much, what all the pins do, and how to hook it up. You may need to reference datasheets, schematics, and know the ins and outs of electronics.

2 Electrical Prototyping

Skill Level: Rookie - You may be required to know a bit more about the component, such as orientation, or how to hook it up, in addition to power requirements. You will need to understand polarized components.
See all skill levels


Comments

Looking for answers to technical questions?

We welcome your comments and suggestions below. However, if you are looking for solutions to technical questions please see our Technical Assistance page.

  • MDGeist / about 8 years ago / 1

    Unless I am missing something, the box that this product comes in is $4.65! Let me explain. I put all these items in my cart and it came out to $91.30, this is $4.65 less than the price of this Kit.

    Can anyone please explain what I am missing here??

    • The box, retail sticker on the box, and our kitters to put the whole kit together nicely all cost money that the individual components do not require.

      • MDGeist / about 8 years ago / 1

        Well, that's just strange because everywhere else I have seen kits that put multiple parts together, give a Discount for it, NOT raise the price for the package deal.

  • Colin J. / about 9 years ago / 1

    I would love to see this kit offered with series 2 XBee modules.

  • Member #579381 / about 9 years ago / 1

    The XBee Shield in this kit uses the R3 footprint (32 pins), but the stacking headers in the kit use the old footprint and only provide 28 pins. I was wondering whether this matters or not. Should I just leave 4 pins unconnected? If so, which ones? Or do I have to buy a whole new pack of stacking headers that is R3 compatible?

    • Contact techsupport@sparkfun. This was a mistake on our part, and they should be able to help you out to fix that. All packages now coming out will have the proper headers included in them.

  • Member #406899 / about 9 years ago / 1

    Any idea when this should be available again? I didn't see it was backordered, and I'm wondering whether this is going to slow my whole order by a few days, a few weeks, a few months, etc.

  • Izerna / about 9 years ago / 1

    Can I use this with any micro controller that has a UART port? I use the PIC micro controllers from Microchip and would like to branch into the wireless world. If these are not compatible maybe someone could point me in the right direction.

    And a big thanks to SparkFun you guys have been great for my electronic addiction.

    • GeoffreyF / about 9 years ago / 1

      XBee is in essence a radio modem with other features. Send data in, it comes out at the other radio. At high data rates, you may need to use the hand shaking features as well but no less than for any modem.

      You can use the XBee themselves for that purpose and you can use the XBee USB to talk to another XBee that is connected to that UART port. Keep in mind that these run on 3.3v, not 5v. Also the XBee has API mode in which most of its pins are data or analog IO, not dissimilar in its own right from microprocessors. If you follow links, you will find links to data sheets for the XBee Radios, headers into which they can be connected. Also different radios with a range of power / range capability.

Customer Reviews

4 out of 5

Based on 2 ratings:

Currently viewing all customer reviews.

3 of 3 found this helpful:

Easy to hookup, easy to program, and good distance. The tutorials could go into some detail about the differences between the AT and ATI modes and which one you really want to be in. Using mine between the Sparkfun weather meters/shield and computer.

1 of 1 found this helpful:

Good kit, but cheaper elsewhere

I ordered the kit and found it quite well made and easy to use. My only issue is that it is actually cheaper to by all of the individual pieces of this kit from SparkFun, provided they are in stock.

Wow, good catch! This one missed us. Thanks for letting us know and we will review the pricing for this kit.