
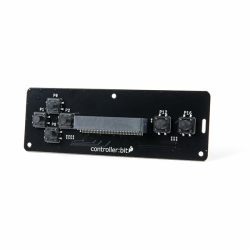
SparkFun moto:bit - micro:bit Carrier Board (Qwiic)
The SparkFun moto:bit is a fully loaded carrier board for the micro:bit that provides you with a fully functional robotics platform.
Product Overview
The SparkFun moto:bit is a fully loaded "carrier" board for the micro:bit that, when combined with the micro:bit, provides you with a fully functional robotics platform. The moto:bit offers a simple, beginner-friendly robotics controller capable of operating a basic robotics chassis. Onboard each moto:bit are multiple I/O pins capable of hooking up servos, sensors and other circuits. At the flip of the switch you can get your micro:bit moving!
The moto:bit connects to the micro:bit via an edge connector at the top of the board, making setup easy. This creates a handy way to swap out micro:bits for programming, while still providing reliable connections to all of the different pins on the micro:bit. We have also included a basic barrel jack on the moto:bit that is capable of providing power to anything you connect to the carrier board.
The micro:bit is a pocket-sized computer that lets you get creative with digital technology. Between the micro:bit and our shield-like bit boards you can do almost anything while coding, customizing and controlling your micro:bit from almost anywhere! You can use your micro:bit for all sorts of unique creations, from robots to musical instruments and more. At half the size of a credit card, this versatile board has vast potential!
Note: The SparkFun moto:bit does NOT include a micro:bit board. The micro:bit will need to be purchased separately.
Features:
- Edge connector for easy use with the micro:bit
- Full H-Bridge for control of two motors
- Control servo motors
- I2C port for extending functionality
- Power and battery management onboard for the micro:bit
Documents:


-
-
-
-
-
-
-
-
-
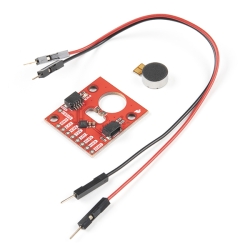 SparkFun Qwiic Haptic Driver Kit - DA7280
Special Price Current price: $10.50 Regular Price Original price: $17.50Discontinued
SparkFun Qwiic Haptic Driver Kit - DA7280
Special Price Current price: $10.50 Regular Price Original price: $17.50Discontinued -
-
-
-


Features & Specs
- More reliable Edge connector for easy use with the micro:bit
- Full H-Bridge for control of two motors
- Control servo motors
- Vertical Qwiic Connector
- I2C port for extending functionality
- Power and battery management onboard for the micro:bit
Customer Reviews

Stock and Customer Discounts
Available Discounts
- $27.08 | 10+ units
- $24.23 | 100+ units