SparkFun Qwiic Mux Breakout - 8 Channel (TCA9548A)

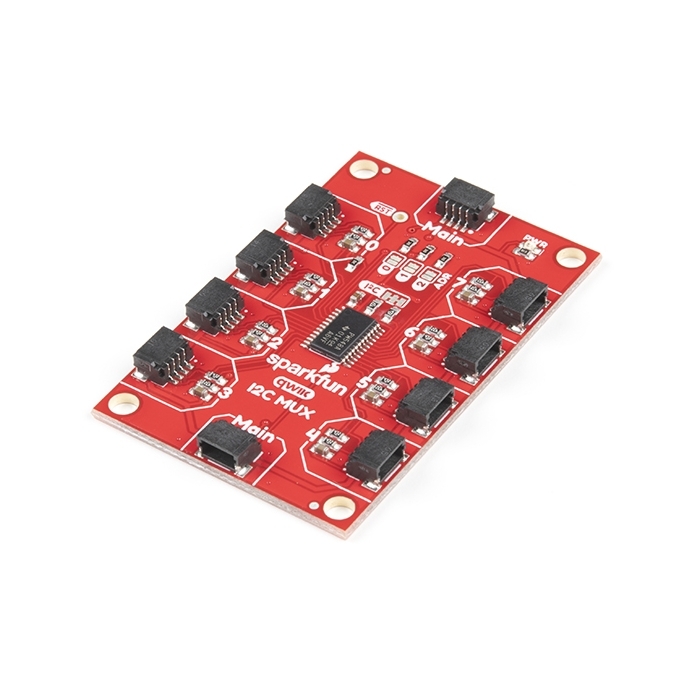
Do you have too many sensors with the same I2C address? Put them on the SparkFun Qwiic Mux Breakout to get them all talking on the same bus! The Qwiic Mux Breakout enables communication with multiple I2C devices that have the same address that makes it simple to interface with. The Qwiic Mux also has eight configurable addresses of its own, allowing for up to 64 I2C buses on a connection. To make it even easier to use this multiplexer, all communication is enacted exclusively via I2C, utilizing our handy Qwiic system.

The Qwiic Mux also allows you to change the last three bits of the address byte, allowing for eight jumper selectable addresses if you happen to need to put more than one Qwiic Mux Breakout on the same I2C port. The address can be changed by adding solder to any of the three ADR jumpers. Each SparkFun Qwiic Mux Breakout operates between 1.65V and 5.5V making it ideal for all of the Qwiic boards we produce in house.


The SparkFun Qwiic Connect System is an ecosystem of I2C sensors, actuators, shields and cables that make prototyping faster and less prone to error. All Qwiic-enabled boards use a common 1mm pitch, 4-pin JST connector. This reduces the amount of required PCB space, and polarized connections mean you can’t hook it up wrong.

The Qwiic Mux can also be automatically detected, scanned, configured, and controlled using the OpenLog Artemis datalogger system. No programming, soldering, or setup required!


  • Operating Voltage: 1.65V - 5.5V
  • Operating Temperature: -40 - 85° C
  • I2C Address: 0x70 (default) up to 0x77
  • 10x Qwiic Connectors
    • 2x Pass Through (Daisy Chain)
    • 8x Channels

Revision Changes: With this revision of the SparkFun Qwiic Mux Breakout, we have only made one change to improve the ease of use of the board, listed below. If users are unsure about which version they purchased, please refer to the product pictures.

  • The SparkFun Qwiic Mux Breakout includes an additional Qwiic connector with a pass through trace to bypass the MUX and daisy chain other Qwiic boards.

SparkFun Qwiic Mux Breakout - 8 Channel (TCA9548A) Product Help and Resources

Getting Started with the Autonomous Kit for the Sphero RVR

December 13, 2019

Want to get started in robotics? Look no further than the SparkFun autonomous kit for the Sphero RVR! Whether you purchased the Basic or Advanced kit, this tutorial will get you rolling...

Qwiic MUX Hookup Guide

July 19, 2018

Have a bunch of sensors with the same I2C address? Put them on the Qwiic MUX (TCA9548A) to get them all talking on the same bus!

Core Skill: Electrical Prototyping

If it requires power, you need to know how much, what all the pins do, and how to hook it up. You may need to reference datasheets, schematics, and know the ins and outs of electronics.

2 Electrical Prototyping

Skill Level: Rookie - You may be required to know a bit more about the component, such as orientation, or how to hook it up, in addition to power requirements. You will need to understand polarized components.
See all skill levels


Comments

Looking for answers to technical questions?

We welcome your comments and suggestions below. However, if you are looking for solutions to technical questions please see our Technical Assistance page.

Customer Reviews

4.7 out of 5

Based on 10 ratings:

Currently viewing all customer reviews.

1 of 1 found this helpful:

Qwiic Mux working great and easy to use!

The 8-channel i2c mux is easy to program, just one register to load to enable the 8 channels. Easy to read back as well to check your code. I'm using a number of devices each at the same i2c address. I didn't want to change their addresses so I just put them on different channels. All my programming is in C code on a Raspberry Pi Pico. The mux also allow's you to not have to mess with the pull up resistors if you put devices on different channels on the mux.

2 of 2 found this helpful:

Extra hole set?

Works as intended - I have two in a stack now, will probably need to add a third.

Suggestion - in a future revision, add an extra set of mounting holes with the same footprint as the square sensor/etc. boards (maybe two sets side-by-side) so the square boards can be easily stacked above the MUX, and even the MUX could be stacked on the Qwiic (Arduino) shield. I've 3D printed custom frames so I can mount 2 ADCs, three pressure sensors and two MUXes onto a Qwiic shield (and that onto an OpenCR), but something where one only needed screws and stand-offs to do the same would be great.

Adding such holes on as many of the Qwiic boards as possible would be desirable too..

Very useful!

Very handy, easy to use.

Very useful in projects, A must have!

Multi QWIIC connecter for many sensors. Any project with two, or more, of the same sensors will benefit from this 8 channel Mux breakout. This was used in one of my projects with the Spark Fun Triad Spectroscopy Sensor. (https://pilgrimageoftruth.wordpress.com/2022/05/01/sparkfun-triad-spectroscopy-sensor-project/)

Did what it was suppose to do

Works great with my Arduino Uno displaying two OLEDs and with 2 DHT20 humidity sensors all on I2c. Amazingly easy.

Really easy to incorporate in a sketch, and it's fast. Great

Really easy to incorporate in a sketch, and it's fast. Great

The board is great. The python library is awful.

Ironically, Adafruit has their own python support library that works with this board, and it's simple and intuitive to use. For some inexplicable reason, none of Sparkfun's python documentation says anything about how to actually use this board with attached devices. Sparkfun should just pull their library and link to the Adafruit one.