If you missed the most recent installment of Engineering Round Table, I showed off my latest creation: my Aquaponics system. As you can imagine, designing and creating the system itself was a fun, albeit time-consuming, project. However, building it was just the beginning. Now that my system has made it through the cycling process, it's been amazing to see the results.
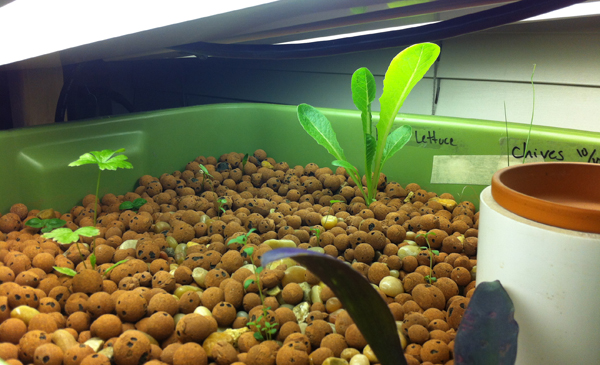
The state of my aquaponic plants as of 11/19/2013.
It's been about 40 days since I germinated my first seeds. I planted three waves, each about a week apart. Some seeds I germinated in my Aerogarden, and some I planted right in my grow bed. Shortly after I transplanted the last of my seedlings from the Aerogarden (around 11/7/13), I decided that I wanted to setup a time-lapse camera to capture every moment of plant growing goodness.
Here we have some basil seedlings planted directly in the grow bed (left) and some seedlings -- parsley, thyme, and Romain lettuce -- germinated in 3D printed seed pods with the Aerogarden (right).
After a failed attempt at hacking an old point-and-shoot camera (I'm pretty sure it didn't work before I got here), it was back to the drawing board. I tried using a Kodak Zi8. I have a remote for this camera, and that remote can be used to capture still photos at will. I tried hacking the IR codes to get an Arduino to do my bidding for me. Once again, I hit a wall, and all the while I was missing my plants' first steps. I didn't have time to go sniffing around IR protocols, I needed a camera now.
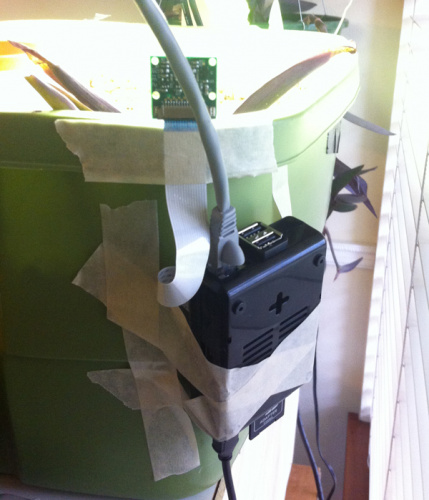
Finally, I remembered the Raspberry Pi Camera Module. I strung up some Ethernet cable and taped the Pi and the camera to my grow bed. Getting the camera to take stills was easy enough with the quick start guide, but I wanted this process to be fully automated. My plants are currently on a 14-hour sunlight cycle. The lights turn on at 6:00am and shut off around 8:00pm. I'm rarely up by 6, and sometimes I'm not home in the evenings. Thus, I sought out a python script that would eliminate the need for me to start and stop the script manually.
Here is the Pi and Camera taped to my grow bed.
After a little searching, I found this tutorial for a time-lapse camera in a coffee can using the Pi. The python script accompanying the tutorial, written by James Moore, was just what I needed. When this python script runs, it creates a folder with the date and time in the name, and then it stores all the photos taken in that folder with the date and time in the name of the photo. Editing the script for my needs was a breeze. I simply changed the time.sleep() value to 300 to give me five minutes in between each shot instead of one minute. I also changed the if statement on line 76 to trigger if d.hour is between 6 (am) and 20 (8pm). Now, I can call the python script and just let it run for days. The downside to my changes is that all the photos end up in one folder (the folder created when the script is first executed). However, since the time stamp is in all the photo names, it's easy to tell where one day stops and the next begins. It would be easy to alter the script to automatically create a new folder for every new day. As I said, I was in a hurry to get it up and running, so there is lots of room for improvement.
And, here are the results:
ReplaceMeOpen
ReplaceMeClose
The video was taken over the course of ten days. It starts off kind of slow, but the action really picks up about halfway through.
All in all, the video turned out pretty well. There are a few things I am going to tweak for the next round. First, I would probably set the interval between shots to ten minutes instead of five. Ten, I think, would have made for a shorter video with more action. Second, I would mount the camera better. The masking tape held up the entire time, but I was always afraid it was going to come undone and ruin my whole setup. I am also going to increase the resolution next time. I wasn't sure how full the Pi would get, so I kept it at the lowest setting for the first run. Last, I want to start my lapse before the next round of seedlings emerge, so I can get the whole life cycle on film.
We'd love to see what kind of projects you're creating with your Raspberry Pi Camera Modules. If you have some time-lapse footage taken with a Pi, or some other project involving the Pi Camera such as object avoidance or face recognition, we'd love to see it. Share in the comments below, or send us an email describing your project. It just might get featured on our blog.
P.S. if you're in the Boulder area and want to get more hands-on with aquaponics, check out my new Meetup group, Boulder Aquaponics Enthusiasts. Thanks for reading!


Maybe I missed something, but couldn't this be done with a cron script a bit easier insead of a Python script?
*/5 6-20 * * * raspistill -o /path/to/image.jpg
Instead of running the command directly, call a script that stores the current date and time in a string and uses that to create the directory and file name convention that you are using.
TMTOWTDI and all that.
BSCINABTE. Some methods are better than others. The Zen of Python states "there should be one -- and preferably only one -- obvious way to do it". What if he lost power while he was at work, the system rebooted, the script terminated, and he didn't realize it for three days? That's a lot of lost images. Cron is not only an easier solution, it's a clearly superior one.
I had the same thought. Years ago, I had a script to scrape the Mt. St. Helens webcam image and store it. I used cron to run the script every 5 minutes, and at the end of the month another script ran to make a timelapse for the month using ffmpeg. You can concatenate the date/time into the filename when you save the image. If I can find the script when I get home tonight, I'll post it.
Here's the script I used to pull the images:
The important bit is the command substitution in the filename using
date +%d%m%g-%H%Musing the crontab example above, you could do:
I then used transcode to make the movie at the end of the month.
I did mess around with cron a little bit. I've never used it before, so I found the python script to be easier. You're probably correct that would be a simpler way to implement the time-laspe.
Yeah, cron is a bit cryptic to new and old users alike. I still have to check the man page to remember which column is which. Waiting for the next tick to check to see if it ran properly can be an annoying waiting game. Once you get it setup, though, you don't have to worry about whether or not it's going to run on time.
I've been experimenting with the same script in order to make a timelapse movie of a construction project we have starting at home. The problem I have is that I need to site the camera where there is no mains power, so I'm running the Pi from a Lithium Ion battery / solar pack. It works great and is easily able to power the rig for the whole day, so I just need to top up the battery each night.
However I'm new to coding and have struggled with the Python script. I managed to set up an @reboot cron job which runs the script when I reboot the Pi, but I think if I used your time parameter to only take pictures between 08:00 and 17:00 then I could probably get at least two days of use out of one battery charge. Can you please tell me the syntax you used on line 76?
Thanks
I tried the same thing you did, where cron would start the python script, but I couldn't figure out how to get it to stop. That's when I figured out I could just alter the python script. Put this on line 76:
if d.hour >= 8 and d.hour < 17:I then commented out the print line in the else statement, and added a
time.sleep(60)so that it checks to see if it's time to take a picture every minute. You might want to change the frequency of that if you are running off a battery.Great, thanks for the reply. I like the idea of the sleep statement so it's not checking constantly. I've made the changes and will find out when I get home tonight if its worked.