T³: Using LEDs as Light Sensors
It's a known trick that we can use LEDs in reverse. We'll explore how to use them as photodetectors with Arduino and create a simple demo that responds to hand swipes.

Using an LED as a light detector is nothing new (see this 2007 Electronic Design article). However, it seemed like a cool trick that deserved some more love, as it can be done with an Arduino and a single LED. I'll briefly go over the science involved, and then give a couple of example projects.
The Science
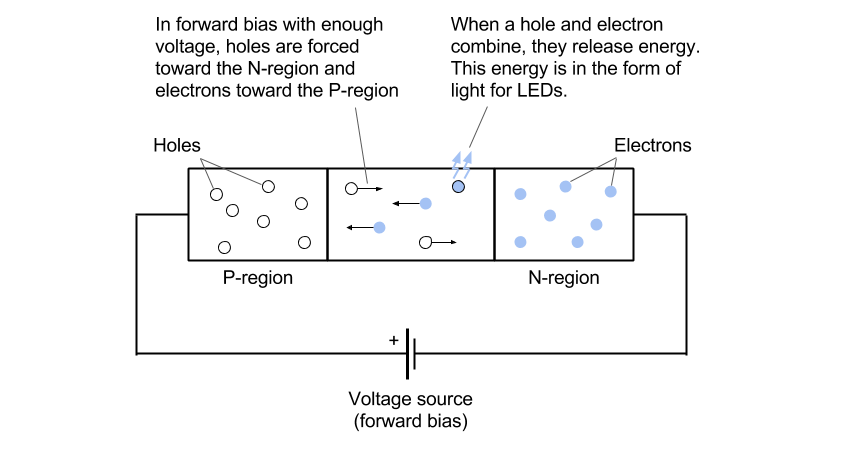
Light-emitting diodes (LEDs) are made by joining N-type and P-type semiconductor materials. To create these different types, impurities are added to the crystal structure of the semiconductor in a process called doping. N-type semiconductors contain impurities that result in an excess of electrons in the structure. P-type doping, on the other hand, results in a lack of of electrons, which are known as holes.
The best way to think about a hole is the absence of an electron in the atoms of the crystal lattice. Holes can move freely around the lattice, and can therefore act as a positive charge carrier.
The area where the two types are joined is known as a PN junction. When we apply enough voltage across the PN junction (forward bias – meaning the P-region is at a higher potential than the N-region), electrons from the N-region move toward the P-region, and holes from the P-region move to the N-region. When an electron and hole meet, they cancel and release some energy.
In basic diodes (e.g. those made of silicon), the energy is released in the form of heat. In LEDs, which use different semiconductor and doping materials (e.g. gallium arsenide phosphide), the energy is released in the form of photons (i.e. light).
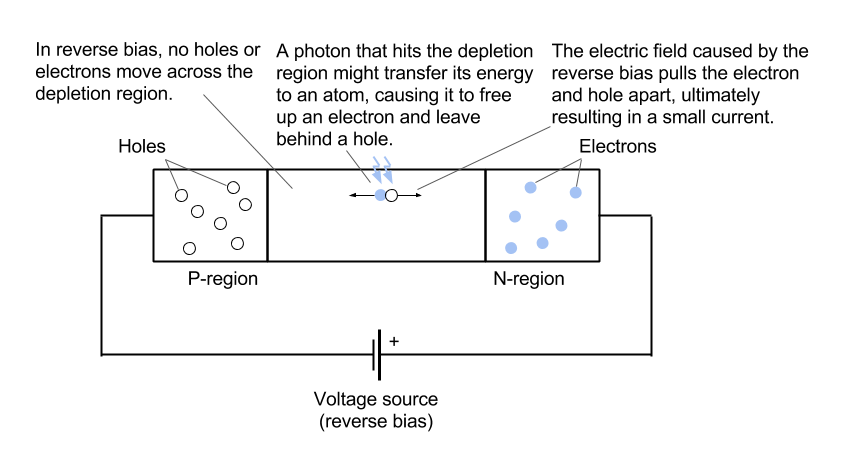
The fun begins when we reverse the process. If we apply a reverse bias across the PN junction (i.e. the N-region is at a higher potential than the P-region), the holes and electrons are pulled away from each other, creating a larger depletion region where no electrons or holes dare venture.
However, if a stray photon hits the depletion region, the photon may give up its energy to an electron in the lattice, which causes the electron to become loose from the atom and freely roam the lattice. This process also leaves behind a hole in the lattice.
In normal circumstances, the electron-hole pair would recombine, but the electric field from the reverse biasing pulls them apart. The hole is attracted to the N-region, and the electron is attracted to the P-region. Once they reach their respective regions, they combine and cancel with their opposites. The moving of electric charges is also known as a "current."
So, when light hits a PN junction, a tiny current is produced.
Measuring the Light
Measuring the tiny current produced by light falling on an LED is extremely difficult, especially with a microcontroller. However, we can still get an idea of how much light is falling on the LED.
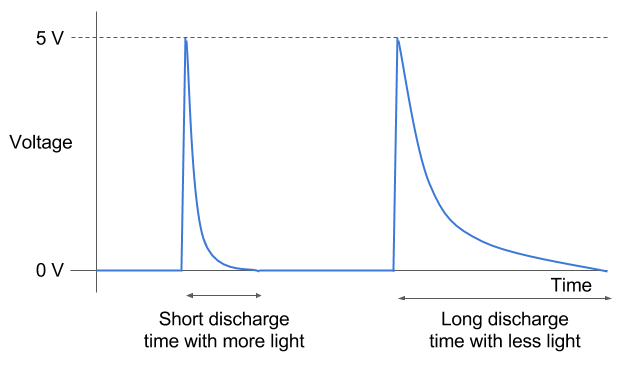
Take a look at the second diagram in the Science section. The P-region and N-region are essentially plates holding a charge with some kind of insulator separating them. Does this sound like another electrical component? If you guessed "capacitor," congratulate yourself.
We can trick an LED into acting like a capacitor by applying a reverse voltage. This will charge the tiny plates (in the form of P- and N-region semiconductors). If we remove the voltage, the charge should stay (in theory). However, if light falls on the PN junction, electron-hole pairs will be formed, which then move to the opposite sides and cancel with other holes and electrons. This process, in effect, diminishes the total charge in the LED-acting-as-a-capacitor.
We can use a microcontroller to measure the time it takes for the LED to completely discharge. If more light falls on the LED, it will discharge very quickly. In darkness, it will discharge very slowly.
In Practice
As the video shows, we can sense the presence of objects above the LEDs. In this case, we're just measuring the amount of light falling on the yellow LEDs to determine how much to light up the red LEDs.
To see how to sense light using an Arduino and one LED, see this project tutorial. Note that we put the LED directly into the Arduino's pins. I originally tried wiring the sense LED to a breadboard from the Arduino, but the inductance and capacitance from the wires and breadboard threw the readings way off. This means the input LEDs need to be fairly close to the microcontroller's pins to work.
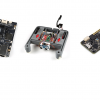
If you want to get more adventurous with multiple LEDs, check out the Shadow Swipe project tutorial. This tutorial shows how to make the project shown in the video.
Want to get even more advanced? Here is a demo showing an LED array being used as a multi-touch input.
While we don't generally see LEDs being used as inputs (let's be honest, there are much better components for sensing light), they could be useful. What projects can you come up with that use LEDs as both light emitters and light detectors?
Interested in learning more about LEDs?
See our LED page for everything you need to know to start using these components in your project.


The trick to allow LEDs to sense light as well as emit it, using only digital I/O pins, came from Mitsubishi Electric Research Laboratories (MERL), and was originally published in this paper in 2003. The accompanying video is here.
This is not the most sensitive method of detecting light with an LED; you'll probably want a transimpedance amplifier for that. However, it is certainly the cheapest.
Fun experiment to try at home: wire two LEDs in parallel (i.e. cathode to cathode, anode to anode). Place one LED in bright light and hold the other one close to your eye, shielded from the light. What do you see?
That video was definitely fun. The card fight at the end was amusing :)
I'm gonna go out on a limb and guess that you should see light from the LED close to your eye. This reminds me of wiring motors together and manually spinning one to cause the other spin.
You are right. But the fun part is actually trying it. :-)
Links to the projects are broken. Do you have updated links?
Unfortunately, the "invent" domain has been discontinued. I will try to reach out to the marketing to see if we have the information linked somewhere else.
You can also check this 555 timer IC video- https://www.youtube.com/watch?v=VnNCEa-1pe4
The other thing about using LEDs for light detection is that they are sensitive to specific portions of the spectrum. That is, they are most sensitive at the colors that they emit when acting as light sources. This allows them to be used as sensors in multi-spectral devices.
Forrest Mims (a living legend and inspiration to those of us of a certain age) used this property to make sensors to study atmospheric light levels at different wavelengths and studied things like the particulate content of the sky over time.
http://makezine.com/projects/make-36-boards/how-to-use-leds-to-detect-light
That Make article is really good at explaining how LEDs are spectrally selective.
I think I saw a concept using this. There was a company that wanted to pave roads with durable solar panels. One potential added function was to sense an obstacle in the road (like a deer) and use LEDs to alert drivers around blind corners. The LED could be used as the sensor and the driver indicator.
I think I remember that. There was this YouTube video. Considering they disabled comments and you can't view likes vs. dislikes, it makes me a little skeptical :) Reconfigurable LEDs in a road would be cool, though.
But it seems like it would just be simpler to use some other cheap light sensor.
Might be simpler, but if you can multiplex several functions onto one component, that is less components you have to purchase and helps reduce your full project BOM cost.