Taking Your PiRetrocade to the Next Level
I started with a PiRetrocade kit and kept adding until I had a major appliance on my hands: my very own full-size arcade cabinet!

A few weeks ago, we introduced the SparkFun PiRetrocade kit. I've long (like, for 10 years or more) had a desire to make a full-size arcade cabinet where I can play all of the long-lost titles of my youth. So I jumped on the chance and built one.
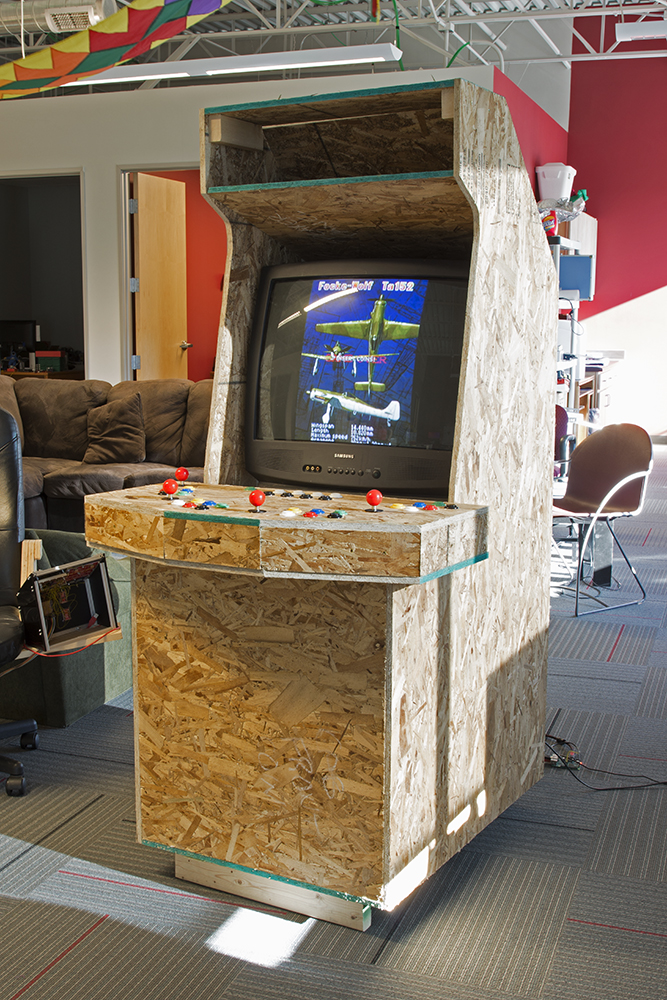
I apologize for the crude appearance. I haven't had time to arrange a vinyl wrap for it yet.
Now, I know what you're thinking: how did he add all those buttons? The PiRetrocade kit only supports five! Well, I cheated a bit and used a FreeSoC2 to make a keyboard device that had enough inputs to support all the buttons I wanted.
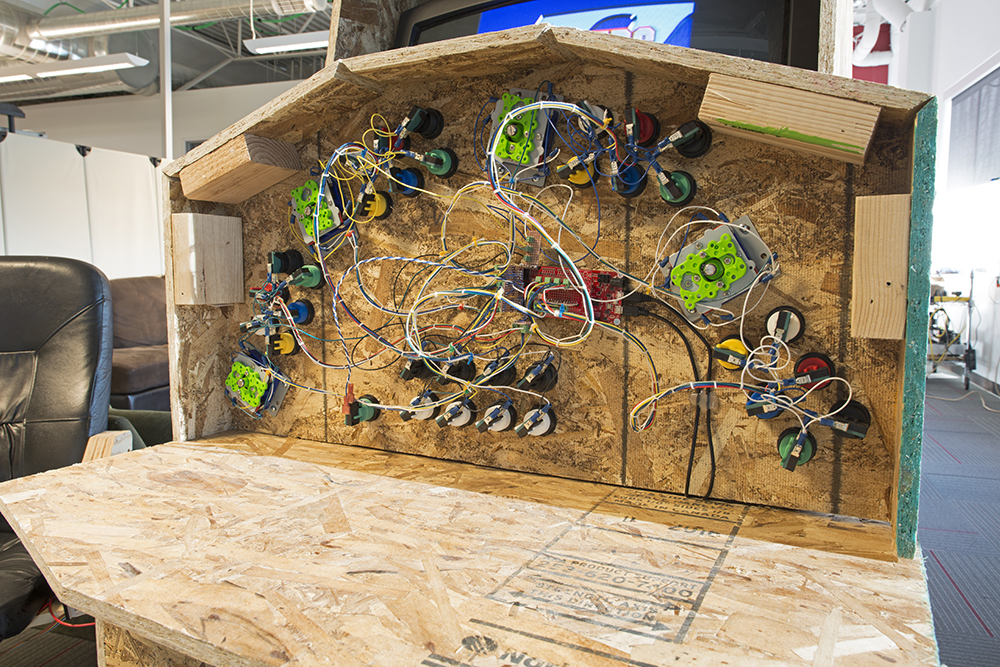
If you're interested in making your own arcade controller, I've posted the project files on GitHub so you can leverage the work I did. It's also a good example project for making a keyboard device with a FreeSoC2 in general.
Where did I get the AWESOME plans for that cabinet? I'm glad you asked, because I did a bunch of research so you don't have to. I did a Google search for "four player arcade cabinet plans" and found many, many options. But in the end, I selected the first link returned by the search. It had the obvious advantage of being free, and of showing how to lay out the components on three 4'x8' sheets of plywood, which made cutting the parts easy.
The TV was a scrounge from a friend, and there I ran into a problem: it's an old TV, and only has RCA jacks for composite video. A little searching came up with the answer: an HDMI to RCA converter.
I'm using the Raspberry Pi 3 that works with the PiRetrocade kit, and the image on the SD card as it ships. No special modifications were necessary despite my using the keyboard-type controller.
All in all, with a little help from my friends on the internet and Mary's work on the PiRetrocade, it wasn't that tough of a project. Total cost came in at around $200.
If you make your own advanced version of the PiRetrocade, let us know! Post a link to your project page in the comments below, or in the comments on the PiRetrocade kit product page.


This is excellent, but it's missing the trackball for all those great centipede / missile commander type games!
The Raspberry PI 3 already has RCA output on the TRRS connector, no need for a HDMI to Composite converter.
Cool! I'll try that out. I've had trouble getting audio to work from the HDMI. Maybe the TRRS will work better!
You know, I was about to comment about composite video being such low resolution, and the I realized for these old games (where were originally designed for composite video resolutions) that isn't a problem. Actually, the old CRT monitor would look better than a fancy high-def running off the HDMI. Old SD CRT monitors have a large enough sub-pixel pitch that automatically does an analog form of anti-aliasing which reduces the jaggedness of curves and angled lines. Back in the late 80's I remember seeing a nice "high-resolution" (for the time) monitor on an Amiga and thought it looked like crap because all the pixels were easily discernible as squares. But on the Commodore monitor (I forget the model number) that was usually used on (and I used on) Amiga computers the individual pixels were slightly rounded.
This is great, thanks for sharing! I pre-ordered one of the PiRetrocade kits a couple weeks ago since getting the controls right was always the main roadblock for me. Why did you decide on OSB instead of MDF for the cabinet build? I'm planning on following this build log to make a 4/5 scale Galaga style cabinet this winter.
I don't like working with MDF. The dust it generates, and touching it in general, makes me itch. I could wear long sleeves and gloves (I wear a mask, goggles, and hearing protection already) but that gets uncomfortably warm for me really quickly. OSB is also lighter than MDF (I think) and is definitely cheaper than plywood.
Will you be able to make the sides look smooth when you paint it? I haven't worked with OSB enough to really know all the tricks.
OSB is smooth or at least has ONE smooth side. It only looks "not smooth" unfinished.
Remember, the original cabinets were particle board!!! They are HEAVY!!!
Thanks for the info!