
I have been spending a lot of time with our 3D printer lately. Whenever I get to know a tool pretty well, I always try to look for a project that ties in my creative interests (visual arts) with newer technology. I spent a good few years in undergraduate and high school studying fine arts and photography, so I was naturally quite excited when one of our developers told me about 3D-printed lithophanes.
What is a lithophane, you ask? It’s a specific kind of artwork that can only be seen clearly when backlit, meaning light is an element of this creative technique. Traditionally, a lithophane is a thin porcelain tile with an etched artwork on one side. Porcelain has a translucent quality when the walls are thin enough, so by carving into a thin tile, artist were able to make lithophanes by hand. This technique first showed up in the late 1820’s around different parts of Europe. Below is an example of a traditional lithophane, both on its own and backlit.
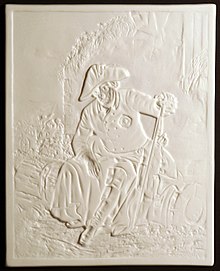
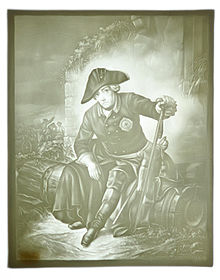
Images courtesy of wikipedia.
Fast forward to the 21st century: We have tons of new fabrication tools at our fingertips. A 3D printer seems like a natural tool for building lithophanes, and many folks working with 3D printers have picked up on that. A quick online search will offer plenty of DIY, 3D-printed lithophane tutorials. Some describe how to model a lithophane from a photograph, and others point to software options that will generate a lithophane model directly from a picture upload. I am a firm believer in the KISS (keep it simple, stupid) principle so I decided to use this easy and handy free online lithophane generator.
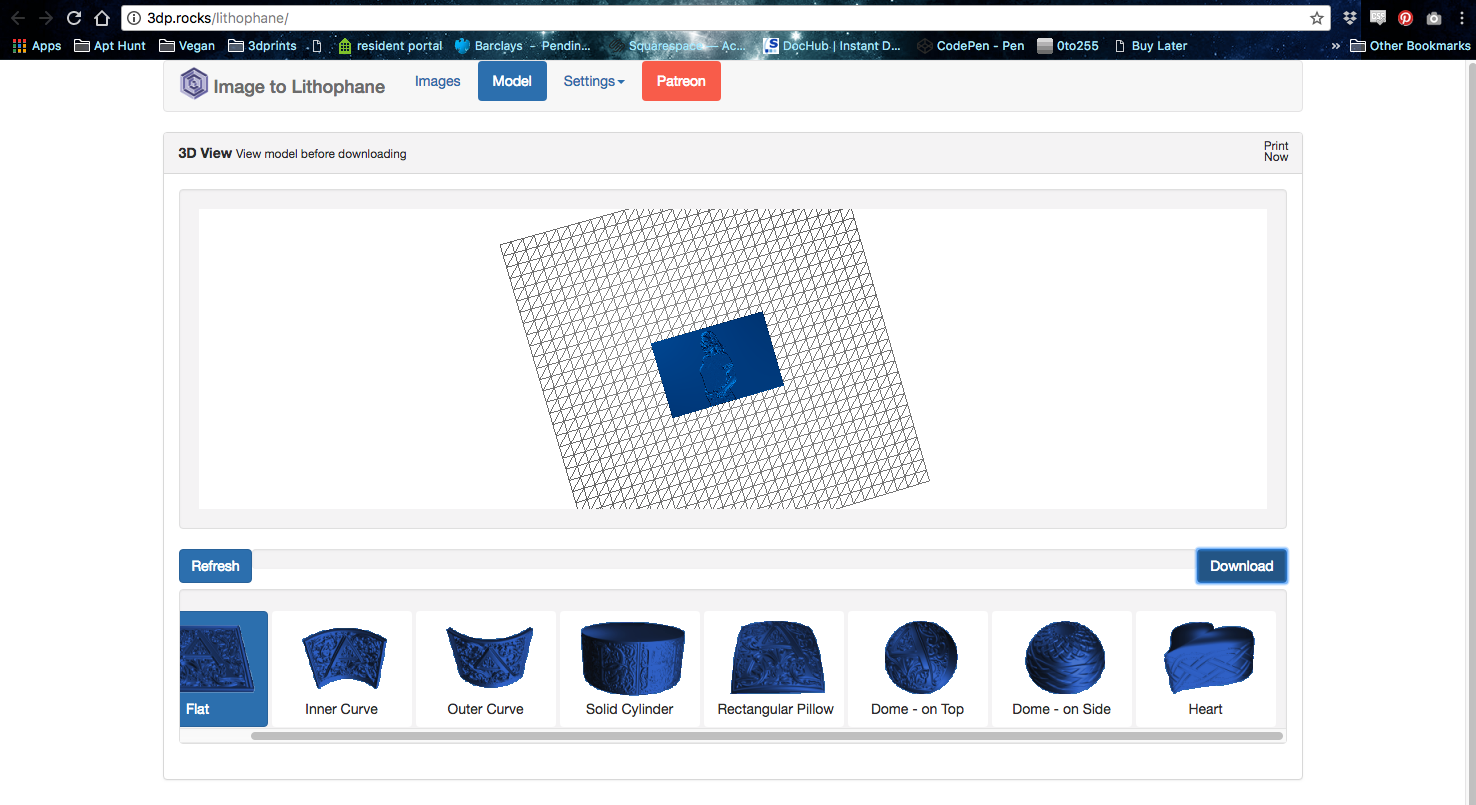
The process from there is pretty simple. Once you have uploaded your image and chosen your lithophane shape, simply hit download. You will get an .stl file. Open this in Cura, or any other G-code generator, and continue to save your G-code as usual.
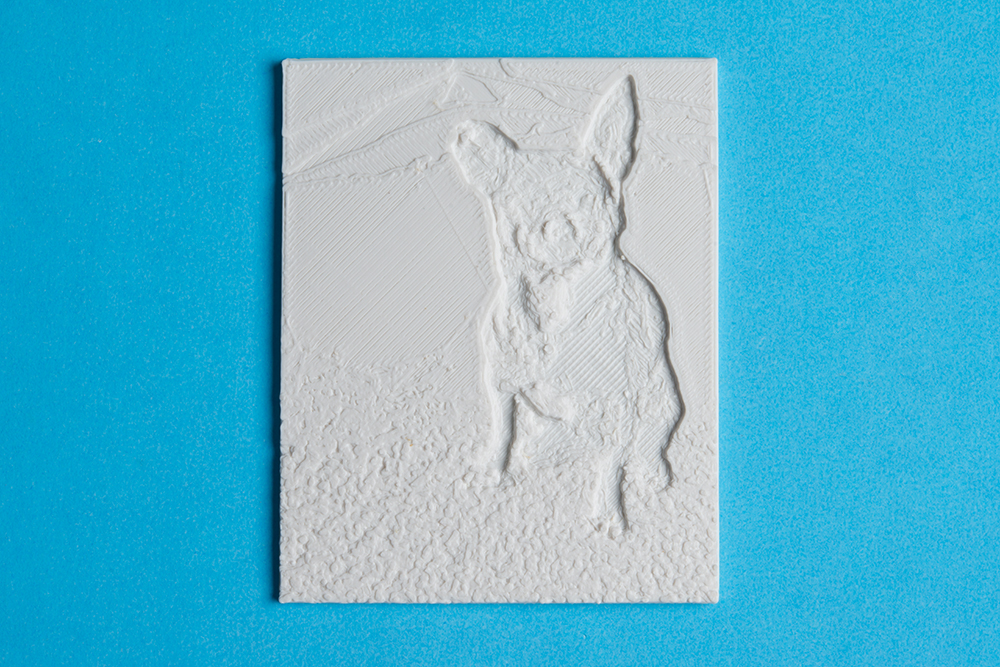
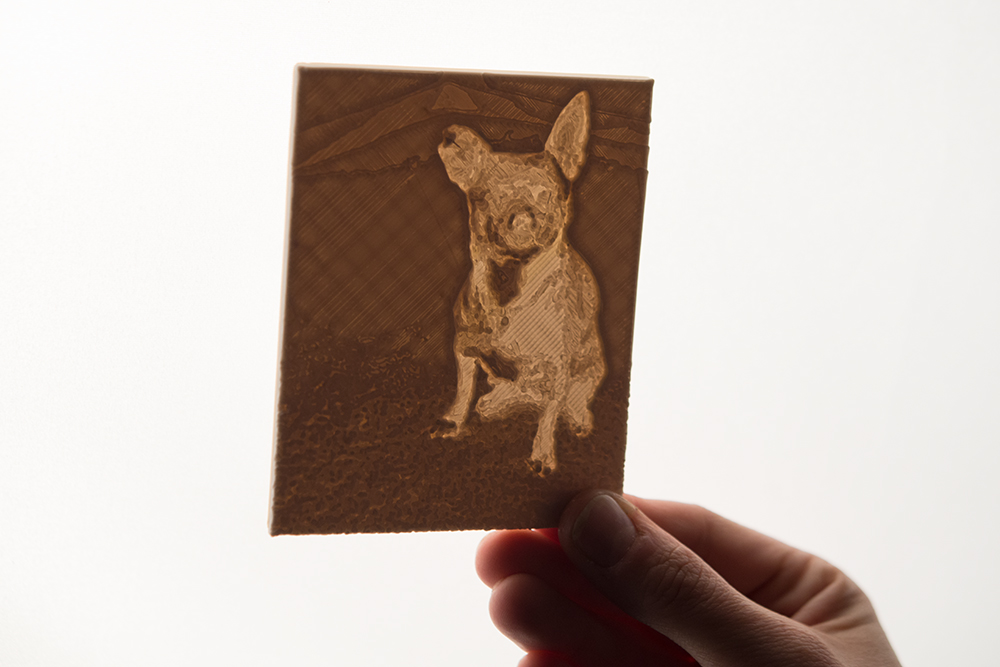
The first lithophane I printed was a photo of my dog. I chose it because of the high contrast and simple background. In reading up on 3D-printed lithophanes, I learned that you want a high contrast image with minimal detail, and that solid backgrounds work best. The printer/extruder I am using also limits the amount of detail and refinement I could generate.

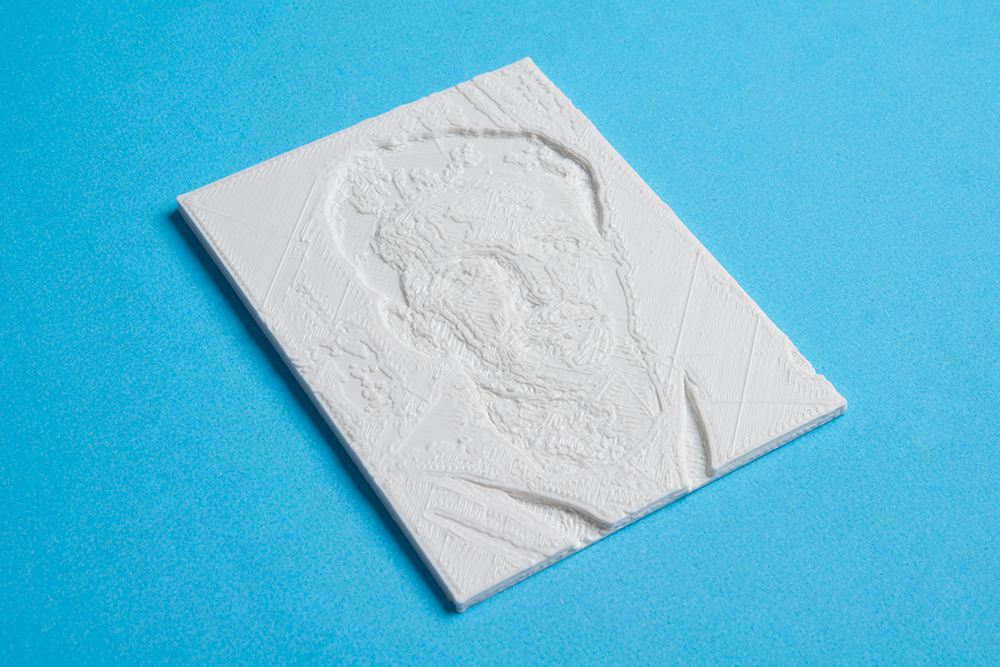
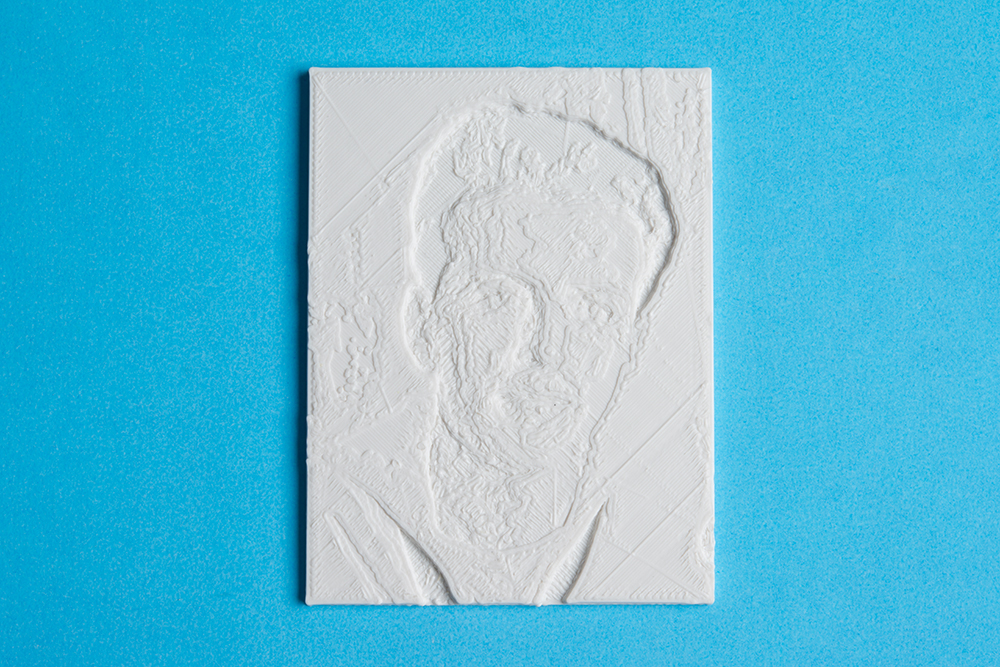
The photo worked pretty well, but I wanted to do something a little more interesting. I dug up an old Navy photo of my grandfather and decided to work with that. I was a little more excited about the way this lithophane came out.

At this point I started to think about ways to bring this project to life without having to hold it up to a window or light source. I decided I would print the lithophane as part of a larger enclosure, and put LEDs inside to keep the image backlit at all times. I used Tinkercad, a free online 3D modeling program, to design my enclosure. I'm sure none of you want a photo of my grandfather, but I have included a link to this file for you to work from.
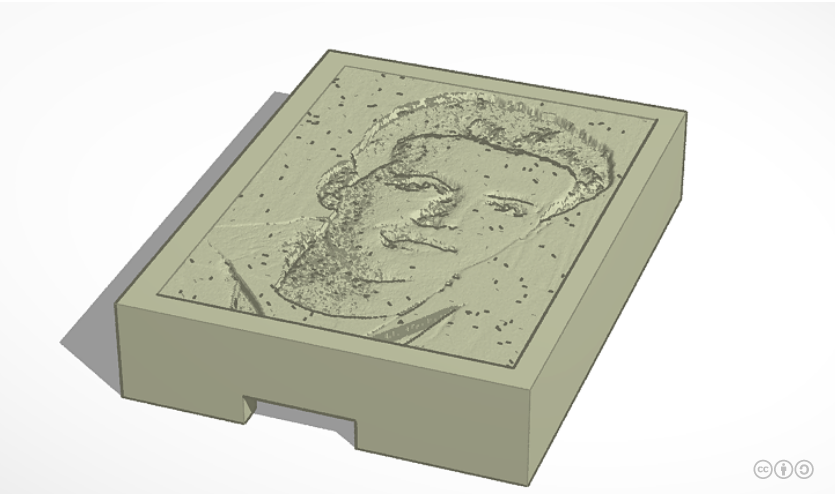
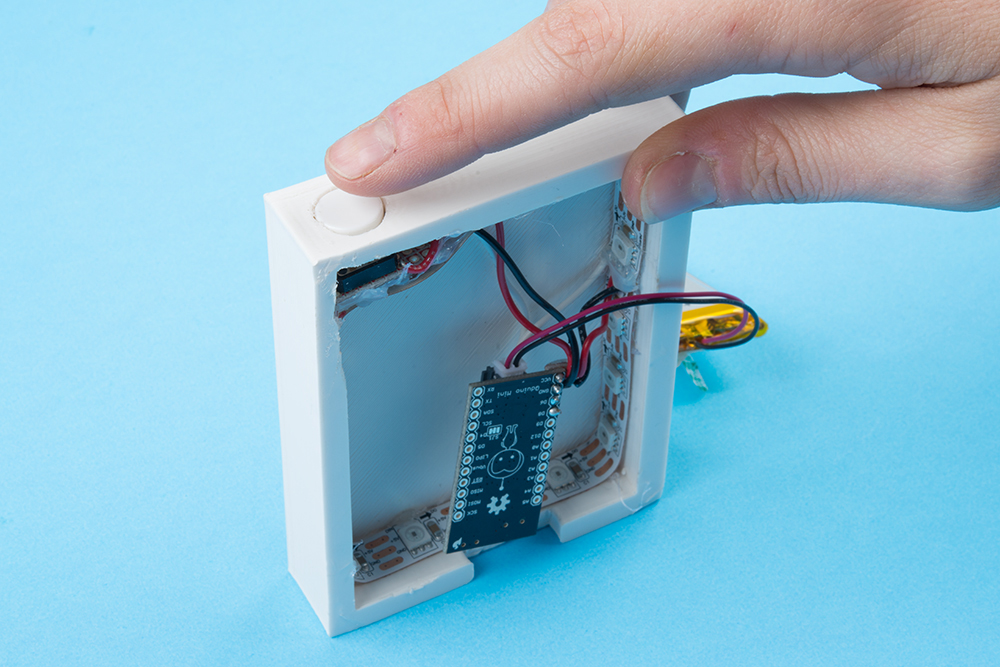
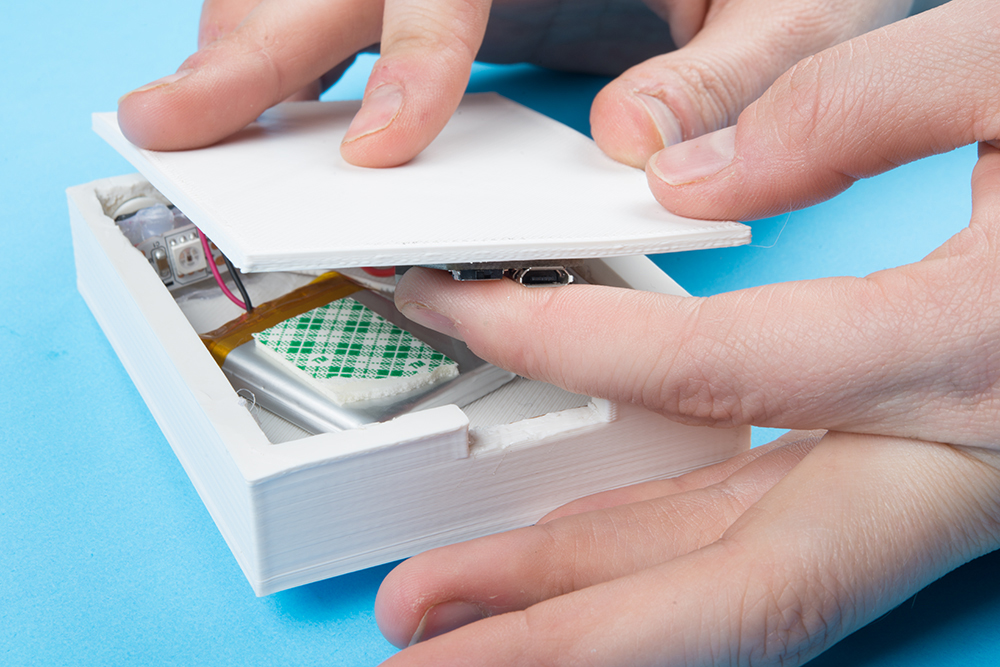
In this model, I included a space for a momentary pushbutton so I could change the color of the LEDs, and well as easy access to the microcontroller switch and USB port for charging and reprogramming. I also printed a solid bottom for the enclosure to be glued on later.
Circuit:
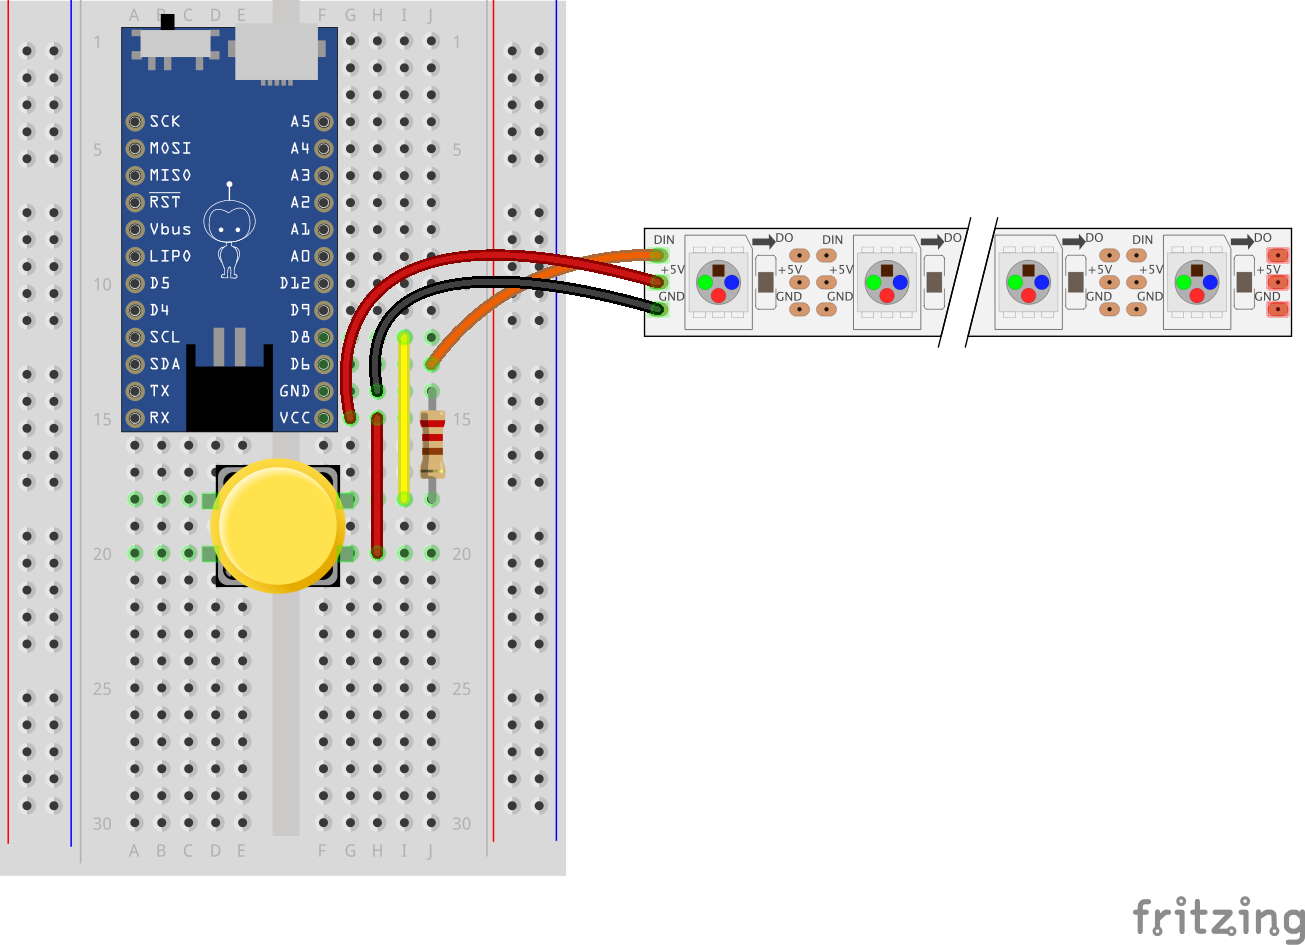
Having a hard time seeing the circuit? Click on the wiring diagram for a closer look.
Parts:
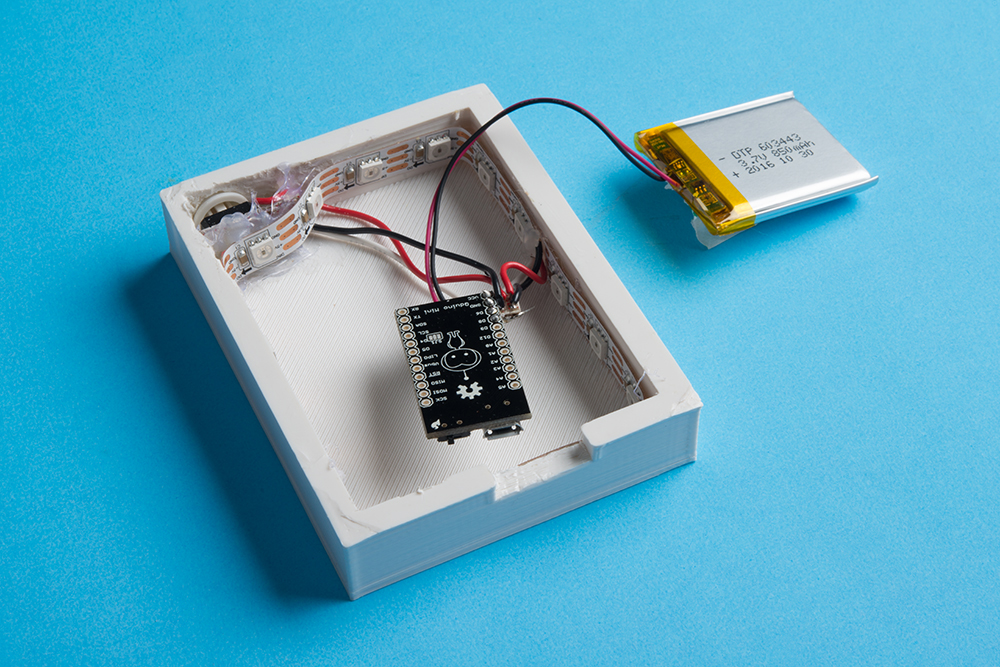
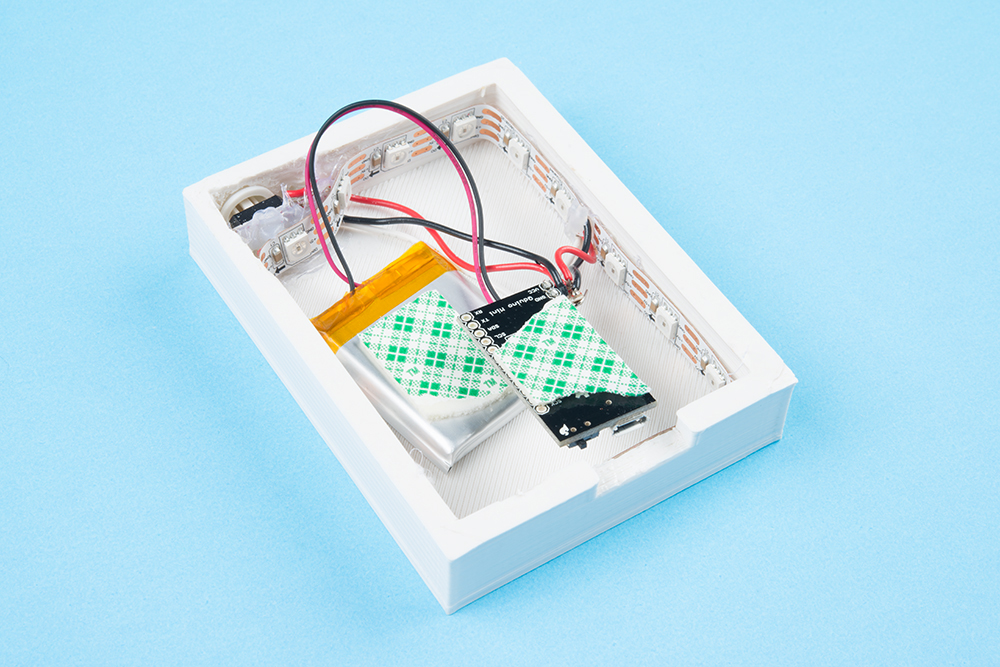
The images below demonstrate how all the electronics fit into the lithophane enclosure. I used hot glue and 3M double-sided foam tape to keep everything where it belongs.

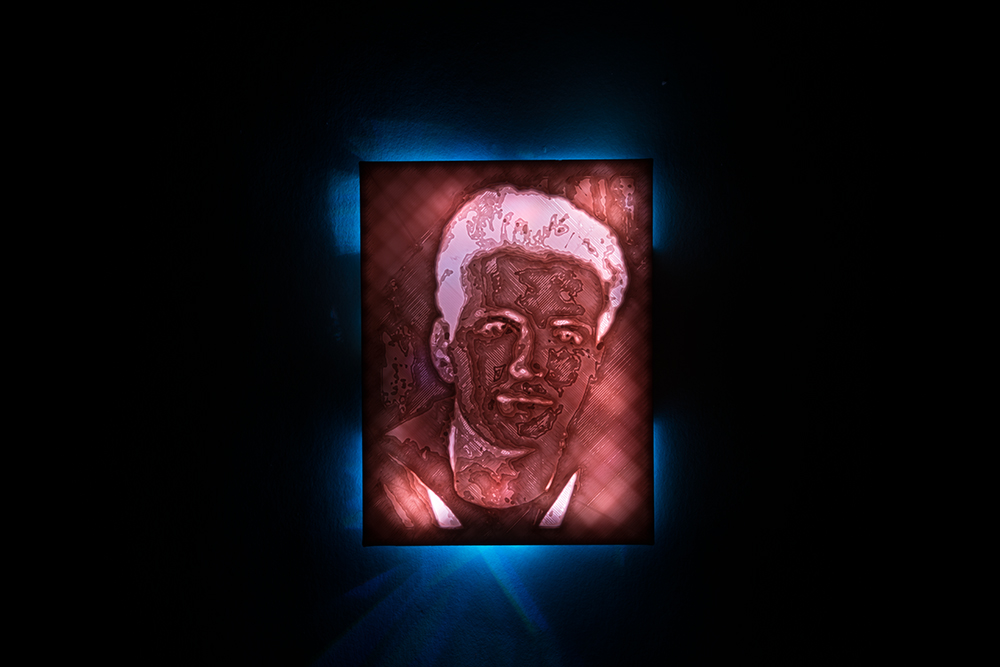
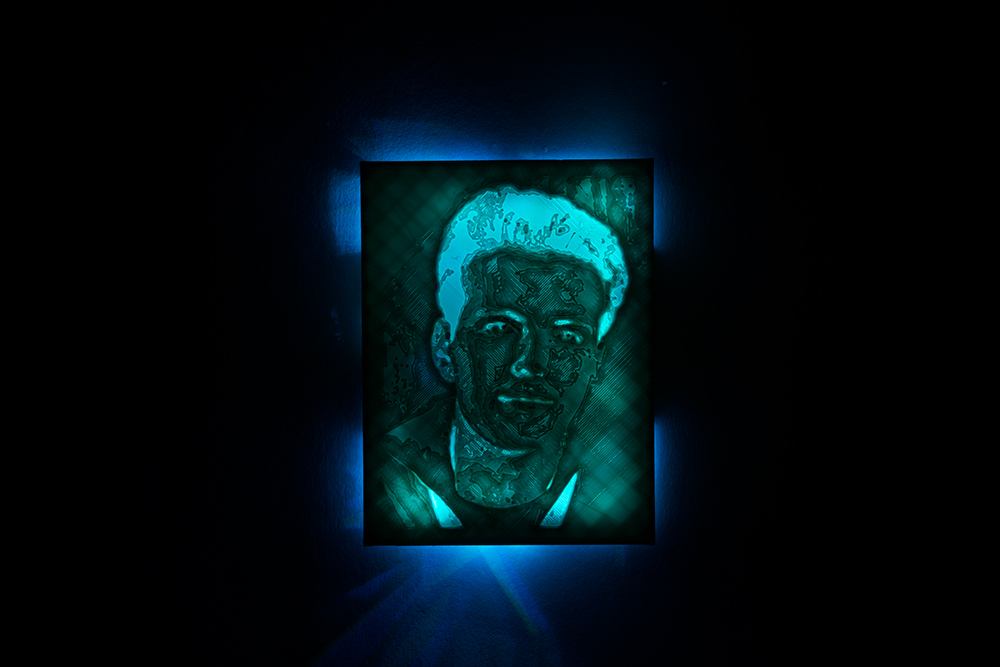
Below is the example code to use for this project. I have included five separate color modes. Off, white, magenta, cyan and yellow. Each time the button is pressed, it changes from one color mode or animation to another. You can make as many different states as your heart desires. Check out my comments in the program to know where to make adjustments.
//Melissa Felderman for SparkFun Electronics
//Lithophane V1
//This program uses the Adafruit Neopixel Library
//March 25, 2018

#include <Adafruit_NeoPixel.h>

#define PIN 6

int momBut = 8;
int NUMPIX = 16; //Update this with the amount of LEDs included in your strip
int state = 0;
int maxState = 4; //update this to be the highest possible state from your switch state function

Adafruit_NeoPixel strip = Adafruit_NeoPixel(NUMPIX, PIN, NEO_GRB + NEO_KHZ800);


void setup() {
  // put your setup code here, to run once:
  Serial.begin(9600);
  pinMode(momBut, INPUT);
  strip.begin();
  strip.show();


}

void loop() {
  // put your main code here, to run repeatedly:
  int momButVal = digitalRead(momBut);

  if (momButVal == 1) {
    delay(1000);
    state++;
    Serial.println(state);

    if (state > maxState) {
      state = 0;
    }
    button = false;
  }
//below is where we have each different state or mode for LEDs. If you want to customize your own colors/animations, rplace my code inbetween case x: and break;

  switch (state) {
    case 0:
      for (int i = 0; i < NUMPIX; i++) {
        strip.setPixelColor(i, 0, 0, 0);
      }
      strip.show();
      break;
    case 1:
      for (int i = 0; i < NUMPIX; i++) {
        strip.setPixelColor(i, 255, 255, 255);
      }
      strip.show();
      break;
    case 2:
      for (int i = 0; i < NUMPIX; i++) {
        strip.setPixelColor(i, 255, 0, 255);
      }
      strip.show();
      break;
    case 3:
      for (int i = 0; i < NUMPIX; i++) {
        strip.setPixelColor(i, 0, 255, 255);
      }
      strip.show();
      break;
    case 4:
      for (int i = 0; i < NUMPIX; i++) {
        strip.setPixelColor(i, 255, 255, 0);
      }
      strip.show();
      break;

    default:
      state = 0;
      break;
  }

}
Now I have a lithophane with the light built in!
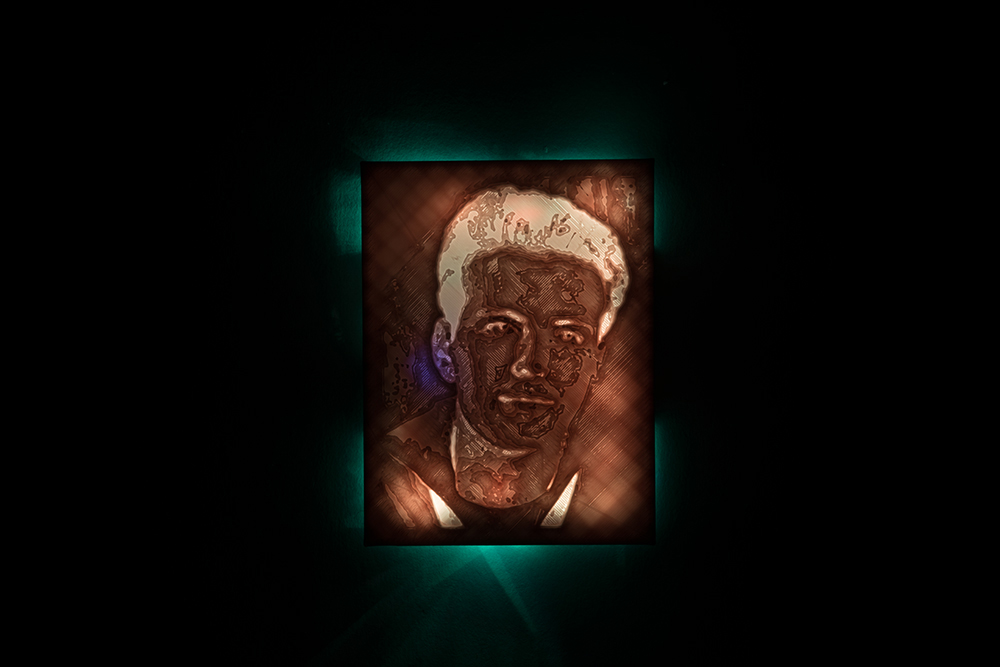
I call this Lithophane 2.0 - a Lithophane for the modern world. This project makes a really lovely gift for pretty much any occasion. I know not everyone has access to a 3D printer, but there are maker spaces all over the country, local libraries with 3D printers, as well as plenty of low cost 3D printing services online. If you are considering investing in a 3D printer, I can't recommend the Lulzbot Taz more. I have been printing on this baby non stop for the last 3-4 weeks using 2.85mm ABS filament, and I haven't had any issues!
Let us know your thoughts on this techie version of a traditional visual arts process in the comments below!
Interested in learning more about LEDs?
See our LED page for everything you need to know to start using these components in your project.


This is cool! You should do a Rick Astley one with a proximity sensor and a speaker that Rick rolls anyone who gets too close.
Yes! Love this idea!
This is my first time doing any programming and when I copy and paste your program into arduino it keeps giving me an error message; 'button' was not declared in this scope. Any help would be appreciated. Thank you
I'm a little confused as to how you wanted this to turn out? If you were aiming to print a picture from the 80's it looks good. If you were trying to make a lithophane try printing the whole thing stood up! Depending on how you get the stl file, as in from a website generator or you import a jpeg and do it in Cura. some require you to print the lithophane stood upright on the z axis, where Cura requires you to do it flat. Also on the website, I think, you have to make the image positive. and in Cura you have to set darker is higher when you import your jpeg. Otherwise you get the negative effect you have here. Hope this helps!
I sincerely didn't have any intentions for how this should turn out! Sorry to hear you feel confused - this is simply an experiment in 3D printing that I wanted to share. As mentioned in other comments, it does look like inverting the photo would yield a better result. In any case, I'm very happy with how it came out, and it does happen to stand up straight on it's own. Given you seem to know so much about this, I'd love to see your version of how you think it should look! Cheers :)
Very nice. I notice that the image came out negative. Is that a setting in the generator?
It's not. I noticed it as well. I suppose if you want it to not be negative, you can invert it in any photo editor first!
End to end this is a great project for taking old technology and puting a new spin on it.
I really like the built-in lighting. Keep up the good work!
Glad you enjoyed it :)
Can you touch on what kind of filament you used and would color selection make a difference? Printer settings such as fill density, shell thickness, etc.?
Sure! I used white 2.85 mm ABS. I like the way it works with our printers. I have heard that different materials print better on different printers so I can't comment if this is the best option, but it's what I used. Using a smaller filament weight or finer extruder would allow for more detail in your print. The smaller the layer height, the more detail as well. I used a generic LulzBot Profile in Cura for my materials to generate my g-code: https://www.lulzbot.com/taz-cura-profiles. High precision printers will offer a more traditional lithophane feel, while the desktop variety will be a bit more crude. A light color filament is always best for this as light needs to leak through, so try to avoid anything that prints super opaque.
Hope this helps!