
Background
I've always had a bit of a maker or DIY lean in my hobbies. There is something old–timey and satisfying about being the source of your own stuff. For years, depending on my living situation, I've kept an indoor garden. They are fun to take care of and a cheap source of food and ornamentals. At times I've had tomato plants going so well in one of my hydroponic setups that I couldn't reach them all! That became a mess. Recently I had some basil growing in the kitchen that I wasn't using fast enough. It had started to yellow & was in serious need of a larger pot. Rather than take 5 minutes to replant I decided it was time to blow all of my disposable income on some glass labware I'd wanted for years and extract the good stuff!
There are a handful of ways that I'm familiar with for extracting oils, volatiles, and other compounds of interest from solid materials.
Hydrodistillation
Hydrodistillation takes two main forms, one where the material to be extracted is mixed into the water, and one where steam is passed through a bed of the material. Oil and water are generally immiscible. When heated, the two liquids form an azeotrope and boil off together. The vapor is condensed two layers form and can be separated by decantation. A third layer of hydrosols will often form. This is a mixture of the components that are water soluble. One advantage of using water is that your product will contain a lot less impurities due to their lower solubility. One downside of hydrodistillation is that water doesn't boil until 100˚C. Many compounds degrade at temperatures this high.
Solvent Extraction
Technically hydrodistillation is a solvent extraction. After all, water is the universal solvent! In this case I'm referring more to non-polar organic solvents (the ones with a low dielectric constant for an electronics reference). Solvents like chloromethane, dichloromethane, trichloromethane, ethoxyethane, methanol, ethanol, petroleum ether, butane, and hexane are common. More components of plant matter are soluble in these solvents than in water. You will get essential oils, esters and heavy terpenes, fatty acids, triglycerides, waxes, resins, and some pigments. Depending on your goal, many of these compounds are undesired. The advantage is that you will generally get the the highest yields of the desired compound. Plus it feels like real chemistry and you can get hurt!
Supercritical fluid extraction (SFE!)
Possibly the coolest extraction method is supercritical fluid extraction. A supercritical fluid is a substance at a temperature and pressure above the critical point on its phase diagram. Yeah thermodynamics! In this region there is no distinct liquid and gas phase. Varying the exact temperature and pressure will change the solubility of various compounds. The most common substance used is CO2. One paper I've read found that CO2 the region right about 30˚C and a pressure right below 300 bar gave some of the highest yields when extracting basil. Since the boiling point of CO2 is -78.5°C, it's trivial to boil it all off after extraction. A downside is that it's easy to spend thousands of dollars on the equipment needed.
Setup
I went for a solvent extraction system; more specifically, a Soxhlet extractor. A guy like me can only read so many papers talking about them before the urge to get one grows too high to resist. They can cost you an easy grand if you buy a nice PYREX® setup from Corning. If you don't mind slow boating one form China they are an order of magnitude cheaper. They consist of 4 main parts, an Allihn condenser, the actual Soxhlet extractor, a thimble of some sort, and a boiling flask.
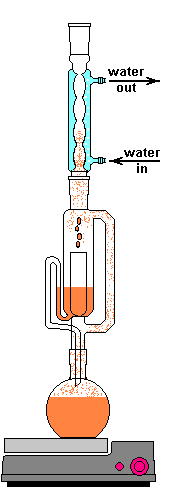
Soxhlet extractor in action (Wikipedia)
A Sohxlet extractor is effectively a closed system which allows extractions to be run for hours or days unattended. Sohlext extraction is a reflux operation where the volatiles are cooled and not allowed to escape. The process starts by packing the source material into the thimble. The main purpose of the thimble is to prevent the solid from getting drawn out of the Soxhlet extractor during siphon. There are many options for thimbles. I've seen people with small extractors use a cotton ball packed into the bottom. Larger cotton pads can be used. The material can be packaged in a coffee filter. Cellulose thimbles are made specifically for this purpose. The consistent and known particle retention is useful for repeatability. My setup has a fritted disc extraction thimble. Again if you go with the PYREX® version you can pay $90 for the size I have, crazy! Probably worth it if is a profession and you are dealing with rare compounds, but for a hobby...
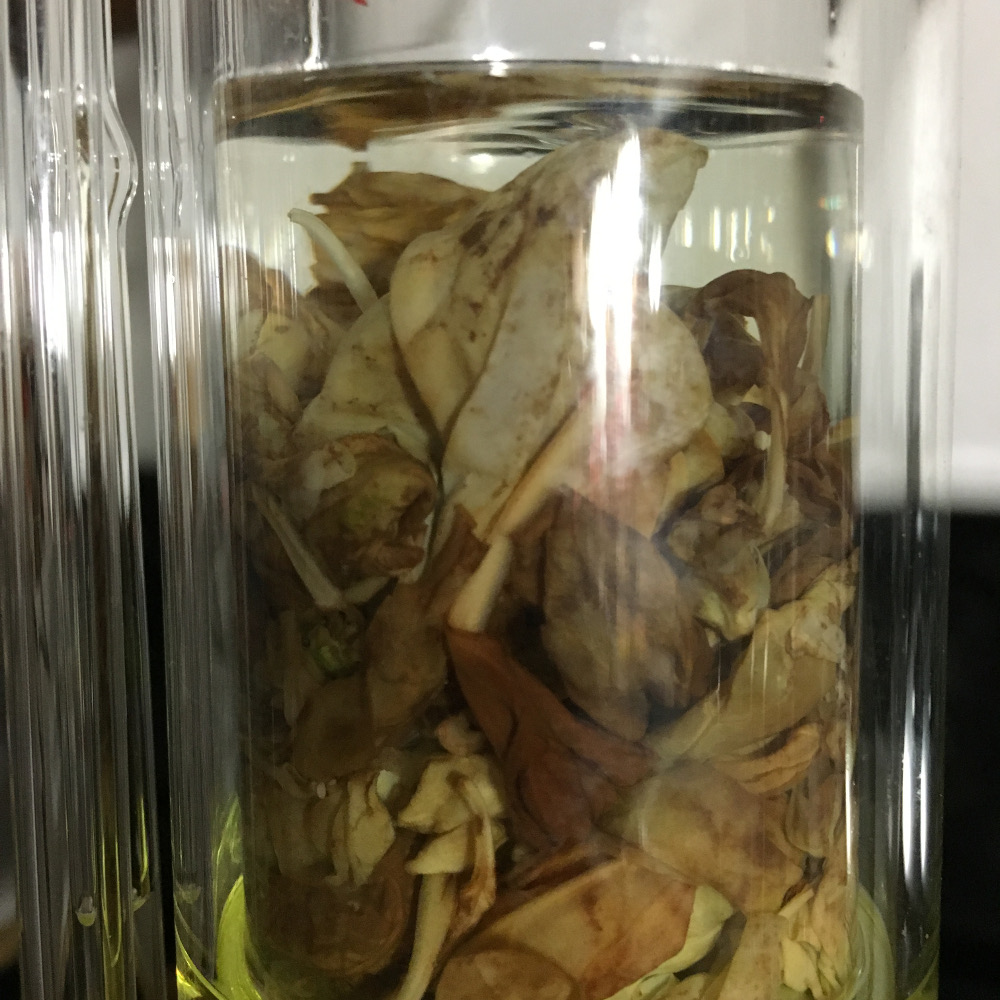
Here is my thimble loosely packed. I let the material air dry for a few days. You are supposed to dry it better, but I'm only playing and I didn't want to wait any longer or degrade it with heat. I wasn't using a high quality solvent anyway.

Fritted disk thimble under-packed with basil
After the material is loaded, the lower flask containing a solvent is heated. The flask only needs to be heated until the solvent lightly boils. This vapor travels up the distillation arm and into the reflux condenser. Once in the condenser the vapor cools back in to a liquid and drips out the bottom. The Allihn condenser prevents anything other than pressure to leave the system. I didn't want to waste a lot of water, so mine is cooled by a small pump in a bucket of ice water connected with some 1/2" tubing. This cold water jacket cools the solvent vapors and they drip down into the thimble.
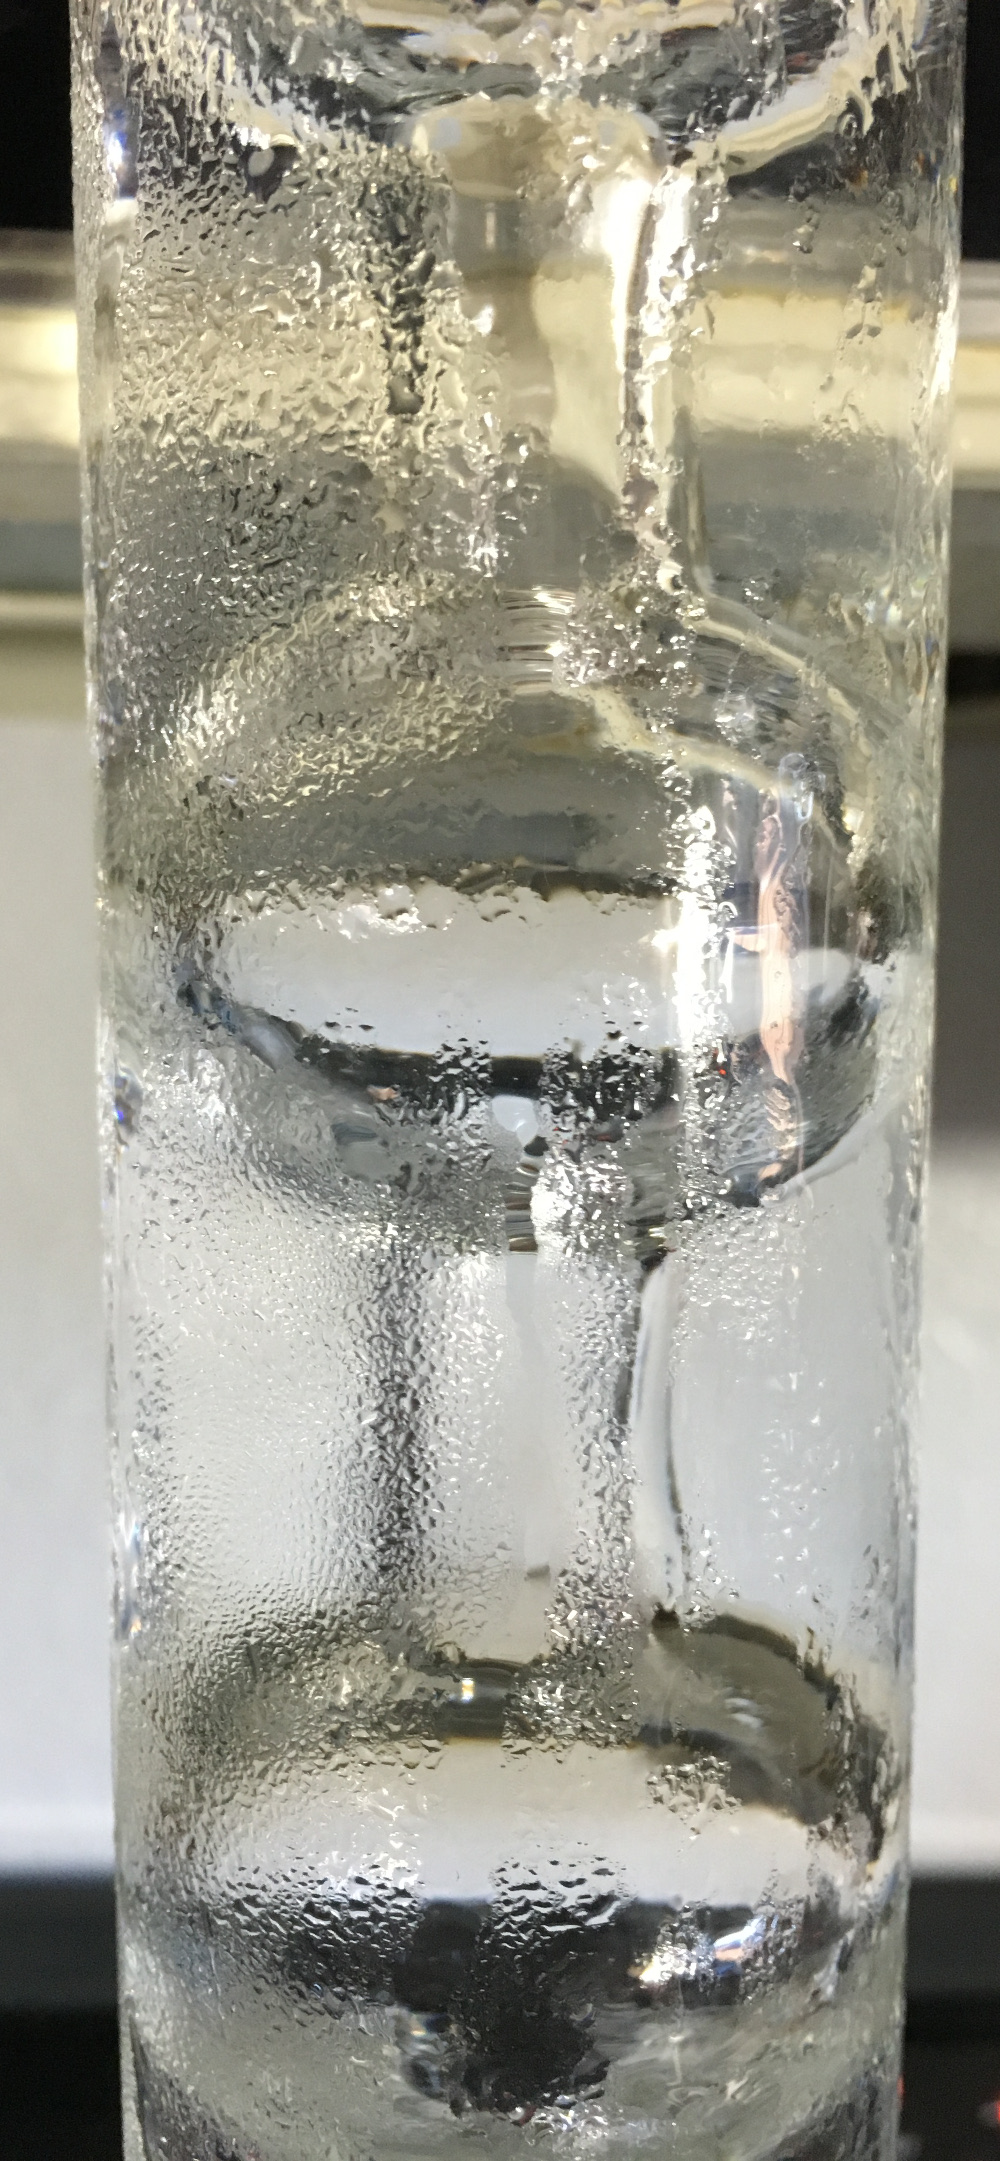
Condensation from water bath on Allihn condenser
Solvent dripping out of Allihn condenser
The solvent slowly drips into the chamber allowing the soluble compounds to be dissolved. Drip by drip the chamber fills until the level reaches that of the top of the siphon tube. The following images shows the chamber nearly full. After it filled about 1 more millimeter, gravity pulled the liquid in the siphon tube on the left down and back into the flask. This is the completion of a cycle. My thimble has a pore size of 25-50 µm, so it doesn't drain very fast as shown in the animation at the top of this section.
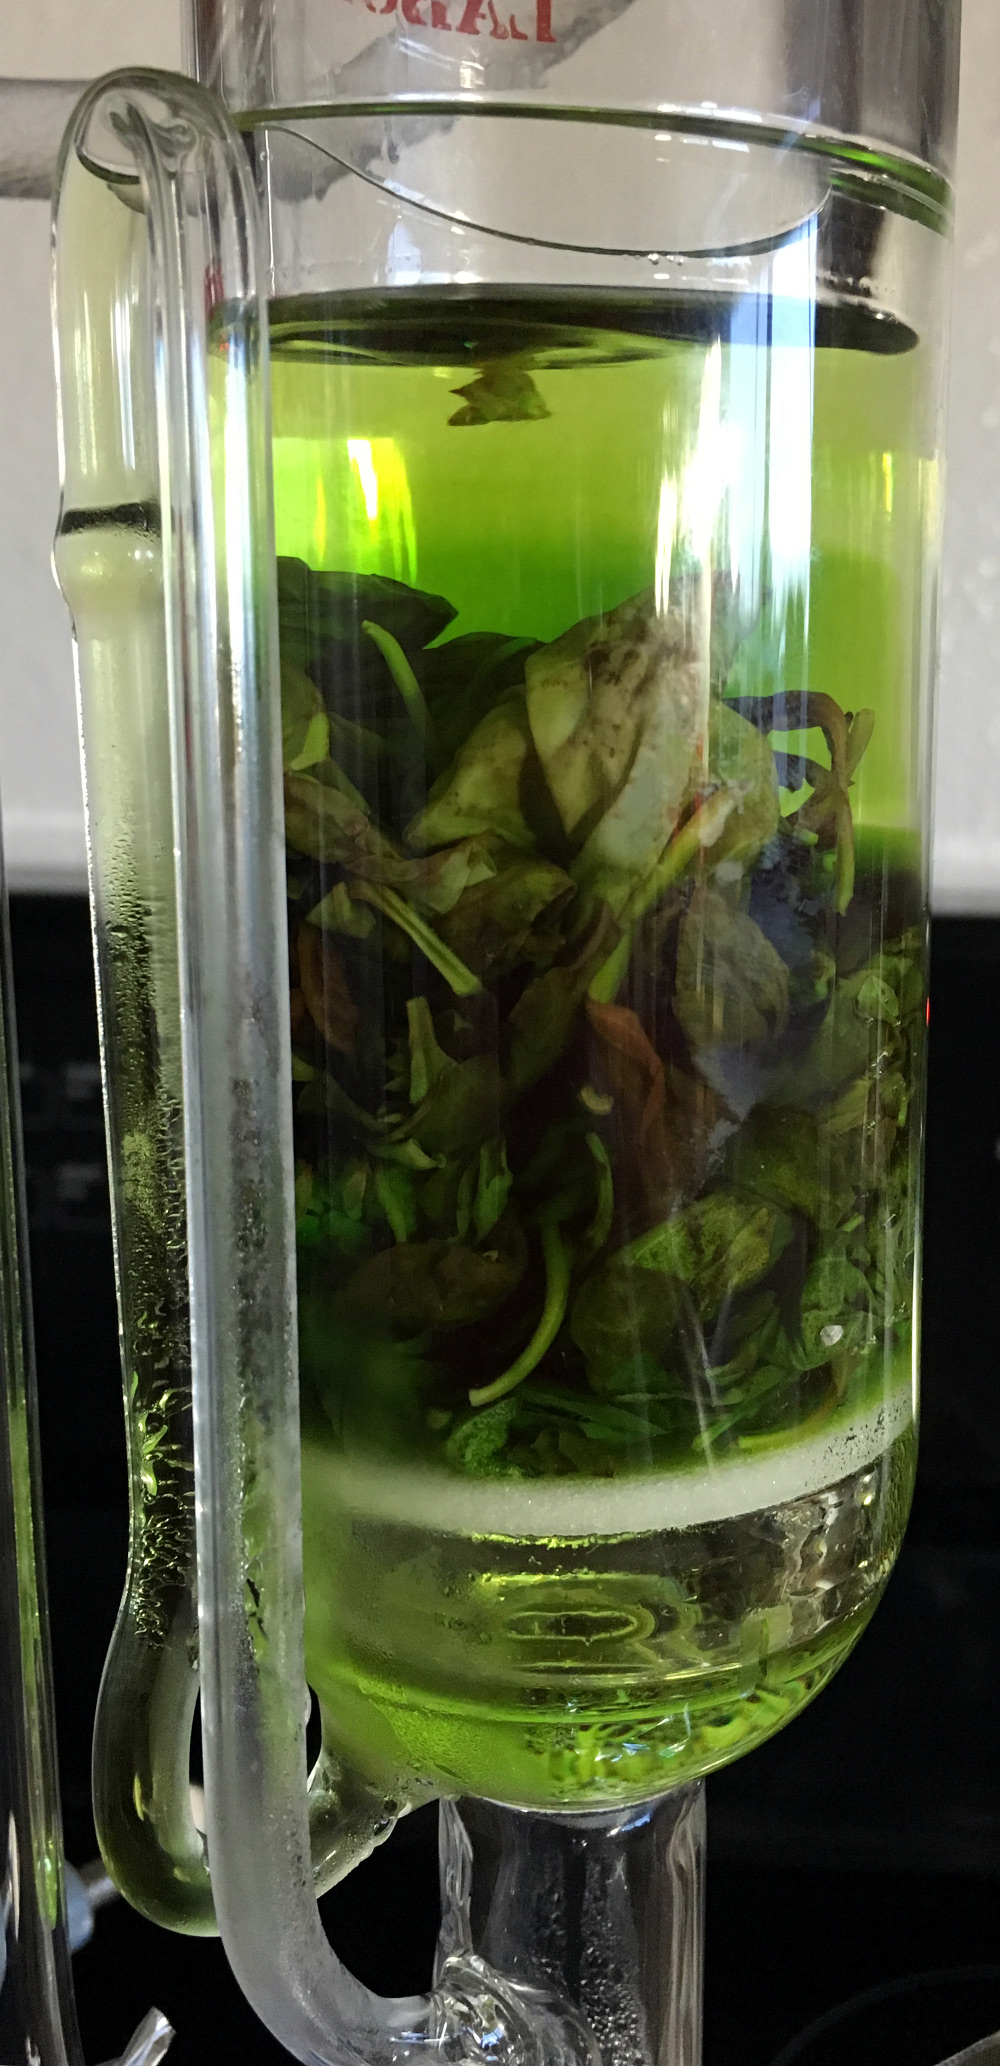
Soxhlet chamber nearly full and ready to siphon
Chamber draining
The cycle time of this setup was about 15 to 20 minutes. This means that a good portion of the plant material is soaking in warm solvent for up to 20 minutes at at time. Here is where Frick's laws come into play. As the concentration of the solute increases the flux decreases. At the end of a cycle osmosis has slowed due to the pressures equalizing. The Soxhlet extractor dumps this solution and immediately begins refilling the chamber with freshly distilled solvent. This allows the process to behave as if many washes of clean solvent have taken place, but only uses a smaller recycled volume of solvent. Neat trick, right?
Procedure
I got the plant material by stripping the leaves from two basil plants I had. I don't own a drying oven, or even a food dehydrator, so I let the leaves air dry for a day or two. I didn't bother grinding them up in part because I was too impatient to let them fully dry. I could have fit at least double the plant material in the thimble.
I wanted to use an easy to get and food safe solvent. I don't have the best setup for removing solvents. Anyone have a spare rotovap they want to donate? I decided to pickup some 95% ethanol. It's sold on every third corner, so it was an easy choice.
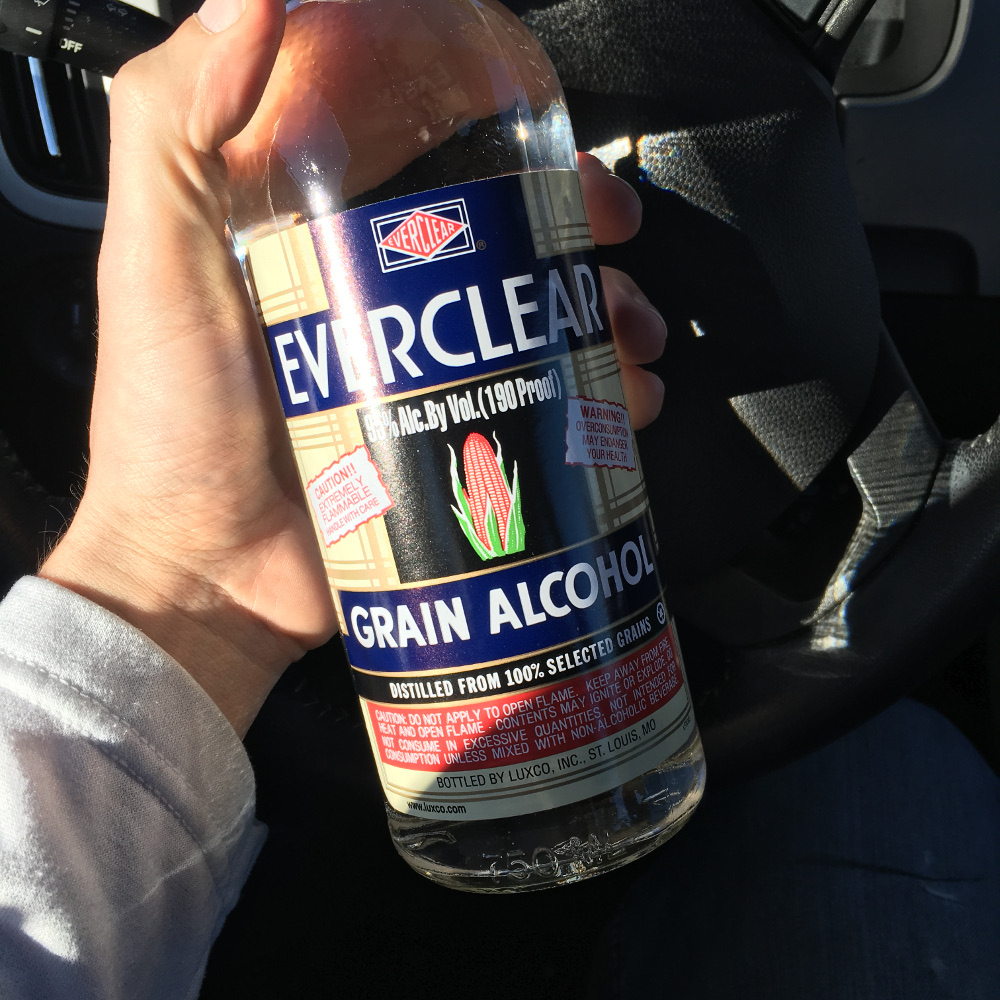
Food safe solvent for experiment
I could have purified the ethanol with some 3A molecular sieves, or an azeotropic distillation with benzene, but since the only goal is learning and eating, it felt like wasted time. The CaCl2 I have isn't recommended for use with alcohols on a chart I have and didn't want to bother with researching any further.
I attached my Soxhlet extractor to a 1L round bottom flask. I poured in ethanol until the Soxhlet siphoned. That gave me the BARE MINIMUM solvent. I can't have my flask boiling dry, so I poured in another which brought the flask nearly 1/2 full which is good. I didn't bother with boiling stones.
For gentle heating I suspended the flask in a water bath on my range. If figured a water bath would work since I only needed to heat to about 78.4°C. I didn't bother with thermometers. I turned up the heat until the water simmered. Looking back it would have been easier to keep the temperature below 100°C or to have used an oil bath or heating mantle (which I don't own yet). The steam had to have contributed to heating the condenser lowing the efficiency. After the first cycle I wrapped the bath with foil to contain the heat and keep it away from the cooling system.

Setup ready to start reflux
I ran the extraction for about 10 cycles until the solvent began to stay clear. I'm not sure of the exact number of cycles. After I was sure everything was fine I started only checking in periodically. After it was apparent that there were going to be no noticeable visual changes, I deemed the extraction good enough.
Solvent done dissolving pigment and running clear

Basil leaves are blanched
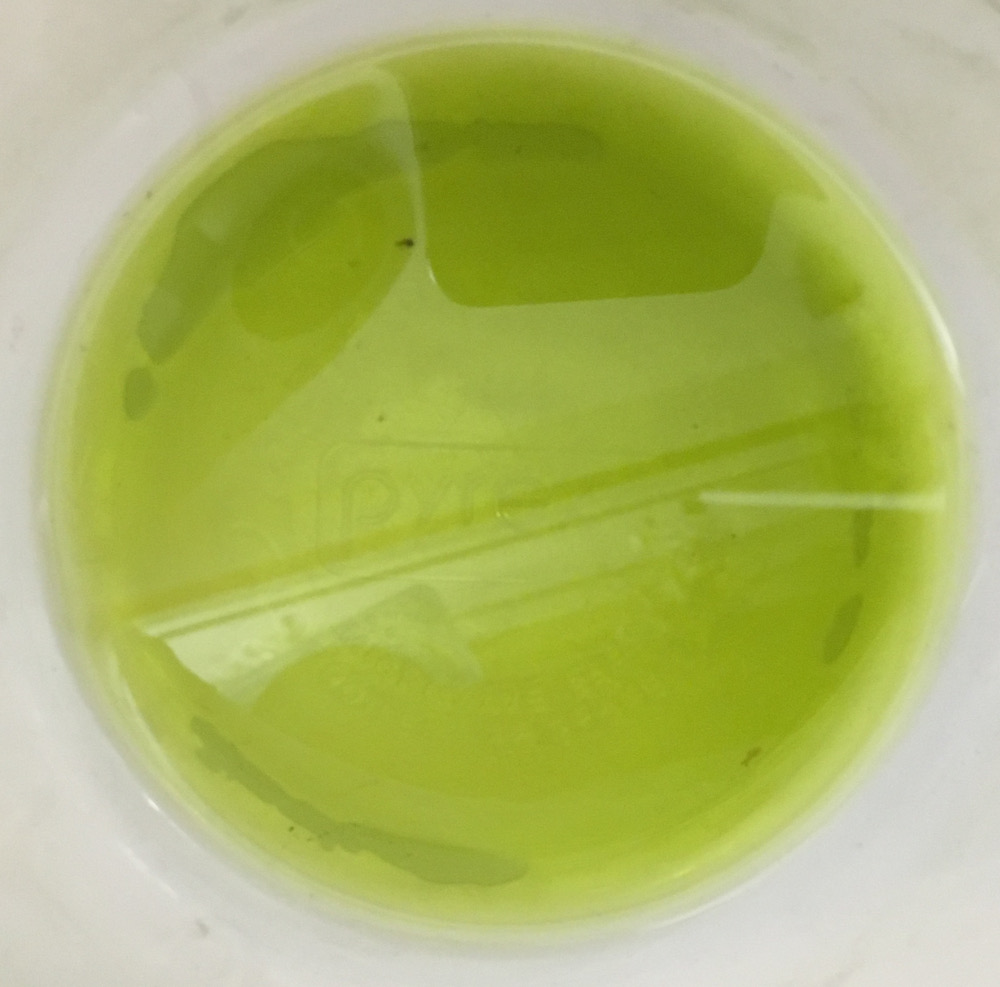
A surprising amount of color was extracted. The flask essentially looked black. It seems plausible that a flask of chlorophyll-a, & chlorophyll-b 'designed' to absorb light would absorb a lot of light(?) That white mess in the next image was only minerals from the water and wiped right off when it cooled.

Raw extract
Swirling the flask in front of a light showed something more expected.

Swirling raw extract in front of window
Rather than waste the ethanol I plan to do a vacuum distillation to recover most of it. I'm too impatient for that, so I poured 5 or so milliliters into a PYREX® dish to evaporate. As expected it left a green oily residue. It smells great. A little more 'earthy', but a lot 'sweeter' and 'spice like'. This makes sense since basil contains the same odoriferous compounds as many plants.
Thin (~1mm) layer in a PYREX® dish
A few days later I got back to the project. After pouring off a bit while impatient and consuming some I got around to the distillation. The next image shows the recovered ethanol. Smelling it was the standard nose burn experience, but it seems that some of the interesting volatiles came through with the solvent. Not ideal, but I'll reuse it with the new seedlings I have going.
Recovered ethanol
But why?
That's a great question... Science is fun, need more reason than that? Because I can?

The only 'practical' application I have is to make food additives. Why add a sprig of basil when I can add 1/2 ml of tincture? Doesn't look as nice, but science is way more interesting than manual muddling (seriously a first world problem). I can extract flavors from one food or herb and deposit them in another. Think Grāpple (the apples that taste like grapes).
I know the nerd in me won't stop until I've collected some fractions from column chromatography. It would make my day to isolate some methyl cinnamate or linalool. It might be fun to grab some polarizers and look at the chirality of some of the compounds. I don't know what I'm doing but, neither did the people who discovered this stuff either, and I have Google!
Caution: Some of the compounds like estragole are suspected to be carcinogenic. If you try this, do your research before consuming large amounts of any compound.
Obtaining the necessary solvents to do this right will require a lot of money or some fun organic syntheses! Might push me over the edge to finally take one of the OChem courses I've been eying.


Thanks for the write-up, Brent.
The alcohol costs add up fast, so it is generally a good idea to plan on alcohol recovery if you want to do this very often.
The extracts that one gets with alcohol really depend on the preparation before the separation. You can freeze your alcohol and use it with thoroughly dry plant materials to get a much purer extraction of oils- the waxy paraffins are too cold to go into solution, and the water solubles (terpenes, phenols, chlorophylls) are far less soluble or immobilized for the actual extraction when frozen. You may lose some of the oil using this method, but depending on the plant, it can be surprisingly efficient.
Another tip is to use something called phase extraction with your concentrated extract. The oily compounds in the watery/oily mixture will often have a much higher solubility in a 'carrier' oil added to your concentrates. Glycerin or almond oil are popular carrier oils. Adding some carrier oil and vigorously mixing the mess will literally draw the oils from your extract into them, leaving more polar compounds and chlorophylls behind in the watery mix. You can then let the mixture sit overnight and draw off the oil layer to use.
The Extractcraft process uses a vacuum to complete the process in an hour or so, and is on sale now actually. There is Spark Fun in that machine for sure.
The Source you(?) make does look like a super handy way to recover the solvent. W/o vacuum my distillation took more than an hour.
I wasn't aware of carrier oils. I have intentions to try some form of liquid-liquid extraction. It's definitely easy enough to see what happens when I add an immiscible non-polar solvent and throw it in a separatory funnel. From what you said the water should take on most of the terpenes, phenols, and chlorophylls. This sounds like a useful step(?)
Acid-base extractions are also easy, but I'm worried that I'll have some undesirable reaction making it less safe for human consumption. Solid phase extraction sounds more difficult than column chromatography if I don't really know what's in the biomass, but the information I'd need must be out here.
Phase extraction is a form of chromatography, and it separates by molecular polarity in a manner similar to many traditional LC/column approaches. In this case, both phases are liquid rather than a traditional column separation in LC methods, where the stationary phase is usually solid. The hydrophilic carrier oil is edible which is sometimes not the case with eluents in LC. While there is dilution, great concentrates for room fresheners, flavorings, lotions, and soaps are very accessible with this method.
I wonder if using a small slow cooker full of water on low would make an acceptable heat source.
If you want to put some nerdy electronics into it, maybe using a DIY sous vide cookers made with an arduino PID controller and a rice cooker to get the perfect water bath heat source... And then the setup won't be taking up valuable stove real estate for when you want to actually cook food. ;-)
From experience, a crockpot/slow cooker plus oil bath is near perfect as a heat source for Soxhlet extraction with ethanol. The cheapo thermostat in the cooker is good enough to keep temperature regulation without needing to bother with a whole PID controller setup--I don't believe crock pots get hot enough to boil water (mine doesn't anyway) but it easily hits ethanol's BP.
An aluminum foil tent around the boiling flask helps the system reach equilibrium temp faster, but isn't strictly necessary.
I typically use vegetable oil in the cooker as the heat transfer medium because it's cheap and renewable. Downside is that my apartment smells like french fries for days afterward.
Based on Wikipedia, a slow cooker might make a great heat source. They seem to sit right above the boiling point of ethanol. I was sloppy (impatient) with the temperature control so my water kept slowly boiling off. Oil would be a lot easier to leave fully unattended. A DIY sous vide cooker is on my list of stuff I want, but don't need. Our thermocouple digitizer could be used for that and/or to monitor the distillation. During a distillation the composition of the mixture in the boiling flask changes. The different mixtures have differing vapor pressures and boil off at different temperatures. Connecting a thermocouple probe to one of our IoT offerings would all you to get notifications when the temperature of the vapor changes and it's time to change collecting vessels. The temperature plots would be worth the effort to me!
I've played with AdaFruit's thermocouple digitizer breakout and published my sketches on GitHub. They use the same chip that you use. While their product has been on the market longer, yours has the benefit of being designed to use a standard mini thermocouple connector.
There might need to be some modification of code to translate from AdaFruit's libraries to yours, but I offer them as a jumping block.
This one is just a single thermocouple, 2x40 LCD display, chronodot, and a sd-card reader (I think I used a shield that has both xBee and sd-card sockets). https://github.com/Sembazuru/Thermistor-logging
This one is quite a bit more advanced. Using a shift register I multiplex the CS signal of the SPI bus. This gives me up to 8 SPI devices with only two CS pins. Using a 2 to 1 multiplexer chip I provide for daisy chaining for having as many SPI devices as signal integrity will allow, still with only 2 CS pins. The demo sketch reads from 4 thermocouples and outputs to 4 OLED displays. (Again, sorry it was all designed with AdaFruit tech, but the underlying structure should be portable.) This would allow multiple temperature zone monitoring. https://github.com/Sembazuru/SPI-shift-register-CS
I might have to take a look at that, they at least sound like a good resource for the community. Our library does allow you to use multiple breakouts. At the top of the example sketch you can see examples of how to select which pin is used for chip select for each instance.
I just looked at the example code for your thermocouple library and it's interesting that you provide for using I/O pins to power the sensor. I don't think I've seen that in other libraries. Neet.
As far as specifying the CS pin per instance, AdaFruit's provides the same functionality. The second example that I mentioned has the benefit of only needing 2 CS pins (and one thermocouple object in uP memory) for 8 thermocouples. Without that circuit one would need 8 CS pins (plus the MISO and SCK for 10 pins) and 8 unique objects gobbling up memory for 8 thermocouples. Eventually I plan on adding more silkscreen notes to make hooking up easier. (I discovered on my prototype that I didn't have enough on-board documentation to make hook-ups easy...)
Is it my imagination, or is this thread starting to wander away from topic? ;-)
Edit: Head-smack. This thermocouple amplifier doesn't use MOSI, so I removed it from my pin count, above.
For those of you who have an interest, but not the motivation, some local makers created this cool product that's nearly released: http://www.extractcraft.com/
Looks entertaining! In the future when I have money for the glassware, definitely count me in for trying this!
Am I the only one thinking that basil is not the only GREEN LEAFY plant one could put into a setup like this? ;- )
Something something Niwot, CO
This isn't directly related to the enginursday post, but I saw an add for SparkFun on a website using Google's advertisement service, and I was wondering if you have started posting ads, or if this is some scam.
Wonderful article - thanks for writing it! How did you do the vacuum distillation at the end?
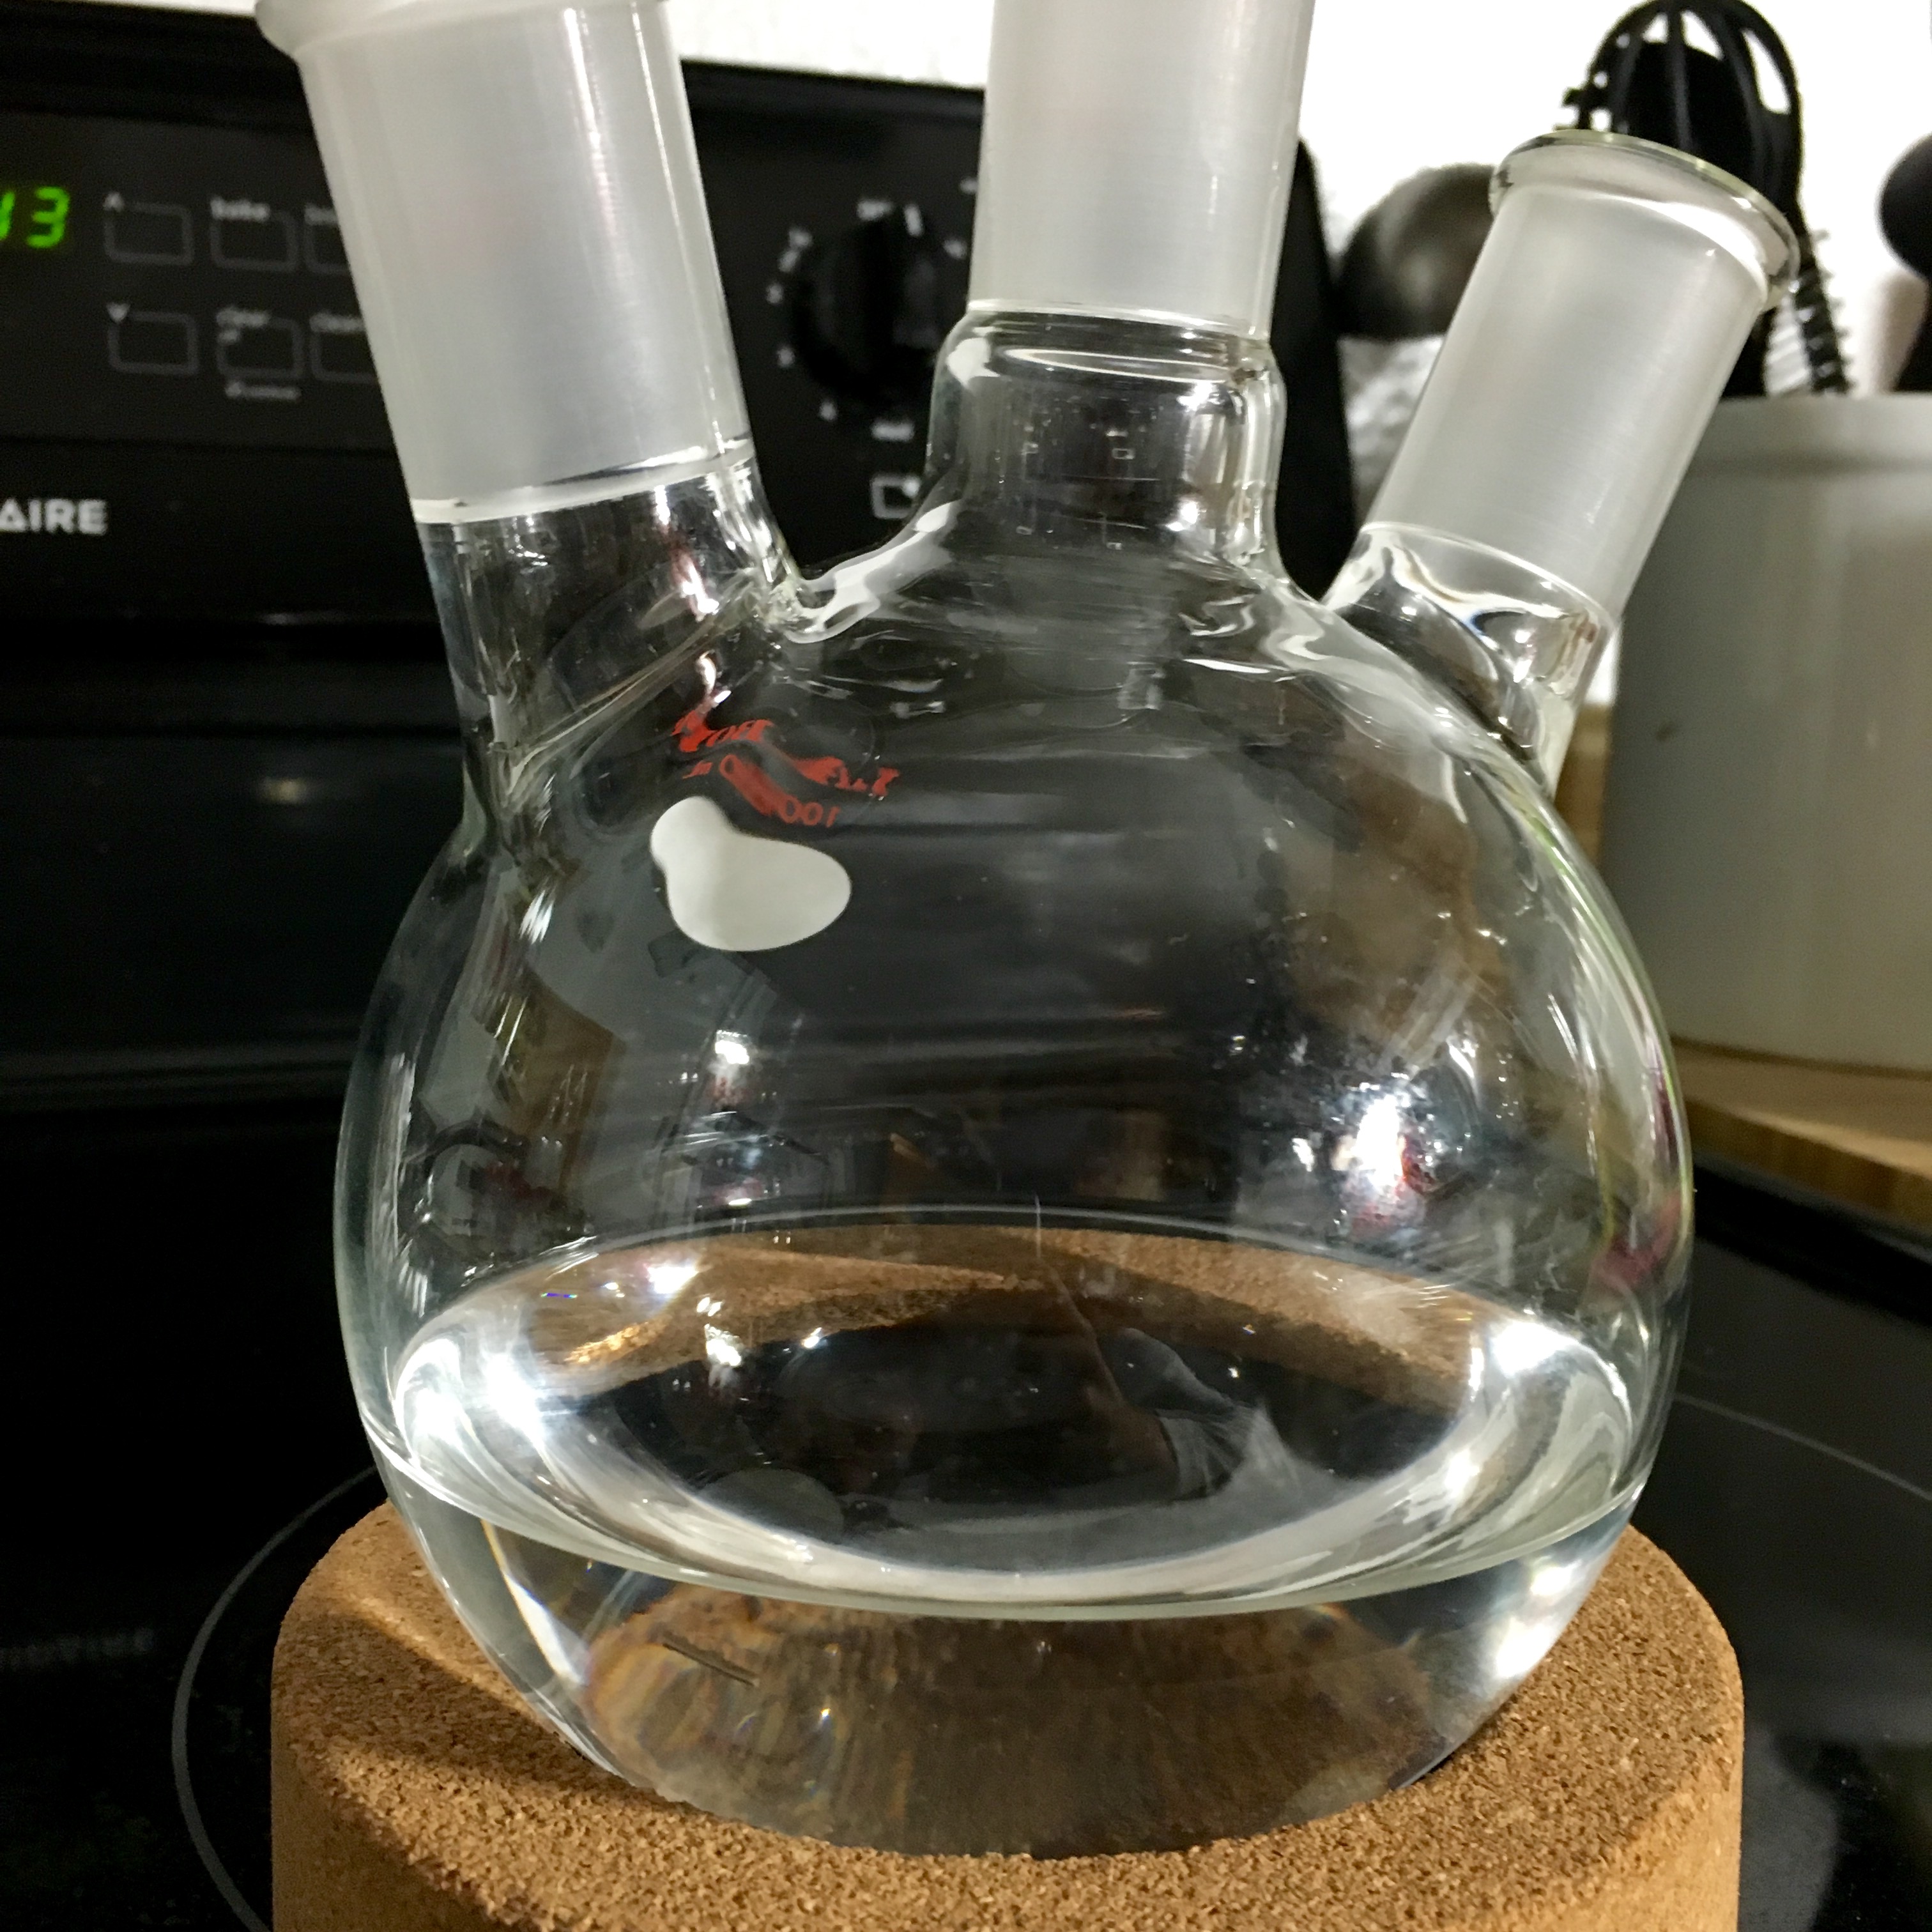
Busted! My setup isn't complete yet. I'm short on flasks and/or glass stoppers, so I couldn't in time for this post. I did a simple distillation very similar to the setup shown for the extraction. Same round bottom flask in the same water bath. To that I attached a three-way distilling adapter connected to a liebig condenser. I used the 3 neck flask shown near the end of the post for collection of the distillate. I set it in an ice bath for good measure and connected it to the condenser with a vacuum take-off adapter. If I'd had a sealed system I would have hooked the take-off adapter to a cheap faucet aspirator vacuum pump. I don't own a good vacuum pump (yet). I don't have a mantle heater or (stirring) hotplate, so I couldn't use my lab jack to lift the distillation flask. My distillation column wasn't available either, so the angle of the condenser was a little sketchy. I distilled off most of the ethanol leaving as much as I estimated would keep the extract from being too messy.
There are strange states like Texas who make you register for a permit to buy scientific equipment like this, but as far as I can tell all laws deal with intent. The relevant sounding part of law I've found is "to possess any three-neck round-bottom flask", a list of a bunch of other items including "any equipment, chemical, product, or material" ..... "knowing, intending, or having reasonable cause to believe, that it will be used to manufacture a controlled substance or listed chemical..." This makes it as illegal as a plastic drink bottle in some places. Pretty much anything can be used to make something 'bad'.