Midwest Defenders
This is the first part of a series on Jesse Brockmann's build for the OpenCV Spatial AI Contest.

Team Midwest Defenders
Jesse Brockmann is a senior software engineer with over 20 years of experience. Jesse works for a large corporation designing real-time simulation software, started programming on an Apple IIe at the age of six and has won several AVC event over the years. Make sure you stay up-to-date with our blog to read all about Jesse and his team's submission!
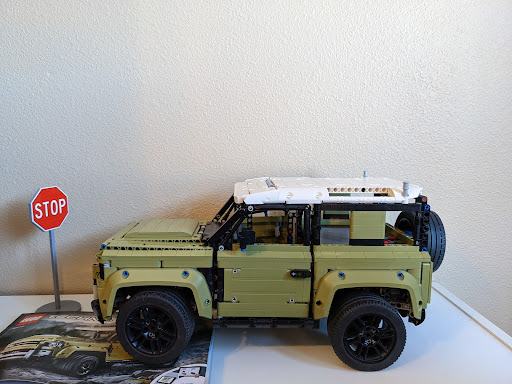
The Lego Land Rover Defender is ready for an Oak-D Lite upgrade!
The Midwest Defenders team consists of the following members:
Jesse Brockmann: Jesse lives in Iowa and is a Senior Software Engineer for a very large company and has been working for 24 years as a software developer on a multibody dynamics solver used by many companies in the automotive and other fields. In his free time he likes to work on autonomous rovers, promote STEM as Brand Ambassador of Sparkfun Electronics and work on other projects when he has time. He won the Sparkfun Autonomous Vehicle Competition (Sparkfun AVC) in 2016 and 2017 and has worked on autonomous rovers since 2011. He recently completed the Udacity Self Driving Car Engineer program with classes on computer vision, deep learning, localization and path planning.
Ted Meyers: Ted lives in Colorado and has been interested in computers and robotics since he was a young child. He currently has 25 years of experience as a software developer. He now works for Northrop Grumman writing software that processes data for sensors that fly on unmanned aerial vehicles. He is also a robotics enthusiast and has built several robots and competed in a variety of robotics contests over the last 10 years. He competed several years in the Sparkfun AVC, winning multiple awards. In 2014 Ted worked on team "Troubled Child" at the Sparkfun AVC where he helped convert a Jeep Wagoneer to a full -size autonomous vehicle that took first place in the "doping" class competition. More recently, in August 2021, he competed in the Dallas Personal Robotics Groups RoboColumbus competition; a contest to build a completely autonomous rover that could navigate an outdoor obstacle course. His rover navigated the first challenge area successfully and placed third overall in the competition.
Our team decided to use the Lego Land Rover and the Oak-D-LITE to replicate the environment of a warehouse robot, or any other environment where autonomous navigation might be used. Although we decided to use street signs, the use of april tags would be a good substitute.
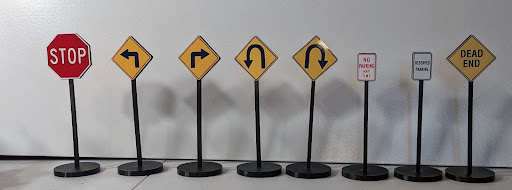
Some example 3D printed signs
The first stage was to build the Land Rover and modify it to run instead of being a static display. For this we used directions purchased from Rebrickable to allow motorized conversion of the rover. We will note our build deviated from the instructions, as we decided to only have high gear and switched to using an RC servo to drive the steering instead of the servo recommended in the build.
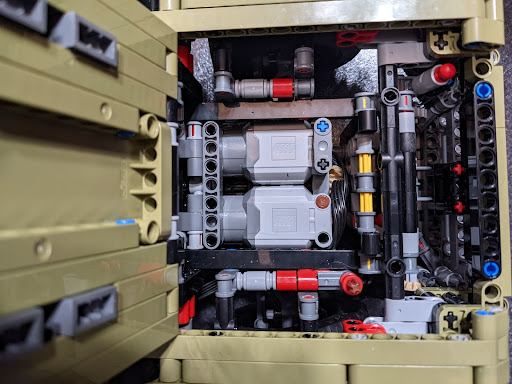
Engine bay with Lego motors
The recommended Lego servo has very coarse steering control and was very weak compared to a standard micro hobby servo. The servo was mounted using a 3D printed bracket. Control of the Lego motors was done using a stock RC Speed Controller. At the end of this process we had an RC controlled Land Rover. Testing was done to make sure this vehicle operated well before proceeding with the conversion to autonomous.
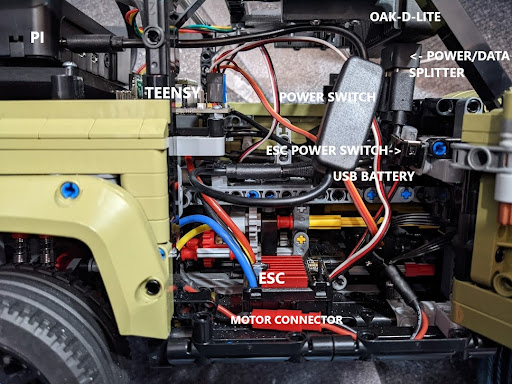
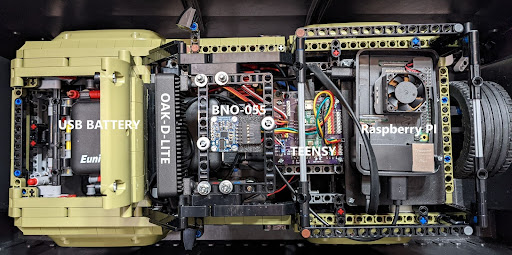
The lego build was next modified to add the features required for autonomous operation. The roof was removed and internal structures strengthened to compensate for the roof removal. The front engine bay was cleared of the simulated motor to allow room for a large USB battery bank. All interior pieces for appearance were removed and a 3D printed platform was added to mount a Raspberry Pi and a custom circuit board with a Teensy 3.2 microcontroller.
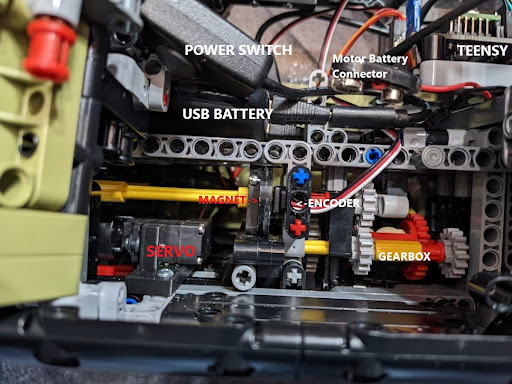
Components as seen from the driver's side door showing modified design
Components as seen from passenger side door showing modifications
A battery pack with 6AA batteries was added to power the drive motors and the RC servo. An encoder was added to detect distance traveled and speed. A BNO-055 IMU on a custom 3D printed part was added to provide heading information. At this point the Pi was mounted in the vehicle, along with the Oak-D-LITE. The camera was mounted using two 3D printed brackets made of ABS. ABS is a better choice due to its ability to handle higher temperatures. There was some concern that PLA could deform from the heat of the camera. The Pi was placed into a case and simply mounted using two sided tape.
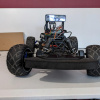
Finished rover with all modifications


