Adventures in Science: How to Use Calipers
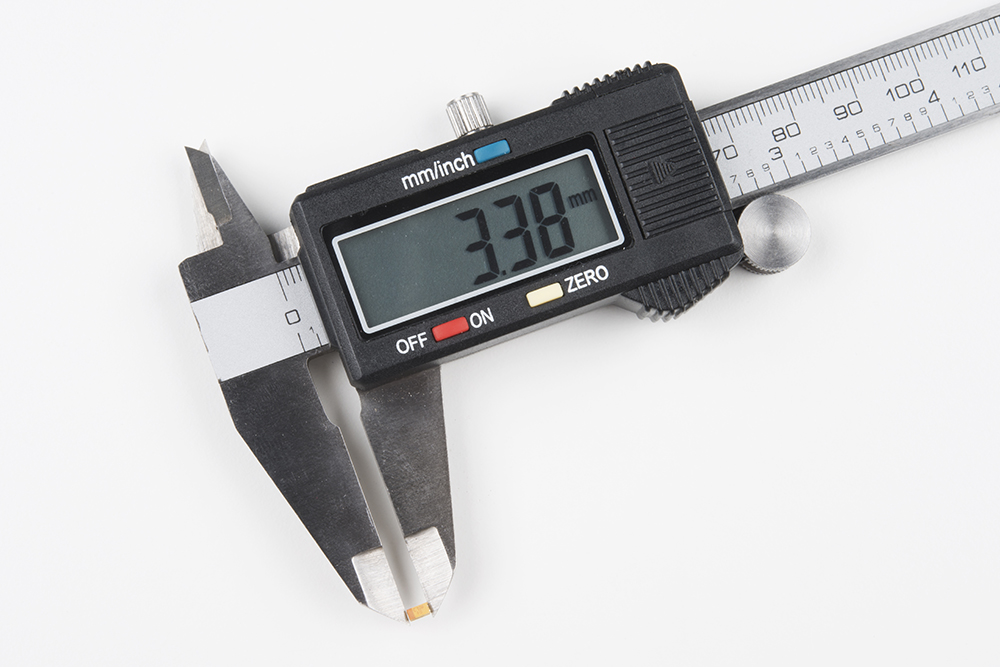
A set of calipers can be an incredibly useful tool for precisely measuring the distance between objects.

Based on a suggestion by user Sembazuru, we made a video showing you how to use calipers! Digital calipers are fairly straightforward, but it can be a little tricky to read dial and Vernier calipers. Don't worry; we've got you covered.
While they are often found in fields like mechanical engineering and metalworking, calipers have their place in electronics as well. Every now and then, I run across a component that has no datasheet, or the datasheet has incomplete information on the required PCB footprint for the part. If I happen to have the component in hand, I can pull out my trusty calipers to take whatever measurements I need from the component.
Beyond just PCB layout, they are also extremely useful for taking precise measurements to 3D print enclosures for your electronics, like Nick's Pokédex phone case.
I use a set of digital calipers for quick work, but I also have a set of Vernier calipers for when I need reliability in my measurements. Beyond these, what else do you like to use calipers for? Any tips or tricks you can offer for taking good measurements?
Interested in learning more foundational topics?
See our Engineering Essentials page for a full list of cornerstone topics surrounding electrical engineering.


Came across a GREAT tip a while back to measure the center to center spacing for 2 (same sized) holes.
Use the calipers to measure the inside opening of one hole, then zero the calipers whilst making this measurement. Effectively now all measurements will have this distance subtracted.
Now measure the outside to outside distance of the 2 holes and the reading will now represent the center to center spacing.
This only works of the holes are the same size though, but still extremely useful tip.
Awesome! I actually struggle trying to take accurate center-to-center measurements of holes, so this'll come in handy.
I believe you omitted a step in the ZERO PROCEDURE, one should always clean the outside measurement jaws prior to performing a zero. A lint free cloth should be used. This is a step we teach our students here at the college and its often overlooked, a bit of pocket lint or debris from the workbench can easily give you incorrect measurements.
Good call, thanks for the tip!
Calipers are never an improvised adjustable wrench!!!
What about an improvised hammer? ;-) (grinning, ducking, and running)
Truth, although I hear that you can use the sharp edges to mark your material, if you're careful.
Marking with the sharp edges seems to work better with:
The scratch that one can make with the caliper points is very faint, so it shows up better with the contrast of marking blue.
An alternate to the marking blue (according to some quick and dirty googling that I did to make sure I wasn't talking out of my sits-upon) seems to be sharpie marker. Use the marker to color a patch where the marking will be made, and then scratch through the sharpie ink to show a high-contrast bright line. Cleans off easily with alcohol, cooling fluid (this might be a problem), and I'm sure a good handful of common shop solvents. (But not water.)
not directed at anyone specific, just don't do it.
If you're taking requests, I'd love to see you break down everything there is to know about wiring. There's a Sparkfun tutorial on wire/connectors, but I feel like it just scratches the surface. I'd love to see a deep dive into: - What are the different types of wire available? Why should I use one over the other? Solid, stranded, different insulators, gauges, ribbon, bundles, etc... - Best practices for making your own wire bundles - Everything you ever wanted to know about heat shrink - Waterproofing and wiring - Choosing the correct gauge for a project... - How do I shop for multiple conductor wire? And where would one shop for that? - What kinds of connectors are out there, and how do you hook those up/crimp them on?
NASA has a published standard for wiring that I saw recommended on a FIRST robotics site.
https://www.hq.nasa.gov/office/codeq/doctree/NSTD87394A.pdf
Good idea, thanks! Not to spoil too much, but I know that Pete was working on a video involving wiring tips.
Yay! Thanx for getting to this, Shawn. You did forget the one measurement that I also usually forget about, the step measurement. It tends to be easier to accurately achieve as long as there is clearance because instead of relying on the lesser stiffness of the depth gauge to get plumb and the narrow end of the beam to get square, it actually uses the stiffness of the beam to get plumb and the width of the jaws to get square. (See the last measurement on this page.)
I am glad to see that you did cover how to read a vernier scale. It is a more advanced scale reading technique, but there are a lot of tools (particularly older) that use that measurement scale. Just having an understanding of it might help when confronted with some old piece of equipment picked up for pennies at an estate sale. And even if one doesn't remember how to read it, one would hopefully recognize it as a vernier scale and then know the proper keyword search to find the answer. (Sometimes it is more valuable to know how to find an answer than to just know the answer itself...)
(Edited word order and spelling error for clarity.)
It was a good suggestion, so I hope it helps people! I've never actually used the step measurement, so thanks for the tip. I would normally just go for the depth gauge for something like that, but I can see how it would be better than relying on the somewhat flimsy depth rod.
As I said, I also usually forget about it. But the times that I do remember to use it I find my measurement is less fiddly to take.
This is a good explanation of how to use calipers. I would also add that calipers will only provide accurate measurements if they have been calibrated against a standard in a metrology lab. For most people that really isn't a requirement, and they can get away with using them off the shelf. If you drop your calipers, know that they can no longer be relied on unless tested with gauge blocks. One last thing, when taking measurements, the jaws have to be perpendicular to the measured surface for an accurate reading.
After adding the external battery do you find the extra bulk gets in the way of some readings?
Not usually. No more than having a giant dial or some other piece protruding from the face of the slider.