Enginursday: Exploring the Arduino/Intel Galileo
First impressions of the Arduino/Intel-hybrid Galileo board - an x86 Arduino! - a small example project, and our likes and dislikes.

The list of official Arduino boards continues to grow, and, continuing with the famous-Italian-person trend, now includes the Galileo. The Galileo is Intel's toe-dip into the Arduino waters. It features their Quark SoC X1000 -- a 32-bit, x86 system-on-a-chip that can run at up to 400MHz with 512 kB of built-in SRAM.
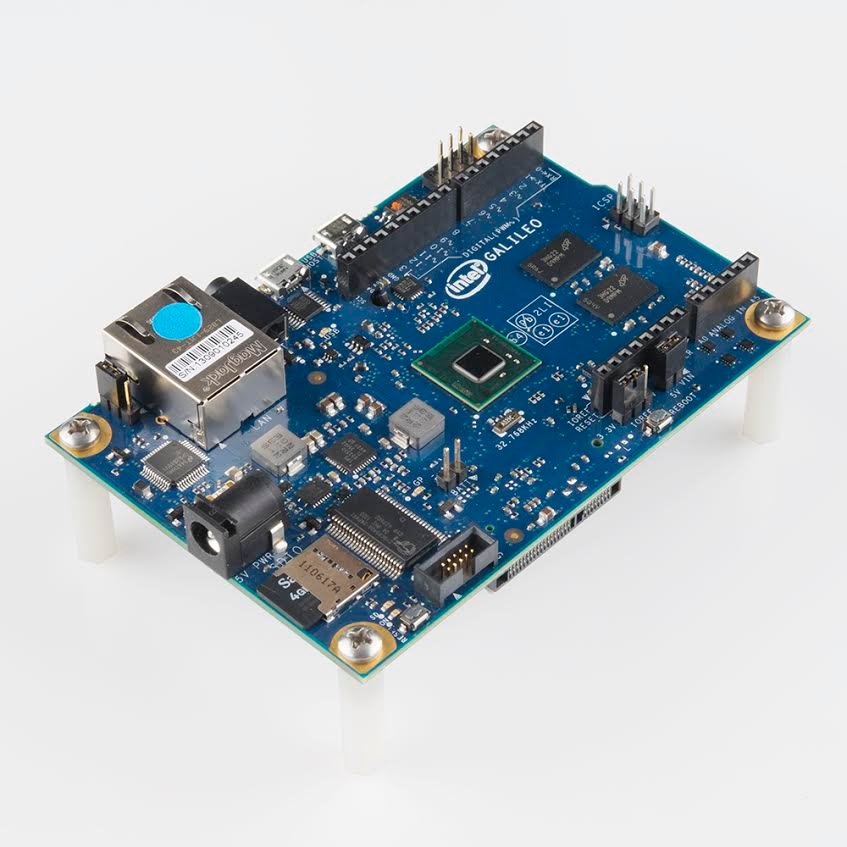
The Galileo board supports the Quark with a wide range of external peripherals. There's 8MB Flash (to store firmware), 11kB EEPROM, a µSD socket (supports up to 32GB), 10/100Mb Ethernet, USB 2.0 host and device ports, an RS-232 port, and a mini PCI Express (mPCIE) socket. On top of all that, it's got that same, familiar Arduino pinout we all love (to hate?). The Arduino pins -- including six analog inputs, SPI, I2C, UART, and PWM outputs -- are all exactly where an Arduino user would expect them to be.
What the Galileo tries to do is meld the ease of Arduino's hardware manipulation with the power of a Linux operating system. Most sketches written for Arduino Unos, Leonardos, and other boards can be ported directly over to the Galileo. You can still use popular Arduino libraries like SD, Ethernet, WiFi, EEPROM, SPI, and Wire, but you can also make requests of the Linux kernel with system() calls. This gives your Arduino sketch access to powerful utilities like Python, Node.js, OpenCV, and all sorts of fun Linux-y stuff.
Unread-Email-Checker Example Project
We were fortunate enough to receive a couple of early Galileo boards for evaluation, one of which landed in my hands to futz around with. To get a feel for the board, I tried to whip together a quick project that melded a few of the Galileo's unique features together.
Most of our work communication occurs in emails, but I'm often turned away from my computer, wielding a soldering wand or banging my head against my Pi workstation as those emails pile up. It's imperative that I stay up-to-date with the latest SparkFun memes and cool robot videos, so a simple unread-email-counter would be great to have permanently installed over my workbench. Sounds like a perfect project for the Galileo!
First, I needed a utility to check how many unread emails I have. Well, I don't need much of an excuse to whip out some Python, so I did a quick search and found the script below. It logs into our email server with my credentials, checks how many unread emails there are in the inbox, and prints that value.
# pyMailCheck.py - Logs into your gmail and prints the number of unread emails.
# Place this file in the top level of your Galileo's SD card.

import imaplib # Used to connect to an IMAP4 server.
obj = imaplib.IMAP4_SSL('imap.gmail.com', '993') # Connect to an IMAP4 sever over SSL, port 993
obj.login('my_email_address@gmail.com','myPassword') # Identify the client user and password
obj.select() # Select a the 'INBOX' mailbox (default parameter)
# Search mailbox no (None) charset, criterion:"UnSeen". Will return a tuple, grab the second part,
# split each string into a list, and return the length of that list:
print len(obj.search(None,'UnSeen')[1][0].split())
I loaded that onto a µSD card (also including the Galileo's SD-bootable "bigger" Linux image, required for Python), and proceeded to the next task.
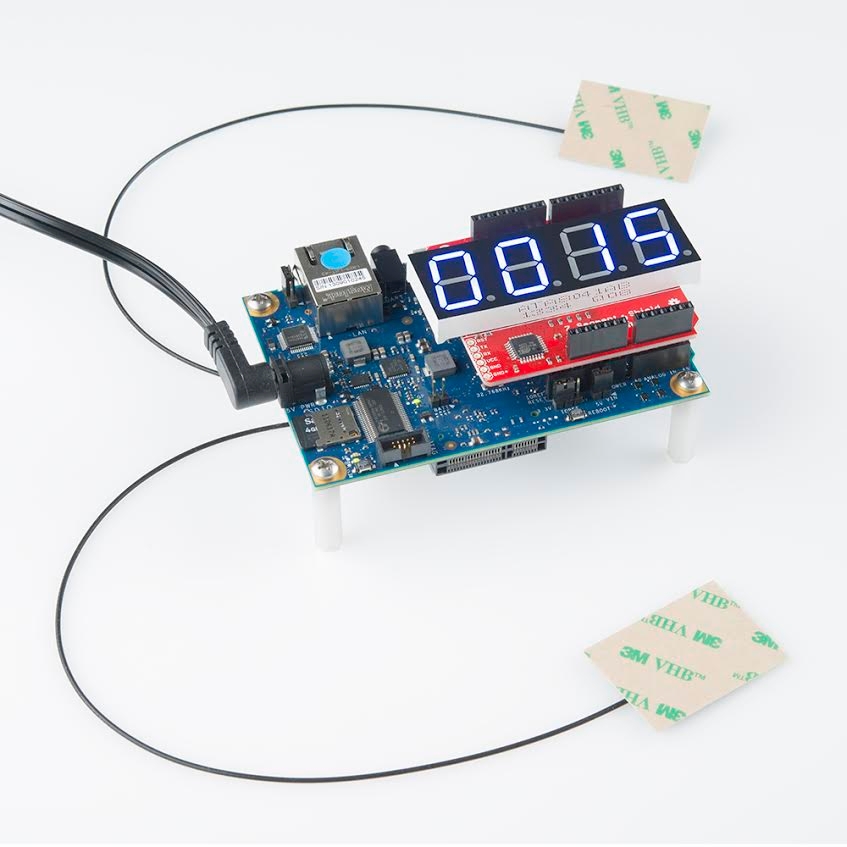
To display the email count (and retain the Arduino-y-ness of the Galileo) I used an OpenSegment Shield, controlled over SPI. No modifications, just plop it right on top of the Galileo. A lot of the Arduino code below might look familiar, especially if you've used the SPI, SD, or WiFi libraries, which all work swimmingly with the Galileo.
/* Galileo Email Checker
   by: Jim Lindblom
       SparkFun Electronics
   date: January 7, 2013
   license: Beerware. Please use, reuse, and modify this code.
   If you find it useful, you can buy me a beer when we meet.

   This code connects a Galileo to WiFi. Then runs a Python script
   - https://gist.github.com/jimblom/8292444#file-pymailcheck-py -
   that lives on the Galileo's SD card to check how many unread
   emails you have. That number is displayed on an OpenSegment
   Shield - https://www.sparkfun.com/products/11846 - which is
   controlled over SPI.
*/
#include <SPI.h> // SPI is used to control the OpenSegment Shield
#include <WiFi.h> // WiFi (could be swapped out for Ethernet)
#include <SD.h> // The SD library is used to read a temporary file,
                // where the py script stores an unread email count.

//////////////////////
// WiFi Definitions //
//////////////////////
char ssid[] = "WiFiSSID"; //  your network SSID (name)
char pass[] = "WiFiPassword";    // your network password (use for WPA, or use as key for WEP)
IPAddress ip;
int status = WL_IDLE_STATUS;

/////////////////////
// Pin Definitions //
/////////////////////
const int SS_PIN = 10; // SPI slave select pin (10 on the shield)
const int STAT_LED = 13; // The Galileo's status LED on pin 13

////////////////////////////////
// Email-Checking Global Vars //
////////////////////////////////
const int emailUpdateRate = 10000; // Update rate in ms (10 s)
long emailLastMillis = 0; // Stores our last email check time
int emailCount = 0; // Stores the last email count

// setup() initializes the OpenSegment, the SD card, and WiFi
// If it exits successfully, the status LED will turn on.
void setup()
{
  pinMode(STAT_LED, OUTPUT);
  digitalWrite(STAT_LED, LOW);

  Serial.begin(9600); // Serial monitor is used for debug
  initDisplay(); // starts up SPI and resets the OS Shield
  initSDCard();  // Initializes the SD class

  // Initialize WiFI. On success turn on the stat LED. On fail,
  // print an error on the LED, and go into an infinite loop.
  if (initWiFi() == 1) // If WiFi connects, turn on Stat LED
    digitalWrite(STAT_LED, HIGH);
  else
  { // If WiFi connect fails, print error, inifinite loop
    SPIWriteString("----", 4);
    while (1)
      ;
  }
}

// loop() checks for the unread email count every emailUpdateRate
// milliseconds. If the count has changed, update the display.
void loop()
{
  // Only check email if emailUpdateRate ms have passed
  if (millis() > emailLastMillis + emailUpdateRate)
  {
    emailLastMillis = millis(); // update emailLastMillis

    // Get unread email count, and store into temporary variable
    int tempCount = getEmailCount();
    if (tempCount != emailCount) // If it's a new value, update
    { // Do this to prevent blinking the same #
      emailCount = tempCount; // update emailCount variable
      printEmailCount(emailCount); // print the unread count
    }
  }

  // Bit of protection in case millis overruns:
  if (millis() < emailLastMillis)
    emailLastMillis = 0;
}

// printEmailCount(emails) prints the given number to both the
// serial monitor, and the OpenSegment Shield.
void printEmailCount(int emails)
{
  Serial.print("You have ");
  Serial.print(emails);
  Serial.println(" unread mail.");

  SPIWriteByte('v'); // Clear display
  for (int i=3; i>= 0; i--)
  {
    SPIWriteByte((int) emails / pow(10, i));
    emails = emails - ((int)(emails / pow(10, i)) * pow(10, i));
  }
}

// getEmailCount runs the pyMail.py script, and reads the output.
// It'll return the value printed by the pyMail.py script.
int getEmailCount()
{
  int digits = 0;
  int temp[10];
  int emailCnt = 0;

  // Send a system call to run our python script and route the
  // output of the script to a file.
  system("python /media/realroot/pyMail.py > /media/realroot/emails");

  File emailsFile = SD.open("emails"); // open emails for reading

  // read from emails until we hit the end or a newline
  while ((emailsFile.peek() != '\n') && (emailsFile.available()))
    temp[digits++] = emailsFile.read() - 48; // Convert from ASCII to a number

  emailsFile.close(); // close the emails file
  system("rm /media/realroot/emails"); // remove the emails file

  // Turn the inidividual digits into a single integer:
  for (int i=0; i<digits; i++)
    emailCnt += temp[i] * pow(10, digits - 1 - i);

  return emailCnt;
}

// initDisplay() starts SPI, and clears the display to "0000"
void initDisplay()
{
  initSPI();
  SPIWriteByte('v');
  SPIWriteString("0000", 4);
}

// initSPI() begins the SPI class, and sets up our SS_PIN output
void initSPI()
{
  pinMode(SS_PIN, OUTPUT);
  digitalWrite(SS_PIN, HIGH);

  SPI.begin();
  SPI.setBitOrder(MSBFIRST);
  SPI.setClockDivider(SPI_CLOCK_DIV64);
  SPI.setDataMode(SPI_MODE0);
}

// initSDCard() begins the SD class
void initSDCard()
{
  SD.begin();
}

// initWiFi() initializes WiFi, connecting to the ssid/passkey
// combo defined up above.
// This function will attempt 3 connections to WiFi. If we
// succeed a 1 is returned, and the IP address is printed.
// If connections fail, a 0 is returned.
uint8_t initWiFi()
{
  byte timeout = 0;

  while ((status != WL_CONNECTED) && (timeout < 3))
  {
    Serial.print("Setting up WiFi : attempt ");
    Serial.println(timeout + 1);
    // Connect to WPA/WPA2 network. Change this line if using
    // open or WEP network:
    status = WiFi.begin(ssid, pass);
    //delay(10000); // Wait 10 seconds between connect attempts
    timeout++;
  }

  if (timeout >= 3)
    return 0;
  else
  {
    Serial.print("Connected to ");
    ip = WiFi.localIP();
    Serial.println(WiFi.SSID());
    Serial.println(ip);
    // !!! Idea here: print IP address to seven segment display.
    // That'll make it easier to know which address to ssh over to
    // if we need.
    return 1;
  }
}

// SPIWriteString will write an array of chars (str) of length
// len out to SPI. Write order is [0], [1], ..., [len-1].
void SPIWriteString(char * str, uint8_t len)
{
  digitalWrite(SS_PIN, LOW);
  for (int i=0; i<len; i++)
  {
    SPI.transfer(str[i]);
  }
  digitalWrite(SS_PIN, HIGH);
}

// SPIWriteByte will write a single byte out of SPI.
void SPIWriteByte(uint8_t b)
{
  digitalWrite(SS_PIN, LOW);
  SPI.transfer(b);
  digitalWrite(SS_PIN, HIGH);
}
(Check out the GitHub Gist for a nice, syntax-highlighted copy of this code.)
One of the key, uniquely-Galilean functions this code incorporates is the system() function, which can issue requests to the Linux kernel. With the below line of code, we can run a Python script from the comfy confines of Arduino:
system("python /media/realroot/pyMail.py > /media/realroot/emails"); The output of the script is routed to a file named "emails." Then we can use the Arduino SD library to read the "emails" file, which simply contains the number of unread emails there are. After a bit of parsing, and SPI-ing, we've got an unread email count printed to the OpenSegment Shield!
(Now if only I could program it to answer those emails...)
First Impressions
After toying around with the board for a few days, here are a few of my thoughts on the pros and cons of the Galileo:
Likes
- Life is pretty sweet on the Arduino half of the Galileo. Setup is about as easy as any other Arduino board, most shields should be supported (though watch out for that 3.3V operating voltage), and a lot of sketches can be ported directly over to a Galileo. Plus, there's a ton of SRAM; you can include memory-hungry libraries and mess with strings and large buffers with little worry of exhausting your memory supply.
- A sketch's ability to interact with the Linux kernel via system calls leaves the door open for a lot of nifty hacks.
- For those who want to directly interact with Linux, a terminal is available via the on-board RS-232 port. Or you can even SSH into the board if it's set up on a network.
- The mini PCIE socket certainly makes it unique among modern SBC's. Though it seems like, generally, it'll be used for WiFi, perhaps it can be used to drive video, audio, SATA, or other interfaces.
- It's open-source! You can check out the schematics or even the board design files. While you may not be designing a Quark-based board any time soon, there's still a lot to learn from these documents.
Dislikes
- In comparison to other Arduino boards (fair or not) the documentation is limited and the community still seems to be in its infancy. The getting started guide is a good place to start; after that you may be relegated to forum searching/posting.
- The recommended Linux distribution is limited. Don't go in expecting anything like a flavor of Debian (no
apt-getmakes for a sad Linux-newbie). I definitely recommend throwing an SD card in there with the "big" Linux image, which adds WiFi support as well as the fun stuff like Python, SSH, node.js, ALSA, V4L2, and openCV. - The maximum I/O speed on most pins is around 230 Hz, which may be a problem for some applications. There are a couple pins capable of faster speeds (~3MHz), and that limit doesn't have effect on the UART, SPI, or I2C clocks.
- A personal nitpick: to interact with the Linux terminal, one of the Galileo's UARTs is converted, on-board, to RS-232 and sent out through a 3.5mm "stereo" jack. To connect that up to my computer, I need a weird combination of 3.5mm-to-DB9 RS-232 cable, and then a RS-232-to-USB cable to my computer. It works, but I'd rather it just output a simple TTL UART signal, which I can convert as I please.
The Galileo is a unique entry into the growing Arduino board catalog. I'm sure there are plenty of projects out there that can make use of the unique blend of Arduino and Linux. Is the Galileo ever going to unseat the Raspberry Pi? Probably not. But they both serve their own, unique purpose. The Pi, with its HDMI output, gives you a complete, mini-computer, while the Galileo is more of a hardware-focused platform, with a smaller Linux backbone (and Arduino shield compatibility!).
Have you had a chance to play with the Galileo yet? What are your thoughts? Looking to pick one up? It looks like availability is beginning to increase; I hope to see the Galileo community continue to grow, and seed more projects that can make use of the board.


On the shield compatibility: looking over Intel's schematics for the Galileo there is a jumper to select 3.3v or 5v as the IOREF voltage, so it should be compatible with all existing shields from a "doesn't smoke when hooked up" perspective
I think a more notable limitation is that the power supply input must be 5v and is not able to handle the 7-12v DC that many other Arduinos use.
Other than voltage, there are other issues with compatibility. Mainly I/O pin speed. For instance, the DHT11 sensor cannot be used with a Galileo board, because the I/O speed is too slow. https://communities.intel.com/message/216870#216870
I am not sure if any of the Ethernet, WiFi, or SD card shields would work. But using the onboard Ethernet and SD card work. Also adding in a mPCIe WiFi card allows you to use the WiFi like you would with a shield. So, really there is no need for those shields on Galileo.
So, when will SparkFun be carrying Galileos?
Soon-ish...? We will be carrying them at some point, but don't have a firm date. We did spend some time talking with them at CES about the Galileo and the forth-coming Edison. Stay tuned for more...
I suppose after all of the Arm development boards are burned in a sacrificial fire as required by Intel?
Where can I find out more about the system() call? Or how about a search string that doesn't return everything Arduino?
system() is a common C/C++ function call that forks a shell, run the command on the OS and returns the exit status. Arduino don't have it because they don't have an OS aside from the boot loader and uploaded code. Galileo having a version of Linux installed means it can run commands from inside your program.
I could use that unread email counter for my wife's email, but sadly I don't think a 4 digit display is enough. :-)
Is there any support for Media in Galileo by the help of PCIe. If it is,please do tell.
It looks like there isn't much point in coding on this board with arduino - much better to use an SD card & write code in C that can make full use of the board's IO & speed (Given that some people are claiming this is about 200 times SLOWER than an AVR based arduino)
Hi. Why would I need an Arduino if I have a Galileo board? Thanks.
Yeah, that's what Arduino needs... Intel's tired-ass ISA.
I'm guessing that Adafruits neopixels won't run on it. Their library uses some assembly language incantations.
I'm mostly interested in arduino compatible boards for battery/solar powered wireless monitoring outdoors so the first thing I did was plug in an arduino wireless shield with an XBee 900HP radio on board into the Galileo. Picture at http://99.115.132.114/news2.htm It took a day and a half to get it working but, it works well. I was able to integrate the data packet stream coming from my sketch running on the Galileo with my XBee CS3 gateway and web server where I can view the data, just battery voltages at this point. Battery life of 4 AA batteries powering the node was about 3 hours corresponding to about 350mA current draw on average, very high for an arduino board.
The Galileo fits in an odd place somewhere between low cost Linux computers like pcDuino/Raspberry Pi and arduino boards like Uno and Mega2560. It costs more,and has no graphics output like the Linux machines and uses way too much power to be a battery powered arduino based device. The most interesting feature of Galileo is that it can access openCV functionality from an arduino sketch. The way this functionality is accessed still needs work though. You have to use an arduino-Galileo extention system() call to pass data and run a linux program you have written and compiled on the SD card separately which uses openCV and then read the results back into your arduino sketch using some file manipulation calls that Intel added to their version of the arduino language. fopen(), fget()...etc. If Intel were to create an openCV standard arduino library that would be a very special feature. That plus a camera shield would make a great vision platform which would fully utilize the Gallileo's Quark processor performance.
Mbr 28359,
Could you shed more light on how you got the XBee to work? The link to http://99.115.132.114/news2.htm is no longer active. I can be reached at d t h u s m a (AT) gmail.com
Thanks,
-Darrin
I am new on Galileo. After load the linux image (big) on SD card, do I have to install Opencv as did in Linux system? Besides, is there any example of using Opencv on Galileo?
put DOS on it.
It is for sale at MicroCenter for $60 http://www.microcenter.com/product/424730/Galileo_Development_Board
Please describe the wifi card and antennas you chose. It seems that the wifi library is only set to work with two official Intel cards from an Intel forum post.
Yeah, it does seem like the official distribution only has support for the Intel cards. Another shortcoming. This is the WiFi card I was using, works well and not too expensive. I paired that with our nifty adhesive, u.fl antennas.
The pre-built Linux image only works with two wireless cards Intel N 135 or N 6205.
Any WiFi card that has a Linux driver should work. I personally have installed an Intel N 6235 and it works great. I followed these instructions. http://www.malinov.com/Home/sergey-s-blog/intelgalileo-addingwifi (though I used different antennas)
The Galileo looks pretty neat, but I don't see why it is even comparable to things like the Arduino TRE. Also, what is the price range?
The Galileo runs Linux and Arduino code on the same processor. The TRE appears to use two separate processors. Both approaches have advantages and disadvantages.