
When I think about what the future will be like, I think of flying cars and home automation. I've given up on the flying cars -- for now -- but home automation, that's something that has been around for decades. I wanted to build my own devices and explore the possibilities.
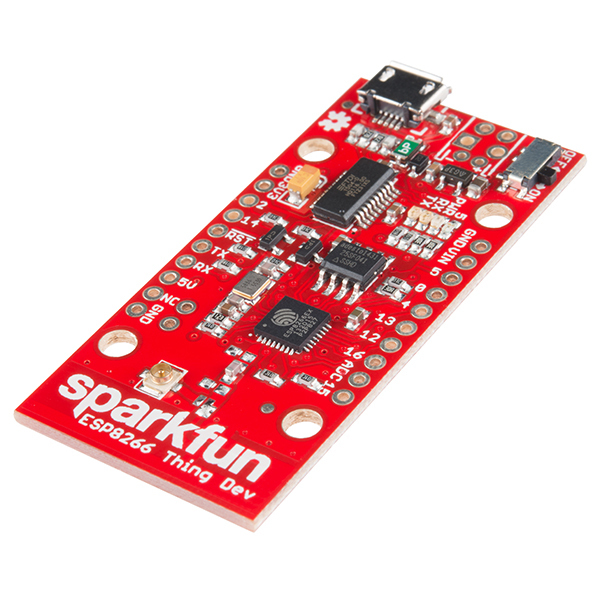
I was first exposed to home automation as a kid. Our Christmas tree lights were connected to a wall timer. Later on, my family upgraded to the [X10 controllers](https://en.wikipedia.org/wiki/X10_(industry_standard)) that we still use today. The X10 blew my mind because it communicated through the house wiring to the clock base station, where you could program the switches to turn on and off at set times. The Internet of Things (IoT) has made home automation even more convenient, by using our smartphones and computers to control these devices. My current favorite IoT devices are the ESP8266 and the SparkFun ESP8266 Thing due to their low cost, community support, and ease of use when programming with the Arduino IDE.
Starting Simple
One of my first projects to get started with the ESP8266 was creating a web page that had a button to turn an LED on and off. This is about as simple as you can make it: connect the ESP to the access point, and from an internet browser, enter the IP address of the ESP. You now have a remote control, and you can easily control a light by using a relay. But, what if you have multiple devices you want to control and don't want to memorize the IP address of every single device? Or what if you want to control multiple lights that aren't physically tied together?
Enter MQTT
We've talked about MQTT before, it's a multi-client publish and subscribe messaging service. It's a simple protocol: you have clients, which can subscribe or publish to a topic, and a broker (server) that handles all the messages coming and going. The client can subscribe to topics, which are just a string of characters like "LivingRoom" or "LivingRoom/Light." The client will listen for incoming messages from that topic and react to what was published to the topic, such as "off" or "on." The client can also publish to other topics, such as "LivingRoom/Light/State" with "off" or "on" so that other clients can monitor the state of the light.
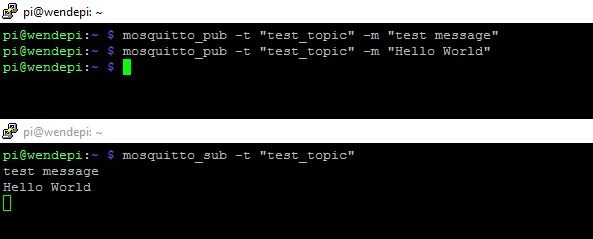
For my broker, I chose to use a Raspberry Pi running Mosquitto. To install Mosquitto, I followed the instructions on this page with a couple of changes:
wget http://repo.mosquitto.org/debian/mosquitto-repo.gpg.key
sudo apt-key add mosquitto-repo.gpg.key
cd /etc/apt/sources.list.d/
Then one of the following, depending on which version of Debian you are using:
sudo wget http://repo.mosquitto.org/debian/mosquitto-wheezy.list
sudo wget http://repo.mosquitto.org/debian/mosquitto-jessie.list
Then update apt information:
sudo apt-get update
Finally, I installed Mosquitto and Mosquitto-clients (so we can subscribe and publish to a topic):
sudo apt-get install mosquitto mosquitto-clients
Subscribing to a topic test_topic was as easy as entering mosquitto_sub -t "test_topic". In a second window, I entered mosquitto_pub -t "test_topic" -m "test message" to publish "test message" to the topic test_topic.
Adding the Things to the Internet
After installing the broker, I turned to my ESP8266 and, using the code below, I entered my WiFi SSID, password and the IP address of my Raspberry Pi and flashed the code to my ESP. When I say I'm adding them to the internet, what I really mean is connecting them to my access point. The messages travel from my ESP to my broker. If I add multiple clients, they all talk to my Raspberry Pi, and that's it. The messages never leave my home network. This way, if the internet goes down, it's nice to still be able to use my lights.
In this example the ESP connects to my Raspberry Pi with the name Example_Light and subscribes to the topic room/light. The important stuff happens in the function void callback(). From here, if the message published to room/light is "off", GPIO pin 2 will be LOW; if the message is "on", the pin will be HIGH. Now, I can send messages to my ESP8266 from my Raspberry Pi by entering: mosquitto_pub -t "room/light" -m "on" to turn the light on, or mosquitto_pub -t "room/light1" -m "off" to turn the light off.
Before you head to the comments section to say, "So, instead of getting up off the couch, you have to SSH into your Pi and enter those strings to turn a light on and off? Aren't you just wasting your energy by doing that?" If I had stopped there, you would be 100% correct, but I didn't. I also added a MQTT switch.
Adding the switch was actually something I wanted to add from the start, and that's what I feel like many IoT devices are missing: maintaining original functionality. By connecting a relay to turn on and off a light, you remove the functionality of the original switch. Sure, you can turn it off, but turning it back on is a bit more complicated. By adding a switch, I can physically toggle the light state by connecting the switch to another GPIO pin to maintain functionality, even if the access point is off, or I can add a remote switch by using MQTT. Once again, to use this code, make sure you fill in your network name, password and the IP address of your MQTT broker.
As with the light example, my ESP connects to my Pi, this time with the name Example_Switch. This time, however, instead of subscribing to the topic room/light, it publishes to the topic whenever the button is pressed. When my light sees that the topic has a new message, it will read the message and turn the light on or off based on that information in the message.
Adding Even More
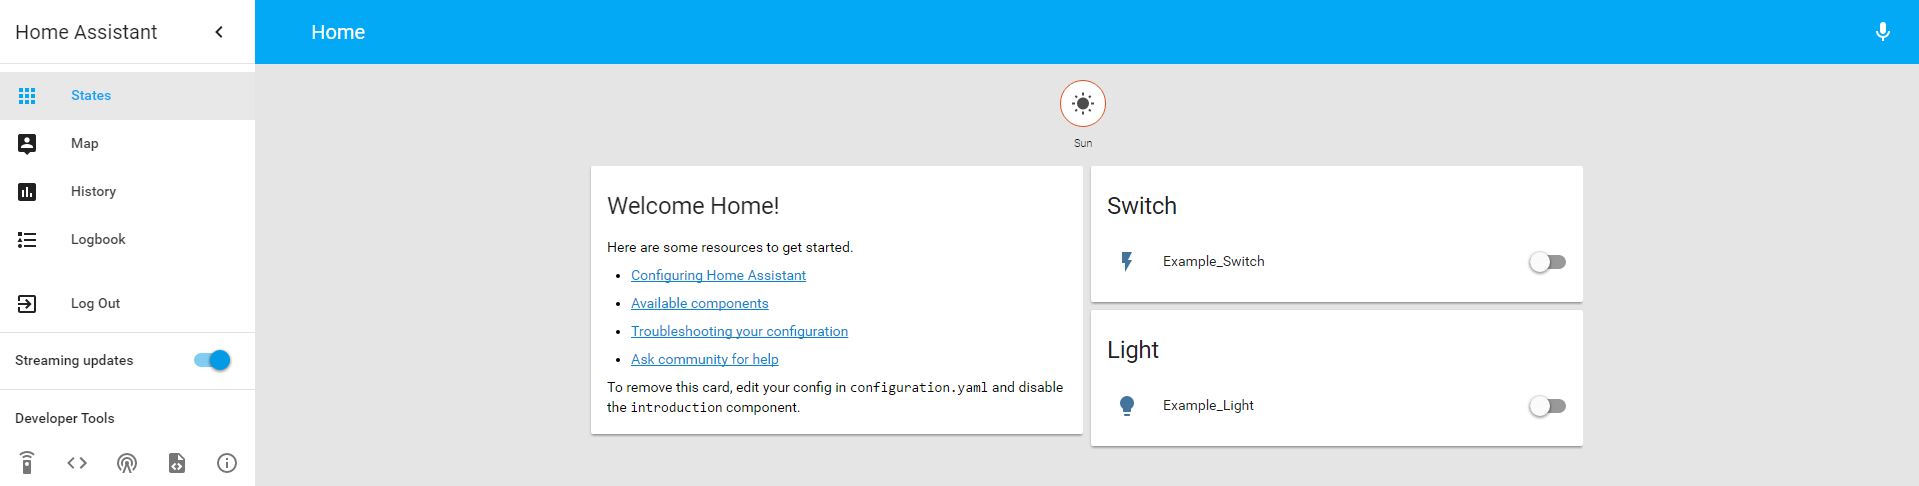
Now that I have the light and switch working, I've basically reached the point where I started; a light is connected to a switch that I can press to turn off and on. Now, in order to add more smarts to the light and switch, I added an open source web app called Home Assistant. I installed Home Assistant on my Raspberry Pi to give me control of my connected devices via my phone or computer.
To install Home Assistant, I made sure I had Python 3 installed, and from the command line I entered:
sudo pip3 install homeassistant
hass --open-ui
The second command actually runs the UI, but when it starts up for the first time, it will install a few configuration files needed to add the light and switch. After a minute, I pressed Ctrl+C to stop the program. After the program stopped, I entered:
cd .homeassistant
sudo nano configuration.yaml
This is where I told Home Assistant about the MQTT broker and then the light and switch, as well as some security features like adding a password to the web app. At the bottom of the file I added the following:
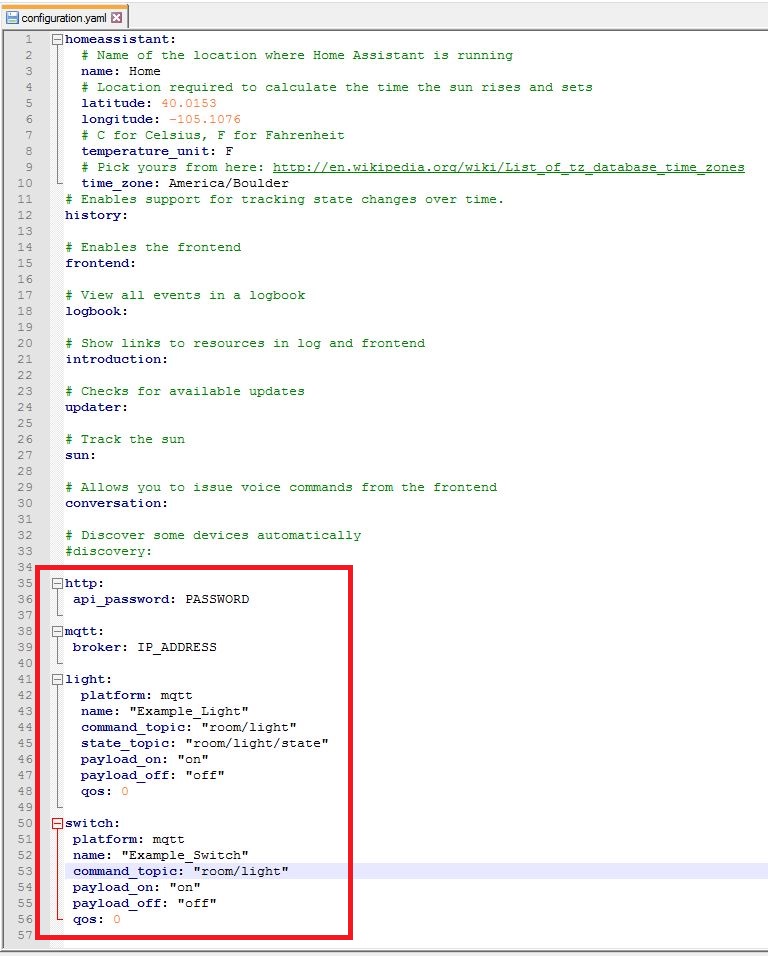
After saving and closing the file, I ran hass --open-ui again. From my phone or computer, I opened a browser and went to the IP address of my Raspberry Pi on port 8123 (e.g., 192.168.1.38:8123), entered the password and I was in.
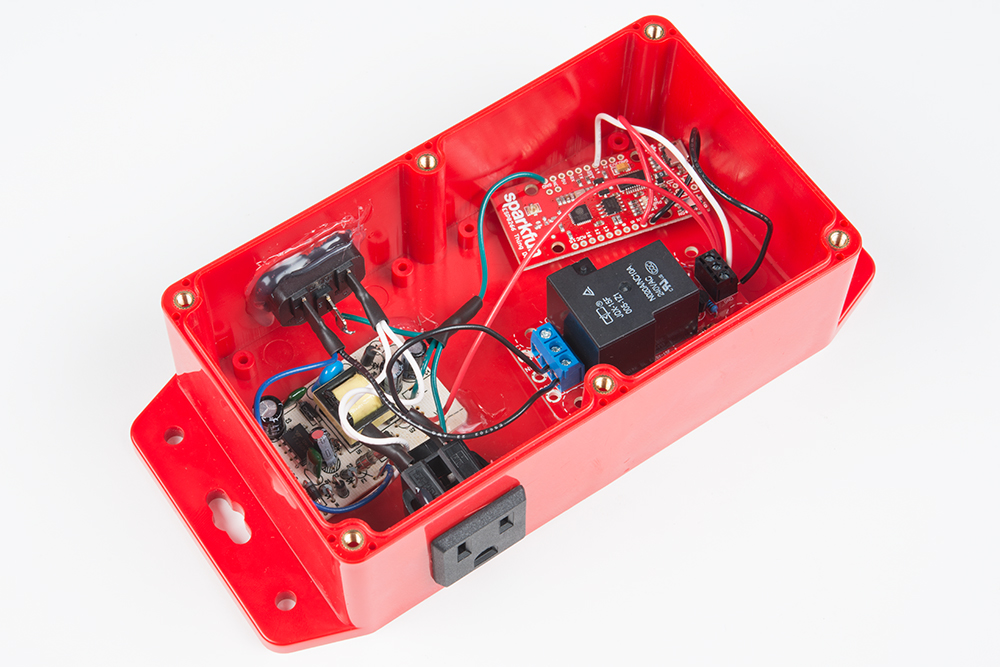
The Finished Product
In my initial testing I was happy to just turn on and off a single LED; however, the end goal was to switch 120 VAC to control a light. For power entry, I used an IEC power cable, and to power the ESP8266 Thing, I took apart an old 5V USB charger. To control the lamp, I replaced the LED with a Beefcake Relay Control Kit and wired in a standard 3-prong outlet. If you decide to take on a project like this, make sure you understand the dangers of working with mains electricity and take appropriate safety precautions.
Exploring More Options
One of the things I love about Home Assistant is that a lot of work has already been done to add MQTT devices like a door lock, a garage door, sensors and even an alarm control panel. You can add commercial products just as easily too, such as a Nest, Belkin WeMo devices, and even your Amazon Echo!
The Amazon Echo feature allows for voice control, so turning a light on is as easy as saying, "Alexa, turn the light on." There's also an iPhone app that's currently in beta. When the official app is released, it may support Apple's HomeKit, which means you could possibly use Siri's voice recognition to control devices across your home. Currently however, if you're looking to use Siri with your ESP8266, I'd recommend reading this.


Thanks for the excellent write up. I appreciate the great explanation of the publish/subscribe design scheme which sounds exactly like what I need for my setup.