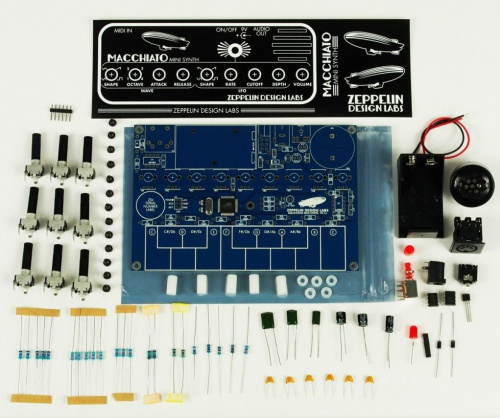
I've got a new synthesizer to show today, fresh from Zeppelin Design Labs. This video continues on the synth theme and shows off what this spry little kit, called the Macchiato Mini Synth, can do. Then I connect it up with some MIDI tools I built from SparkFun products to show how you really can get exactly what you want when you build with open source.
Have a look, and then read a bit about the parts and components used in the video.
The Macchiato Mini Synth
This came to me as a prototype kit, which assembled easily and was fun to build. Check out the product page, or the end of the assembly manual, for a schematic. This runs an ATMega644pa processor at 16MHz to get extra IO and twice the memory of a 328p. It can be reprogrammed with our Pocket AVR Programmer.
Key features of the synthesizer:
- Two-voice polyphony
- Capacitive touch keyboard
- MIDI IN
- Wave shape select
- Amplitude envelope
- LFO modulation to filter
- 1-inch onboard speaker
- Audio Out — accepts 3.5mm (1/8") TRS or TRRS male jack
- ISP header for PC connection (to upload software updates/mods)
Although you can really program this from the ground up, it's easier to reuse existing work. The factory example sketch is written with the Mozzi Arduino Library. You may remember Mozzi coming up before in our SbarkFun post. The Mozzi system allows wave shapes, generators, envelopes and other objects to be created and routed within the Arduino sketch --- and can get a lot from a small microcontroller.
MIDI debug tool:
In the video, I have two MIDI shields and a USB serial device strapped to a RedBoard for MIDI splitting and debug output.
The software it runs is available at GitHub.../MidiSplitter, which starts a software serial instance for the debug port and dumps select MIDI messages on it.
Here are the parts used to build the device. (OK, so I used a USB Explorer instead of an FTDI Basic. Use whatever works for you!)
MIDI bender
The MIDI filter box is a bit more involved, and the source can be found at GitHub.../ArduinoSynthMidiBender.
The firmware is written to allow me to update and change the behavior of the filter as needs arise. For instance, this project required me to add the split feature, where I can select a split point, octave shift all notes and relative octave shift the upper half.
The flexibility is achieved by creating an included class DeviceSettings that holds all the data regarding the current configuration of the filter. A file BenderPanel.cpp contains state machines that control the settings object, and that configures the look of the panel based on its state and current settings.
Here are the parts I used to build the MIDI bender, which lives in an enclosure cut with a Shapeoko 3.
If you have any thoughts on these projects or the cool new synth, please share them in the comments below.
Keep on making,
Marshall


