Adventures in Science: Level Up Your Arduino Code with Registers
In order to use more advanced features or optimize our code for space and speed, we need to understand how to work with registers directly in microcontrollers.

If you're looking to learn more about how your Arduino works, create more advanced projects using things like interrupts or optimize your code for speed and size, then you'll need to work with registers.
Registers are nothing more than storage containers for data inside a processor or microcontroller, and for many microcontrollers (like the ATmega328P), they share the same space with SRAM. A large portion of registers are simply "general purpose registers," which are just places that the program can use to store results from calculations. However, many microcontrollers have a set of "special function registers" that have hardware connections built into the die for setting up timers, toggling the voltage on pins, reading analog voltages, and so on.
In this "Adventures in Science," we describe registers, how to interact with them in Arduino, and how to control hardware using them.
Special function registers are really what make the magic behind microcontrollers. Knowing how to use them allows you to control hardware connected to the microcontroller. The Arduino framework provides a level of abstraction so you don't need to worry about working with registers, which is a blessing and a curse.
On one hand, you don't have to dig through a datasheet and learn all the register names for that microcontroller. If you were to move to a different architecture (say, stop using the 328P and start using the ESP32), you'd need to find a new datasheet and learn new register names. The abstraction is perfect if you want to make a project or prototype (i.e., you just need something to work).
On the other hand, if you are making a product and need your code to be as small and fast as possible, ditching the Arduino framework is often the way to go. If you can reduce the size of your program so that it fits on a cheaper microcontroller, you might save a few cents for each unit produced (which can add up). Additionally, if you make your program run more efficiently, that may mean less power used and more battery time!
What other reasons are there for using registers directly? How would you describe a register to someone just learning about microcontrollers? Let us know in the comments below.


Awesome video SF! I had so many questions answered in 20mins. Keep up the great work!
Thanks! Glad you found it helpful :)
I think this is a great video introducing the idea of hardware registers. However, I think that one thing that may make coding easier after learning about bit-shifting is the predefined names for a pin. Another thing that I think makes the code more readable is using the compound operators to do bitwise logic. Instead of using PORTD = (1 << 5) | PORTD; I think using PORTD |= (1 << PD5); would be more readable and it gives a more intuitive way to think about how setting a bit in a register directly affects the output.
I also think a great book for people who want to know more about this topic is Make: AVR Programming, by Elliot Williams, and can be purchased here. This is how I learned to directly program AVRs without Arduino, and I think that this book is fairly straightforward in explaining everything, starting out with blinking an LED to more advanced projects that use SPI, I2C, and motors.
When reading the pin value, based on your logical check (only checking to see if the result is zero) you don't need to right shift your result. 4 is not zero just as much as 1 is not zero.
But as a beginner code I can see including it to show the full steps to get either a 0 or 1 (instead of a 0 or not-0). And it only saves 1 (or a small handful depending on how much memory swapping into the accumulator or general purpose registers is needed) op-code(s) and a similar number of clock cycles for the shift.
All this shifting left and right in C feels very cumbersome once one gets used to assembler direct bit access. No masks needed, simply access the bit directly. The commands to set/clear/branch if set/branch if clear are all individual opcodes on most processors (all processors that I've looked into at that level). Assembler also gives access to the carry bit in the flag register. On the other-hand I'd rather read C-code than assembler code... ;-)
This is true. The if() statement only cares if something is 0 or not 0, but I wanted to show how to make the C code act like Arduino code (at least the digitalRead() portion). It's funny, because I don't mind shifting in C, and it's been so long (13 years?) since I've had to do assembly, that I don't remember what shifting in assembly looks like!
Well, yes it has also been a while since I've worked in assembler. So to write my above comment (and to make sure I wasn't making things up), I found this page on AVR bit manipulation in assembler: https://sites.google.com/site/avrasmintro/home/avr-asm-bit-manipulation Not only is there left and right shifting, but also left and right rolling. I seem to remember on the MC6800 (yes the count of zeros is correct) processors that I last did assembler on there were two type of shifting. With and without the carry bit. But I could be mis-remembering.
I learned on a 6800 too. At first, I didn't have enough RAM for an assembler, so I hand-assembled my programs into hex, then keyed them in to run them. Here's a picture of that computer (now expanded with a whopping 16k of RAM), which I still have: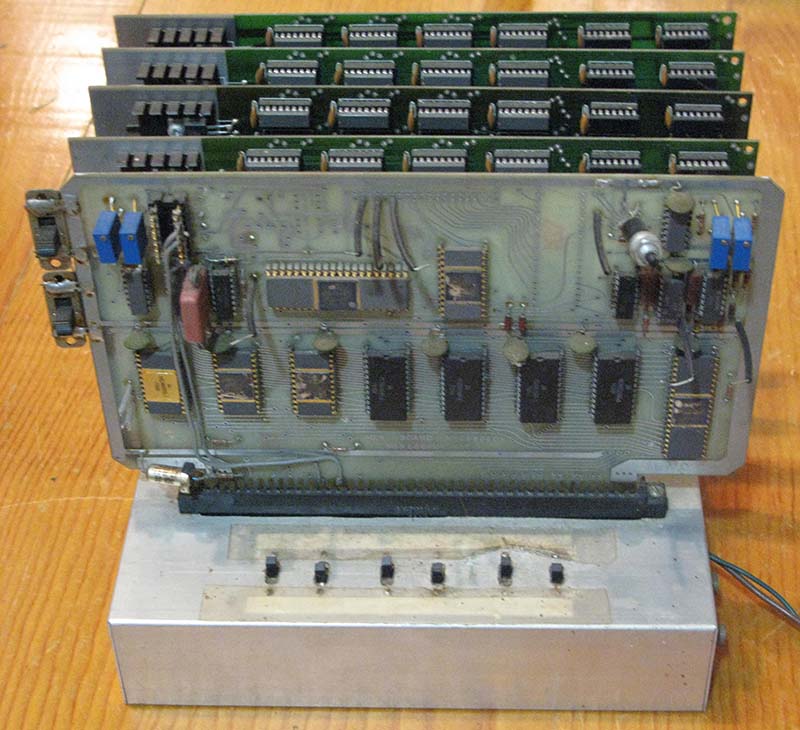
Wow, that's going back about 33 years since I've done any 6800 assembler. Talk about a trip down memory lane... I recall that it did have a rich set of shift and rotate instructions. Rotates always shifted into the carry bit, but the carry bit didn't necessarily rotate into the register, depending on which instruction was used.
Shawn, as mentioned by Sembarzuru, you don't need to do two shifts to read the bit value. It's good enough to use Sembarzuru's 0 or not 0 logic, but if you specifically want the result to be 0 or 1, you can still do it with one shift. Shift the whole port value right by the desired bit number, and then AND with 1:
Admittedly, this is not quite as easy to understand for a beginner, and the way you presented it makes more sense as it draws upon the lessons learned with the previous statement. But once you understand what's going on, this introduces just a little more processing efficiency.
Another observation is a matter of personal taste and style, but the code you use to clear the LED pin relies on the operator precedence rules in order to read it properly:
The ambiguity is over whether the negation (~) or the AND (&) operator is processed first - do you do the negation on just the shifted one, and then AND with PORTD; or do you AND the shifted one with PORTD and then negate it? There is no ambiguity to the compiler, but it may not be read properly unless one is rather familiar with the precedence rules. One could add parentheses to remove ambiguity, but things can quickly get cluttered. Or, as suggested by ComputerAided, use the compound assignment statement. Another very simple way to eliminate any reading ambiguity is to re-order the terms:
Now, it's clear that the arguments to the AND are PORTD and the shifted/negated one.
Swapping the NOT and AND operations does help avoid ambiguity, so thanks for that tip! And you are correct, I only shifted the "read" bit to make it line up with what "digitalRead()" does in Arduino. You don't actually need to do it.