Get Heavy and Humid with this DIY GPS Humidity Tracker
It's in the name of science! No, really, it is, I swear.

Break out the soldering iron, screwdrivers and spreadsheets for some good ol’ fashioned data collection. Don’t worry, you don’t have to be a specialist with degrees from Oxford or MIT. We’ll use open source parts and simple data points to make some measurements that we can contribute to science! Above our heads is a network, nearly 50 years old, zooming around for public use. Why is it important? Well, ask your phone, ships, or planes. GPS is simply a coordinate system free to the public’s use (with a small barrier of the right hardware). We’ve had several blogs and guides explaining what GPS is, now we want to explore what it can be.
I grew up in the Midwest, and at times it was very dry. Humidity, when nature sees fit to use it moderately, can be a saving grace. So, why not measure humidity? We have the tools; we have the technology, yada yada yada. Let's get started!
I centered this project around the Si7021 Humidity and Temperature sensor and GPS Logger Shield. The logger shield has a prototyping area that will fit the sensor perfectly, making for a slim profile. The module has to be small enough to be carried and/or attached during data collection. Below you can find the parts you’ll need to get started:
Assembly
Let's assemble our parts, starting with the humidity sensor, and break away headers. Break off four pins. We’re going to solder them to the bottom of the board, so the short pins of the headers should be poking up by the circuit components. Do a shimmy dance and set aside.
Now let's solder our stackable headers to the GPS shield. If you haven’t soldered a stackable header shield, start with one header set. Place it through the matching header holes from the top of the board. What I like to do is quickly take my iron and tap off a small drop of solder and quickly touch it to the pin and pad, like a welding tack. This will hopefully set the board to header. You can come back and solder that one pin fully into a nice Hershey Kiss. Rotate to check if the header is straight; solder and adjust as needed. Pull some solder wizardry on the rest of the pins and headers.
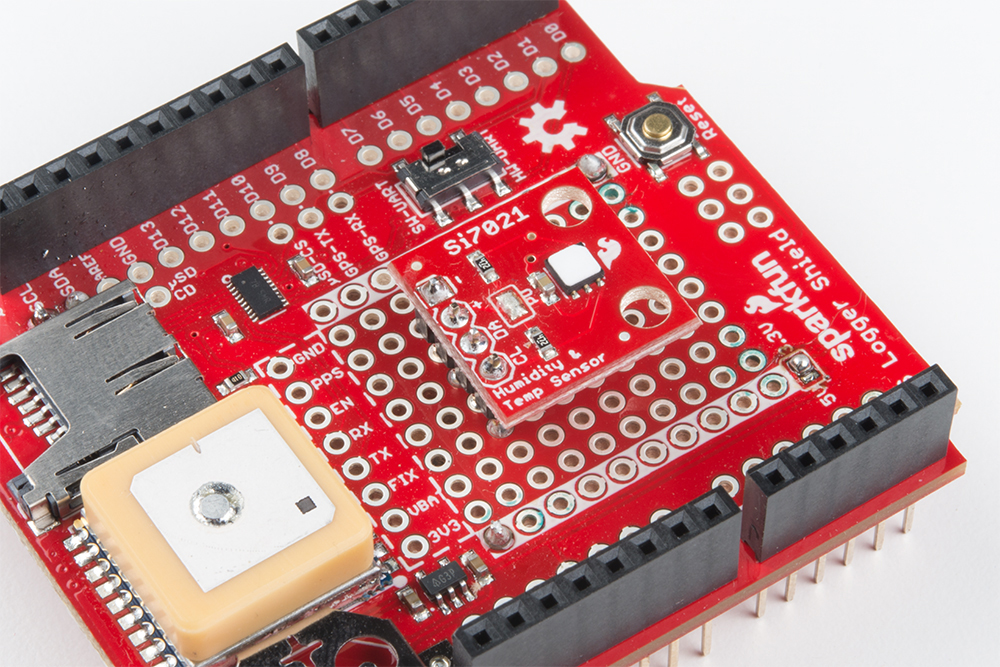
Now let's combine our two components. I aligned my humidity sensor in the center-most spot in the prototyping area. I have the headers toward the GPS module, but you can orient how you wish. Next is a little tricky: solder those long pins of the humidity sensors to their pads on the shield with a depth just barely poking out the other side. It’ll look like a diving board when finished.
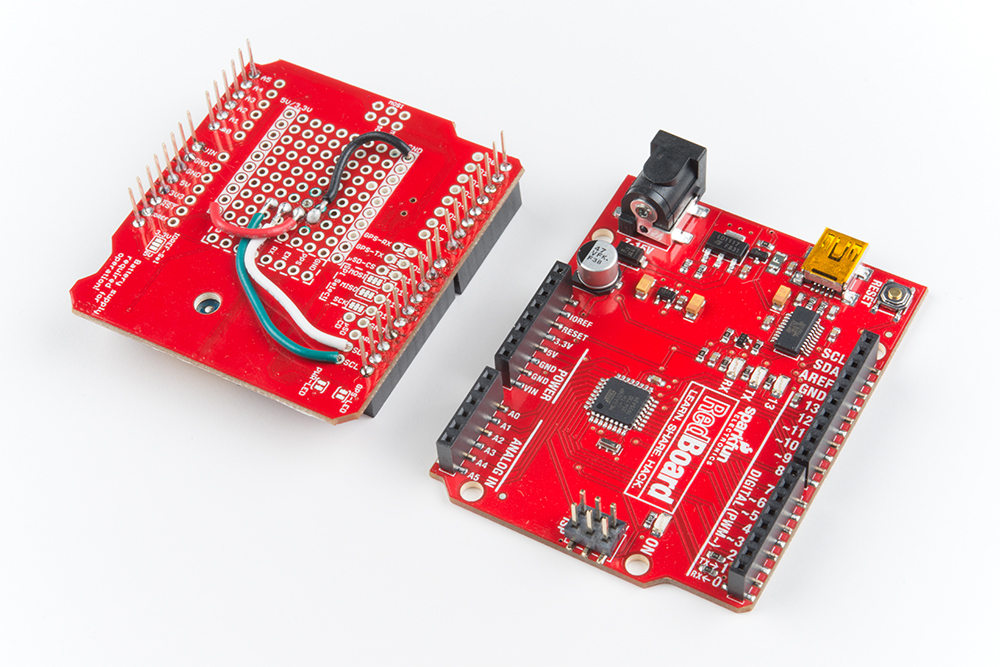
The prototyping area is made of isolated pads, and we can use some neat wire placement to connect to the pins we need. First, let's desolder that 5V jumper on the top, bottom left corner of the GPS shield. Re-solder the pads to make a jumper on the 3V3 jumper. The sensor operates on 3.3V, so let's not fry it. Second, take some of your favorite stranded wire (or solid, I’m not judging), and connect the power pins and I2C pins. When those are together our GPS/humidity shield creature is ready! Now, we code!
Code
I started by reading through the example sketches and hookup guide for the GPS Logger Shield and the Si7021 Humidity and Temperature Sensor.
These resources gave me insight and easy-to-follow code to start from. In the spirit of learning, I kept it simple. Let’s slap the files together! The two files I’ve used are CSV_Logger_TinyGPSPlus.ino and SparkFun_Si7021_Breakout_Example.ino. You can reference which portions I’ve used from each file by comparing my code to the example codes.
/******************************************************************************
Humidity and Temperature GPS Logger
Brandon Williams @ Sparkfun Electronics
Builds upon source code developed by:
Joel Bartlett "Sparkfun Si7021 Breakout" May 4, 2016
Jim Lindblom CSV_Logger_TinyGPSPlus.ino February 9, 2016
This project is a simple introduction to using GPS for logging
atmospheric data with geographic coordinates. We will use the
Si7021 Breakout Library and TinyGPS++ Library.
https://github.com/sparkfun/Si7021_Breakout/tree/master/Libraries
https://github.com/mikalhart/TinyGPSPlus/releases
The arduino parses the GPS data from the UART bus and the
humidity/temperature data from the I2C bus. The data is then
saved on the microSD card for later retrival.
**Caution** code is for quick prototyping, there may be a few bugs or
errors! Gotta catch em all. Good luck and have fun!
*******************************************************************************/
#include <SPI.h>
#include <SD.h>
#include <TinyGPS++.h>
#include <SparkFun_Si7021_Breakout_Library.h>
#include <Wire.h>
#define ARDUINO_USD_CS 10
#define LOG_FILE_PREFIX "gpslog"
#define MAX_LOG_FILES 100
#define LOG_FILE_SUFFIX "csv"
char logFileName[13];
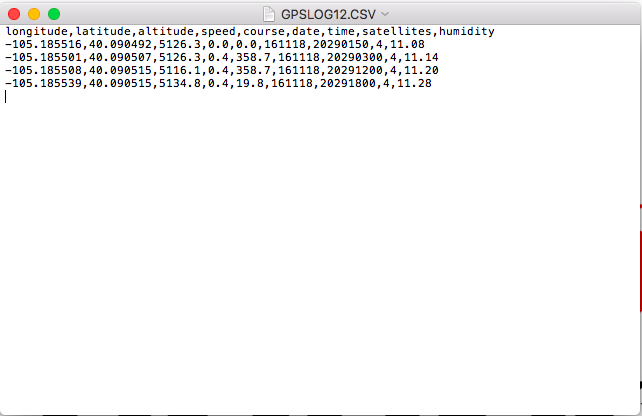
#define LOG_COLUMN_COUNT 9
char * log_col_names[LOG_COLUMN_COUNT] = {
"longitude", "latitude", "altitude", "speed",
"course", "date", "time", "satellites", "humidity"
};
#define LOG_RATE 5000
unsigned long lastLog = 0;
TinyGPSPlus tinyGPS;
#define GPS_BAUD 9600
#include <SoftwareSerial.h>
#define ARDUINO_GPS_RX 9
#define ARDUINO_GPS_TX 8
SoftwareSerial ssGPS(ARDUINO_GPS_TX, ARDUINO_GPS_RX);
#define gpsPort ssGPS
#define SerialMonitor Serial
float humidity = 0;
Weather sensor;
void setup()
{
//sensor.begin();
Wire.begin();
SerialMonitor.begin(9600);
gpsPort.begin(GPS_BAUD);
SerialMonitor.println("Setting up SD card.");
if (!SD.begin(ARDUINO_USD_CS))
{
SerialMonitor.println("Error initializing SD card.");
}
updateFileName();
printHeader();
}
void loop()
{
getWeather();
if ((lastLog + LOG_RATE) <= millis()){
if (tinyGPS.location.isUpdated()){
delay(500);
if (logGPSData())
{
SerialMonitor.println("GPS logged.");
lastLog = millis();
}
else{
SerialMonitor.println("Failed to log new GPS data.");
}
}
else{
SerialMonitor.print("No GPS data. Sats: ");
SerialMonitor.println(tinyGPS.satellites.value());
}
}
while (gpsPort.available())
tinyGPS.encode(gpsPort.read());
}
byte logGPSData()
{
File logFile = SD.open(logFileName, FILE_WRITE); // Open the log file
if (logFile)
{
logFile.print(tinyGPS.location.lng(), 6);
logFile.print(',');
logFile.print(tinyGPS.location.lat(), 6);
logFile.print(',');
logFile.print(tinyGPS.altitude.feet(), 1);
logFile.print(',');
logFile.print(tinyGPS.speed.mph(), 1);
logFile.print(',');
logFile.print(tinyGPS.course.deg(), 1);
logFile.print(',');
logFile.print(tinyGPS.date.value());
logFile.print(',');
logFile.print(tinyGPS.time.value());
logFile.print(',');
logFile.print(tinyGPS.satellites.value());
logFile.print(',');
logFile.print(humidity);
logFile.println();
logFile.close();
return 1;
}
return 0;
}
void printHeader()
{
File logFile = SD.open(logFileName, FILE_WRITE);
if (logFile){
int i = 0;
for (; i < LOG_COLUMN_COUNT; i++){
logFile.print(log_col_names[i]);
if (i < LOG_COLUMN_COUNT - 1)
logFile.print(',');
else
logFile.println();
}
logFile.close();
}
}
void updateFileName()
{
int i = 0;
for (; i < MAX_LOG_FILES; i++){
memset(logFileName, 0, strlen(logFileName));
sprintf(logFileName, "%s%d.%s", LOG_FILE_PREFIX, i, LOG_FILE_SUFFIX);
if (!SD.exists(logFileName)){
break;
}
else{
SerialMonitor.print(logFileName);
SerialMonitor.println(" exists");
}
}
SerialMonitor.print("File name: ");
SerialMonitor.println(logFileName);
}
void getWeather(){
humidity = sensor.getRH();
}
There are a couple key portions to my code. The first highlight is on line 19 and continues to line 23 – the #include statements. Make sure you include SPI, SD, TinyGPS++, Si7021 Breakout Library, Software Serial and the Wire library. The SPI is for the SD card in conjunction with the SD library, and the Wire library is primarily for I2C communication to the sensor.
The second highlight is on line 30 and is the number of columns that will be in the CSV file. I have it set to nine, which is one more than the TinyGPS++ example to house my humidity value. I also added a “humidity” string for the array on the next line. This next highlight was make-or-break in my code. On line 53, I have Wire.begin() instead of sensor.begin(). When I had sensor.begin(), I would get an unexpected integer return in logGPSData(). I didn’t investigate very far to find the exact cause, but since sensor.begin() is just an initialization call, I replaced it with Wire.begin() and that seems to work. Next is on line 68; we just need to call the getWeather() method. Last, simply add the humidity value into the data row to be saved to the CSV file. I just tacked it on the end.
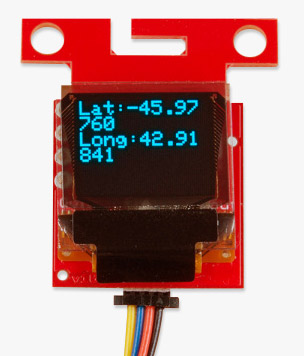
Here’s a quick look at the output I got from a few readings, all conveniently located at our batcave.
Conclusion
I ran into two things when I uploaded my code. The first thing is that the internal flash memory will get really full and the IDE will chime to you that it's really full. Everything should still work, but outliers could happen. Take that into consideration if you get weird data or other bugs during operation.
Second, you may notice that the Si7021 can do humidity and temperature. I originally wanted both, but I got a weird failure when I tried writing 10 data points to the SD card. Nine will work fine, but I suspect that if you want to go further one could look at the SD library for the answer.
Just like that, with a little bend here and a little twist there, we have a humidity tracker! I hope this gets your feet wet with GPS and opens possibilities to use it as a great tool. Look for more GPS projects and products to spark your next idea!
Ready to get hands-on with GPS?
We've got a page just for you! We'll walk you through the basics of how GPS works, the hardware needed, and project tutorials to get you started.


Thanks for posting this Brandon. I have a similar project going on where I am trying to measure many things including VOcs for my bike commute from Gunbarrel to South Boulder. I want to assess the air quality exposure riding a bike vs driving and create some maps at various times of day and seasons. My work is supported by CU. I would really love to find a compact Ozone sensor that can measure Ozone with accuracy of less than 5PPB accuracy.
That's an awesome project! I worked on something similar when I was still in college for a senior project. I'm not entirely sure if we have a direct ozone product, but I had used a Spec Ozone sensor. However, I didn't have much luck trying to integrate it into a larger circuit back then. I don't think it'll match your desired tolerance, but it'd be a good place to look if you haven't already.
I wish you the best of luck!
Your article is great, I am interested in GPS. I also want to post an article using NEO M8P with ESPrtk, how do I post a guide like yours to SparkFun?
We're working on our process for guest contributors but it's still a work in progress; we'll keep you in mind when we get everything nailed down. Keep an eye out for updates.
Recording the temperature is important, since you can easily use the Magnus formula to calculate dew point, which is a measure of "absolute humidity", useful with wide temperature variations. I'd be more inclined to throw out speed and/or course if you need to limit the columns.
On the issue of full flash memory, one thing you can do is to shorten the text messages in the SerialMonitor.println() calls, for instance, "Err1" is only 4 characters compared to "Error initializing SD card." which is 27 characters. It's not a lot, but it can make a difference. Better yet, put "#ifdef" "#endif" pairs around the SerialMonitor.println() statements, or just comment those lines out. I've had to use these tricks in years past with Arduinos, though I don't like to use them with processors with more "program memory", e.g., a Raspberry Pi. (It also isn't necessary with an IDE that supports "single step" mode, even if it "fakes" it by extensive target processor rewrites, as the "debug by writeln()" isn't necessary. The Arduino IDE's debug capabilities are SO 1970s...)
I also meant to say that it's a neat project! Getting time/date info from GPS can be a very valid way of getting a highly accurate timestamp for datalogging, albeit somewhat expensive if that's all you're using the GPS for and need a lot of recorders (and it assumes that the recorder has a "sky view" that allows receiving GPS).
BTW, GPS has a very interesting history. When the military was first developing it, they foresaw that there might be some very limited civilian uses for it, and they felt that it would be fair for those users to help pay for the lanching of twenty-some satellites. Rather than having some sort of "on-going" tax for the end-user, what they came up with was a $50 per receiver "license fee" that the manufacturer would pay. It turned out that the civilian uses weren't nearly as "limited" as they originally foresaw, and it put the Pentagon into the position where it would actually turn a profit on the GPS system -- and the Pentagon accounting systems simply can not deal with the concept of "profit", so the "problem" was "solved" by dropping the license fee.
Thank you! I did consider shifting some things around to get both temperature and humidity. Aside from more intensive debugging, one could just replace one of the GPS data points like speed, course, or satellites. The dew point is a very good consideration, and is a measurement worth using for environmental and weather data.
Also, fair point about shortening print statements or other memory saving tricks. I would have done so if I was planning on elaborating further on this project. It was a small project for myself to use the logger shield and a sensor for the fun of it. I just hope others may use it for actual science, because that would be awesome!
Thank you also for your additional history information. I knew some but not all of that. Maybe that's why we're drawn even more to GPS with it being, more or less, open source itself. I also find the two different comm. protocols of SiRFstarV and NEMA. I thinks there's a lot to learn for everyone no matter the skill level.
There's lots more about GPS history, and similar systems, but there are a lot of sources for this info. I'm always amazed by the sensitivity of modern GPS modules -- many dB below the noise level! And almost as amazing is how they're able to cram all that map data (including a lot of "features" like stores and such) into those things we put onto our car dashboards.
BTW, back in the early 80s, one start-up approached me about doing a LORAN-C based product. After some investigation, I decided I didn't want to be involved, though one of the major reasons was I really didn't relish moving from Phoenix to Detroit.
Nice..