Autonomous Riding Lawnmower Update
Jesse concludes the first phase of his autonomous lawnmower project!

Jesse Brockmann is a senior software engineer with over 20 years of experience. Jesse works for a large corporation designing real-time simulation software. He started programming on an Apple IIe at the age of six and has won several AVC events over the years. Jesse is also a SparkFun Ambassador. Make sure you read today's post to find out what he'll be up to next!
This is the third part of a multi-post series. If you would like to start from the beginning click here to see part one, or here to see part two.
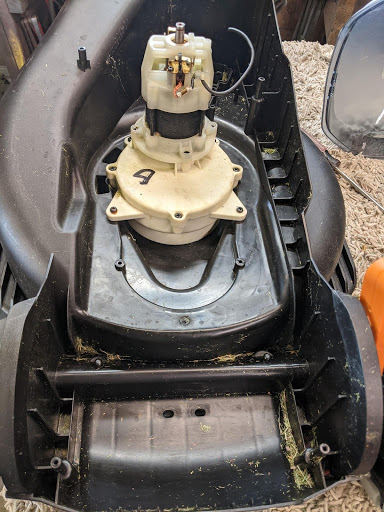
So I finally have been making good progress on this project, and I’m ready to show you the finished product. This is what the electronics look like:
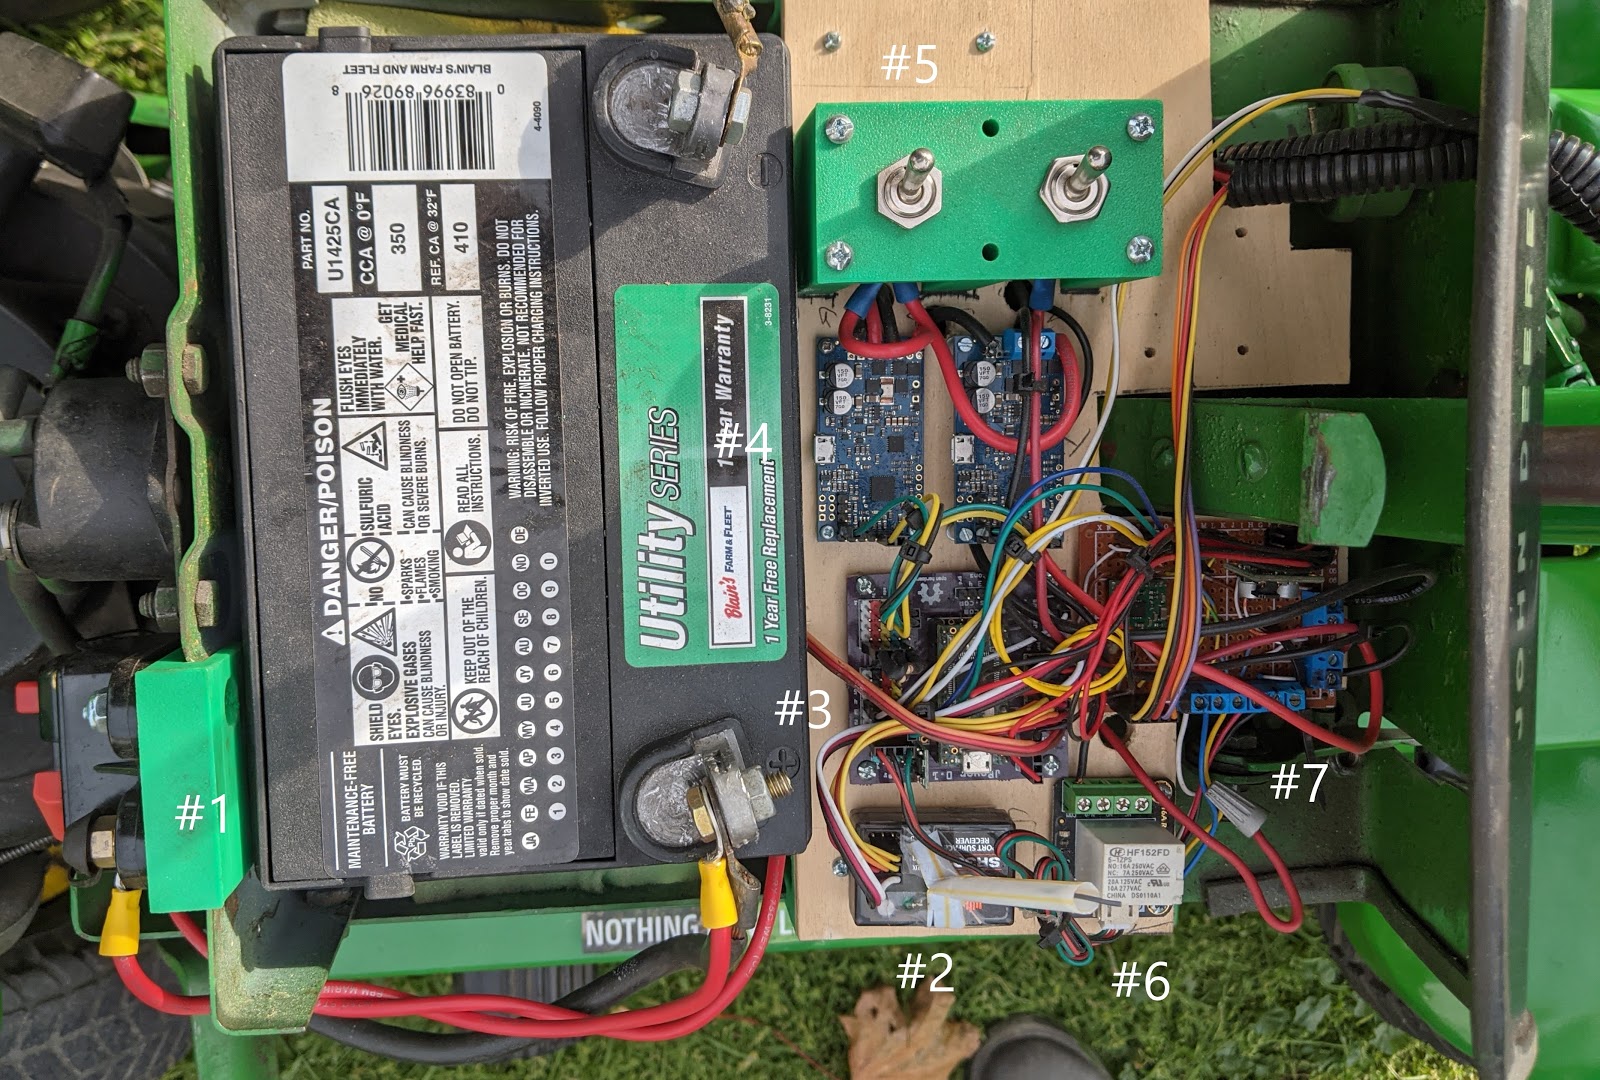
- 40 A circuit breaker that can be manually tripped to remove all power from control electronics
- Standard ground Spektrum RC receiver - the antenna is being propped up for better reception (yes, it is a straw)
- My standard V0.1 JRover baseboard
- Pololu Simple Motor Controller G2 18v15 x 2 - one for the steering motor and one for the linear actuator on the brakes
- Switch on the left is for the motor controllers in #4, and the right switch is for control electronics and shifter
- Kill Relay - if power is lost to electronics or microcontroller fails this relay will turn off and will kill the motor by grounding out the magneto for the ignition
- Custom perfboard with DC motor driver for shift controller, voltage regulator from 12 V to 5 V for use by electronics and RC servo and connections for linear actuator used for shifting
Some parts of the control system were previously discussed in my last Phase One update, and I am happy to say that after fixing some bugs, the system seems to work perfectly. Along the way I did find some fun issues: When switching from run mode to stop mode the throttle would stay in the previous position and not go to idle, and sometimes the brake would not engage. These are the exact type of issues that make it essential to test and try to find all the bugs before the weight of a 400-pound mower is involved. Any change to the code, even minor, should be thoroughly tested in a safe environment before driving the mower - failure is always an option.
After all the systems were tested on the mower without driving it, the time came to finally drive the mower around under remote control! Unfortunately a snag was encountered at this time and I had to wait a month for some gas engine issues to be resolved.
Here you can see the mower in its current configuration.
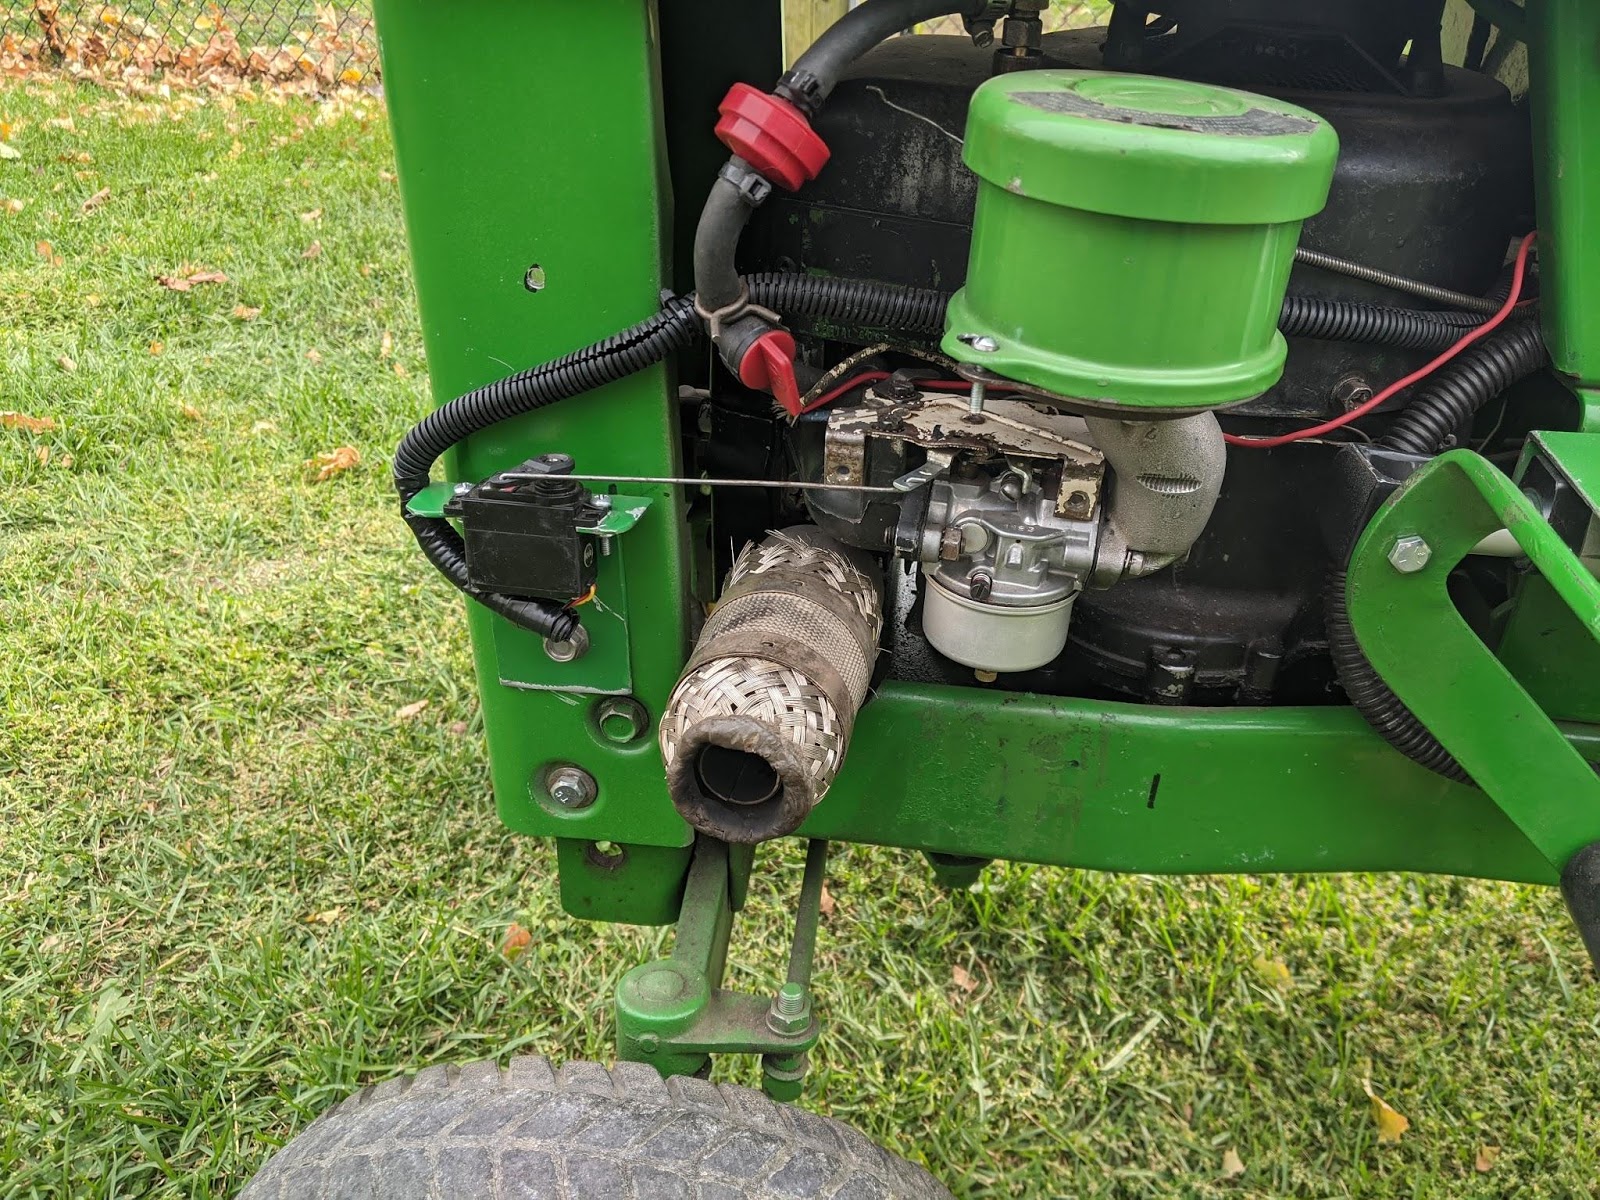
This shows the servo that controls the throttle of the mower by replacing the throttle linkage. The servo can also be used to shut off the mower by moving the throttle arm all the way to the left, which shorts out the magneto. A heat shield was added to the muffler to prevent radiant heat from damaging the servo. In the future, a guard might be added over the servo to protect it and make it look more OEM.
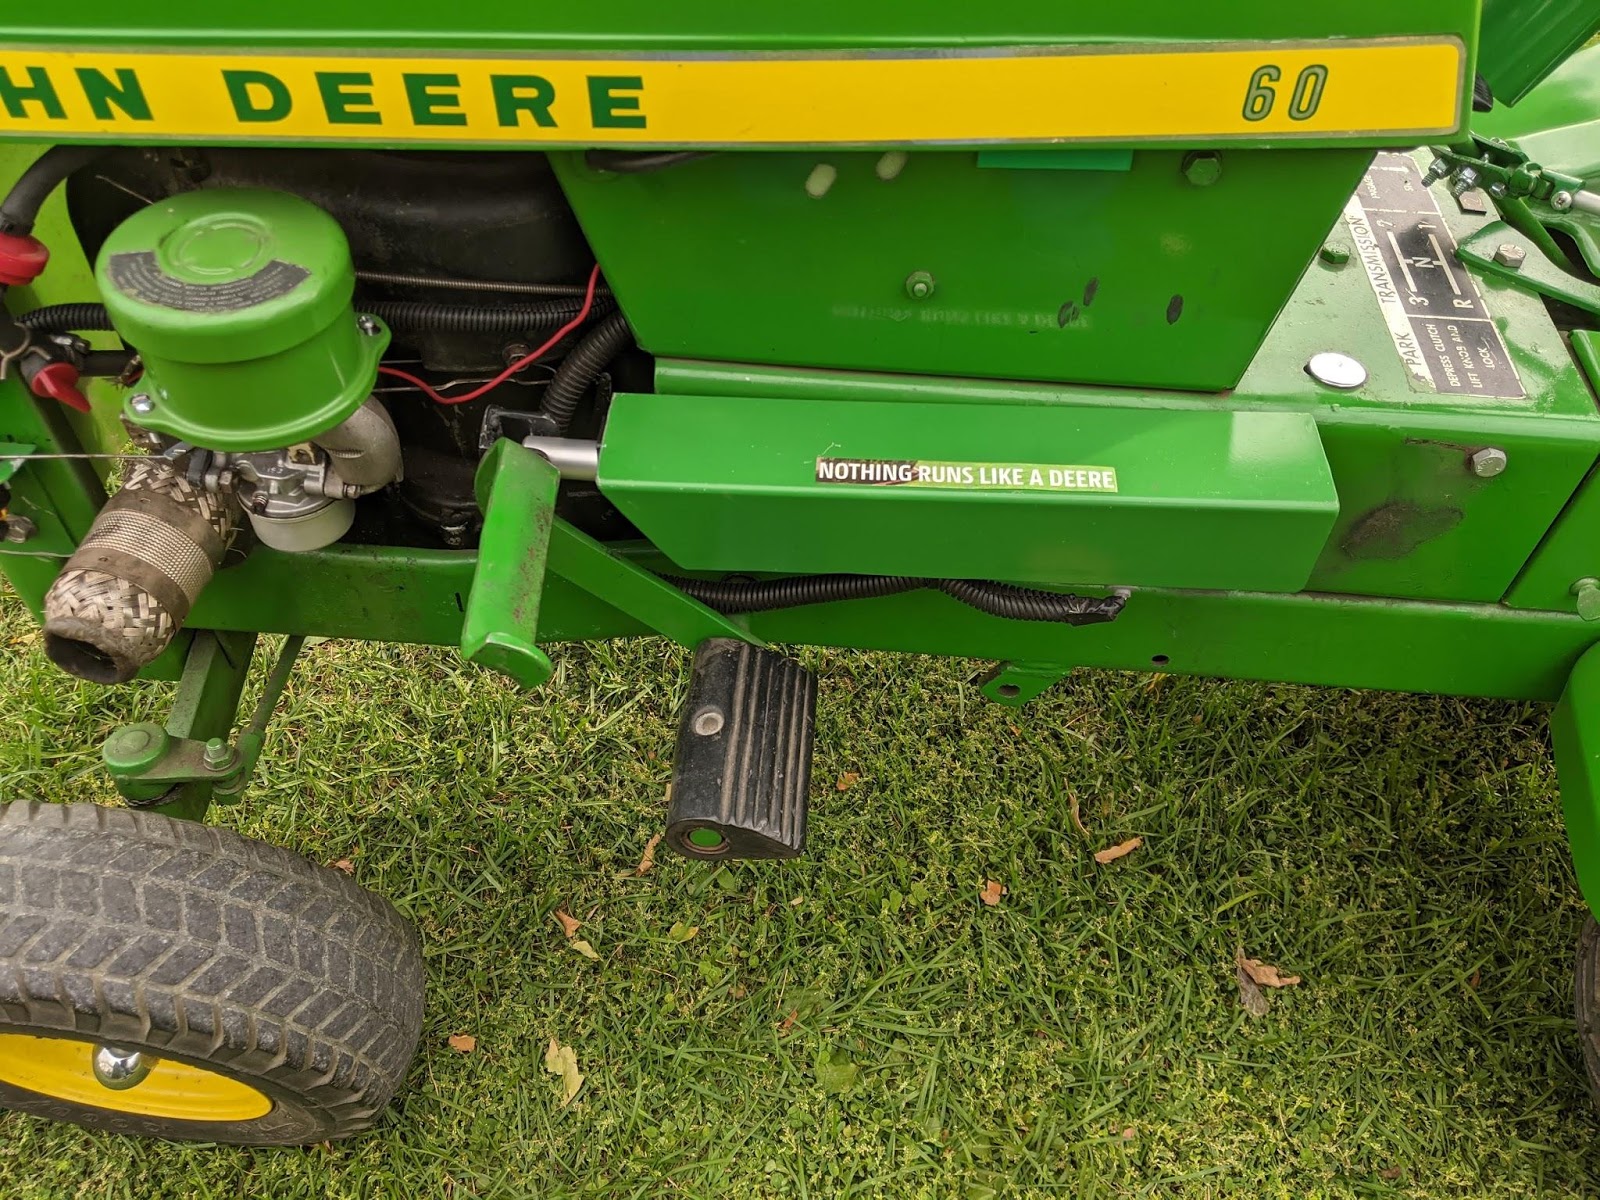
A guard was also added to the linear actuator for the brake. This helps it blend in better and look more professional (oops, I see the red kill wire needs to be tucked into a wire loom).
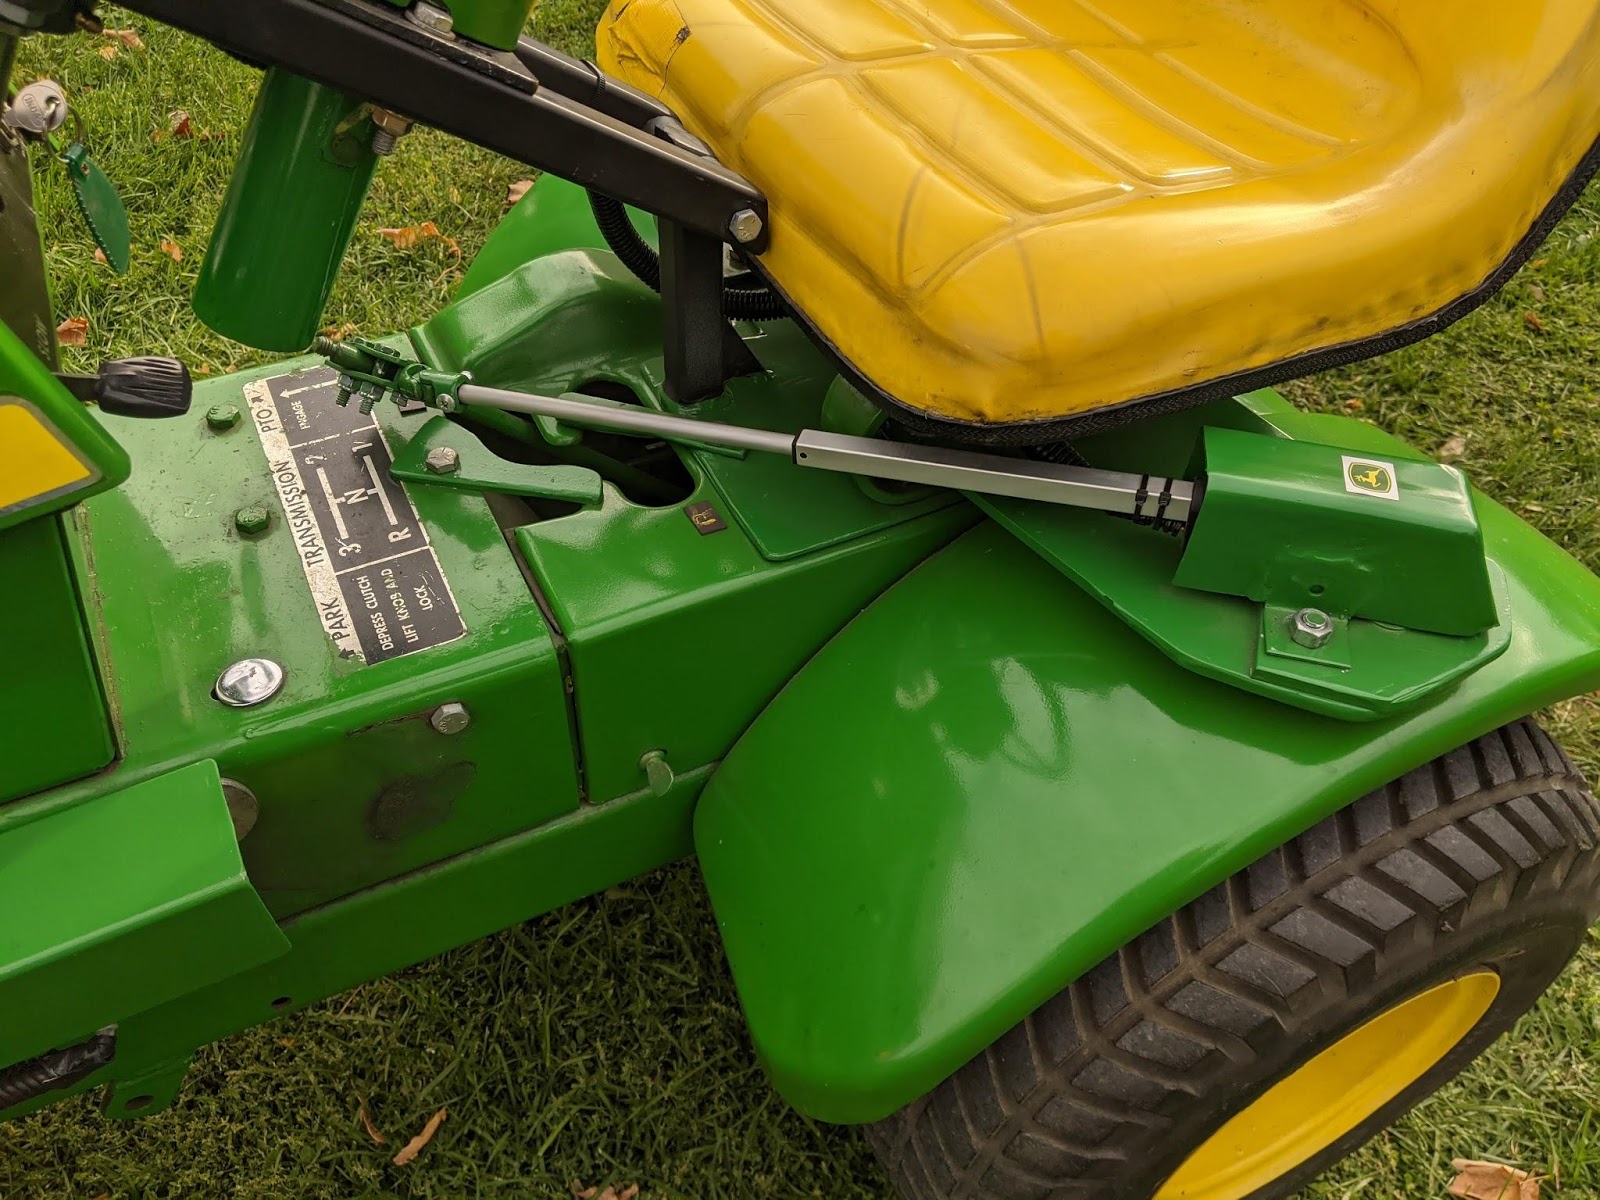
The shift actuator is shown with the mower in second gear. The selectable gears are second, neutral and reverse. Guides were added to help the shifter into the correct gears without jamming. A potentiometer built into the actuator is used for feedback, which allows the controller to know the current extended length. One feature still needs to be added here to allow detection of the actuator stalling. Occasionally the transmission will still get jammed when going into gear, and that could burn out the actuator quickly if not detected. I will do this using a current sensor, as the power used when an actuator stalls is higher than in normal use.
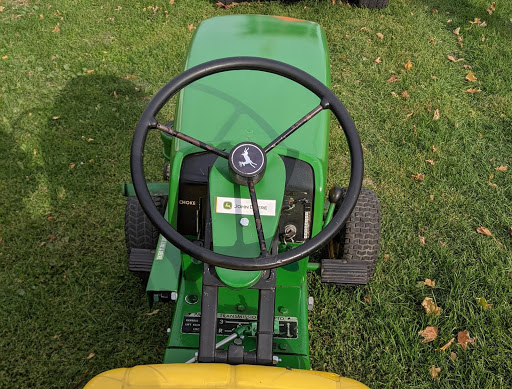
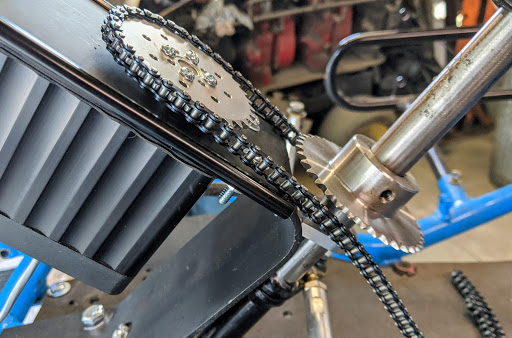
A guard was added for the steering to keep the chain clean, and look more professional. Just to the right of the key in this picture is a strip of RGB LEDs used to show the status of the control system and display any errors.
A kill switch with tether was also added to the back of the mower, but I’m sorry to say I don’t have a picture of it.
Now for the big moment in this project: a wrap-up video montage!
This means that Phase One of my autonomous mower project is (almost) done. As I said in the original post for this series, I was going to move on to an autonomous mower once I was done with this. But as with all things, changes can and do happen. Before building an autonomous riding mower, I’ve decided to test my code with an autonomous electric go-kart!

This is a 1800 W 48 V brushless BOMA brand motor mounted, and a #35 chain ran back to the drive sprocket.
A Torxis servo is being used to drive the front steering. This servo is very large at 5 inches long, weighs 2.2 lbs and is rated at 800 oz-in continuous torque.
I plan to keep working on the go-kart project until the weather makes me stop. I would like to have it running via remote control before winter hits, but I’m not sure I will make it. I’m going to use a VESC to drive the motor, and a 12 s 20 Ah Lipo battery to power everything. Next step is to mount a box to contain the batteries on the go-kart and then start working on the wiring to run via remote control. For this I don’t even need a micro controller - the steering servo and VESC can both work with normal RC pwm signals. Stay tuned, I will blog more about this in the future.
As if that project was not ambitious enough, I have another actual autonomous mower project I’m going to work on now as well. This is aimed at mowing yards, where the riding mower project is for larger spaces. For this I’m going to convert a push mower into an autonomous mower. I’ve decided to convert an electric mower so I don’t have to worry about gasoline; it can run whenever and charge on its own. Here you can see my preliminary work on this.
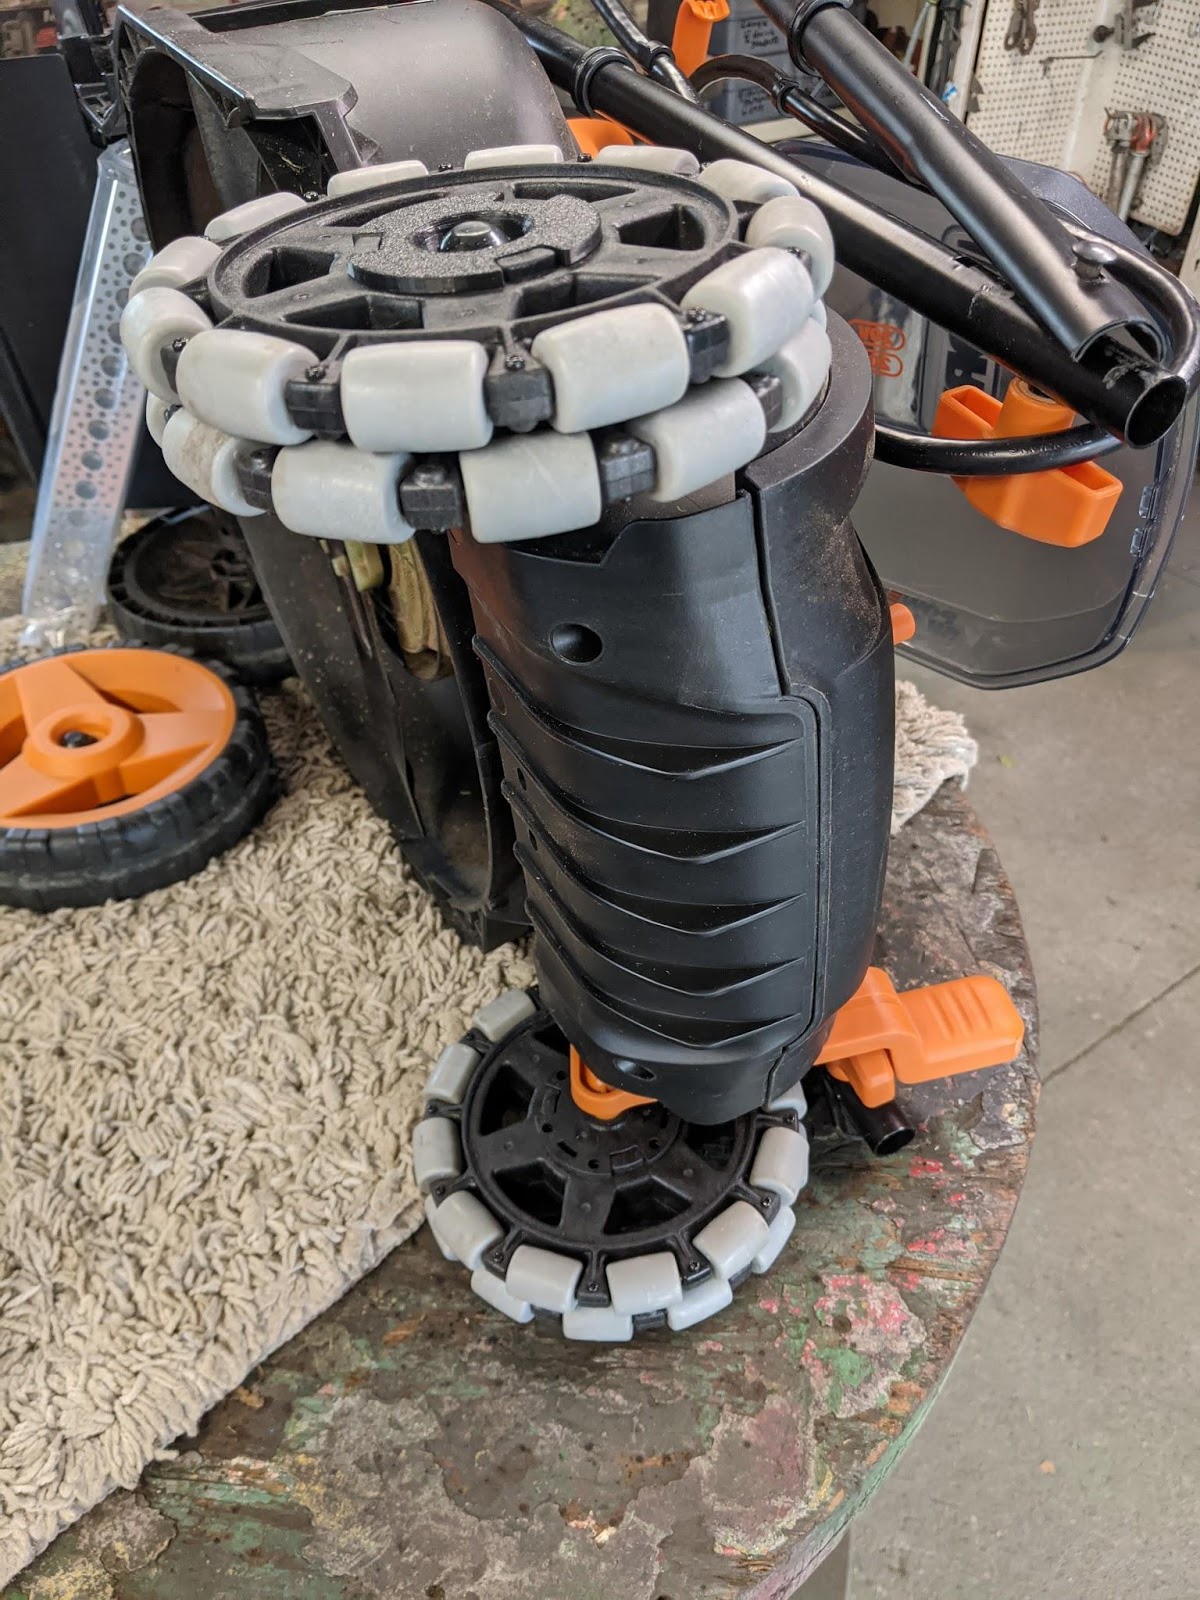
The front wheels were replaced with omni-wheels so they rotate easily.
I replaced the back wheels with two DC gear motors for differential steering.
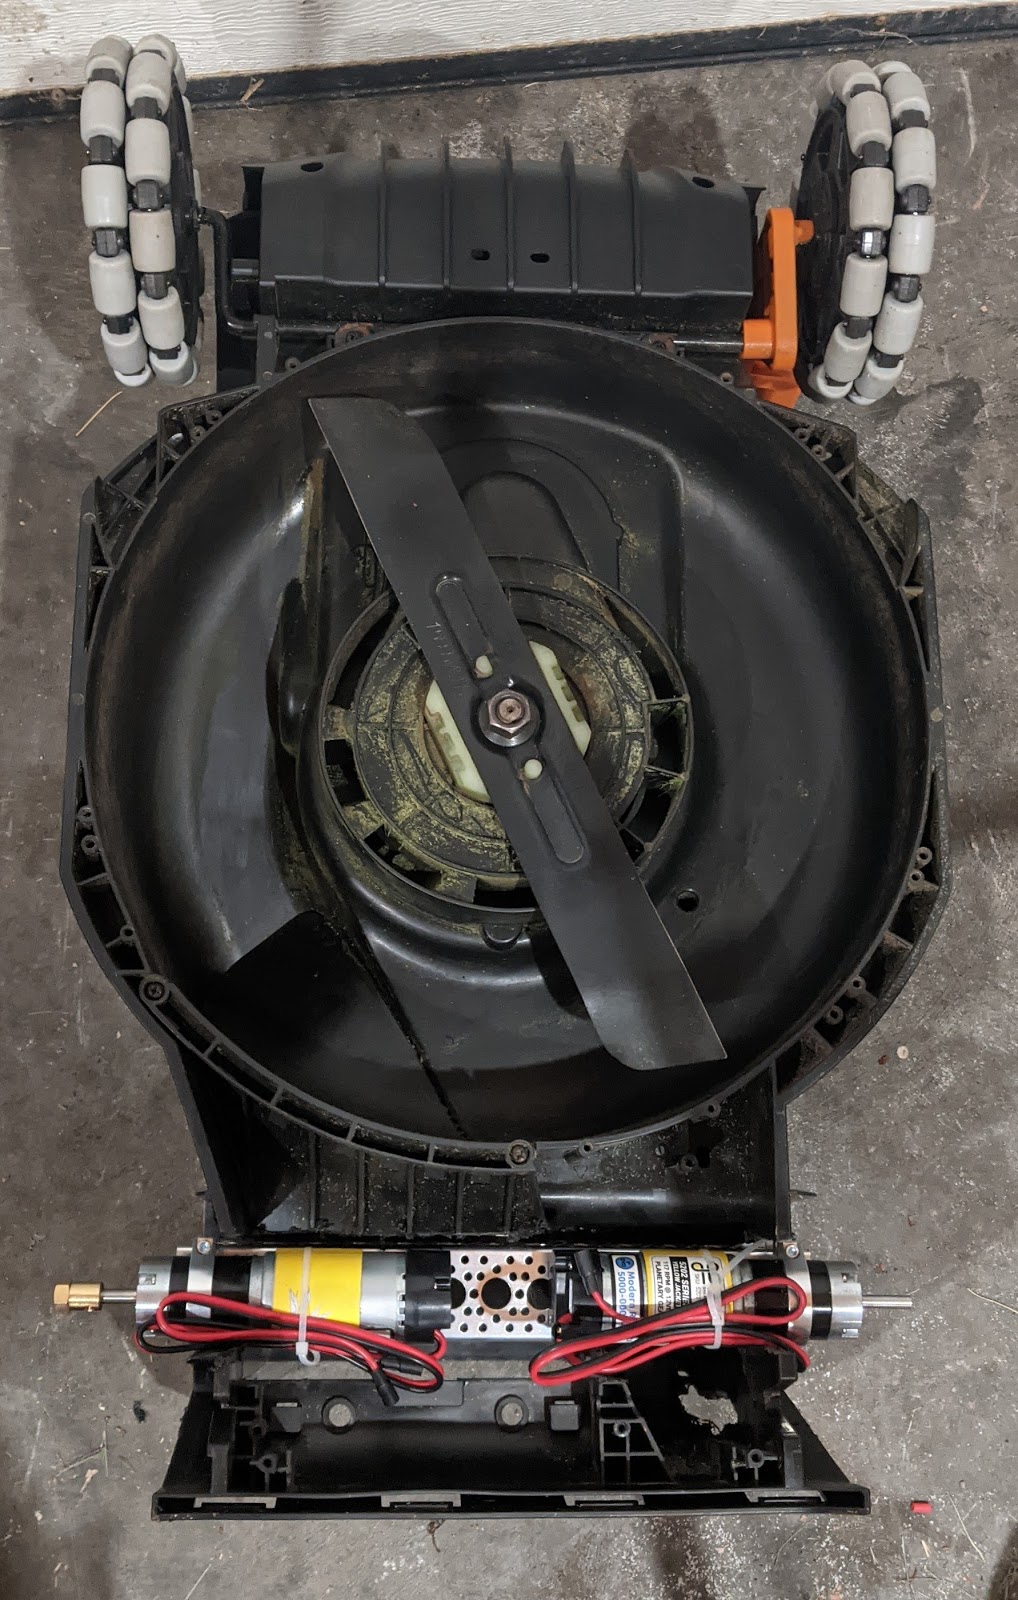
The existing wiring was removed, and the battery compartment was opened up for easier access. Look at all that space! There was a 3-pound sand bag in the front so the mower didn’t tip backward.
My next steps are to figure out the power system and get the rear wheels made or purchased, then work on the rest of the electronics required to make it remote control. Autonomous conversion will happen after testing with just RC control.
Stay tuned to how these and other projects evolve. Thanks again for following along in my adventures!
As a thank you for reading this far, I would like to let you know I have a special promo code you can use to get 10% off any SparkFun Original products. Just use ORIGINALRED2020 during checkout. This code is good through the end of 2020, but can only be used once per customer. Thanks for reading - I hope I can start attending STEM shows next year and show off my hard work on these projects and others I have been working on.
Project Submissions:
If you have a project that you want to show off and are interested in writing a post for SparkFun, tweet us @SparkFun, tag us on Instagram @SparkFun, or shoot us an email, but the best way is to submit your project by clicking the link below. We'd love to work with you and share your project!


"Any change to the code, even minor, should be thoroughly tested in a safe environment" -- I can sure agree with that! Back in 1983, I had the responsibility for testing a new compiler we were working on. The month of February has roughly 2.5 million seconds -- my account (on a VAX-11/780) was charged 1.5 million CPU seconds in February, 1983, nearly all of it with "nightly" testing of the compiler.
Thanks for sharing the update!
BTW, while watching the video, the (slightly belated for this year) thought occurred to me that putting a skeleton in the driver's seat could prove very entertaining on Halloween!
Thanks! :) It's funny how computers have come back around to time-sharing/cloud computing. I wonder how much 1.5m cpu seconds cost back then? :)
I certainly did think of the skeleton idea, and I'm going to try to make it happen next year. If it happens I'll see if Sparkfun will post the video of it or I'll add it to one of my blog posts next year. This year I just had too many things going on and there are still some (non rc) issues with the mower I'm trying to resolve.
I have no idea how much the time would have cost. The company owned 3 VAX 11/780s at that point, so the "time-charging" was merely a tool for management. The VAX was a "CISC" (Complex Instruction Set Code) processor, just the opposite of "RISC". With that said, it's 5MHz speed was more comperable to a 15 to 20MHz RISC machine, but even so, something like a Raspberry Pi 4B would run rings around it, and I suspect that had our compiler been running on a RPi, I'd have been able to run the entire test suite every time I went for a cup of coffee. ;-) I still miss the EDT editor (under VMS)... and the "versioning" of files was quite useful and "saved my bacon" on a lot more than one occasion...
This is my dad's dream! To be honest, I didn't even look for this product, I accidentally got on the recommendations, but I'm definitely thinking now! A cool product is definitely worth your attention! Time saving 100%