First off, a quick announcement - there was some confusion about the expiration of Free Day credits. To make sure everyone has a chance to use their credit if they haven't already, Free Day funds will expire March 15th, not March 13th (as previously reported). Now back to our regular programming...
Like clockwork, it's Thursday, so that means another round of new products. So sit back and take a break from watching Charlie Sheen constantly 'winning' and take a look at some cool new products.
Oh, the best of times indeed. I tried my best to refrain from puns this week and kept it all high-brow with Dickens.
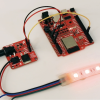
Buttons are pretty useful for input and LEDs are great for feedback. So what happens when you combine them? You get our new LED tactile buttons! They combine a standard tactile button with various colored LEDs. So not only can you use the button for input, but you can use it to get feedback as well. Or you can just use them to look cool. We have them in 5 colors, white, green, orange, red, and blue.
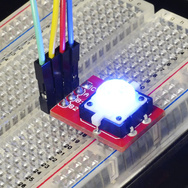
The LED pins that come off the LED tactile buttons make them very difficult to use in a breadboard. Thankfully, we have a breakout board for them! We kept it really simple with this board, only breaking out what you need to get the button working. Use our boards or use the layout to make your own.
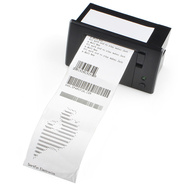
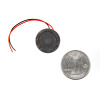
Looking to make your print functions really come to life? Well, with this thermal printer, you can do that, literally. Now your lowly microcontroller can print messages to the real world on some thermal paper (the same stuff used in receipts and such). You can even do barcodes and poor ACSII art! We also have some example code that will get your printing in no time.
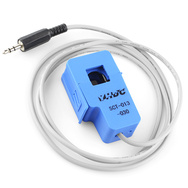
We already have a few current sensors, but what if you don't want to cut wires and hack the sensor into the circuit? Here is a non-invasive 30A current sensor. It simply clamps around a wire and outputs a voltage corresponding to the current running through your wire. These can be quite handy if you are trying to lower or monitor your power consumption, or just to know how much current you're drawing.
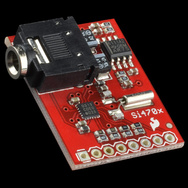
Building your own radio was the "hello world" or "blink" back in the days. Now radios are commonplace and making your own isn't as 'cool' as it once was. But, with the new Si4703 Breakout Board, you can utilize all the modern features of radio in one small board. Now you can process both RDS and RBDS, song data, and much more.
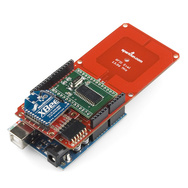
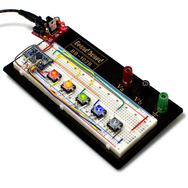
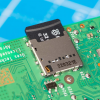
We now have an evaluation shield for the SM130 Mifare RFID module. The shield has a header for an XBee module, the SM130 module and even includes a PCB trace antenna. Now you can start reading and writing Mifare RFID tags with your Arduino.
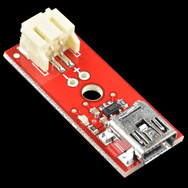
Not everyone is completely on-board with the new micro-USB connector. We decided to offer our LiPo Charger Basic with both micro-USB and now a mini-USB connector. Now you can choose which charger you want based on the cables you probably already have.
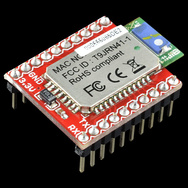
We have a minor revision to our Bluetooth DIP Module. There's really nothing too important to mention here. It uses the same RN-41 module, but has a few minor silkscreen changes. But, we have them back in stock and ready for your next Bluetooth project.
Well, there you have it, another Thursday New Product Post. I'm really curious to see some cool projects with some of the new products from this week. Thanks for reading and we'll be back next week.


One day Dave will be discovered, and SparkFun will lose him to Hollywood. If Keanu can get a job there, there's no doubt Dave can.
i see a beer, was he drunk?
"... are you kidding me..." Love it! :)
I hope he doesn't end up as Charly Sheen then...
dude. at least he can win here and win there... be bi-winning not bi-polar! lmao
The bigger question is does he want to give up playing around with the new products or does he want to be hounded by the paparazi.
Can't he have both?
Oh Dave. What will we do with you next week. (evil laugh)
Is it possible to give the code for the LED Tactile Button project?
No one has made a comment about what Dave was reading? Really?
For those of you who are lazy, it's Tale of Two Cities.
I used the RN-41 bluetooth module to do this with my Android Phone!
http://www.youtube.com/watch?v=Ec4xj1VBrlo
Sparkfun Rocks!
Just so you know, the YouTube HTML5 video playback is now broken and doesn't work with Safari. I'm guessing they want to push people to the WebM format.
Trying to view directly on YouTube doesn't work either since it now requires a Google account just to view videos.
I would like to see SparkFun switch to Vimeo. Their HTML5 playback works just fine and they don't ask viewers to have an account just to view videos.
I just watched the video both on our homepage on YouTube in a logged out state in Safari with flash disabled on a Mac. I was unable to play it in Safari on Windows with flash disabled, however in that case Vimeo videos don't load at all. I'm not sure what issue you're experiencing, but ping me on IRC if you'd like to discuss it.
That said, I too prefer Vimeo, but I think we're pretty pot-committed to YouTube at this point - but it's always worth taking another look! :)
The Vimeo videos play fine for me in HTML5 (Safari on Mac), however the YouTube HTML5 videos now play fine too.
I guess Google was messing around with the HTML5 playback code then finally figured out they broke something and fixed it.
The example code provided for getting started drving the LCD ASCII display (e.g., LCD-09395) didn't work. The code below fills the first and second lines with alphabetic and numeric characters, respectively. Just load the upload the code (I used an Arduino Duemilanove), and then connect the LCD display's ground wire to GND, its Vcc wire to +5V, and its signal wire to digital pin 1 (TX). Feel free to post this code; it might help other newbies like me get started with the LCD dislay.
// Sparkfun_Serial_Enabled_LCD_display_001
// Sample code to write something from Arduino into Sparkfun Serial_Enabled_LCD_display
// http://www.sparkfun.com/products/9393
//
//Jonaskj | March 20, 2010 at 9:44 AM1
//Sample to get you started. Simply connect rx pin to pin 1(rx), and apply power to the LCD.
//include define txPin 1
// include the SoftwareSerial library so you can use its functions:
include
define txPin 1
SoftwareSerial LCD = SoftwareSerial(0, txPin); // since the LCD does not send data back to the Arduino, we should only define the txPin
void setup() { pinMode(txPin, OUTPUT); LCD.begin(9600); delay (1000);
}
void loop() {
selectLineOne();
delay(100);
LCD.print("ABCDEFGHIJklmnop");
selectLineTwo();
delay(100);
LCD.print("123456789012345");
delay(100);
}
void selectLineOne() {
//puts the cursor at line 0 char 0.
LCD.print(0xFE, BYTE); //command flag
LCD.print(128, BYTE); //position
}
void selectLineTwo() {
//puts the cursor at line 0 char 0.
LCD.print(0xFE, BYTE); //command flag
LCD.print(192, BYTE); //position
}
void clearLCD(){
LCD.print(0xFE, BYTE); //command flag
LCD.print(0x01, BYTE); //clear command.
delay(50);
}
FYI, indenting by four spaces should give you a code block.
// like this
print "hello sparkfun";
Anyhow, are you sure you weren't looking to comment here?
I like last weeks solder paste, but I would also like to see some good quality solder balls added to the lineup too. Maybe a few different sizes in smaller quantities.
Cool wedding-ring! (I presume)
Agreed! I reminds me of an engineer's Iron Ring
http://en.wikipedia.org/wiki/Iron_Ring
Hey! I have one and wear it 24/7!
"non-invasive 30A current sensor"
You must have read my mind, I thought of a project involving a similar sensor just that last week.
Is it just me, or do those LED buttons just scream for a Star Trek TOS control panel? Maybe with real sampled sounds in the MP3 player board.
Too bad I already have three other projects going.
Sigh
Was this video shot on a DSLR?
Sure was. I use a Canon 5D for the footage of Rob and a Canon t2i for all the product close-ups.
Very nice. I've hardly touched my "real" camcorder since I got the T2i. The only thing I miss is the servo zoom. Hmmm.... hey, project idea!
5D MK II :-)
It was the best of times, it was the blurst of times.
Anyone older work there? You guys all look younger.....at least those we have seen.
Older than what? Younger than whom? Alas! you speak in such relative terms.
lol! older than 40?....just wondering.....
(Shakes cane) You kids get off my lawn!
Hey you woodchucks! Quit chuckin' my wood!
Calm down gramps.
Is that a Teensy I spy in the LED button demo :D? Any chance Sparkfun would start carrying them?
Believe it or not, that's just what an Arduino Pro Mini looks like with header pins soldered to it.
Lol nice one.
"sniff" Are you kidding me!..... It's so beautiful!
I must congratulate Mr.Dave at his acting (or maybe its not acting.. :) ) and willing to be the brunt of the jokes on Thursdays product post... And for having his keys hung from the ceiling :)
yep, Dave rocks.
speaking of keys, have they come down yet?