How to Write A Great Arduino Library
We've written hundreds of libraries and made lots of mistakes. Learn the basics of how to write a good library.

SparkFun has written a large number of libraries for Arduino over many years. This is a compiled list of lessons we've learned along the way that can make a good Arduino library great. Please consider them the next time you write a library.
Read and follow the Arduino API Style Guide for writing libraries
The Arduino API Style Guide is a great starting point to make users feel comfortable with your library as well as XYZ library. I really like it. Be sure you are being as kind to the user as possible with your library.
Read and follow the Arduino Style Guide for writing examples
Read the Arduino style guide to give you a starting point for your examples. These are the bare basics. We'll get more advanced below.
Write multiple examples
If the user has no other documentation they should be able to use almost all the features of a device by going through all the examples. A library should have an example of most, if not all, of the methods in the class.
Use escalating examples
Create your examples with the naming convention “Example1_BasicReadings”, “Example2_SetReadRate,” etc. This will make it obvious to the user where to begin (i.e. Example1) as shown below:
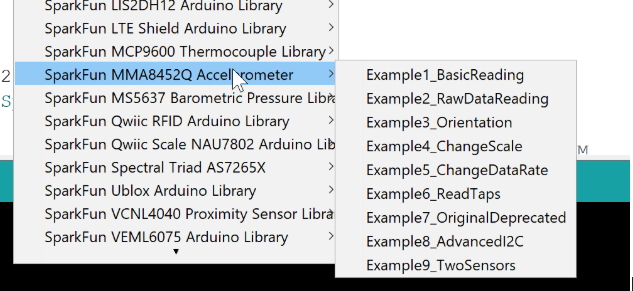
Note that the complexity of the examples should advance. Everyone will need basic readings. Fewer people will need the AdvancedI2C or TwoSensors examples. If you have multiple interface types for your library (say I2C and Serial) consider adding subfolders with examples demonstrating the different library methods using the different interfaces.
Write examples that are as clean and lightweight as possible
Example 1 should do what 90 percent of users want to do - no more, no less. The MMA8452Q accelerometer Example 1 is shown below.
#include <Wire.h>
#include "SparkFun_MMA8452Q.h" // Click here to get the library: http://librarymanager/All#SparkFun_MMA8452Q

MMA8452Q accel;

void setup()
{
    Serial.begin(115200);
    Serial.println("MMA8452Q Basic Reading Code!");

    Wire.begin();

    if (accel.begin() == false)
    {
        Serial.println("Not Connected. Please check connections and read the hookup guide.");
        while (1)
            ;
    }
}

void loop()
{
    if (accel.available()) // Wait for new data from accelerometer
    {
        // Acceleration of x, y, and z directions in g units
        Serial.print(accel.getCalculatedX(), 3);
        Serial.print("\t");
        Serial.print(accel.getCalculatedY(), 3);
        Serial.print("\t");
        Serial.print(accel.getCalculatedZ(), 3);
        Serial.println();
    }
}
Notice how it does nothing but output acceleration values - that's all that 90 percent of users will need.
The library should have a begin() function that returns true if the device responded as we expect, and initializes any settings to the most default/90 percent use case the user may want. Minimize the amount of configuration that is done in Example 1.
If the device doesn’t begin, freeze and print. Users will be copying and pasting examples together and it is good practice to verify the device is online during setup.
Again, Example 1 should be very simple and demonstrate what the user is most likely to want to do. Do not show the user how exciting and configurable your widget is. Users just want it to blink, then they want it to dance, so go slow.
Efficiency is not paramount; readability is
Write your library so it can be understood and maintained by the community. If you have a very important function that absolutely needs to be written in assembly then go for it. But do not write dense, tricky code when (gasp) more verbose code can do the same thing.
Begin Serial at 115200
9600 bps and 115200 bps are the most popular baud rates. SparkFun will have all its examples compile and run at 115200 bps so the user won’t have to guess or not see output when switching between examples and/or products. In the few instances where a lower baud is needed, make it clear in the comments in the header.
Write example code that you could explain to a beginner in a sentence or two
Consider the code shown below. Both 'if' statements are valid, but how do you explain them to a student/beginner? If you find yourself saying things like, “Oh, that’s a boolean operator that inverts the return value of that function,” you’re doing it wrong. Keep it simple, stupid.
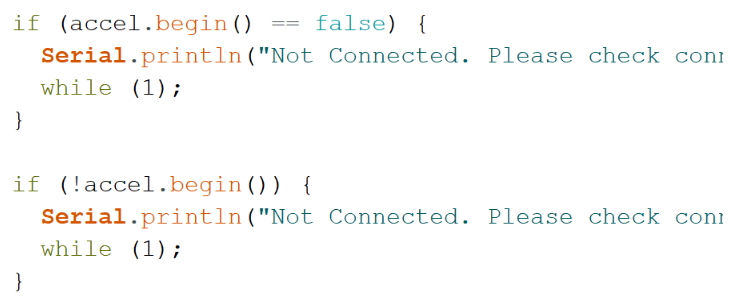
You are welcome to write complex C and CPP code within the confines of your library. If a later example (i.e. Example7) needs more advanced logic or code, that’s ok. But keep your early examples as simple as possible.
Genericize the library so that any Wire or Serial or SPI stream can be used
Read this blog post. When it makes sense, have your library accept a Wire or Serial or SPI port in the .begin() function.
Define .begin() with defaults for address and Wire port
If the device can accept multiple addresses, pass the optional address into the begin() function. Add defaults to the begin function declaration. For example in the header file:
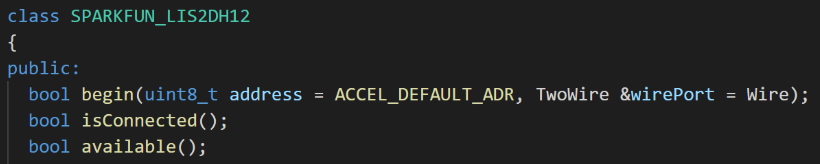
This allows the user to call accel.begin() without any arguments but initializes the library with the default address and Wire as the port.
Arrange the defaults of functions with most used option first
What is the problem with the following begin() definition?

By putting Wire first we force the user to pass Wire into the begin function when the user wants to use the library with a different address.

Ninety-nine percent of users will want to use Wire as the default port, but quite a few users will want to change the device address. Arrange the defaults so that address is first and Wire is second. This allows the user to call a more simplified begin to change the address:

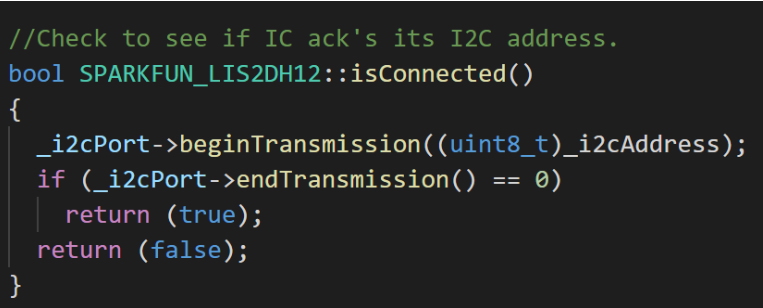
Have an isConnected() function
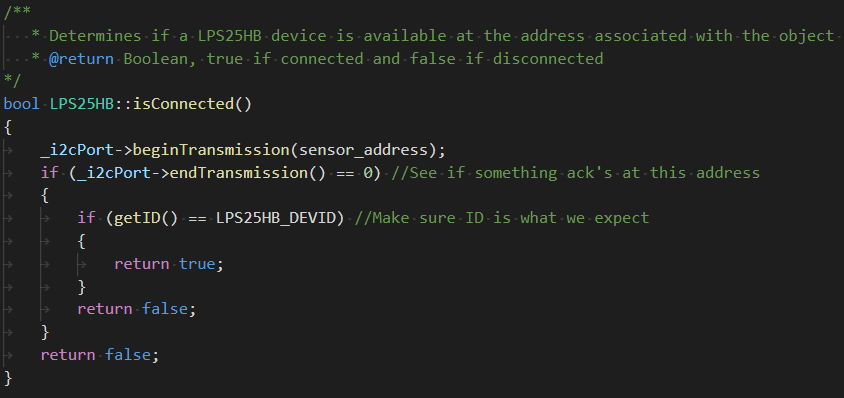
isConnected() should return true if a device acknowledges as we would expect it to. Ideally isConnected() would test an ID or WHO_AM_I register containing a non-changing function to increase the confidence that we are actually connected to what we think we are. Sometimes this is not possible so we merely do an I2C ACK test. IsConnected checks to see if the device responds correctly and returns true. This function is often used in the begin() function (where begin does this check and any additional config) but is also helpful for bus scanning and auto-ID'ing of devices on a bus.
Here is a full ID test:
bool LPS25HB::isConnected()
{
    _i2cPort->beginTransmission(sensor_address);
    if (_i2cPort->endTransmission() == 0) //See if something ack's at this address
    {
        if (getID() == LPS25HB_DEVID) //Make sure ID is what we expect
        {
            return true;
        }
        return false;
    }
    return false;
}
Below is a simple ACK test that is fine, but doesn't test with as high of confidence:
Don’t call Wire.begin() in the library
Require a Wire.begin() inside the example sketch, not the library. Calling Wire.begin() in a library will re-initialize the Wire hardware, causing a reset of the Wire clock speed to 100kHz. This overwrites any setclock() commands that the user did outside of the library. Additionally, calling multiple Wire.begins can cause instability of some platforms (namely ESPs).
Don’t Serial.print in your library
Don’t assume the UART has been initialized. If you do a Serial.println in your library the platform may crash or act very oddly if a Serial.begin() has not been called. Don’t think for the user, let them print the output of a function. Don’t hard code Serial; genericize your library. If you must, allow user to pass in a debug port of their choosing. See the Simultaneous RFID Library for an example.
Include a link to the library in the example
There are a ton of similarly-named libraries. Which of the 15 available KeyPad libraries does this sketch rely on? Add a link in a comment after the header include that displays the necessary library in the lib manager.
#include <LPS25HB.h> // Click here to get the library:http://librarymanager/All#SparkFun_LPS25HB
Comment your code
Do I really have to write that out loud? Use comments enough to describe non-obvious code, but be succinct. Before every function in the CPP, comment its use and output. Limit your line length to 80 characters.
Use a correctly formatted keywords.txt file
Have a keywords.txt file (see the end of this tutorial) in your library so all the functions are highlighted. If you have many functions use the SparkFun Keyword File Generator to make the keywords file. If you’re manually modifying a keywords file, make sure you don’t use spaces and instead use a tab to separate KEYWORD2 and the function name. If you don’t, you will get a visit from per1234, a nice person trying to make all the keywords files correct. Per1234 is epic.
Avoid common I2C mistakes
Koepel has written up a great list of common I2C mistakes in Arduino. Avoid them.
Avoid passing Strings
The String method (capital 'S') in Arduino uses a large amount of memory and tends to cause problems in larger scale projects. ‘S’trings should be strongly avoided in libraries. Use char * if you need to pass warning messages in/out of the library. See the ICM-20948 library for a good example of passing out a char array for printable error messages.
Use a symbolic link to enable example writing
Arduino write-protects the example sketches within libraries. To get around this, create a symlink (mklink in Windows) from your working library directory (that is repo/version controlled) to your Arduino\libraries directory. This will allow you to make modifications without having to copy/paste your changes into the Arduino\libraries directory.
Don’t steal code
Do I really have to write that out loud? Feel free to use code from other sources but use proper attribution and license maintenance.
Avoid duplicating work and don’t fork code
If a library has already been written, consider adding to or augmenting an already created library. That said, only work with collaborators that are responsive. Contact the author with your proposed changes before you write a giant branch and submit a PR. If they are open to changes, proceed. If they fail to respond or decide a necessary feature is not important to them (genericizing the Wire port is a common one) then decide whether to start from scratch or from a fork.
Create a proper release after all library changes
Updating a library requires correctly increasing the library version in the library.properties file, then committing, then doing a release that matches the file version. This is tedious and prone to error so we made a tool! Use the SparkFun GitHub release tool to update the version of a library. Read the Arduino Library Manager FAQ for specifics of how the Arduino Library Manager works.


Great reference and tips on creating a library! I don't use Arduino's but rather ESP devices; mostly now ESP8266 devices using the PlatformIO extension to VSCode. I'm creating my own version of a DS2482 1-wire master library using the ESP8266 Wemos D1 Mini: it SHOULD work for any I2C-capable Arduino as well. I know interest in the 1-wire devices has pretty much faded, I think, but I was trying to get a remote DS2423 counter (I know, it's obsolete) to work with the DS2482 1-wire master chips and got really frustrated with, well, libraries that didn't work so well. So, I'm doing my own. Any tips on lib creation using PlatformIO is welcome! Oh, and about comments... I love commenting code. And if I DON'T make good comments, I can't figure out what the heck I was doing! Again, thanks Nate, for the great article.
Well stated, Nate! Thanks!
I'll add my $0.02 worth: Don't be afraid to make that first example seem to be so simple that many might think it silly, as long as it shows something useful. (Despite over half a century of "computing" experience, I reecently went into the realm of GUIs to build a "pretty" display, and got rather frustrated as the examples assumed that you wanted to have boo-coo editable data, when I just wanted to display a few measurements readable from across the room.)
On the topic of comments: One of my professors back in the 70s said that he commented "for the total idiot" because the "idiot" was often himself going back six months later trying to figure out what he did. (He was an "adjunct" professor, who worked full time for Sandia National Laboratories, and taught one course per semester.) Descriptive variable names are also always a good thing...
Thanks!
Descriptive variable names - Totally agree. I wasn't sure where to draw the line on this post. There's a whole other post on best programming practices but I figured other folks have that covered better than me :)