
The waking is the hardest part
Let’s face it, waking up is the worst. If you are anything like me, your room is still pitch black when it’s time to get up and the struggle is real. Every type of alarm sound I’ve tried has just become a trigger to hit the snooze button. I’ve seen several of these sunrise alarm clocks that claim to be better for your sleep-wake cycle and wanted to try them out, but never pulled the trigger. Then it dawned on me a month ago that I work at SparkFun, and we make stuff ourselves.
Measure twice; cut once; throw some LEDs in it
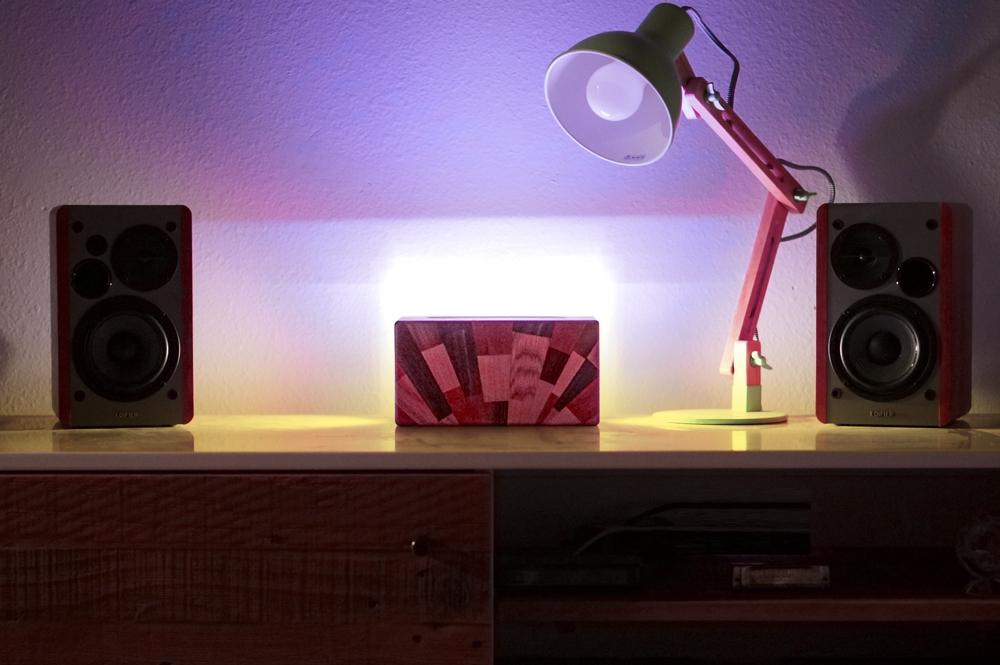
When it comes to making electronics projects I’m still a bit of a noob, but whenever I set out to make a project I always have another goal in mind than simply making the project work...it’s gotta look good. I don’t want something sitting in my room that is just a pile of PCBs, LEDs and wires. With that said, I decided to put my ever-evolving woodworking hobby to the test and make an enclosure for the sunrise alarm that fits in with our bedroom. Plus, I figured it would be an excuse to buy more tools!
“He who dies with the most tools wins."Old random woodworker guy
I knew that I wanted to incorporate some abstract sun rays into the design by using several different woods that would contrast well with one another. I ended up with oak, maple, mahogany and walnut, and I’m pretty happy how it all turned out. The video does a good job of recapping the build.

Daytime
Time to wake up
Parts
Even a novice like myself can recognize that there are going to be different choices of parts to complete this project. One thing I can say is that I really liked working with the Lumenati line of LEDs. The rigidity and shape options for these boards were just what I needed. Beyond a soldering iron, solder and some wires, the complete list of electronics can be found in the following wishlist:
Code
In the past I’ve worked a lot with software that employs a timeline (Flash, Edge Animate, Premier, etc.), so I tend to think in a timeline fashion whenever I try and code. If you dive in you’ll see that my functions are called based on a time change. Again, there are going to be many different ways to code this out but frankly all that matters to me is that it ended up working the way I intended.
//Sunrise Alarm
//https://www.sparkfun.com/news/2646

//Real Time Clock Module libraries
#include <Wire.h>
#include <SparkFunDS1307RTC.h>

//fastLED libraries to control the LED boards
#include <FastLED.h>

//Number of LEDs
#define NUM_LEDS 46

//Define the clock and data lines
 #define DATA_PIN 11
#define CLOCK_PIN 13

  // Comment out the line below if you want month printed before date. Mainly used for help with debugging
  // E.g. October 31, 2016: 10/31/16 vs. 31/10/16
  #define PRINT_USA_DATE

  //This is where you decide when you want the "sunrise" to begin (5:18 pm). Currently it's set to end at 5:30 am. So you better wake up!
  //The delay(18000); in the "sunriseAnimation();" functions will equate for each function to be 3 minutes long with a total of 10 steps for each function
  //18000 = 18 seconds x 10 = 180 seconds = 3 minutes
  int startHour = 5;
  int startMin = 18;
  int startMin2 = 25;
  int startMin3 = 28;
  int startMin4 = 31;


  //Create the LED array
  CRGB leds[NUM_LEDS];

  //Initialize the starting RGB values for the two 9-led boards
  int r1 = 29;
  int g1 = 52;
  int b1 = 125;

  //Initialize the starting RGB values for the 28-led loop
  int r2 = 55;
  int g2 = 63;
  int b2 = 135;

  void setup() {

  //Tell FastLED what we're using. Note "BGR" where you might normally find "RGB".
  //This is just to rearrange the order to make all the colors work right.
  FastLED.addLeds(leds, NUM_LEDS);

  //Set global starting LED brightness, kept low for first "sunriseAnimation();" cycle.  Brightness will increase in each function
  FastLED.setBrightness(3);

  // Use the serial monitor to view time/date output
  Serial.begin(9600);

  // Call rtc.begin() to initialize the real-time clock module library
  rtc.begin();
  }

  void loop() {

    static int8_t lastSecond = -1;
    //get new data from the RTC
    rtc.update();


//START OF CALLING ANIMATIONS FROM RTC

//  the following if statements will be how you call the functions that will change the colors
      if (rtc.hour() == startHour && rtc.minute() == startMin) {
        sunriseAnimation(); //this is how to call the animation function. In order for something to happen during the run of the program, it must be called in loop.
      }
      else if (rtc.hour() == startHour && rtc.minute() == startMin2) {
        sunriseAnimation2();
      }
      else if (rtc.hour() == startHour && rtc.minute() == startMin3) {
        sunriseAnimation3();
      }
      else if (rtc.hour() == startHour && rtc.minute() == startMin4) {
        sunriseAnimation4();
      }
      else { //this is how you "shut off" the LEDs for anytime outside of the sunrise alarm times previously designated
            for (int i = 0; i < 46; i++) {
      leds[i].red = 0;
      leds[i].blue = 0;
      leds[i].green = 0;
      FastLED.show();
            }
      }

    //following lines are from example code to print time to Serial Moniter
    //THis can help with debugging so adding it in here.
    if (rtc.second() != lastSecond) // If the second has changed
    {
      printTime(); // Print the new time

      lastSecond = rtc.second(); // Update lastSecond value
    }


  }


//This is the first animation cycle. It will last 3 minutes total and incrementally change the colors for 10 steps
void sunriseAnimation() {

    for( int i = 0; i < 10; i++ ) {
        //equations for the 2 9-led boards
        r1 = r1 + 22;  // bringing up the red value by 22 for 10 steps to end up at desired color for next animation cycle
        g1 = g1 + 3;    // bringing up the green value by 3 for 10 steps to end up at desired color for next animation cycle
        b1 = b1 - 10;  // bringing down the blue value by 10 for 10 steps to end up at desired color for next animation cycle

        //equations for the 28-led loop
        r2 = r2 + 13;  // bringing up the red value by 13 for 10 steps to end up at desired color for next animation cycle
        g2 = g2 + 2;    // bringing up the green value by 2 for 10 steps to end up at desired color for next animation cycle
        b2 = b2 - 1;  // bringing down the blue value by 1 for 10 steps to end up at desired color for next animation cycle

        // Sets the color for the two side panels of 9 leds
        for(int x = 0; x < 18; x++){
            leds[x] = CRGB(r1,g1,b1);
        }FastLED.show();

        // Sets the color for the top loop of 28 leds
        for(int x = 18; x >= 18 && x <= 46; x++){
            leds[x] = CRGB(r2,g2,b2);
        }FastLED.show();

        //18 second delay between color change. Remember you're waking up slowly here!
        delay(18000);

        //Can be used for debugging. Will show the colors values changing with each step to ensure they are meeting desired effect
//        Serial.println(rtc.minute());
//        Serial.print("red: ");
//        Serial.println(r1);
//         Serial.print("green: ");
//        Serial.println(g1);
//         Serial.print("blue: ");
//        Serial.println(b1);

    } //second for loop
}

//second cycle. A little more brightness and moving colors more toward daylight. Works just like the previous animation
void sunriseAnimation2() {
    //increment brightness for second cycle
   FastLED.setBrightness(13);

    r1 = 249;
    g1 = 82;
    b1 = 25;

    r2 = 185;
    g2 = 83;
    b2 = 125;

    for( int i = 0; i < 10; i++ ) {
        r1 = r1 + 0;
        g1 = g1 + 9;
        b1 = b1 + 0;

        r2 = r2 + 5;
        g2 = g2 - 4;
        b2 = b2 - 8;

        for(int x = 0; x < 18; x++){
            leds[x] = CRGB(r1,g1,b1);

        }FastLED.show();

        for(int x = 18; x >= 18 && x <= 46; x++){
            leds[x] = CRGB(r2,g2,b2);
        }
        FastLED.show();
        delay(18000);

    } //second for loop
}

void sunriseAnimation3() {

   FastLED.setBrightness(23);

    r1 = 249;
    g1 = 172;
    b1 = 25;

    r2 = 235;
    g2 = 43;
    b2 = 45;

    for( int i = 0; i < 10; i++ ) {
        r1 = r1 + 0;  // Full Redness
        g1 = g1 + 6;    // Step up to yellow by adding green
        b1 = b1 + 15;  // Blue starts at full and goes down to zero

        r2 = r2 - 18;  // Full Redness
        g2 = g2 + 11;    // Step up to yellow by adding green
        b2 = b2 + 20;  // Blue starts at full and goes down to zero

        // Now loop though each of the LEDs and set each one to the current color
        for(int x = 0; x < 18; x++){
            leds[x] = CRGB(r1,g1,b1);

        }FastLED.show();

        for(int x = 18; x >= 18 && x <= 46; x++){
            leds[x] = CRGB(r2,g2,b2);
        }
        FastLED.show();
        delay(18000);

    } //second for loop

}

void sunriseAnimation4() {

   FastLED.setBrightness(33);

    r1 = 249;
    g1 = 232;
    b1 = 175;

    r2 = 55;
    g2 = 153;
    b2 = 245;

    for( int i = 0; i < 10; i++ ) {
        r1 = r1 + 0;  // Full Redness
        g1 = g1 + 2;    // Step up to yellow by adding green
        b1 = b1 + 8;  // Blue starts at full and goes down to zero

        r2 = r2 + 14;  // Full Redness
        g2 = g2 + 7;    // Step up to yellow by adding green
        b2 = b2 + 1;  // Blue starts at full and goes down to zero

        // Now loop though each of the LEDs and set each one to the current color
        for(int x = 0; x < 18; x++){
            leds[x] = CRGB(r1,g1,b1);

        }FastLED.show();

        for(int x = 18; x >= 18 && x <= 46; x++){
            leds[x] = CRGB(r2,g2,b2);
        }
        FastLED.show();
        delay(18000);

    } //second for loop
}


//function from the RTC example code to print time in your serial moniter
//Can help with debugging
void printTime()
{

//  Serial.print(String(rtc.hour()) + ":"); // Print hour
//  if (rtc.minute() < 10)
//    Serial.print('0'); // Print leading '0' for minute
//  Serial.print(String(rtc.minute()) + ":"); // Print minute
//  if (rtc.second() < 10)
//    Serial.print('0'); // Print leading '0' for second
//  Serial.print(String(rtc.second())); // Print second
//
//  if (rtc.is12Hour()) // If we're in 12-hour mode
//  {
//    // Use rtc.pm() to read the AM/PM state of the hour
//    if (rtc.pm()) Serial.print(" PM"); // Returns true if PM
//    else Serial.print(" AM");
//  }
//
//  Serial.print(" | ");
//
//  // Few options for printing the day, pick one:
//  Serial.print(rtc.dayStr()); // Print day string
//  //Serial.print(rtc.dayC()); // Print day character
//  //Serial.print(rtc.day()); // Print day integer (1-7, Sun-Sat)
//  Serial.print(" - ");
//#ifdef PRINT_USA_DATE
//  Serial.print(String(rtc.month()) + "/" +   // Print month
//               String(rtc.date()) + "/");  // Print date
//#else
//  Serial.print(String(rtc.date()) + "/" +    // (or) print date
//               String(rtc.month()) + "/"); // Print month
//#endif
//  Serial.println(String(rtc.year()));        // Print year
}
Thanks for reading, and if you like the craftsmanship element of this post I recommend you check out a previous project where we backlit a reclaimed wood mountain scene to mimic the current weather conditions. As always, leave a comment and let me know what you think!
Interested in learning more about LEDs?
See our LED page for everything you need to know to start using these components in your project.


Cool project. I love the wood work - especially the lamp! Where can I find more info on that lamp?
I found it. Amazon Link
Very nice. I like the concept and the woodwork is wonderful. A few comments: It's not clear whether the whole thing is powered by the batteries or they are just a backup for the RTC. If the whole thing, how long do the batteries last? In the code listing, the #include statements do not seem to have filenames. It might be possible to use one of Sparkfun's ESP32 boards to get the time from the Internet for instance https://www.nist.gov/pml/time-and-frequency-division/services/internet-time-service-its
I appreciate the kind words! As for powering up the project I'll be using just a wall adapter for when it's actually being used at home. The battery pack you see in the video was used so we could easily move it around for filming. I really don't know how long they would last. The RTC uses a small coin cell on the back that says it last a minimum of 9 years and only needs set once. I do however like reaching out via the ESP32 to get the time. Just getting started with electronics you certainly find out quickly that the amount of features you could add never seems to end!
As for the #include statements it was an issue with me mixing some html with markdown. It should be fixed now.
This project is really cool and I actually need to do the exact same thing for my Product Design GCSE at school, however I need to incorporate the sound system you mentioned in the video. Do you know when/if you will do that?
I appreciate the complement! Unfortunately, I'm not sure if/when I'm going to get to that part of the project. Hopefully I can point you in the right direction for instructions though. I was going to use the MP3 Player Shield with Stackable headers and a Hamburger Mini Speaker to output the sound. You can find a hookup guide for the MP3 Player Shield here. I hope that helps get you moving. If you feel like you are getting close you can hit up our support team and they might be able to help you out with troubleshooting some issues.
I should preface this by saying that I REALLY like your project! Great combination of woodworking and electronics!
One of my "pet peeves", though, is that few of the "Single Board Computers" include a (battery backed up) Real Time Clock Calendar. (I've worked professionally with several microprocessors that include an RTCC "on-chip", and IM[not so]HO, chips without it should die from lack of sales. It does take 3 pins [2 for the RTCC's crystal and one for the battery], but the amount of "silicon realestate" is, pardon the pun, microscopic.)
Anyway, you might think of using the Teensy 3.5 which has an RTCC built in (you do have to add a battery and holder), or with headers installed. It's also programmable with the Arduino IDE. (Admittedly, I haven't tried using a Teensy 3.5 to control NeoPixels, but I'd be fairly confident that it will work.)
BTW, using the Teensy instead of a Red Board and separate RTCC will save a few bucks (you'll still need to add a battery holder and battery).
Good advice as always and I appreciate the kind words!
I've never worked with a Teensy as I'm still very new to all of this. To be completely honest, this was pretty much the first time I've done a project that wasn't part of our SIK guide. Still learning but having a lot of fun as well.
Hey, Blake, when I started in electronics 50 years ago, "computers" were big room-full-of-machine things that we didn't even dream we could ever access. So, it seems to me that you've done a good job for a "first on-your-own project". Keep on doing it! You'll learn a LOT over the next 50 years, and leave me in the proverbial dust! ;-)
I do encourage you to look over some of the last few issues of Nuts and Volts, and think about writing up something for them! (Having articles you've published looks great on a resume, BTW.)
One other thought, Blake, is that Nuts and Volts magazine really seems to like "clock projects" -- maybe you should think about writing it up for them, too.