Enginursday: Using Both ESP32 Cores
In this week's Enginursday, we'll explore how to use both cores of the ESP32, and why you might want to.

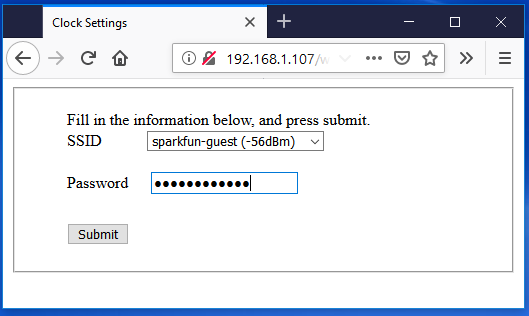
For the last year I've been working on and off on my OLED clock code. If you haven't read my previous blog posts, you can read about part one here, and a follow up here. But as a quick overview, I've been working on a clock that uses our ESP32 Thing to communicate with a Network Time Protocol (NTP) server to get the current time and display it on my OLED displays. With the WiFi radio, I can also scan for the available access points and provide the password to the access point I'm trying to connect to. The problem is the scan takes a few seconds to complete, and during that time, the displays freeze until the scan is complete.
Occasionally, some of the NTP servers from this list can go offline without a warning. So as a backup, I check all of the servers until I receive a UDP packet. With a 1000ms timeout, if I lose my Internet connection, I have to wait 14 seconds before I'm able to update the time again. As a workaround, I tried updating the time after each failed attempt, but everything I tried resulted in the ESP32 crashing and rebooting.

That's when I had fellow Funion Engineer Andy recommend I use the other core of the ESP32. Honestly, I hadn't thought of that. After doing some digging, I came across this tutorial by RandomNerdTutorials.com. After uploading the duel LED blink code, I started to understand how to use it.
/*********
  Rui Santos
  Complete project details at http://randomnerdtutorials.com
*********/

TaskHandle_t Task1;
TaskHandle_t Task2;

// LED pins
const int led1 = 2;
const int led2 = 4;

void setup() {
  Serial.begin(115200);
  pinMode(led1, OUTPUT);
  pinMode(led2, OUTPUT);

  //create a task that will be executed in the Task1code() function, with priority 1 and executed on core 0
  xTaskCreatePinnedToCore(
                    Task1code,   /* Task function. */
                    "Task1",     /* name of task. */
                    10000,       /* Stack size of task */
                    NULL,        /* parameter of the task */
                    1,           /* priority of the task */
                    &Task1,      /* Task handle to keep track of created task */
                    0);          /* pin task to core 0 */
  delay(500);

  //create a task that will be executed in the Task2code() function, with priority 1 and executed on core 1
  xTaskCreatePinnedToCore(
                    Task2code,   /* Task function. */
                    "Task2",     /* name of task. */
                    10000,       /* Stack size of task */
                    NULL,        /* parameter of the task */
                    1,           /* priority of the task */
                    &Task2,      /* Task handle to keep track of created task */
                    1);          /* pin task to core 1 */
    delay(500);
}

//Task1code: blinks an LED every 1000 ms
void Task1code( void * pvParameters ){
  Serial.print("Task1 running on core ");
  Serial.println(xPortGetCoreID());

  for(;;){
    digitalWrite(led1, HIGH);
    delay(1000);
    digitalWrite(led1, LOW);
    delay(1000);
  }
}

//Task2code: blinks an LED every 700 ms
void Task2code( void * pvParameters ){
  Serial.print("Task2 running on core ");
  Serial.println(xPortGetCoreID());

  for(;;){
    digitalWrite(led2, HIGH);
    delay(700);
    digitalWrite(led2, LOW);
    delay(700);
  }
}

void loop() {

}
For my application, I wanted to keep everything WiFi related to core0, while updating the displays was handled by core1. You can see my full code in my GitHub repository, but here's a snapshot of what I added.
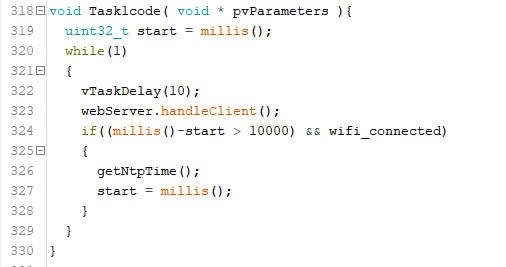
You can more or less treat the while loop as a second main loop. By moving my webserver handleClient() function into Task1's loop, every client is automatically handled by core0. There were a few gotchas for me, however. The time library has the ability to automatically update the time, but it will use core1. I was able to get around this manually updating the time by using a non-blocking, 10-second delay and calling the NTP request function. I also ran into an issue where creating the task caused the ESP32 to crash, which I was able to work around by using vTaskDelay() function. The issue could have also been a result of not changing the size of the stack in the setup.
I've been making slow and steady progress, including working on a clock using our new LuMini 8x8 Matrix LEDs that I'm hoping to be able to show off in the near future. But in the meantime, have you used both cores to parallel tasks for your ESP32 project? If this is the first time you've heard about using both cores on your ESP32, what could you see it being useful for? Let us know in the comments below!


I want to try this code!
I had the same idea when designing my clock's code: https://github.com/dwaq/Super7Seg/tree/master/Firmware-ESP32 Unfortunately it still isn't synchronized to sub-second accuracy. I want to dig deeper into the Time() library to see if there's anything I can do there, but I'll need to write my code in something a little better than the Arduino IDE.
I made an Arduino package called TinyUPnP to open ports automatically in any router and this can be very useful in one of the examples I made. Thank you very much!
Can’t you just run the blocking operation on a separate thread?