Enginursday: Revisiting the MLX90614 IR Thermometer
In lieu of any cool, new project, I took on the task of updating documentation and example code for the MLX90614 IR Thermometer Evaluation Board (and shaved some yaks in the process).

This blog post was supposed to be short and sweet. Just like updating the code and documentation for the SparkFun Infrared Thermometer Evaluation Board -- MLX90614 was supposed to be a breeze -- copy and paste one of the dozens of I2C interfaces I've written, pull in some readings from the chip, and convert them to Farenheit and Celsius. Nothing to it, right? Ha! Never underestimate how much fur that yak is hiding!
We've got a deep catalog; I've been working at SparkFun for over six years, but I can always find something new to play with. The MLX90614 infrared thermometer has been on my radar for a while now; it's a simple but effective infrared thermometer that can remotely measure temperatures ranging from -70 to 382.2°C. I can keep myself entertained for hours with a non-contact Thermometer in my hands – just think what I can do with a hackable version! We've even got a handy ATmega328-based, Arduino-compatible evaluation board for it.
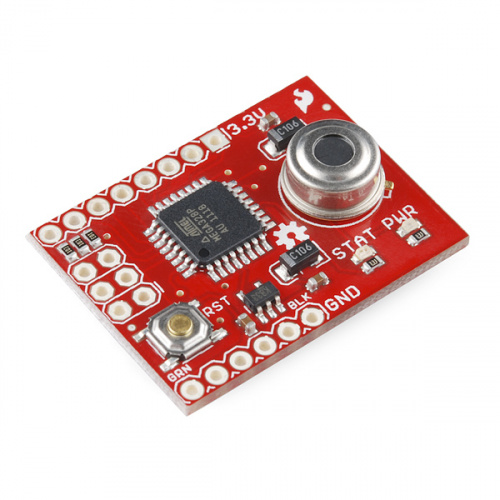
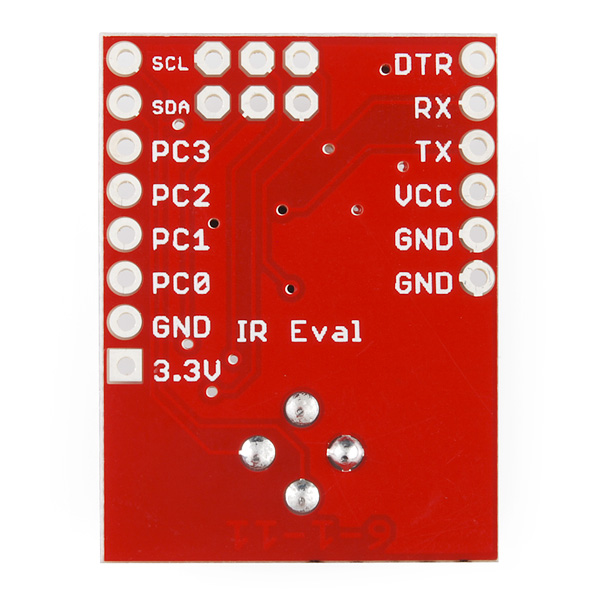
The eval board is almost five years old. It was released at a time when we were more lax about what kind of documentation a product required before it launched. The pre-loaded firmware for the MLX90614 Evaluation Board was written in the dark, pre-Arduino days. Want a Halloween scare? Have a peek at the source code. The board layout is similarly old-school: the pin labels are all port/bit pairings instead of simplified Arduino pin numbers – and just look at that date code.
The hardware still works great, but the supporting material could use a modernizing bump. My first task in updating our documentation would be "Arduino-ifying" the code to make it more legible, and more portable. Of course, my first task should have been RTFM'ing the datasheet a little more closely.
After writing a couple functions to read and write over the SMBus, I was able to get believable data out of the thermometer, but the sensor kept locking up on successive reads. Attempts at playing with stop bits -- repeated or not -- didn't fix anything. So -- ugh -- I pulled up the datasheet which, in my defense, isn't the most well-written or intelligible document out there. Buried in the dark recesses of the "SMBus Protocol" overview (a section I gloss over because I've read the same description, and seen the same timing diagrams, in every I2C-based sensor datasheet ever), was a blurb about "Packet Error Codes".

For every SMBus read or write the MLX90614 requires an 8-bit cyclic redundancy check (CRC-8) at the tail end of the transmission. Yay data integrity! But that's a more unique problem to solve, and a new concept to (re-)learn.
It turns out calculating a CRC isn't all that hard. Find your polynomial representation (0x07 for a x8+x2+x1+x0 polynomial, assuming MSB-first), then cycle through every bit of every byte being transferred, and perform the proper bit operation on it.
uint8_t IRTherm::crc8 (uint8_t initialCrc, uint8_t inData)
{
    uint8_t i;
    uint8_t data;
    data = initialCrc ^ inData; // XOR initial CRC value with input data
    for ( i = 0; i < 8; i++ ) // Cycle through every bit of the data byte
    {
        if (( data & 0x80 ) != 0 )
        {
            data <<= 1; // Shift data byte left one bit, elimintate msb every time
            // 0x07 is the poly representation for x^8 + x^2 + x^1 + 1
            data ^= 0x07; // exclusive or the polynomial
        }
        else
        {
            data <<= 1;
        }
    }
    return data; // Return calculated CRC value
}
Handy! And it doesn't require too much overhead. I think I'll try incorporating checksums like that into other projects I build.
Once I had the library properly pulling in temperature data -- verified by a CRC check -- I had a chance to start testing the accuracy of the sensor. I built a test platform out of a Micro OLED Breakout and a Snappable Protoboard, and started pointing the IR sensor at everything in my office.
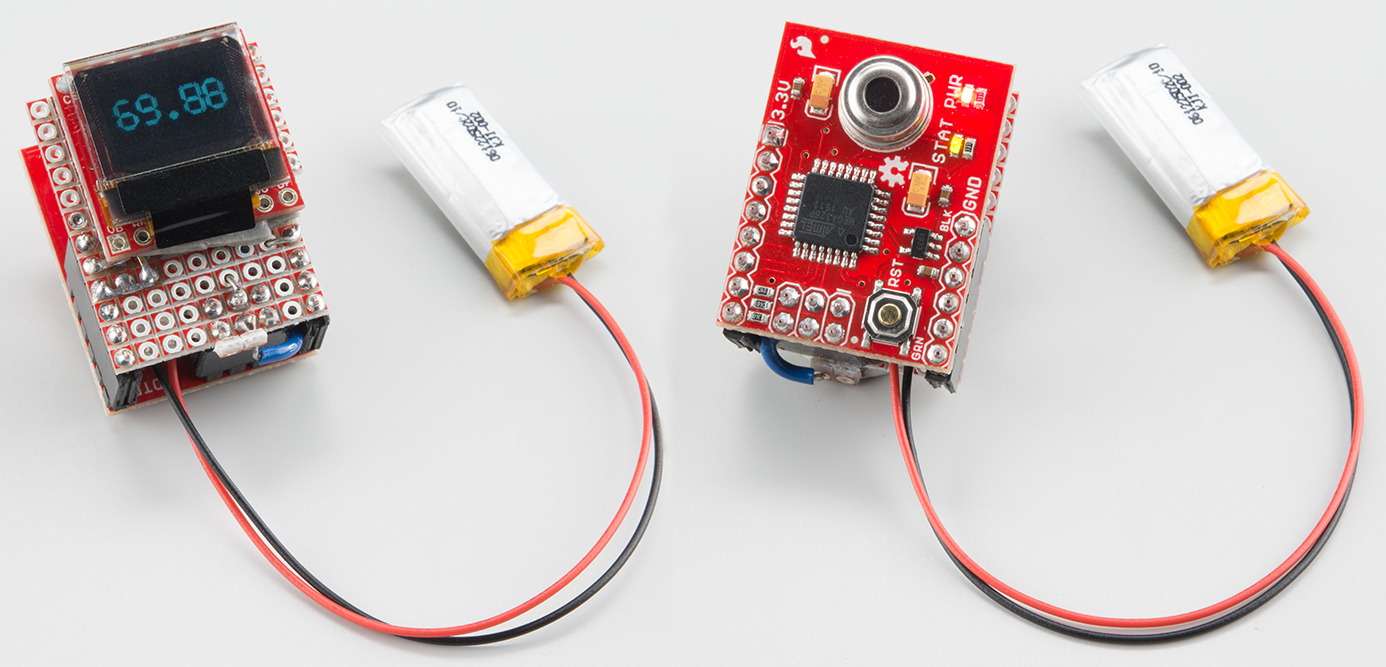
The readings were close, but nothing seemed close enough. If the analog dial was to be believed, my soldering iron was reading way too low, and the thermometer kept telling me I was getting a cold.

96.4°F? But I don't feel sick. Time to configure the emissivity.
That led me down a Wiki-rabbit-hole beginning with emissivity and the Stefan-Boltzman law, and further into calculating the sensor's view area relative to its distance and field-of-view. It also gave me a chance to test out that emissivity-setting function I wrote into the library.
This project took longer than it should have, mostly because I was too stubborn to lean on the examples already out there. On the bright side, it was a good opportunity to brush up on, and apply, some computer science and physics concepts I probably learned once.
We like to think that SparkFun sells yak fur -- we lay the groundwork, so you have a more direct path to making cool projects -- but shaving your own yaks can be a great opportunity to learn something new. That's a huge benefit of making things open: you can take advantage of the shortcut, then, once your project is humming, you can go back and learn from the source.
The tutorial's up now and the Arduino library is published. If you're in the market for an IR thermometer, or you need distance temperature sensing in your next project, definitely check out the MLX90614 and our new-and-improved documentation!
MLX90614 IR Thermometer Hookup Guide
October 29, 2015
How to use the MLX90614 or our SparkFun IR Thermometer Evaluation Board to take temperatures remotely, over short distances.
I'll take any excuse I can get to play with one of our older, but still solid products. Is there anything in our catalog you think could use a bump in documentation?


Thanks for updating the Hookup Guide! The ones you do have all been great and i really appreciate having these resources! It keeps me coming back!
Cheers!
I work at an early learning resource center. We have toys and things people can check out. I have to clean the toys each time they are checked back in. This would make it faster and easier! <a title="Thanks for the tour. " href=" http://scantoolcenter.com/obd2-scanners/actron-cp9680-autoscanner-plus-review/">Thanks for the tour. </a>
"It is very useful but please put the schematic of it, i want to see it."
Perhaps a bit nit-picky as the data sheet calls x^8+x^2+x+1 a CRC-8, but the oh so helpful table you link specifies it as CRC-8-CCITT with a plain CRC-8 being x^8+x^7+x^6+x^4+x^2+1.