Adventures in Science: Level Up Your Arduino Code With Timer Interrupts
Yay! More interrupts. Let's see how to set up timer interrupts in an Arduino.

Previously, we looked at using registers directly in Arduino and setting up external interrupts. This time, we configure a timer interrupt to toggle an LED every 0.5 seconds. That's right; we're going to redo blinky the hard way.
The ATmega328P has three timers that continually increment. Note that Arduino uses them for various functions, which means you probably don't want to use those functions if you plan to mess with the timers. On the UNO and RedBoard, you will find:
| Name | Size | Possible Interrupts | Uses in Arduino |
|---|---|---|---|
| Timer0 | 8 bits (0 - 255) |
Compare Match Overflow |
delay(), millis(), micros() analogWrite() pins 5, 6 |
| Timer1 | 16 bits (0 - 65,535) |
Compare Match Overflow Input Capture |
Servo functions analogWrite() pins 9, 10 |
| Timer2 | 8 bits (0 - 255) |
Compare Match Overflow |
tone() analogWrite() pins 3, 11 |
Each of these timers can be configured for one or more interrupts:
- Compare Match --- When the timer value reaches a specific value (stored in the corresponding output compare register), an interrupt will be generated. This can be useful for creating pulse width modulation (PWM) signals on pins or sampling a sensor at specific intervals.
- Overflow --- When the timer rolls over from its max value (e.g., 65,535) to 0, an interrupt is generated. Overflow interrupts are also used for PWM signals and running pieces of code at precise intervals.
- Input Capture --- When a specific pin changes value (e.g., ICP1), the current timer value is stored in another register (ICR1) that can be retrieved later to see the exact time that event occurred. This type of interrupt is good for measuring the time between pulses.
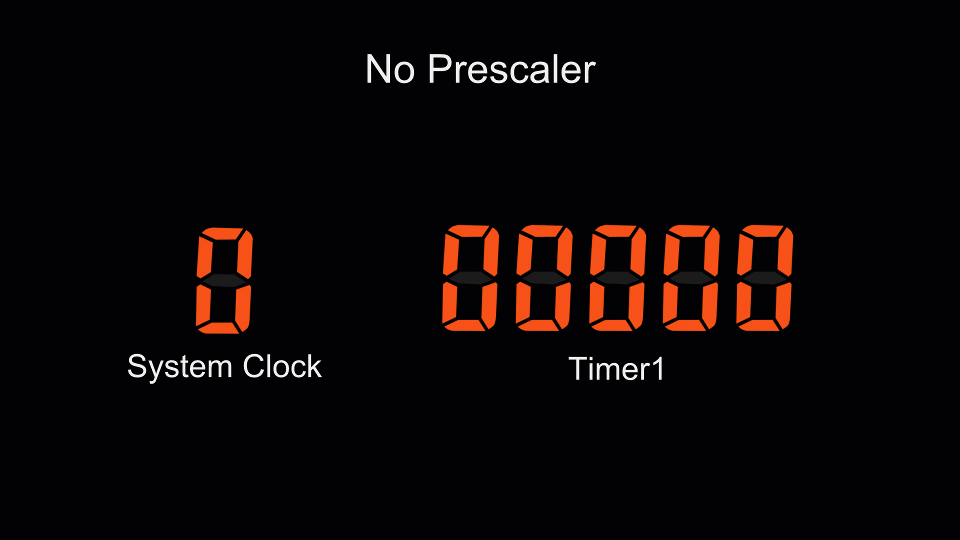
To help make timing longer events easier (especially when some of the timers can only count up to 255), a prescaler can be used. A prescaler, in effect, divides the system clock to make something operate more slowly. For example, here is Timer1 counting up to 15 with no prescaler. You can see how Timer1 increments on every rising edge of the system clock.
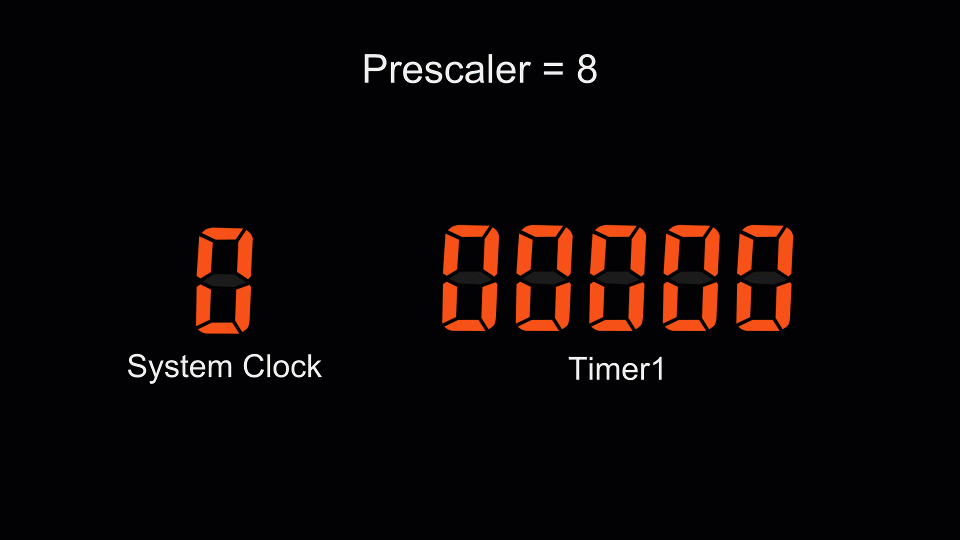
If we set a prescaler of 8, we can see how the timer counts up at a much slower pace. The timer only increments once for every 8 counts of the system clock.
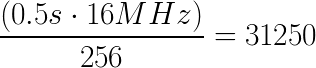
Knowing that we have a 16MHz clock on the Arduino UNO and RedBoard, we can calculate what kind of prescaler we need and to what value we need to count to trigger an interrupt every 500ms. Timer1 supports four different prescalers in addition to no prescaler (directly connected to the system clock): 8, 64, 256, 1024. We can find these by looking at the TCCR1B register description in the ATmega328P datasheet. We can multiply the desired delay by the clock speed and divide that answer by the prescaler to get the number of required timer counts. If we use a prescaler of 256, we see that we need 31,250 counts:
We set the prescaler to 256 and load 31,250 into the OCR1A register. Don't forget to set the output compare A interrupt enable bit in TIMSK1 and enable global interrupts! Now, whenever Timer1 reaches 31,250, a TIMER1_COMPA interrupt will occur. Create your ISR to toggle the LED and reset the timer.
// Pins
const int led_pin = PB5;

// Counter and compare values
const uint16_t t1_load = 0;
const uint16_t t1_comp = 31250;

void setup() {

  // Set LED pin to be output
  DDRB |= (1 << led_pin);

  // Reset Timer1 Control Reg A
  TCCR1A = 0;

  // Set to prescaler of 256
  TCCR1B |= (1 << CS12);
  TCCR1B &= ~(1 << CS11);
  TCCR1B &= ~(1 << CS10);

  // Reset Timer1 and set compare value
  TCNT1 = t1_load;
  OCR1A = t1_comp;

  // Enable Timer1 overflow interrupt
  TIMSK1 = (1 << OCIE1A);

  // Enable global interrupts
  sei();
}

void loop() {
  delay(500);
}

ISR(TIMER1_COMPA_vect) {
  TCNT1 = t1_load;
  PORTB ^= (1 << led_pin);
}
Timers are extremely powerful and useful microcontroller functions. They allow you to sample, control hardware or measure signals at very precise intervals.
Outside of the already given Arduino functions (delay(), millis(), servo, tone, etc.), how else have you used timers in your microcontroller projects?


Love the series as always Shawn. Great timer interrupts example. Question. Is there a good way to just make a simple blocking delay without using a timer interrupt or a timers at all? Say I just want to have 1,000,000 nop (no operation) instructions run to kill 0.0625 seconds. Is there a way to do that without timers at all? I assumed that was how the Arduino delay() function worked, but I was surprised to learn that is not the case in this video. Is there a simple way to do lots of nop commands? Thanks!
Thanks! I know that delay() is blocking, but it does rely on internal timers. You can definitely do
asm("nop");to insert an assembly nop instructions. For example,Gets you something close to a .5 second delay (very quick calculation based on the assumption that the nop + for loop overhead is ~7 instructions. I seem to be off by some, so if someone else wants to correct it...).
I've avoided using timer interrupts because I was afraid I would break something else when using the Arduino API functions. Do any of the chip communication protocols (not bit-banging, but hardware comms) like UART, SPI, or I2C use the timers? If so, which ones?
Thanx.
Most of the communication protocols (I2C, SPI, UART) have their own set of interrupts, so they should not conflict with your Timers. However, do note that because the 328P is not really set up to support nested interrupts, you'll want to make sure your Timer ISRs are as short as possible so that you don't miss any incoming messages.
Shawn, GREAT VIDEO! Done at the right level. More needed - especially on the Arduino. Thank you!!!!
Great video! 👏