Power Solutions for Wearables and Cosplay
Let's take a look at different power solutions for your garments and props!

One of the biggest challenges for wearables and cosplay projects with electronics is adding power to your creation. Batteries and power solutions can often be bulky and awkward. Whether you are powering a single LED or a robust interactive costume full of sensors, actuators and microcontrollers, you will need to make some decisions about how to add power to your costume. Let’s look at some of the options available to you.
COIN CELL BATTERY OPTIONS
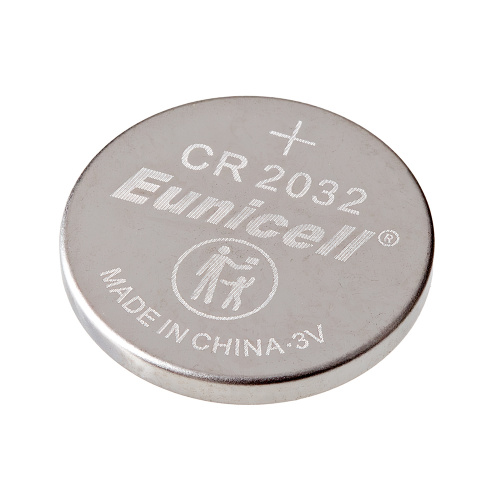
Coin cell batteries are a great option for wearables and cosplay because they are very small and thin, making it easy to hide them within a garment. The limitations of a small coin cell battery lie in the voltage and current. At 3V and 250mAh, a coin cell is perfect for powering low-voltage, low-current circuits, like a low-power processor or a few LEDs.
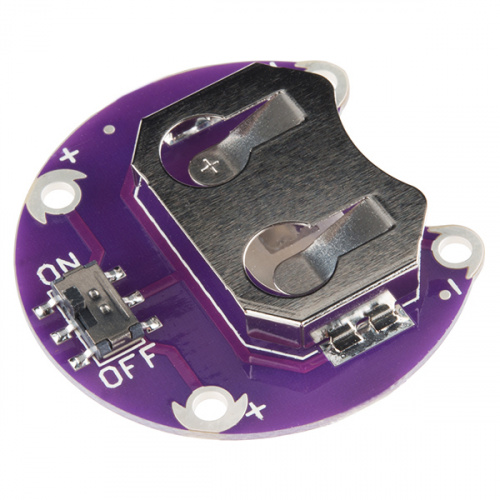
One of my favorite boards for using a coin cell battery in a wearable circuit is the LilyPad Coin Cell Battery Holder - Switched. This is an excellent and convenient board because it includes an on/off switch, making it super easy for you to turn your project on and off without any extra components. It also features two + and two - sew tabs on either side of the board, making it super easy to connect to your projects via conductive thread or traditional wire. You can also use the extra tabs to arrange two holders in parallel or in series to up the current or the voltage.
Another wonderful option for putting two coin cell batteries in series is the Coin Cell Battery Holder - 2xCR2032. This sleek and compact battery holder contains your batteries in a plastic enclosure, making sure that all conductive part are covered. It also features an on/off switch making it simple and easy for you to include a power switch to your project.
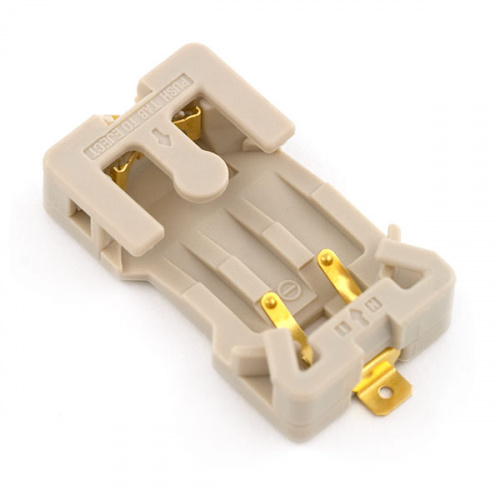
A smaller option for adding coin cell batteries to your wearables or cosplay is the Coin Cell Battery Holder - 20mm (Sewable). This little guy is extremely basic, making it wonderful for discreetly fitting into small spaces. Its + and - tabs feature a small hole, making it easily sewable, as well as usable with traditional hardware. While this battery holder does not feature a switch, you can certainly add one to your circuit using the LilyPad Slide Switch.
**LiPo BATTERY OPTIONS **
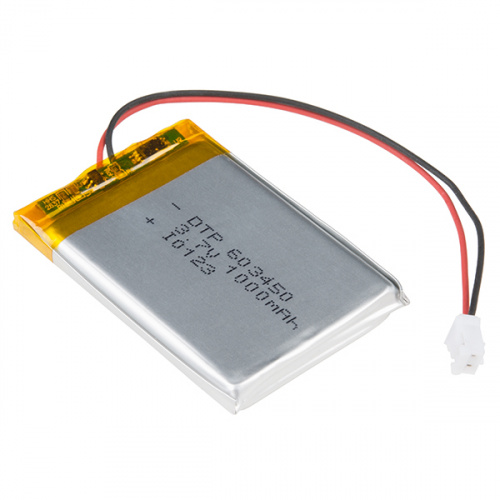
Lithium ion batteries are a fantastic option for wearables and cosplay because they are extremely lightweight and super slim. These batteries vary in size and current depending on your circuit’s needs - our smallest option is super tiny at only 40mAh, while our largest option is a heck of a lot bulkier, but reaches 6Ah! These batteries are also rechargeable, making it easy for you to create a chargeable project. These LiPo batteries come with a 2-pin JST connector, which interfaces with several power connection boards. If you are planing to use conductive thread in your project that uses a LiPo battery, you should be extra careful about shorts in the thread - as this can cause a spark (LEARN FROM MY MISTAKES!!). Let’s take a look at the different ways to include LiPo batteries in your projects.
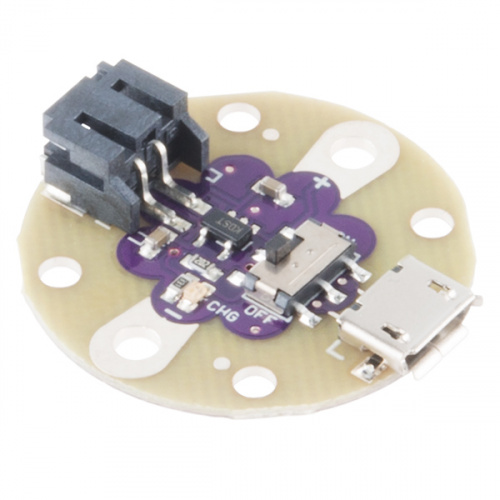
The LilyPad Simple Power board is a great way to add a LiPo battery to your wearable or cosplay project, AND it includes a USB port for easy charging of your battery. Like the LilyPad Coin Cell Battery Holder, the Simple Power Board also includes an on/off switch for controlling the power on your project. This board features one + and one - conductive sew tab, which can be sewn with conductive thread or used with traditional hardware.
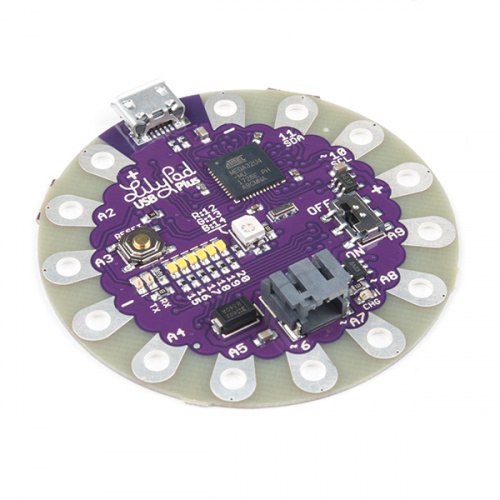
Some of the LilyPad microcontroller boards include a JST connector on the board for powering your project. If you plan to use these boards, you will likely not need a separate power connector board. For example, the LilyPad USB Plus includes a JST connector for LiPo batteries, recharge circuit, as well as an on/off switch. This is definitely something to consider when planning your project because you can save a lot of room and time by using a board with included power connections and switches.
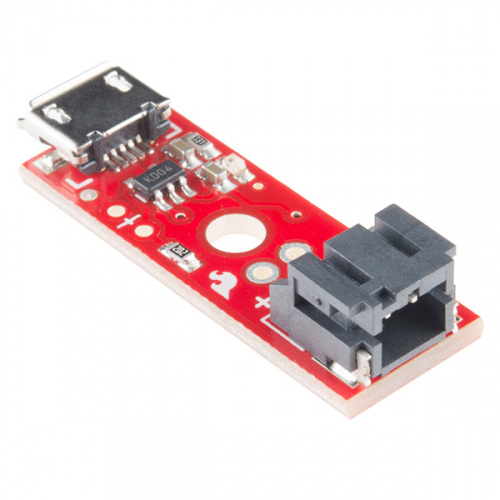
If you are looking for a smaller option to connect your LiPo battery, you may be interested in the SparkFun LiPo Charger Basic - Micro-USB. I often use this board on its own to charge my LiPo batteries, but I have also used it in projects when I’m trying to save on space. This board includes a JST connector for your LiPo battery and a Micro-USB connector for charging purposes. There is one + and one - solder pad connection available to power your projects. The + and - connections are pretty close together though, so I would recommend using wires and solder to create the power connection over conductive thread, to avoid shorts.
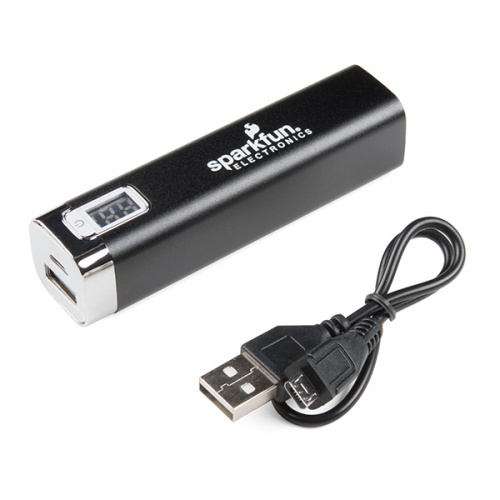
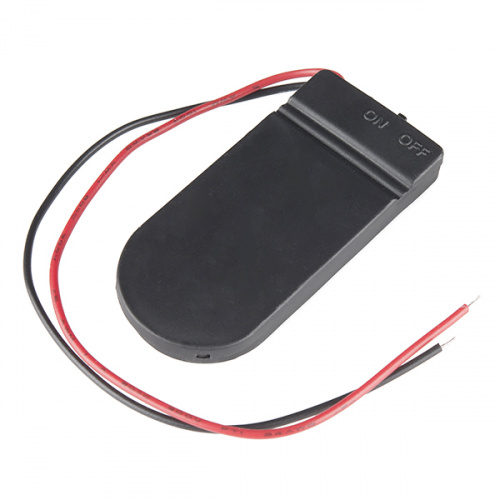
If you need more than 3.3-3.7V, you may want to consider the Lithium Ion Battery Pack - 2.2AH (USB). This rechargeable battery pack runs at 5V and 2200 mAh. It is easy to connect to your projects using a USB micro-B port, like that on the LilyPad Simple Power board discussed above. The battery pack includes an on/off button and a 7-segment display to let you know how much charge you have left at all times. I often hide this power source inside a pocket where I can remove it for charging.
Let us know about how you power your wearables and cosplay in the comments below!


A few safety tips when using LiPos:
I'm currently writing a tutorial specifically about powering LilyPad projects, so stay tuned for that soon!
For more resources to help guide which battery to choose for your project check out our Battery Technologies Guide.
We also have a guide that helps you calculate power considerations for e-textile projects Powering LilyPad LED Projects which includes a chart of approximate run times on different types of batteries and combinations of LEDs.
For some cool behind the scenes, Nate wrote an article on How Lithium Polymer Batteries are Made.
One safety tip that I'd add is to be careful to design any wearable that involves a LiPo so that you can EASILY take it off in a HURRY, given some of the horror videos that have been floating around in recent months.
Also along these lines, try to avoid "man-made fibers" (e.g., nylon, polyester) near the battery (they melt, and when molten, they stick to the skin). A nice piece of leather between the battery and the body could save a LOT of pain... with a "grab and pull" to get it off if the worst happens...
I actually had a lot of conversations about this at Denver Comic Con this weekend when people were asking how I powered my light up fairy costume. I installed batteries in strategic places on a thigh band I could reach instead of the more 'intuitive' placement inside my light up wings because it would be hard to reach them in case of emergency.
I also tend towards using power banks that include an enclosure (and typically have a larger capacity than those exposed LiPos) which can be a little safer in costume applications. Micro USB connectors are also a lot easier to unplug quickly than the JST connectors if you need to do it fast.
I'm a fire spinner in my spare time so luckily most of my wardrobe is natural fibers because of potential melting hazard. A good practice to use in all costuming that includes potential exposure to sparks.
One option I've used to power "wearables" is Adafruit's 3xAAA with a switch which gives about 4.5V (with Duracells that I get at Costco). I've had good luck powering programmable LEDs and 5V processors from them, getting several hours out of a single set of Duracells. As an added benefit, it can make a good "platform" for something like a flashy badge, adding a bar pin from a craft store.
Since it's often good to "breadboard" circuits, Adafruit also has adapters with a switch or without a switch to connect a JST to a standard solderless breadboard.
One other minor comment: since those coin cells can cause shipping problems, I'll mention this. "Corner drugstores" often have them, but at outrageous prices. If you live in an area with a Winco store (a grocery chain in the western U.S.), they often have good prices on them. Harbor Frieght also has them at a good price, though they may not be as good a quality.
AAA holders are a great option too, especially because those are a lot easier to find locally than some of the specialty batteries like LiPos. One thing to make sure to check if you have a JST terminated battery holder is that you disconnect it when you connect to a USB power source while programming boards that have charging circuits built-in (such as LilyPad).
I've heard tips about being able to find coin cells in dollar/discount stores too. They can be quite a pain to acquire with the shipping restrictions put in place in the last couple of years for manufacturers and resellers.
In my running around this afternoon, I noted that the Winco I went into wanted about $4 for a 4-pack of CR2032s, while Walgreens wants about $8 for a 2-pack. I haven't had a chance to check out the ones from the dollar store, but there is the old saw about "you get what you pay for".
On the subject of unplugging the battery holder, I tend to use either Adafruit Trinket boards or ProMini boards, neither of which have either a charge circuit or JST. Also, remember that the battery holder I mentioned has a switch, so turning that off would prevent reverse current. BTW, I usually "amputate" the JST on these projects as I need to solder the leads to the board, though being stingey I leave a few inches of the wire in case I have some use for it in the future.
One other thought: if you find that AA or AAA batteries are not lasting as long as you'd like, try the Eveready "Ultimate" Lithium batteries, though be aware that they can be pricey. Be $ure to check around for the be$t price$. (Side light: these batteries have much better performance at temperatures below freezing, especially before 0F. Folks who do balloon flights use them exclusively.)
18650s and the 6A DC/DC converter we sell! (https://www.sparkfun.com/products/9370) Good for powering projects with lots of lights.